
springboot系列二、springboot项目搭建
一、官网快速构建
1、maven构建项目
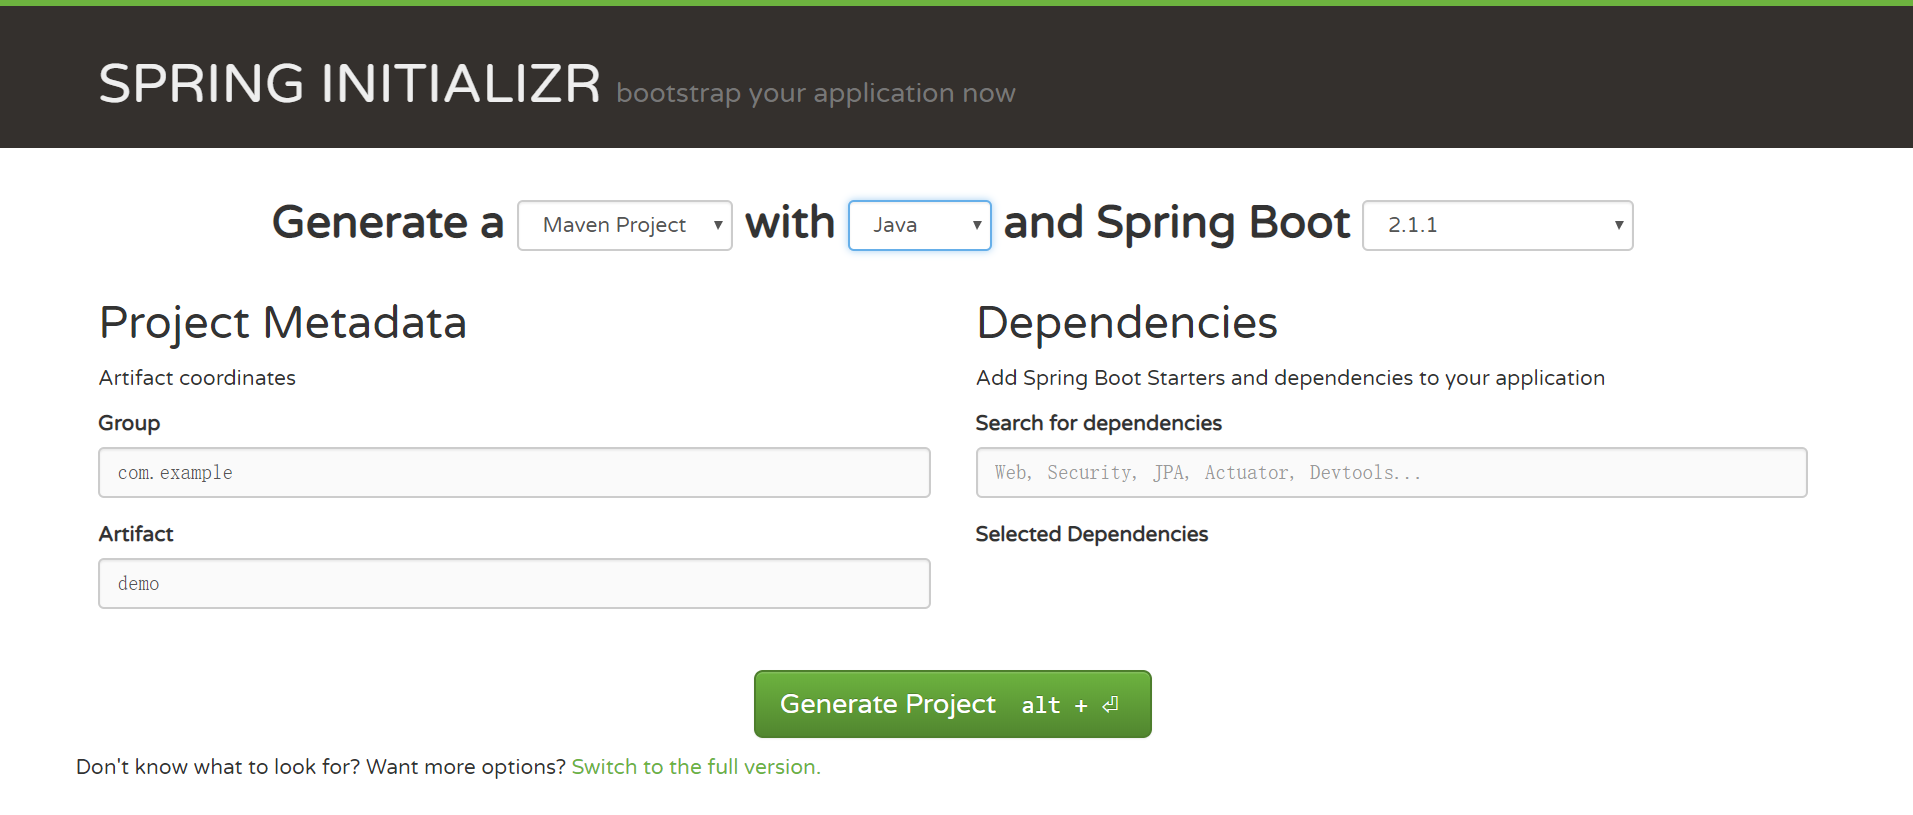
- 1、访问http://start.spring.io/
- 2、选择构建工具Maven Project、Spring Boot版本2.1.1以及一些工程基本信息,可参考下图所示:
- 3、点击Generate Project下载项目压缩包
- 4、解压后,使用idea,File -> new -> Project from existing sources ->demo中的pom.xml-> Finsh,OK done!
Spring Boot的基础结构共三个文件:
- src/main/java 程序开发以及主程序入口
- src/main/resources 配置文件
- src/test/java 测试程序
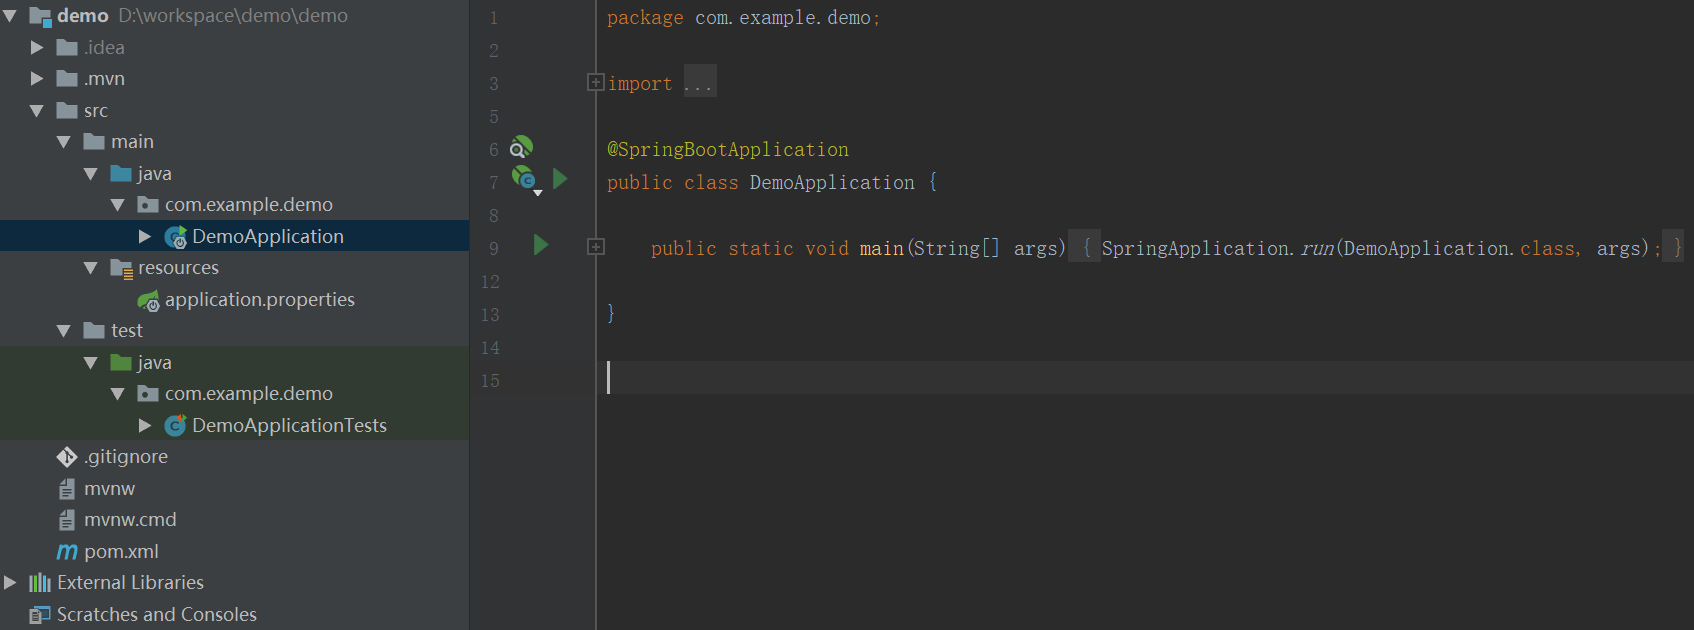
采用默认配置可以省去很多配置,当然也可以根据自己的喜欢来进行更改
最后,启动Application main方法,至此一个java项目搭建好了!
2、引入web模块
pom.xml中添加支持web的模块:
<dependency>

        <groupId>org.springframework.boot</groupId>

        <artifactId>spring-boot-starter-web</artifactId>

 </dependency>
pom.xml文件中默认有两个模块:
spring-boot-starter :核心模块,包括自动配置支持、日志和YAML;
spring-boot-starter-test :测试模块,包括JUnit、Hamcrest、Mockito。
二、还可以通过pom文件手动构建项目
1、pom文件,简单的springboot程序只需三个基础jar
<?xml version="1.0" encoding="UTF-8"?>

<project xmlns="http://maven.apache.org/POM/4.0.0" xmlns:xsi="http://www.w3.org/2001/XMLSchema-instance"

    xsi:schemaLocation="http://maven.apache.org/POM/4.0.0 http://maven.apache.org/xsd/maven-4.0.0.xsd">

    <modelVersion>4.0.</modelVersion>

    <parent>

        <groupId>org.springframework.boot</groupId>

        <artifactId>spring-boot-starter-parent</artifactId>

        <version>2.1..RELEASE</version>

        <relativePath/> <!-- lookup parent from repository -->

    </parent>

    <groupId>com.example</groupId>

    <artifactId>demo</artifactId>

    <version>0.0.-SNAPSHOT</version>

    <name>demo</name>

    <description>Demo project for Spring Boot</description>

    <properties>

        <java.version>1.8</java.version>

    </properties>

    <dependencies>

        <dependency>

            <groupId>org.springframework.boot</groupId>

            <artifactId>spring-boot-starter</artifactId>

        </dependency>

        <dependency>

            <groupId>org.springframework.boot</groupId>

            <artifactId>spring-boot-starter-test</artifactId>

            <scope>test</scope>

        </dependency>

        <dependency>

            <groupId>org.springframework.boot</groupId>

            <artifactId>spring-boot-starter-web</artifactId>

        </dependency>

    </dependencies>

    <build>

        <plugins>

            <plugin>

                <groupId>org.springframework.boot</groupId>

                <artifactId>spring-boot-maven-plugin</artifactId>

                <configuration>

                    <fork>true</fork>

                </configuration>

            </plugin>

        </plugins>

    </build>

</project>
2、创建以下目录结构
com

  +- example

    +- demo

      +- Application.java

      |

      +- domain

      |  +- Customer.java

      |  +- CustomerRepository.java

      |

      +- service

      |  +- CustomerService.java

      |

      +- controller

      |  +- CustomerController.java

      |
3、编写启动类
package com.example.demo;

import org.springframework.boot.SpringApplication;

import org.springframework.boot.autoconfigure.SpringBootApplication;

@SpringBootApplication

public class DemoApplication {

    public static void main(String[] args) {

        SpringApplication.run(DemoApplication.class, args);

    }

}
三、启动并测试
1、编写controller内容:
@RestController

public class HelloWorldController {

    @RequestMapping("/hello")

    public String index() {

        return "Hello World";

    }

}
@RestController 的意思就是controller里面的方法都以json格式输出,不用再写什么jackjson配置的了!
2、启动主程序
打开浏览器访问http://localhost:8080/hello,就可以看到效果了,有木有很简单!
github:https://github.com/Star-Lordxing/springboot-demo
springboot系列二、springboot项目搭建的更多相关文章
- 从零开始搭建django前后端分离项目 系列二(项目搭建)
在开始项目之前,假设你已了解以下知识:webpack配置.vue.js.django.这里不会教你webpack的基本配置.热更新是什么,也不会告诉你如何开始一个django项目,有需求的请百度,相关 ...
- 系列二VS项目软件配置工具介绍
原文:系列二VS项目软件配置工具介绍 Svn和VisualSvn介绍 在使用TortoiseSvn(SVN客户端)+ AnkhSvn(VS2008插件) +VisualSvn Server(版本控制服 ...
- SpringBoot系列二:搭建自己的第一个SpringBoot程序
声明:本文来源于MLDN培训视频的课堂笔记,写在这里只是为了方便查阅. 一.根据官网手工搭建(http://projects.spring.io/spring-boot/#quick-start) 1 ...
- SpringBoot+Mybatis多模块项目搭建教程
一.前言 框架为SpringBoot+Mybatis,本篇主要记录了在IDEA中搭建SpringBoot多模块项目的过程. 1.开发工具及系统环境 IDE:IntelliJ IDEA 2018.2 系 ...
- 从壹开始前后端分离【 .NET Core2.0 +Vue2.0 】框架之二 || 后端项目搭建
前言 至于为什么要搭建.Net Core 平台,这个网上的解释以及铺天盖地,想了想,还是感觉重要的一点,跨平台,嗯!没错,而且比.Net 更容易搭建,速度也更快,所有的包均有Nuget提供,不再像以前 ...
- SPRING-BOOT系列之SpringBoot快速入门
今天 , 正式来介绍SpringBoot快速入门 : 可以去如类似 https://docs.spring.io/spring-boot/docs/2.1.0.BUILD-SNAPSHOT/refer ...
- Z从壹开始前后端分离【 .NET Core2.0/3.0 +Vue2.0 】框架之二 || 后端项目搭建
本文梯子 前言 1..net core 框架性能测试 2..net core 执行过程 3.中间件执行过程 4.AOP切面 5.整体框架结构与数据库表UML 一.创建第一个Core 1.SDK 安装 ...
- SpringBoot系列——快速构建项目
前言 springboot官方参考指南:https://docs.spring.io/spring-boot/docs/2.1.0.RELEASE/reference/htmlsingle/ Spri ...
- SpringBoot与Dubbo整合-项目搭建
本章节建立生产者和消费者来演示dubbo的demo 生产者:springboot-dubbo-provider 和 消费者:springboot-dubbo-consumer 工程配置详解 Apach ...
随机推荐
- 有标号的DAG计数(FFT)
有标号的DAG计数系列 有标号的DAG计数I 题意 给定一正整数\(n\),对\(n\)个点有标号的有向无环图(可以不连通)进行计数,输出答案\(mod \ 10007\)的结果.\(n\le 500 ...
- LCT模板(指针版)
本来是想做THUWC2017的泰勒展开xLCT题的-- 然后觉得数组写很麻烦-- 然后就决定挑战指针版-- 然后写得全是BUG-- 与BUG鏖战三千年后,有了这个指针版LCT板子! #include ...
- SharePoint 2013 批量导入、删除帐号
删除一个group里所有的帐号: cls ########################### # "Enter the site URL here" $SITEURL = &q ...
- 超越LLMNR /NBNS欺骗 - 利用Active Directory集成的DNS
利用名称解析协议中的缺陷进行内网渗透是执行中间人(MITM)攻击的常用技术.有两个特别容易受到攻击的名称解析协议分别是链路本地多播名称解析(LLMNR)和NetBIOS名称服务(NBNS).攻击者可以 ...
- Hadoop、Hbase基本命令及调优方式
HDFS基本命令 接触大数据挺长时间了,项目刚刚上完线,趁着空闲时间整理下大数据hadoop.Hbase等常用命令以及各自的优化方式,当做是一个学习笔记吧. HDFS命令基本格式:Hadoop fs ...
- Luogu 1979 NOIP 2013 华容道(搜索,最短路径)
Luogu 1979 NOIP 2013 华容道(搜索,最短路径) Description 小 B 最近迷上了华容道,可是他总是要花很长的时间才能完成一次.于是,他想到用编程来完成华容道:给定一种局面 ...
- MySQL之汇总数据(AVG,COUNT,MAX,MIN,SUM)
table test Field Type Null Key Default Extra id int(11) NO PRI NULL auto_increment name char(50) NO ...
- PHP的内存限制 Allowed memory size of 134217728 bytes exhausted (tried to allocate 1099 bytes) in
Fatal error: Allowed memory size of 134217728 bytes exhausted (tried to allocate 1099 bytes) in Fa ...
- CentOS 7下Samba服务部署
Samba,是种用来让UNIX系列的操作系统与微软Windows操作系统的SMB/CIFS(Server Message Block/Common Internet File System)网络协议做 ...
- ElasticSearch文档操作介绍三
ElasticSearch文档的操作 文档存储位置的计算公式: shard = hash(routing) % number_of_primary_shards 上面公式中,routing 是一个可变 ...