[转]How to Add Bootstrap to an Angular CLI project
本文转自:https://loiane.com/2017/08/how-to-add-bootstrap-to-an-angular-cli-project/
In this article we will learn how to setup an Angular project with Bootstrap 3 or Bootstrap 4.
Update May 2018: code updated to Angular v6. Stackblitz link also available at the end of this article.
Contents
Although the setup seems simple, I still get a lot of questions on how to setup an Angular project generated with Angular CLI with Bootstrap. So let’s see the step by step in the sections below.
1: Creating an Angular project with Angular CLI
The first step is creating your Angular project using Angular CLI.
For this example we will use the following command:
ng new angular-bootstrap-example
2: Installing Bootstrap from NPM
Next, we need to install Bootstrap. Change the directory to the project we created (cd angular-bootstrap-example) and execute the following command:
For Bootstrap 3:
npm install bootstrap@3.3.7
For Bootstrap 4:
npm install bootstrap
2.1: Alternative: Local Bootstrap CSS
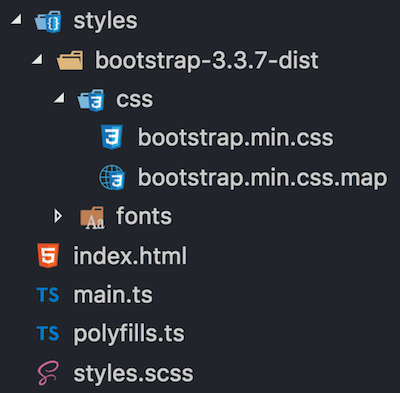
As an alternative, you can also download the Bootstrap CSS and add it locally to your project. I donwloaded Bootstrap from the website and created a folder styles (same level as styles.css):
Don’t place your local CSS files under
assetsfolder. When we do the production build with Angular CLI, the CSS files declared in theangular.jsonwill be minified and all styles will be bundled into a single styles.css. The assets folder is copied to the dist folder during the build process (the CSS code will be duplicated). Only place your local CSS files underassetsin case you are importing them directly in theindex.html.
3: Importing the CSS
We have two options to import the CSS from Bootstrap that was installed from NPM:
1: Configure angular.json:
"styles": [

  "node_modules/bootstrap/dist/css/bootstrap.min.css",

  "styles.scss"

]
2: Import directly in src/style.css or src/style.scss:
@import '~bootstrap/dist/css/bootstrap.min.css';
I personally prefer to import all my styles in src/style.css since it’s been declared in angular.json already.
3.1 Alternative: Local Bootstrap CSS
If you added the Bootstrap CSS file locally, just import it in angular.json
"styles": [

  "styles/bootstrap-3.3.7-dist/css/bootstrap.min.css",

  "styles.scss"

],
or src/style.css:
@import './styles/bootstrap-3.3.7-dist/css/bootstrap.min.css';
With this setup we are able to start using the Bootstrap CSS classes in our project.
4: Bootstrap JavaScript Components with ngx-bootstrap (Option 1)
In case you don’t need to use Bootstrap JavaScript components (that require JQuery), this is all the setup you need. But if you need to use modals, accordion, datepicker, tooltips or any other component, how can we use these components without installing jQuery?
There is an Angular wrapper library for Bootstrap called ngx-bootstrap that we can also install from NPM:
npm install ngx-bootstrap --save
ng2-bootstrapandngx-bootstrapare the same package. ng2-bootstrap was renamed to ngx-bootstrap after#itsJustAngular.
In case you want to install Bootstrap and ngx-bootstrap at the same time when you create your Angular CLI project:
npm install bootstrap ngx-bootstrap --save
4.1: Adding the required Bootstrap modules in app.module.ts
Go through the ngx-bootstrap and add the modules needed in your app.module.ts. For example, suppose we want to use the Dropdown, Tooltip and Modal components:
import { BsDropdownModule } from 'ngx-bootstrap/dropdown';

import { TooltipModule } from 'ngx-bootstrap/tooltip';

import { ModalModule } from 'ngx-bootstrap/modal';

@NgModule({

  imports: [

    BrowserModule,

    BsDropdownModule.forRoot(),

    TooltipModule.forRoot(),

    ModalModule.forRoot()

  ],

  // ...

})

export class AppBootstrapModule {}
Because we call the .forRoot() method for each module (due the ngx-bootstrap module providers), the functionalities will be available in all components and modules of your project (global scope).
As an alternative, if you would like to organize the ngx-bootstrap in a different module (just for organization purposes in case you need to import many bs modules and don’t want to clutter your app.module), you can create a module app-bootstrap.module.ts, import the Bootstrap modules (using forRoot()) and also declare them in the exports section (so they become available to other modules as well).
import { NgModule } from '@angular/core';

import { CommonModule } from '@angular/common';

import { BsDropdownModule } from 'ngx-bootstrap/dropdown';

import { TooltipModule } from 'ngx-bootstrap/tooltip';

import { ModalModule } from 'ngx-bootstrap/modal';

@NgModule({

  imports: [

    CommonModule,

    BsDropdownModule.forRoot(),

    TooltipModule.forRoot(),

    ModalModule.forRoot()

  ],

  exports: [BsDropdownModule, TooltipModule, ModalModule]

})

export class AppBootstrapModule {}
At last, don’t forget to import your bootstrap module in you app.module.ts.
import { AppBootstrapModule } from './app-bootstrap/app-bootstrap.module';

@NgModule({

  imports: [BrowserModule, AppBootstrapModule],

  // ...

})

export class AppModule {}
ngx-bootstrap works with Bootstrap 3 and 4. And I also made some tests and most of the functionalities also work with Bootstrap 2.x (yes, I still have some legacy code to maintain).
5: Let’s code!
Now that we have the setup for CSS and JavaScript components completed, let’s add some code to our app.component.html:
<nav class="navbar navbar-default">
<div class="container-fluid">
<div class="navbar-header">
<a class="navbar-brand">
<img src="assets/img/ngx-bootstrap.svg" class="logo">
</a>
<span class="navbar-brand">Angular + Bootstrap</span>
</div>
<ul class="nav navbar-nav">
<li class="active"><a href="#">
Link <span class="sr-only">(current)</span>
</a></li>
<li><a href="#">Link</a></li>
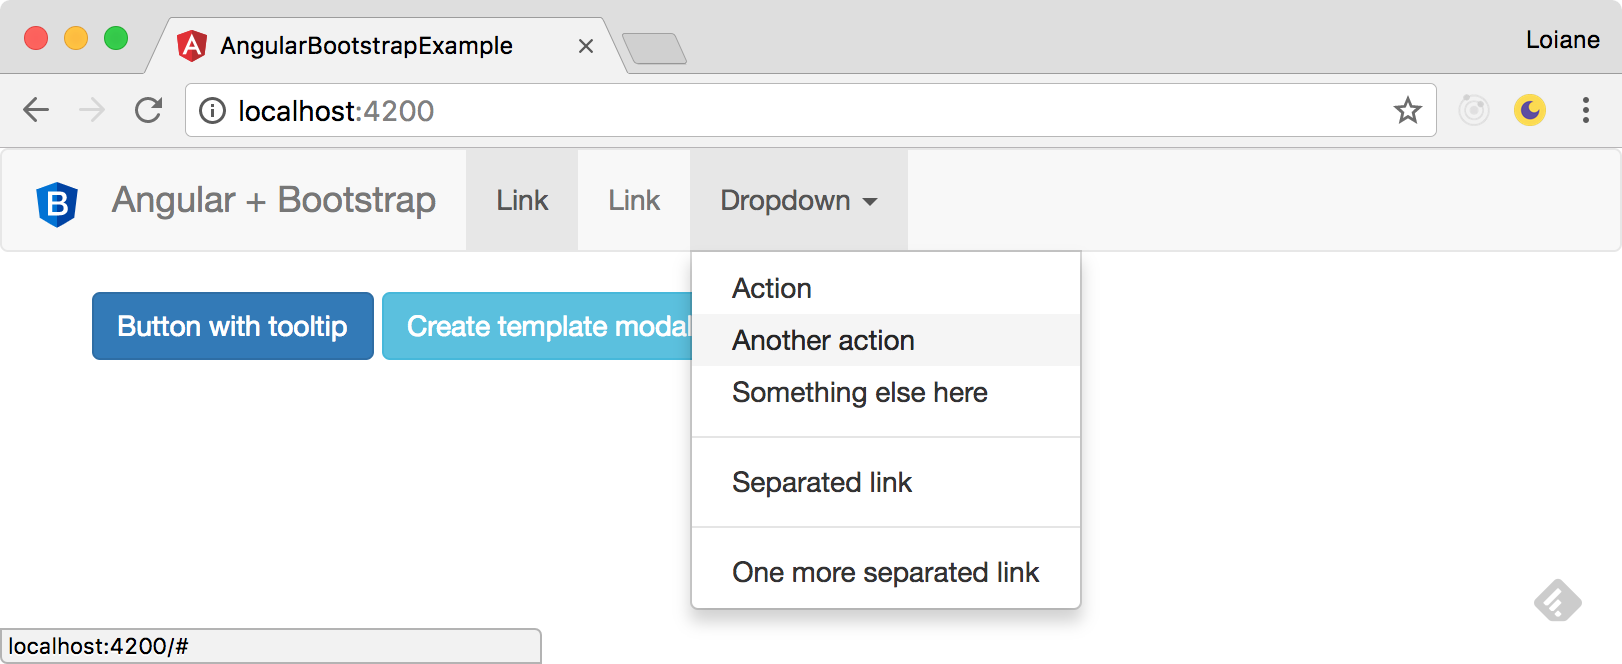
<li class="dropdown" dropdown> <!-- {1} -->
<a dropdownToggle role="button"> <!-- {2} -->
Dropdown <span class="caret"></span></a>
<ul *dropdownMenu class="dropdown-menu"> <!-- {3} -->
<li><a href="#">Action</a></li>
<li><a href="#">Another action</a></li>
<li><a href="#">Something else here</a></li>
<li role="separator" class="divider"></li>
<li><a href="#">Separated link</a></li>
<li role="separator" class="divider"></li>
<li><a href="#">One more separated link</a></li>
</ul>
</li>
</ul>
</div>
</nav>
For the DropDown component, ngx-bootstrap provides some directives:
{1}: dropdown directive: use this directive instead of class="dropdown".
{2}: dropdownToggle directive: use this directive instead of class="dropdown-toggle" data-toggle="dropdown". It will also add the aria atributes to the HTML element.
{3}: dropdownMenu directive: use this directive instead of class="dropdown-menu".
And you’ll have the same behavior as Bootstrap + Jquery:
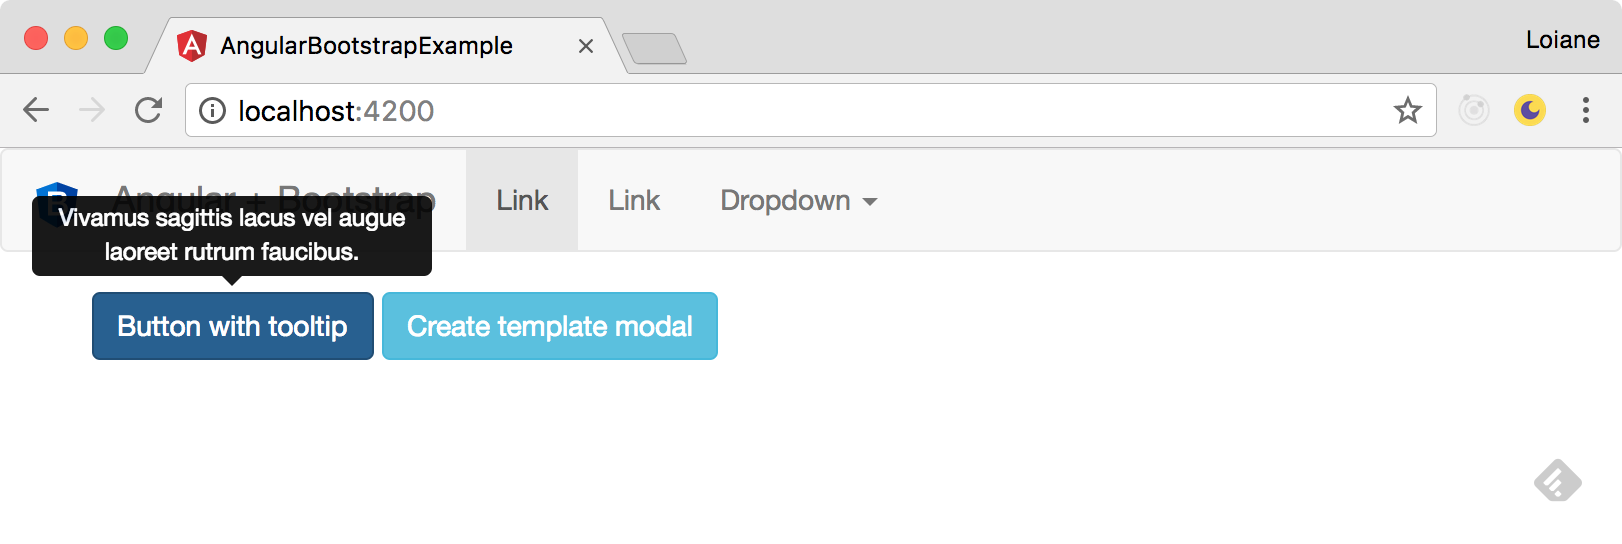
Let’s also develop a button with a tooltip:
<button type="button" class="btn btn-primary"

        tooltip="Vivamus sagittis lacus vel augue laoreet rutrum faucibus.">

Button with tooltip

</button>
The tooptip directive has the same effect as data-toggle="tooltip" title="Tooltip text".
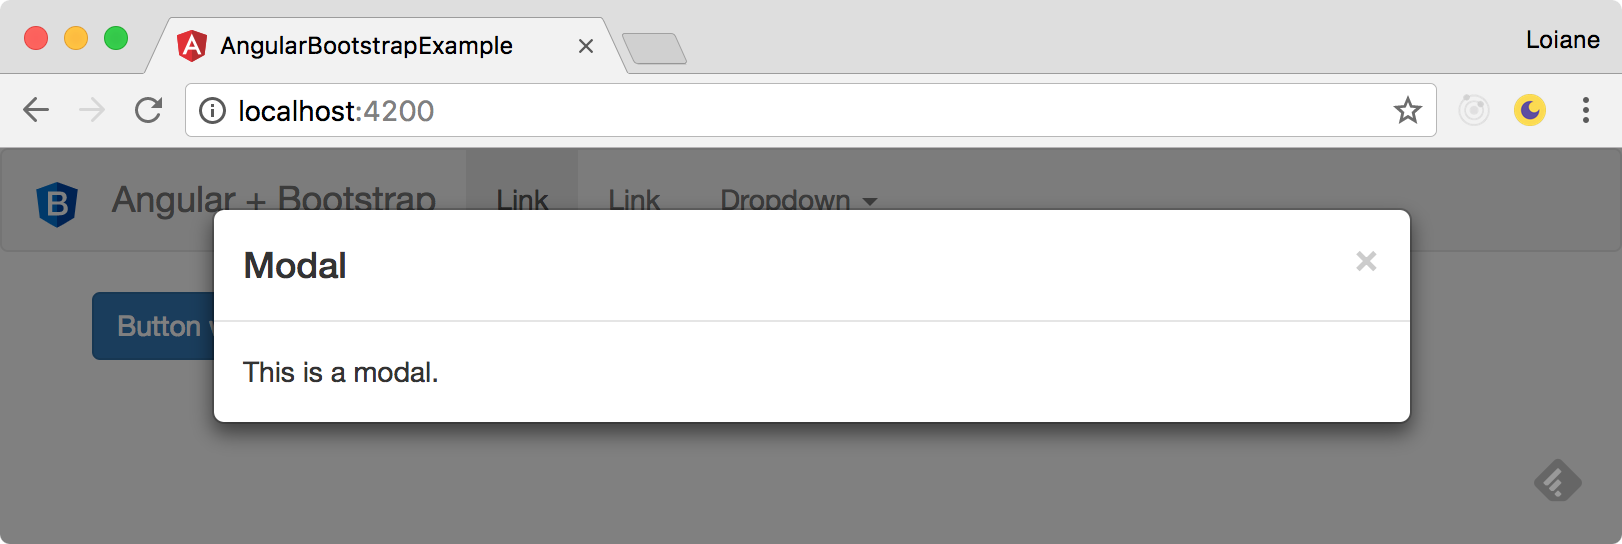
Let’s also take a look how to use a Modal component:
<button type="button" class="btn btn-info"
(click)="openModal(template)">Create template modal</button>
<ng-template #template>
<div class="modal-header">
<h4 class="modal-title pull-left">Modal</h4>
<button type="button" class="close pull-right"
aria-label="Close" (click)="modalRef.hide()">
<span aria-hidden="true">×</span>
</button>
</div>
<div class="modal-body">
This is a modal.
</div>
</ng-template>
In the code above, note the we are using a ng-template as container of our modal template. This template is being referenced by a template local variable template. When the user clicks on the button, we tell our code to open the modal referenced by template (you can have as many modals as needed, just give different names to your local variables).
There is also a close button in the modal that is calling modalRef.hide().
So we need some TypeScript code in our app.component.ts as well:
import { BsModalRef, BsModalService } from 'ngx-bootstrap/modal';

@Component({

  // ..

})

export class AppComponent {

  public modalRef: BsModalRef; // {1}

  constructor(private modalService: BsModalService) {} // {2}

  public openModal(template: TemplateRef<any>) {

    this.modalRef = this.modalService.show(template); // {3}

  }

}
{1}: first we need a variable to keep a reference of our modal. This is going to be used to close the modal.
{2}: to show the modal, we also need the ngx-bootstrap service
{3}: and when the user clicks on the button to open the popup we keep the modal reference and pass the template local name to the modalService.
ngx-bootstrap source code is still using Angular v2.x. Since there were no major breaking changes from v2.x to v.4x, it’s ok to use with v4.x. However, some ngx-bootstrap components use
<template>instead of<ng-template>, so you might get warnings in your browser console related totemplatebeing deprecated. For the examples, such as the modal, replacetemplatewithng-templatein your code and you should be fine.
We have an Angular project using Bootstrap and did not need to import JQuery to have the same behavior!
6: Bootstrap 4 JavaScript Components with ng-bootstrap (Option 2)
There is also a second option to use Bootstrap JavaScript components in Angular without JQuery in case you are using Bootstrap 4: ng-bootstrap.
You can install ng-bootstrap in your project from NPM:
npm install --save @ng-bootstrap/ng-bootstrap
In your app.module.ts you need to import the NgbModule.forRoot() using the forRoot() method.
import { NgbModule } from '@ng-bootstrap/ng-bootstrap';

@NgModule({

  imports: [ NgbModule.forRoot(), ... ],

  // ...

})

export class AppModule {}
If you have feature modules in your application, you also need to import NgbModule, but without the forRoot() method:
Other modules in your application can simply import NgbModule:
import {NgbModule} from '@ng-bootstrap/ng-bootstrap';

@NgModule({

 // ...

  imports: [NgbModule, ...],

})

export class OtherModule {

}
Source code + live demo + Stackblitz
Source code available on GitHub
References:
Happy coding!
[转]How to Add Bootstrap to an Angular CLI project的更多相关文章
- Using Sass with the Angular CLI
https://www.tuicool.com/articles/mauiMzY One of the first things you'll usually do in a project is t ...
- Configure a proxy for your API calls with Angular CLI
Table of contents Local development setup with Angular Issue: Dev server plus backend API Configurin ...
- 从Java角度理解Angular之入门篇:npm, yarn, Angular CLI
本系列从Java程序员的角度,带大家理解前端Angular框架. 本文重点介绍Angular的开发.编译工具:npm, yarn, Angular CLI,它们就像Java在中的Maven,同时顺便介 ...
- (转载)从Java角度理解Angular之入门篇:npm, yarn, Angular CLI
本系列从Java程序员的角度,带大家理解前端Angular框架. 本文是入门篇.笔者认为亲自动手写代码做实验,是最有效最扎实的学习途径,而搭建开发环境是学习一门新技术最需要先学会的技能,是入门的前提. ...
- @angular/cli项目构建--组件
环境:nodeJS,git,angular/cli npm install -g cnpm --registry=https://registry.npm.taobao.org cnpm instal ...
- Angular环境准备和Angular cli
Angular4.0来了,更小,更快,改动少 接下来为Angular4.0准备环境和学会使用Angular cli项目 1.环境准备: 1)在开始工作之前我们必须设置好开发环境 如果你的机器上还没有安 ...
- Angular CLI 安装和使用
1.背景介绍 关于Angular版本,Angular官方已经统一命名Angular 1.x同一为Angular JS:Angular 2.x及以上统称Angular: CLI是Command Line ...
- .Net Core + Angular Cli / Angular4 开发环境搭建
一.基础环境配置 1.安装VS 2017 v15.3或以上版本 2.安装VS Code最新版本 3.安装Node.js v6.9以上版本 4.重置全局npm源,修正为 淘宝的 NPM 镜像: npm ...
- [Docker] Running Multiple Containers for an Angular, Node project
The code is from Plusight course, github link is here. In this post, we will give a overview about h ...
随机推荐
- window下载android 最新源码
https://blog.csdn.net/jason0539/article/details/24010633 2017方法 ok https://www.cnblogs.com/zhangting ...
- springboot 不同环境切换不同的配置文件
开发的流程是本地>测试>预发布>正式,所以不同的环境,肯定是不同的配置文件,所以我们需要针对不同的环境做不同的配置切换. 下面我们来说说 springboot 是怎么来切换的: 1. ...
- jQuery-弹幕
该方法可能有bug,毕竟简单粗暴 <!DOCTYPE html><html> <head> <meta charset="UTF-8"&g ...
- hive 添加和删除分区
命令如下: 增加分区 ', p_loctype='MHA'); 删除分区 ALTER TABLE my_partition_test_table DROP IF EXISTS PARTITION (p ...
- 《JavaScript 高级程序设计》读书笔记五 引用类型
一 Object类型 a.两种创建方式: 1.new+构造函数Object; 2.对象字面量表示法: b.两种访问属性方式: 1.点表示法(.属性): 2.方括号([“属性”]): 二 Arr ...
- 《JavaScript 高级程序设计》读书笔记一 简介
一 历史 二 实现 a. javascript三个部分: ECMAScript:由ECMA-262定义,提供核心语言功能: DOM:提供HTML的应用程序编程接口/提供访问和操作网页内容的方法 ...
- JavaScript 高性能数组去重
中午和同事吃饭,席间讨论到数组去重这一问题 我立刻就分享了我常用的一个去重方法,随即被老大指出这个方法效率不高 回家后我自己测试了一下,发现那个方法确实很慢 于是就有了这一次的高性能数组去重研究 一. ...
- Kali学习笔记29:默认安装漏洞
文章的格式也许不是很好看,也没有什么合理的顺序 完全是想到什么写一些什么,但各个方面都涵盖到了 能耐下心看的朋友欢迎一起学习,大牛和杠精们请绕道 默认安装漏洞: 早期Windows默认自动开启很多服务 ...
- Linux命令行文本工具
浏览文件 cat 查看文件内容 more 以翻页形式查看文件内容(只能向下翻页) less 以翻页形式查看文件内容(可以上下翻页) head 查看文件的头几行(默认10行) tail 查看文件的尾几行 ...
- 13 Tensorflow API主要功能
要想使用Tensorflow API,首先要知道它能干什么.Tensorflow具有Python.C++.Java.Go等多种语言API,其中Python的API是最简单和好用的. Tensor Tr ...