Spring(十五):通过注解配置 Bean
在ClassPath中扫描组件
1)组件扫描(component scanning):Spring能够从classpath下自动扫描,侦测和实例化具有特定注解的组件;
2)特定组件包含:
--- @Component:基本注解,标识了一个受Spring管理的组件;
--- @Respository:标识持久层组件;
--- @Service:标识服务层(业务层)组件;
--- @Controller:标识表现层组件
3)对于扫描到的组件,Spring有默认的命名策略:使用非限定类名,第一个字母小写。也可以在注解中通过value属性值标识组件的别名。
4)当在组件上使用了特定的注解之后,还需要在Spring的配置文件中声明<context:component-scan>:
--- base-package属性指定一个需要扫描的基类包,Spring容器将会扫描这个基类包里及其子包中的所有类。
--- 当需要扫描多个包时,可以使用逗号分隔。
--- 如果仅希望扫描特定的类而非基包下的所有类,可使用resource-pattern属性过滤特定的类,示例:
    <context:component-scan base-package="com.dx.spring.bean.componentscan"

        resource-pattern="autowire/*.class"></context:component-scan>
--- <content:include-filter>子节点表示要包含的目标类
--- <content:exclude-filter>子节点表示要排除在外的目标类
--- <content:component-scal>下可以拥有若干个<content:include-filter>、<content:exclude-filter>子节点。
| Filter Type | Examples Expression | Description |
| annotation | org.example.SomeAnnotation | 符合SomeAnnoation的target class |
| assignable | org.example.SomeClass | 指定class或interface的全名 |
| aspectj | org.example..*Service+ | AspectJ語法 |
| regex | org\.example\.Default.* | Regelar Expression |
| custom | org.example.MyTypeFilter | Spring3新增自訂Type,實作org.springframework.core.type.TypeFilter |
5)注意使用bean注解方式时,需要依赖spring-aop-xxx.jar包,否则会抛出:Caused by: java.lang.ClassNotFoundException: org.springframework.aop.TargetSource
注解配置Bean示例:
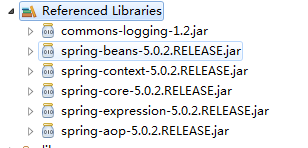
第一步:新建java project,导入spring依赖包:
第二步:新建Componet,Repository,Service,Controller组件类:

User.java ---Component
package com.dx.spring.beans.annotation.component;

import org.springframework.stereotype.Component;

@Component

public class User {

}
IUserRepository.java,UserRepositoryImpl.java --- Repository
package com.dx.spring.beans.annotation.repository;

public interface IUserRepository {

}
package com.dx.spring.beans.annotation.repository;

import org.springframework.stereotype.Repository;

@Repository(value="userRepository")

public class UserRepositoryImpl implements IUserRepository {

}
IUserService.java,UserServiceImpl.java --- Service
package com.dx.spring.beans.annotation.service;

public interface IUserService {

}
package com.dx.spring.beans.annotation.service;

import org.springframework.stereotype.Service;

@Service(value="userService")

public class UserServiceImpl implements IUserService {

}
UserController.java ---Controller
package com.dx.spring.beans.annotation.controller;

import org.springframework.stereotype.Controller;

@Controller

public class UserController {

}
第三步:新建测试类和Spring Bean配置文件:
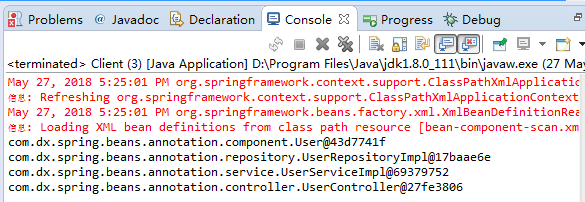
Client.java测试类:
package com.dx.spring.beans.annotation;

import org.springframework.context.ApplicationContext;

import org.springframework.context.support.ClassPathXmlApplicationContext;

import com.dx.spring.beans.annotation.component.User;

import com.dx.spring.beans.annotation.controller.UserController;

import com.dx.spring.beans.annotation.repository.UserRepositoryImpl;

import com.dx.spring.beans.annotation.service.UserServiceImpl;

public class Client {

    public static void main(String[] args) {

        ApplicationContext ctx = new ClassPathXmlApplicationContext("bean-component-scan.xml");

        User user = (User) ctx.getBean("user");

        System.out.println(user);

        UserRepositoryImpl userRepository = (UserRepositoryImpl) ctx.getBean("userRepository");

        System.out.println(userRepository);

        UserServiceImpl userService = (UserServiceImpl) ctx.getBean("userService");

        System.out.println(userService);

        UserController userController = (UserController) ctx.getBean("userController");

        System.out.println(userController);

    }

}
新建spring bean配置文件bean-component-scan.xml
<?xml version="1.0" encoding="UTF-8"?>

<beans xmlns="http://www.springframework.org/schema/beans"

    xmlns:xsi="http://www.w3.org/2001/XMLSchema-instance" xmlns:context="http://www.springframework.org/schema/context"

    xsi:schemaLocation="http://www.springframework.org/schema/beans http://www.springframework.org/schema/beans/spring-beans.xsd

        http://www.springframework.org/schema/context http://www.springframework.org/schema/context/spring-context-4.3.xsd">

    <context:component-scan base-package="com.dx.spring.beans.annotation"></context:component-scan>

</beans>
测试类执行打印信息如下:
测试resource-pattern
第一步:修改spring bean配置文件:
给spring bean配置文件中<context:component-scan>节点添加属性resource-pattern="repository/*.class",使得其只监控到包名包含repository的组件
<?xml version="1.0" encoding="UTF-8"?>

<beans xmlns="http://www.springframework.org/schema/beans"

    xmlns:xsi="http://www.w3.org/2001/XMLSchema-instance" xmlns:context="http://www.springframework.org/schema/context"

    xsi:schemaLocation="http://www.springframework.org/schema/beans http://www.springframework.org/schema/beans/spring-beans.xsd

        http://www.springframework.org/schema/context http://www.springframework.org/schema/context/spring-context-4.3.xsd">

    <context:component-scan base-package="com.dx.spring.beans.annotation"

        resource-pattern="repository/*.class"></context:component-scan>

</beans>
第二步执行Client.java测试:
发现UserRepositoryImpl userRepository = (UserRepositoryImpl) ctx.getBean("userRepository");可以获取到bean,其他组件都没有可以从ioc容器中获取到bean。
测试context:exclude-filter
第一步:修改spring bean配置文件:
    <context:component-scan base-package="com.dx.spring.beans.annotation">

        <context:exclude-filter type="annotation"

            expression="org.springframework.stereotype.Repository" />

    </context:component-scan>
备注:exclude-filter意思是不加载配置项,其他项都可以包含。
第二步:测试结果:
除了UserRepositoryImpl userRepository = (UserRepositoryImpl) ctx.getBean("userRepository");不可以获取到bean,其他组件都可以从ioc容器中获取到bean。
测试context:include-filter
第一步:修改spring bean配置文件:
    <context:component-scan base-package="com.dx.spring.beans.annotation"

        use-default-filters="false">

        <context:include-filter type="annotation"

            expression="org.springframework.stereotype.Repository" />

    </context:component-scan>
备注:1)include-filter意思是加载配置项,其他项要依赖于use-default-filters属性值,该属性值为true都可以加载;false时,才不加载配置项以外的组件。
2)use-default-filters="false",必须修改为false,默认值为true。
第二步:测试结果:
除了UserRepositoryImpl userRepository = (UserRepositoryImpl) ctx.getBean("userRepository");可以获取到bean,其他组件都不可以从ioc容器中获取到bean。
组件装配:
<context:component-scan>元素还会自动注册AutowiredAnnotationBeanPostPorcessor实例,该实例可以自动装备具有@AutoWired和@Resource、@Inject注解的属性。
@Autowire注解也可以应用在数组类型的属性上,此时Spring会把所有匹配的Bean进行自动装配;
@Autowire注解也可以应用在集合属性上,此时Spring读取该集合的类型信息,让后自动装配所有与之兼容的Bean。
@Autowire注解用在java.util.Map上时,若该Map的键值为String。那么,Spring将自动装配与之Map值类型兼容的Bean,此时Bean的名称作为键值。
Map依赖注入:
@Autowired

private Map<String, BaseService> map;
这样会注入:key是bean名字;value就是所有实现了BaseService的Bean,假设使用上一篇的例子,则会得到:
{organizationService=com.sishuok.spring4.service.OrganizationService@617029,userService=com.sishuok.spring4.service.UserService@10ac73b}
List/数组注入:
@Autowired

private List<BaseService> list;
这样会注入所有实现了BaseService的Bean;但是顺序是不确定的,如果我们想要按照某个顺序获取;在Spring4中可以使用@Order或实现Ordered接口来实现,如:
@Order(value = 1)

@Service

public class UserService extends BaseService<User> {

}
@Lazy可以延迟依赖注入:
@Lazy

@Service

public class UserService extends BaseService<User> {

}

@Lazy

@Autowired

private UserService userService;
可以把@Lazy放在@Autowired之上,即依赖注入也是延迟的;当我们调用userService时才会注入。即延迟依赖注入到使用时。同样适用于@Bean。
@Conditional
@Conditional类似于@Profile(一般用于如我们有开发环境、测试环境、正式机环境,为了方便切换不同的环境可以使用@Profile指定各个环境的配置,然后通过某个配置来开启某一个环境,方便切换),但是@Conditional的优点是允许自己定义规则。可以指定在如@Component、@Bean、@Configuration等注解的类上,以绝对Bean是否创建等。首先来看看使用@Profile的用例,假设我们有个用户模块:
1、在测试/开发期间调用本机的模拟接口方便开发;
2、在部署到正式机时换成调用远程接口;
public abstract class UserService extends BaseService<User> {

}

@Profile("local")

@Service

public class LocalUserService extends UserService {

}

@Profile("remote")

@Service

public class RemoteUserService extends UserService {

}
我们在写测试用例时,可以指定我们使用哪个Profile:
@ActiveProfiles("remote")

@RunWith(SpringJUnit4ClassRunner.class)

@ContextConfiguration(locations =  "classpath:spring-config.xml")

public class ServiceTest {

    @Autowired

    private UserService userService;

}
这种方式非常简单。如果想自定义如@Profile之类的注解等,那么@Conditional就派上用场了;假设我们系统中有好多本地/远程接口,那么我们定义两个注解@Local和@Remote注解要比使用@Profile方便的多;如:
@Retention(RetentionPolicy.RUNTIME)

@Target({ElementType.TYPE, ElementType.METHOD})

@Conditional(CustomCondition.class)

public @interface Local {

}

@Retention(RetentionPolicy.RUNTIME)

@Target({ElementType.TYPE, ElementType.METHOD})

@Conditional(CustomCondition.class)

public @interface Remote {

}
public class CustomCondition implements Condition {

    @Override

    public boolean matches(ConditionContext context, AnnotatedTypeMetadata metadata) {

        boolean isLocalBean = metadata.isAnnotated("com.sishuok.spring4.annotation.Local");

        boolean isRemoteBean = metadata.isAnnotated("com.sishuok.spring4.annotation.Remote");

        //如果bean没有注解@Local或@Remote,返回true,表示创建Bean

        if(!isLocalBean && !isRemoteBean) {

            return true;

        }

        boolean isLocalProfile = context.getEnvironment().acceptsProfiles("local");

        //如果profile=local 且 bean注解了@Local,则返回true 表示创建bean;

        if(isLocalProfile) {

            return isLocalBean;

        }

        //否则默认返回注解了@Remote或没有注解@Remote的Bean

        return isRemoteBean;

    }

}
然后我们使用这两个注解分别注解我们的Service:
@Local

@Service

public class LocalUserService extends UserService {

}

@Remote

@Service

public class RemoteUserService extends UserService {

}
首先在@Local和@Remote注解上使用@Conditional(CustomCondition.class)指定条件,然后使用@Local和@Remote注解我们的Service,这样当加载Service时,会先执行条件然后判断是否加载为Bean。@Profile就是这样实现的,其Condition是:org.springframework.context.annotation.ProfileCondition。可以去看下源码,很简单。
用法示例:
spring bean配置文件:
<?xml version="1.0" encoding="UTF-8"?>

<beans xmlns="http://www.springframework.org/schema/beans"

    xmlns:xsi="http://www.w3.org/2001/XMLSchema-instance" xmlns:context="http://www.springframework.org/schema/context"

    xsi:schemaLocation="http://www.springframework.org/schema/beans http://www.springframework.org/schema/beans/spring-beans.xsd

        http://www.springframework.org/schema/context http://www.springframework.org/schema/context/spring-context-4.3.xsd">

    <context:component-scan base-package="com.dx.spring.beans.annotation">

    </context:component-scan>

</beans>
在UserController.java中注入UserService
package com.dx.spring.beans.annotation.controller;

import org.springframework.beans.factory.annotation.Autowired;

import org.springframework.stereotype.Controller;

import com.dx.spring.beans.annotation.service.IUserService;

@Controller

public class UserController {

    @Autowired

    private IUserService userService;

    public void add() {

        System.out.println("UserController add ");

        userService.add();

    }

}
UserService中注入UserRepository
package com.dx.spring.beans.annotation.service;

public interface IUserService {

    void add();

}
package com.dx.spring.beans.annotation.service;

import org.springframework.beans.factory.annotation.Autowired;

import org.springframework.stereotype.Service;

import com.dx.spring.beans.annotation.repository.IUserRepository;

@Service(value = "userService")

public class UserServiceImpl implements IUserService {

    @Autowired

    private IUserRepository userRepository;

    @Override

    public void add() {

        System.out.println("UserService add...");

        userRepository.add();

    }

}
package com.dx.spring.beans.annotation.repository;

public interface IUserRepository {

    void add();

}
package com.dx.spring.beans.annotation.repository;

import org.springframework.stereotype.Repository;

@Repository(value = "userRepository")

public class UserRepositoryImpl implements IUserRepository {

    @Override

    public void add() {

        System.out.println("UserRepository add");

    }

}
Client.java调用测试:
package com.dx.spring.beans.annotation;

import org.springframework.context.ApplicationContext;

import org.springframework.context.support.ClassPathXmlApplicationContext;

import com.dx.spring.beans.annotation.controller.UserController;

public class Client {

    public static void main(String[] args) {

        ApplicationContext ctx = new ClassPathXmlApplicationContext("bean-component-scan.xml");

        UserController userController = (UserController) ctx.getBean("userController");

        System.out.println(userController);

        userController.add();

    }

}
测试1:实现同一个接口的多个Bean注入
添加UserOracleRepositoryImpl.java
package com.dx.spring.beans.annotation.repository;

import org.springframework.stereotype.Repository;

@Repository

public class UserOracleRepositoryImpl implements IUserRepository {

    @Override

    public void add() {

        System.out.println("UserOracleRepositoryImpl add");

    }

}
此时,从新测试执行Client.java,执行通过。UserServiceImpl.java并未抛出异常,一般情况来讲:
@Service(value = "userService")

public class UserServiceImpl implements IUserService {

    @Autowired

    private IUserRepository userRepository;

    。。。

}
这里的userRepository应该包含两个实现类,那么这里是如何成功找到它对应的Bean的呢?
按照userRepository的名称获取而来,因为UserRepositoryImpl.java的注册@Repository(value="userRepository"),按照这个名字而来。
测试2:使用set方法注入Bean
package com.dx.spring.beans.annotation.service;

import org.springframework.beans.factory.annotation.Autowired;

import org.springframework.stereotype.Service;

import com.dx.spring.beans.annotation.repository.IUserRepository;

@Service(value = "userService")

public class UserServiceImpl implements IUserService {

    private IUserRepository userRepository;

    @Autowired

    public void setUserRepository(IUserRepository userRepository) {

        this.userRepository = userRepository;

    }

    @Override

    public void add() {

        System.out.println("UserService add...");

        userRepository.add();

    }

}
测试3:注入Bean@Autowire上设置属性required=false
修改User为非组件类:
package com.dx.spring.beans.annotation.component;

import org.springframework.stereotype.Component;

//@Component

public class User {

}
修改UserRepositoryImpl.java注入User:
package com.dx.spring.beans.annotation.repository;

import org.springframework.beans.factory.annotation.Autowired;

import org.springframework.stereotype.Repository;

import com.dx.spring.beans.annotation.component.User;

@Repository(value = "userRepository")

public class UserRepositoryImpl implements IUserRepository {

    @Autowired(required = false)

    private User user;

    @Override

    public void add() {

        System.out.println("UserRepository add " + user);

    }

}
测试通过,打印信息为:
com.dx.spring.beans.annotation.controller.UserController@166fa74d
UserController add
UserService add...
UserRepository add null
测试4:注入Bean@Qualifier解决一个接口多个实现Bean的问题
修改UserRepositoryImpl.java
package com.dx.spring.beans.annotation.repository;

public interface IUserRepository {

    void add();

}
package com.dx.spring.beans.annotation.repository;

import org.springframework.beans.factory.annotation.Autowired;

import org.springframework.stereotype.Repository;

import com.dx.spring.beans.annotation.component.User;

@Repository

public class UserRepositoryImpl implements IUserRepository {

    @Override

    public void add() {

        System.out.println("UserRepository add " + user);

    }

}
package com.dx.spring.beans.annotation.repository;

import org.springframework.stereotype.Repository;

@Repository

public class UserOracleRepositoryImpl implements IUserRepository {

    @Override

    public void add() {

        System.out.println("UserOracleRepositoryImpl add");

    }

}
在UserServiceImpl.java中注入UserRepository:
package com.dx.spring.beans.annotation.service;

import org.springframework.beans.factory.annotation.Autowired;

import org.springframework.beans.factory.annotation.Qualifier;

import org.springframework.stereotype.Service;

import com.dx.spring.beans.annotation.repository.IUserRepository;

@Service(value = "userService")

public class UserServiceImpl implements IUserService {

    private IUserRepository userRepository;

    @Autowired

    public void setUserRepository(IUserRepository userRepository) {

        this.userRepository = userRepository;

    }

    @Override

    public void add() {

        System.out.println("UserService add...");

        userRepository.add();

    }

}
此时执行就会抛出异常:
Exception encountered during context initialization - cancelling refresh attempt: org.springframework.beans.factory.UnsatisfiedDependencyException:
Error creating bean with name 'userController': Unsatisfied dependency expressed through field 'userService';
nested exception is org.springframework.beans.factory.UnsatisfiedDependencyException: Error creating bean with name 'userService':
Unsatisfied dependency expressed through method 'setUserRepository' parameter 0;
nested exception is org.springframework.beans.factory.NoSuchBeanDefinitionException:
No qualifying bean of type 'com.dx.spring.beans.annotation.repository.IUserRepository' available: expected at least 1 bean which qualifies as autowire candidate.
Dependency annotations: {}
解决方案:使用@Qualifier(value="userRepositoryImpl"),指定具体注入的Bean
package com.dx.spring.beans.annotation.service;

import org.springframework.beans.factory.annotation.Autowired;

import org.springframework.beans.factory.annotation.Qualifier;

import org.springframework.stereotype.Service;

import com.dx.spring.beans.annotation.repository.IUserRepository;

@Service(value = "userService")

public class UserServiceImpl implements IUserService {

    private IUserRepository userRepository;

    @Autowired

    @Qualifier(value="userRepositoryImpl")

    public void setUserRepository(IUserRepository userRepository) {

        this.userRepository = userRepository;

    }

    @Override

    public void add() {

        System.out.println("UserService add...");

        userRepository.add();

    }

}
此时,@Qualifier(value="userRepositoryImpl")也可以注入在set函数入参上:
package com.dx.spring.beans.annotation.service;

import org.springframework.beans.factory.annotation.Autowired;

import org.springframework.beans.factory.annotation.Qualifier;

import org.springframework.stereotype.Service;

import com.dx.spring.beans.annotation.repository.IUserRepository;

@Service(value = "userService")

public class UserServiceImpl implements IUserService {

    private IUserRepository userRepository;

    @Autowired

    public void setUserRepository(@Qualifier(value="userRepositoryImpl") IUserRepository userRepository) {

        this.userRepository = userRepository;

    }

    @Override

    public void add() {

        System.out.println("UserService add...");

        userRepository.add();

    }

}
Spring(十五):通过注解配置 Bean的更多相关文章
- Spring基础18——通过注解配置bean之间的关联关系
1.组件装配 <context:component-scan>元素还会自动注册AutowiredAnnotaionBeanPostProcessor实例,这是一个bean的后置处理器,该实 ...
- [原创]java WEB学习笔记103:Spring学习---Spring Bean配置:基于注解的方式(基于注解配置bean,基于注解来装配bean的属性)
本博客的目的:①总结自己的学习过程,相当于学习笔记 ②将自己的经验分享给大家,相互学习,互相交流,不可商用 内容难免出现问题,欢迎指正,交流,探讨,可以留言,也可以通过以下方式联系. 本人互联网技术爱 ...
- Spring(二)--FactoryBean、bean的后置处理器、数据库连接池、引用外部文件、使用注解配置bean等
实验1:配置通过静态工厂方法创建的bean [通过静态方法提供实例对象,工厂类本身不需要实例化!] 1.创建静态工厂类 public class StaticFactory { private st ...
- IDEA02 利用Maven创建Web项目、为Web应用添加Spring框架支持、bean的创建于获取、利用注解配置Bean、自动装配Bean、MVC配置
1 环境版本说明 Jdk : 1.8 Maven : 3.5 IDEA : 专业版 2017.2 2 环境准备 2.1 Maven安装及其配置 2.2 Tomcat安装及其配置 3 详细步骤 3.1 ...
- Spring IOC机制之使用注解配置bean
一. 通过注解配置bean 1.1 概述 相对于XML方式而言,通过注解的方式配置bean更加简洁和优雅,而且和MVC组件化开发的理念十分契合,是开发中常用的使用方式. 1.2 ...
- Spring框架入门之基于Java注解配置bean
Spring框架入门之基于Java注解配置bean 一.Spring bean配置常用的注解 常用的有四个注解 Controller: 用于控制器的注解 Service : 用于service的注解 ...
- Spring 注解配置Bean
一.使用注解配置Bean 1.注解 在类定义.方法定义.成员变量定义前使用.其简化<bean>标签,功能同<bean>标签.格式为: @注解标记名. 2.组件扫描 Spring ...
- 跟着刚哥学习Spring框架--通过XML方式配置Bean(三)
Spring配置Bean有两种形式(XML和注解) 今天我们学习通过XML方式配置Bean 1. Bean的配置方式 通过全类名(反射)的方式 √ id:标识容器中的bean.id唯一. √ cl ...
- Spring框架学习之注解配置与AOP思想
上篇我们介绍了Spring中有关高级依赖关系配置的内容,也可以调用任意方法的返回值作为属性注入的值,它解决了Spring配置文件的动态性不足的缺点.而本篇,我们将介绍Spring的又一大核心 ...
随机推荐
- GIT(7)----强制用远程代码覆盖本地修改
清除本地修改 git reset --hard 拉代码 git pull Git Pull While Ignoring Local Changes? git pull 并强制覆盖本地修改
- 【转】InitializingBean的作用
原文链接:http://blog.csdn.net/maclaren001/article/details/37039749 最近工作需要得到sping中的每个事物需要执行的sql,称机会简单研究了一 ...
- Mac应用
App Store 安装: AnappyApp: 截图软件 Snap: Dock快捷键启动 izip Unarchiver: rar解压 Dr.Cleaner:内存清理.资源监控 下载安装: C ...
- java 虚拟机启动参数 (转)
在Java.J2EE大型应用中,JVM非标准参数的配置直接关系到整个系统的性能. JVM非标准参数指的是JVM底层的一些配置参数,这些参数在一般开发中默认即可,不需要任何配置.但是在生产环境中,为了提 ...
- HDU 4786 Fibonacci Tree (2013成都1006题)
Fibonacci Tree Time Limit: 4000/2000 MS (Java/Others) Memory Limit: 32768/32768 K (Java/Others)To ...
- DTrace memory leak 内存泄露
http://blog.sina.com.cn/s/blog_538040b70100eecn.html 如下程序用于跟踪,在分配和回收都会触发探针 #!/usr/sbin/dtrace -s p ...
- ERROR 2002 (HY000): Can't connect to local MySQL server through socket
在安装好了MySQL之后,使用了新的配置文件后.MySQL服务器能够成功启动,但在登陆的时候出现了ERROR 2002 (HY000): Can't connect to local MySQL se ...
- select,poll,epoll之间的区别
(1)select,poll实现需要自己不断轮询所有fd集合,直到设备就绪,期间可能要睡眠和唤醒多次交替.而epoll其实也需要调用epoll_wait不断轮询就绪链表,期间也可能多次睡眠和唤醒交替, ...
- Chilkat----开源站点之VS2010 CKMailMan一个很好的邮件发送开源开发包
Chilkat 是一个很好的开源站点,有各种开源库. 开发语言主要有Classic ASP •C • C++ • C# • Delphi ActiveX • Delphi DLL • Visual F ...
- mac 刻录ISO系统盘
今天本本系统坏了,手头上又没有U盘PE工具,只有MAC和光驱,只好在MAC上下载系统ISO刻录,我是直接点ISO文件,右键刻录到光盘,刻录好之后放到本本上发现不能引导,再把光盘放回MAC上一看,光盘里 ...