MQTT服务器搭建——Liunx安装mosquitto,并设置用户密码
一、安装
1、下载mosquitto安装包
地址:http://mosquitto.org/files/source/
2、安装依赖包
yum install gcc gcc-c++ libstdc++-devel

yum install openssl-devel -y

yum install c-ares-devel -y

yum install uuid-devel -y

yum install libuuid-devel -y

yum install c-ares-devel
3、编译并安装
解压下载的安装包:tar zxvf mosquitto-2.0.10.tar.gz
进入解压后的文件夹:cd mosquitto-2.0.10
执行命令:make && make install
4、安装后进入 /etc/mosquitto中,复制配置文件
cp mosquitto.conf.example mosquitto.conf
5、启动
mosquitto -c /etc/mosquitto/mosquitto.conf

//后台启动

mosquitto -c /etc/mosquitto/mosquitto.conf -d
6、关闭,kill进程
ps -aux | grep mosquitto

kill -9 2438
至此安装mosquitto完毕!
二、设置用户密码
1、打开配置文件为/etc/mosquitto/mosquitto.conf
配置如下 :
listener 1883  //配置允许外部访问的端口设置

allow_anonymous false  //配置不允许匿名访问,需输入账号密码才可订阅或者发布

password_file /etc/mosquitto/pwfile.example  //配置账号密码存放的路径
2、设置用户密码
命令如下:
mosquitto_passwd /etc/mosquitto/pwfile.example 用户名
回车后,按照提示输入两次密码即可!

3、用户测试验证
启动 mosquitto:
mosquitto -c /etc/mosquitto/mosquitto.conf

(订阅端)客户端启动:
mosquitto_sub -h 地址 -t 主题 -u 用户名 -P 密码

(发布者)客户端启动:
mosquitto_pub -h 地址 -t 主题 -u 用户名 -P 密码 -m 发布内容

三、补充问题
编译问题
1、fatal error: cjson/cJSON.h: No such file or directory
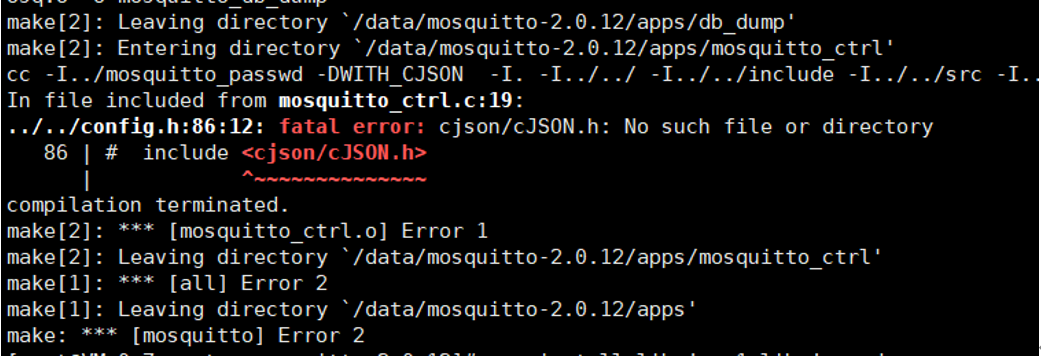
解决:需要安装cJSON(这里cJSON的安装,yum和apt不一定能找到,可以直接从github上下载源码压缩包,然后解压,进入目录,并make,make install)
启动订阅客户端问题
1、error while loading shared libraries: libmosquitto.so.1: cannot open shared object file: No such file or directory
解决:执行以下命令:
sudo ln -s /usr/local/lib/libmosquitto.so.1 /usr/lib/libmosquitto.so.1

ldconfig
2、error while loading shared libraries: libcjson.so.1: cannot open shared object file: No such file or directory

解决:
方法1:
编辑/etc/ld.so.conf文件,在新的一行中加入库文件所在目录(/usr/local/lib);
运行ldconfig,以更新/etc/ld.so.cache文件;
方法2:
在/etc/ld.so.conf.d/目录下新建任何以.conf为后缀的文件(touch mqtt.conf),在该文件中加入库文件所在的目录;
运行ldconfig,以更新/etc/ld.so.cache文件;
3、Warning: Unable to drop privileges to 'mosquitto' because this user does not exist. Trying 'nobody' instead.

解决:
在allow_anonymous 前面加一个 user root
user root

allow_anonymous false
或者创建mosquitto用户和组
groupadd mosquitto

useradd -g mosquitto mosquitto

chown -R mosquitto:mosquitto /etc/mosquitto/
四、参考以下文章
https://www.cnblogs.com/chen1-kerr/p/7258487.html
https://www.cnblogs.com/IC1101/p/14749722.html
https://blog.csdn.net/u012377333/article/details/69397124
https://www.cnblogs.com/x_wukong/p/4722903.html
https://blog.csdn.net/houjixin/article/details/46711547
MQTT服务器搭建——Liunx安装mosquitto,并设置用户密码的更多相关文章
- 常见MQTT服务器搭建与试用
常见MQTT服务器搭建与试用 简介 MQTT(Message Queuing Telemetry Transport,消息队列遥测传输)是IBM开发的一个即时通讯协议,它比较适合于在低带宽.不可靠 ...
- 个人智能家居系统 - MQTT服务器搭建(centOS7.3)
个人智能家居系统 - MQTT服务器搭建(centOS7.3) 0x00 参考 在CentOS7 上安装mosquitto1.4.1服务器,实现MQTT信息推送功能并增加websocket功能 mos ...
- Mqtt服务器搭建
.bg { background: #99CC99 } Mqtt服务器搭建 测试环境:CentOS64位 1.安装基础软件 yum install gcc-c++ yum install cmake ...
- 服务器搭建--Linux安装rabbitmq
安装rabbitmq需要先安装erlang:安装erlang参考https://blog.csdn.net/ztx114/article/details/79912570 1.下载rabbitmq-s ...
- 服务器搭建--Linux安装erlang
1.安装依赖环境: 1)安装GCC GCC-C++ Openssl等模块,安装过就不需要安装了 yum -y install make gcc gcc-c++ kernel-devel m4 ncur ...
- MariaDB数据库设置用户密码
SET PASSWORD [FOR user] = { PASSWORD('some password') | OLD_PASSWORD('some password') | 'encrypted p ...
- MQTT服务器搭建--Mosquitto用户名密码配置
Mosquitto用户认证配置 前言:基于Mosquitto服务器已经搭建成功,大部分都是采用默认的是允许匿名用户登录模式,正式上线的系统需要进行用户认证. 1.用户参数说明 Mosquitto服务器 ...
- 常见MQTT服务器搭建[转载]
简介 MQTT(Message Queuing Telemetry Transport,消息队列遥测传输)是IBM开发的一个即时通讯协议,它比较适合于在低带宽.不可靠的网络的进行远程传感器和控制设备通 ...
- Apollo mqtt 服务器搭建
html { overflow-x: initial !important } :root { --bg-color: #ffffff; --text-color: #333333; --select ...
- MQTT服务器搭建-mosquitto1.4.4安装指南
Mosquitto mosquitto是一款实现了 MQTT v3.1 协议的开源的消息代理服务软件. 其提供了非常轻量级的消息数据传输协议,采用发布/订阅模式进行工作,可用于物联设备.中间件.APP ...
随机推荐
- Educational Codeforces Round 112 (Rated for Div
Educational Codeforces Round 112 (Rated for Div. 2) CodeForces - 1555D Say No to Palindromes 如果一个字符串 ...
- weboack5webpack5用url-loader(file-loader)处理字体
file-loader(url-loader)可以用解析打包字体. webpack配置loader \\ webpack.config.js const webpack = require(" ...
- xorg 屏幕分辨率设置(x11分辨率设置/linux分辨率设置)
记录一下,用于linux虚拟机分辨率设置.https://blog.csdn.net/weixin_36084095/article/details/116839103(在谷歌搜索是简书的文章,在百度 ...
- 1168 Prime Day(20)
The above picture is from Sina Weibo, showing May 23rd, 2019 as a very cool "Prime Day". T ...
- 解决504 GATEWAY TIMEOUT Nginx网关超时
最近遇到一个问题504 GATEWAY TIMEOUT的问题,在浏览器的NetWork里面看是这个效果.时间大概是60s. 修改nginx配置 目前后端技术架构主要是nginx和php-fpm,前端主 ...
- ipmitool使用报错Could not open device at /dev/ipmi0 or /dev/ipmi/0 or /dev/ipmidev/0: No such file or directory
ipmitool使用报错处理 Could not open device at /dev/ipmi0 or /dev/ipmi/0 or /dev/ipmidev/0: No such file or ...
- JS中call、apply、bind
call就是挨个传值,apply传一个数组,bind也是挨个传值 call() 和 apply() 会执行这个函数bind并不会而是将绑定好的this重新返回一个新函数
- (K8s学习笔记四)常用命令实例
1.显示Pod的更多信息 kubectl get pod <pod-name> -o wide kubectl get pods -show-all # 查看已经停止的Pod 2.以yam ...
- rclone挂载对象存储到本地
一.原理图 二.挂载步骤 1.申请对象存储资源 (略) 2.下载rclone https://rclone.org/downloads/ 3.上传服务器,解压并安装 sudo unzip rclone ...
- SQL_SERVER 2000启动问题
SQL Server evaluation period has expired解决办法 问题现象: 本地计算机 上的 MSSQLSERVER 服务启动后又停止了.一些服务自动停止,如果它们没有什么可 ...