Java进阶知识13 Hibernate查询语言(HQL),本文以hibernate注解版为例讲解
1、简单概述
1.1、
1) SQL:面向的是数据库 select * from tableName;
2) HQL查询(Hibernate Query language): hibernate 提供的面向对象的查询语言。
例:Session.createQuery(“from tableName”) //和第1)点的SQL语句恒等的,查询出来的效果是一样的
3) Criteria 查询,完全面向对象的查询(Query By Criteria ,QBC)
4) SQLQuery, 本地SQL查询,逻辑比较复杂,HQL很难实现
缺点:不能跨数据库平台,如果改了数据库,sql语句有可能要改
使用场景: 对于复杂sql,hql实现不了的情况,可以使用本地sql查询
HQL查询要注意:
1、使用hql查询的时候 auto-import="true" 要设置true,如果是false,写hql的时候,要指定类的全名,例如:
1.1、 Query q = session.createQuery("from Employee"); //auto-import="true"的时候
1.2、Query q = session.createQuery("from com.shore.model.Employee"); //auto-import="false"的时候
2、用注解版时,auto-import="true" (默认为true),写不写类的全名,都是可以的。用xml 配置版时,需要指定 auto-import="true" ,这样省代码,不指定为true,则像上面第1点的第1.2小点那样写。
1.2、查询全部列
 Query query = session.createQuery("from Employee"); //OK

 Query query = session.createQuery("from com.shore.model.Employee"); //OK

 Query query = session.createQuery("select * from Employee"); //错误,不支持 *

 Query query = session.createQuery("select e from Employee e"); // OK

 System.out.println(query.list()); //把结果打印到控台上
1.3、查询指定的列
 Query query = session.createQuery("select name,sex,salary from Employee");

 System.out.println(query.list());
1.4、查询指定的列,自动封装为对象
 Query query = session.createQuery("select new com.shore.model.SubEmployee(name,sex,salary) from Employee");

 System.out.println(query.list());
1.5、条件查询
1.5.1、条件查询之占位符(?)
 Query query = session.createQuery("select new com.shore.model.SubEmployee(name,sex,salary) from Employee where department_id = ?");

 //query.setParameter(0, 1);//或者下面的setInteger(0, 1)方法也行

 query.setInteger(0, 1);

 System.out.println(query.list());
1.5.2、条件查询之命名参数(:)
 Query query = session.createQuery("select new com.shore.model.SubEmployee(name,sex,salary) from Employee where department_id = :deptID");

 query.setParameter("deptID", 1);

 System.out.println(query.list());
1.5.3、条件查询之范围查询(between .... and ... )
 Query query = session.createQuery("select new com.shore.model.SubEmployee(name,sex,salary) from Employee where department_id between :d1 and :d2");

 query.setParameter("d1", 1);   //也可以用占位符?实现

 query.setParameter("d2", 2);

 System.out.println(query.list());
1.5.4、条件查询之模糊查询 like
 Query query = session.createQuery("select new com.shore.model.SubEmployee(name,sex,salary)  from Employee where name like ?");

 query.setParameter(0, "%三%");

 System.out.println(query.list());
1.6、聚合函数统计
 Query query = session.createQuery("select count(*) from Employee where name like ?");

 query.setParameter(0, "%三%");

 System.out.println(query.list());
1.7、分组查询(group by)
1 //MySQL数据库写法:select department_id,count(*) from employee group by department_id;
2 Query query = session.createQuery("select department,count(*) from Employee group by department_id"); //根据部门外键

 System.out.println(query.list());
1.8、连接查询 (内连接、外连接、左/右连接等)
内连接:Join == inner join //交集
左连接:Left join,以左边的表为主表,如果没有join上,左边表数据完整,右边表的数据可能为空 。//左边表的所有数据+右边表的交集部分
右连接:Right join,以右边的表为主表,如果没有join上,右边表数据完整,左边表的数据可能为空。//右边表的所有数据+左边表的交集部分
外连接:Outer join //并集
 1) 内连接   【映射已经配置好了关系,关联的时候,直接写对象的属性即可】

 Query q = session.createQuery("from Employee e inner join e.department"); //department是Employee实体中映射的一个外键(Employee表中的department_id)

 2) 左外连接

 Query q = session.createQuery("from Employee e left join e.department");

 3) 右外连接

 Query q = session.createQuery("from Department d right join d.employee"); //映射的一个外键(employee_id)

 4) 迫切内连接    【使用fetch, 会把右表的数据,填充到左表对象中!】

 Query q = session.createQuery("from Employee e inner join fetch e.department");

 q.list();

 5) 迫切左外连接

 Query q = session.createQuery("from Employee e left join fetch e.department");
1.9、HQL查询优化
 Query query = session.getNamedQuery("getAllDept"); //定义一个参数名 getAllDept

 query.setParameter(0, 10);
然后在对应的xml 配置文件中 写SQL语句。(对于发杂的SQL语句,可以这样做,方便项目发布后,还可以修改)
 比如在:Employee.hbm.xml 在xml中存放sql语句      <query name="getAllDept">  //这里的参数名 getAllDept 要和上面的对应

         <![CDATA[

             from Employee d where department_id < ?;  //这里写SQL语句,不是HQL语句

         ]]>

     </query>
2、HQL查询语言 实例
2.1、创建 Employee类、Department类、SubEmployee类、HomeTown类
 package com.shore.model;

 import javax.persistence.CascadeType;

 import javax.persistence.Entity;

 import javax.persistence.GeneratedValue;

 import javax.persistence.Id;

 import javax.persistence.ManyToOne;

 import org.hibernate.annotations.Type;

 /**

  * @author DSHORE/2019-9-25

  * 多对一,单向关联(注解版)

  */

 @Entity

 public class Employee {//员工  (“多”的一方),在多的一方加外键

     private Integer id;

     private String name;

     private Boolean sex;

     private Float salary;

     private Department department;

     private Integer homeId;

     @Id

     @GeneratedValue

     public Integer getId() {

         return id;

     }

     public void setId(Integer id) {

         this.id = id;

     }

     public String getName() {

         return name;

     }

     public void setName(String name) {

         this.name = name;

     }

     @Type(type="yes_no")

     public Boolean getSex() {

         return sex;

     }

     public void setSex(Boolean sex) {

         this.sex = sex;

     }

     public Float getSalary() {

         return salary;

     }

     public void setSalary(Float salary) {

         this.salary = salary;

     }

     @ManyToOne(cascade=CascadeType.ALL)

     public Department getDepartment() {

         return department;

     }

     public void setDepartment(Department department) {

         this.department = department;

     }

     @Override

     public String toString() {

         return "Employee [id=" + id + ", name=" + name + ", sex=" + sex

                 + ", salary=" + salary + ", department=" + department + "]";

     }

     public Integer getHomeId() {

         return homeId;

     }

     public void setHomeId(Integer homeId) {

         this.homeId = homeId;

     }

 }
Department类
 package com.shore.model;

 import javax.persistence.Entity;

 import javax.persistence.GeneratedValue;

 import javax.persistence.Id;

 /**

  * @author DSHORE/2019-9-25

  * 多对一,单向关联(注解版)

  */

 @Entity

 public class Department {//部门 (“一”的一方)

     private Integer id;

     private String name;

     private String description;

     @Id

     @GeneratedValue

     public Integer getId() {

         return id;

     }

     public void setId(Integer id) {

         this.id = id;

     }

     public String getName() {

         return name;

     }

     public void setName(String name) {

         this.name = name;

     }

     public String getDescription() {

         return description;

     }

     public void setDescription(String description) {

         this.description = description;

     }

     @Override

     public String toString() {

         return "Department [id=" + id + ", name=" + name + ", description="

                 + description + "]";

     }

 }
SubEmployee类
 package com.shore.model;

 /**

  * @author DSHORE/2019-9-25

  *

  */

 public class SubEmployee {//查询指定的列,自动封装为对象时 用到(此处不需要创建数据库表)

     private String name;

     private Boolean sex;

     private Float salary;

     public SubEmployee(String name, Boolean sex, Float salary) {

         super();

         this.name = name;

         this.sex = sex;

         this.salary = salary;

     }

     public SubEmployee() {

         super();

     }

     public String getName() {

         return name;

     }

     public void setName(String name) {

         this.name = name;

     }

     public Boolean getSex() {

         return sex;

     }

     public void setSex(Boolean sex) {

         this.sex = sex;

     }

     public Float getSalary() {

         return salary;

     }

     public void setSalary(Float salary) {

         this.salary = salary;

     }

     @Override

     public String toString() {

         return "SubEmployee [name=" + name + ", sex=" + sex + ", salary="

                 + salary + "]";

     }

 }
HomeTown类
 package com.shore.model;

 /**

  * @author DSHORE/2019-9-25

  *

  */

 //后来加入的,没配注解,数据库表和数据都是手动创建的

 public class HomeTown {//在使用“连接查询”时用到(内连接、外连接、左/右连接等)

     private Integer id;

     private String address;

     public Integer getId() {

         return id;

     }

     public void setId(Integer id) {

         this.id = id;

     }

     public String getAddress() {

         return address;

     }

     public void setAddress(String address) {

         this.address = address;

     }

 }
2.2、创建 hibernate.cfg.xml 核心配置文件
 <?xml version='1.0' encoding='utf-8'?>

 <!DOCTYPE hibernate-configuration PUBLIC

         "-//Hibernate/Hibernate Configuration DTD 3.0//EN"

         "http://www.hibernate.org/dtd/hibernate-configuration-3.0.dtd">

 <hibernate-configuration>

     <session-factory>

         <!-- Database connection settings -->

         <property name="connection.driver_class">com.mysql.jdbc.Driver</property>

         <property name="connection.url">jdbc:mysql://localhost:3306/hibernate</property>

         <property name="connection.username">root</property>

         <property name="connection.password">123456</property>

         <property name="dialect">org.hibernate.dialect.MySQLDialect</property>

         <property name="cache.provider_class">org.hibernate.cache.NoCacheProvider</property>

         <property name="show_sql">true</property>

         <property name="hbm2ddl.auto">update</property>

         <mapping class="com.shore.model.Employee" />

         <mapping class="com.shore.model.Department" />

     </session-factory>

 </hibernate-configuration>
2.3、开始测试
package com.shore.test; import java.util.ArrayList;
import java.util.List; import org.hibernate.Query;
import org.hibernate.Session;
import org.hibernate.SessionFactory;
import org.hibernate.Transaction;
import org.hibernate.cfg.AnnotationConfiguration;
import org.junit.AfterClass;
import org.junit.BeforeClass;
import org.junit.Test; import com.shore.model.Department;
import com.shore.model.Employee; /**
* @author DSHORE/2019-9-19
*
*/
public class MyTest {
public static SessionFactory sessionFactory = null;
public static Session session = null; @BeforeClass
public static void buildSessionFactory() {
sessionFactory = new AnnotationConfiguration().configure()
.buildSessionFactory();
} @AfterClass
public static void close() {
session.close();
sessionFactory.close();
} /**
* 单向多对一:多个员工 对 一个部门
*/
/*@Test
public void testAdd() {//插入数据
session = sessionFactory.openSession();
Transaction transaction = session.beginTransaction();
Department dept1 = new Department();
Department dept2 = new Department();
dept1.setName("总裁办");
dept1.setDescription("秘书");
dept2.setName("市场部");
dept2.setDescription("经理"); Employee em1 = new Employee();
em1.setName("张三");
em1.setSex(true);
em1.setSalary(5999.00f);
em1.setDepartment(dept1); Employee em2 = new Employee();
em2.setName("李四");
em2.setSex(true);
em2.setSalary(5999.00f);
em2.setDepartment(dept2); Employee em3 = new Employee();
em3.setName("王五");
em3.setSex(true);
em3.setSalary(5999.00f);
em3.setDepartment(dept1); Employee em4 = new Employee();
em4.setName("赵六");
em4.setSex(true);
em4.setSalary(5999.00f);
em4.setDepartment(dept1); Employee em5 = new Employee();
em5.setName("田七");
em5.setSex(true);
em5.setSalary(5999.00f);
em5.setDepartment(dept2); session.save(em1); // 先创建dept1并数据,后创建em1并插入数据
session.save(em2); // 先创建dept2并数据,后插入em2的数据
session.save(em3);
session.save(em4);
session.save(em5);
transaction.commit();
}*/ /**
* hql :1、查询全部列
*/
@SuppressWarnings("unchecked")
@Test
public void testListAllEmployee() {
session = sessionFactory.openSession();
Transaction transaction = session.beginTransaction();
List<Employee> list = new ArrayList<Employee>();
Query query = session.createQuery("select e from Employee e");
//或者这样写:Query query = session.createQuery("from Employee"); 效果是一样的
list = query.list();
transaction.commit(); System.out.println("!!!!!!!!!!!!!!");
if (list != null && list.size() > 0) {
for (int j = 0; j < list.size(); j++) {
System.out.println(j + ":" + list.get(j));
}
}
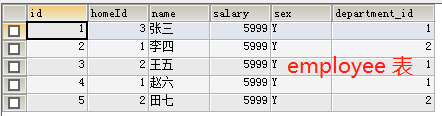
/** testListAllEmployee()运行结果:
* !!!!!!!!!!!!!!
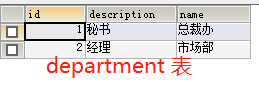
* 0:Employee [id=1, name=张三, sex=true, salary=5999.0, department=Department [id=1, name=总裁办, description=秘书]]
* 1:Employee [id=2, name=李四, sex=true, salary=5999.0, department=Department [id=2, name=市场部, description=经理]]
* 2:Employee [id=3, name=王五, sex=true, salary=5999.0, department=Department [id=1, name=总裁办, description=秘书]]
* 3:Employee [id=4, name=赵六, sex=true, salary=5999.0, department=Department [id=1, name=总裁办, description=秘书]]
* 4:Employee [id=5, name=田七, sex=true, salary=5999.0, department=Department [id=2, name=市场部, description=经理]]
*/
} /**
* hql: 2、查询指定的列
*/
@Test
public void testListSubField() {
session = sessionFactory.openSession();
Transaction transaction = session.beginTransaction();
Query query = session.createQuery("select name,sex,salary from Employee");
System.out.println(query.list());
transaction.commit();
/** testListSubField()运行结果:
* [[Ljava.lang.Object;@259a8416, [Ljava.lang.Object;@4355d3a3, [Ljava.lang.Object;@37b994de, [Ljava.lang.Object;@78dc9766, [Ljava.lang.Object;@5a57e787]
*/
} /**
* hql: 3、查询指定的列,自动封装为对象
* 注意:必须要提供带参数构造器;必须在hql封装类前面要加上package名称
*/
@Test
public void testListSubFieldsToObj() {
session = sessionFactory.openSession();
Transaction transaction = session.beginTransaction();
Query query = session.createQuery("select new com.shore.model.SubEmployee(name,sex,salary) from Employee");
System.out.println(query.list());
transaction.commit();
/** testListSubFieldsToObj()运行结果:
* [SubEmployee [name=张三, sex=true, salary=5999.0], SubEmployee [name=李四, sex=true, salary=5999.0], SubEmployee [name=王五, sex=true, salary=5999.0], SubEmployee [name=赵六, sex=true, salary=5999.0], SubEmployee [name=田七, sex=true, salary=5999.0]]
*/
} /**
* hql: 4 、条件查询
* 4.1、条件查询之占位符(?)
*/
@Test
public void testListByConditions1() {
session = sessionFactory.openSession();
Transaction transaction = session.beginTransaction();
Query query = session.createQuery("select new com.shore.model.SubEmployee(name,sex,salary) " +
"from Employee where department_id=?"); //用department_id或department都是可以的
//query.setParameter(0, 1);//或者下面的setInteger(0, 1)方法也行
query.setInteger(0, 1); //类似于JDBC中的 PreparedStatement
System.out.println(query.list());
transaction.commit();
/** testListByConditions1()运行结果:
* [SubEmployee [name=张三, sex=true, salary=5999.0], SubEmployee [name=王五, sex=true, salary=5999.0], SubEmployee [name=赵六, sex=true, salary=5999.0]]
*/
} /**
* hql: 4.2、条件查询之命名参数(:)
*/
@Test
public void testListByConditions2() {
session = sessionFactory.openSession();
Transaction transaction = session.beginTransaction();
Query query = session.createQuery("select new com.shore.model.SubEmployee(name,sex,salary) " +
"from Employee where department_id=:deptID");
query.setParameter("deptID", 1);
System.out.println(query.list());
transaction.commit();
/** testListByConditions2()运行结果:
* [SubEmployee [name=张三, sex=true, salary=5999.0], SubEmployee [name=王五, sex=true, salary=5999.0], SubEmployee [name=赵六, sex=true, salary=5999.0]]
*/
} /**
* hql: 4.3、条件查询之范围查询
* between 1 and 10 []闭区间 mysql 1<=x<=10
*/
@Test
public void testListByConditions3() {
session = sessionFactory.openSession();
Transaction transaction = session.beginTransaction();
Query query = session.createQuery("select new com.shore.model.SubEmployee(name,sex,salary) " +
"from Employee where department_id between :d1 and :d2");
query.setParameter("d1", 1); //也可以用占位符?实现
query.setParameter("d2", 2);
System.out.println(query.list());
transaction.commit();
/** testListByConditions3()运行结果:
* [SubEmployee [name=张三, sex=true, salary=5999.0], SubEmployee [name=王五, sex=true, salary=5999.0], SubEmployee [name=赵六, sex=true, salary=5999.0]]
*/
} /**
* hql: 4.4、条件查询之模糊查询 like
*/
@Test
public void testListByConditions4() {
session = sessionFactory.openSession();
Transaction transaction = session.beginTransaction();
Query query = session.createQuery("select new com.shore.model.SubEmployee(name,sex,salary) " +
"from Employee where name like ?");
query.setParameter(0, "%三%");
System.out.println(query.list());
transaction.commit();
/** testListByConditions4()运行结果:
* [SubEmployee [name=张三, sex=true, salary=5999.0]]
*/
} /**
* hql: 5、聚合函数统计
*/
@Test
public void testListByCount() {
session = sessionFactory.openSession();
Transaction transaction = session.beginTransaction();
Query query = session.createQuery("select count(*) " +
"from Employee where name like ?");
query.setParameter(0, "%三%");
System.out.println(query.list());
transaction.commit();
/** testListByCount()运行结果:
* [1]
*/
} /**
* hql: 6、分组查询group by
*/
@Test
public void testListByDept() {
session = sessionFactory.openSession();
Transaction transaction = session.beginTransaction();
Query query = session.createQuery("select department,count(*) " +
"from Employee group by department_id");
System.out.println(query.list());
transaction.commit();
/** testListByDept()运行结果:
* [[Ljava.lang.Object;@3b35b1f3, [Ljava.lang.Object;@4235e6e3]
*/
} /**
* hql: 7、连接查询
* 7.1、内连接
*/
@Test
public void testListByInnerJoin() {
session = sessionFactory.openSession();
Transaction transaction = session.beginTransaction();
Query query = session.createQuery("from Employee e inner join e.department");
System.out.println(query.list());
transaction.commit();
/**
* 运行结果:
* [[Ljava.lang.Object;@60c9630a, [Ljava.lang.Object;@4585572a, [Ljava.lang.Object;@351daa0e, [Ljava.lang.Object;@2e879860, [Ljava.lang.Object;@4824de7d]
*/
} /**
* 7.2、左连接
*/
@Test
public void testListByLeftJoin() {
session = sessionFactory.openSession();
Transaction transaction = session.beginTransaction();
Query query = session.createQuery("from Employee e left join e.department");
System.out.println(query.list());
transaction.commit();
/**
* 运行结果:
* [[Ljava.lang.Object;@5d15126e, [Ljava.lang.Object;@126d2380, [Ljava.lang.Object;@3b35b1f3, [Ljava.lang.Object;@4235e6e3, [Ljava.lang.Object;@60c9630a]
*/
} /**
* 7.3、右连接
*/
@Test
public void testListByRightJoin() {
session = sessionFactory.openSession();
Transaction transaction = session.beginTransaction();
Query query = session.createQuery("from Employee e right join e.department");
System.out.println(query.list());
transaction.commit();
/**
* 运行结果:
* [[Ljava.lang.Object;@4235e6e3, [Ljava.lang.Object;@60c9630a, [Ljava.lang.Object;@4585572a, [Ljava.lang.Object;@351daa0e, [Ljava.lang.Object;@2e879860]
*/
}
}
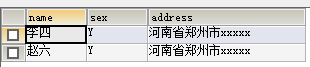
数据库表的原数据图:
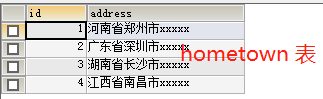
 SELECT

     a.name,a.sex,b.address

 FROM

    (SELECT NAME,sex,homeId FROM employee WHERE homeId=1) a

 LEFT JOIN

    (SELECT id,address FROM hometown WHERE id = 1) b

 ON

    a.homeId = b.id; --MySQL语言 左连接查询
结果图:
|
原创作者:DSHORE 作者主页:http://www.cnblogs.com/dshore123/ 原文出自:https://www.cnblogs.com/dshore123/p/11588358.html 欢迎转载,转载务必说明出处。(如果本文对您有帮助,可以点击一下右下角的 推荐,或评论,谢谢!) |
Java进阶知识13 Hibernate查询语言(HQL),本文以hibernate注解版为例讲解的更多相关文章
- Hibernate学习-Hibernate查询语言HQL
HQL(Hibernate Query Language)Hibernate查询语言,语法类似于SQL,可以直接使用实体类及属性. 使用HQL 可以避免使用JDBC 查询的一些弊端 不需要再编写繁复的 ...
- Java进阶知识25 Spring与Hibernate整合到一起
1.概述 1.1.Spring与Hibernate整合关键点 1) Hibernate的SessionFactory对象交给Spring创建. 2) hibernate事务交给spring的声明 ...
- Java进阶知识12 Hibernate多对多双向关联(Annotation+XML实现)
1.Annotation 注解版 1.1.应用场景(Student-Teacher):当学生知道有哪些老师教,老师也知道自己教哪些学生时,可用双向关联 1.2.创建Teacher类和Student类 ...
- Java进阶知识11 Hibernate多对多单向关联(Annotation+XML实现)
1.Annotation 注解版 1.1.应用场景(Student-Teacher):当学生知道有哪些老师教,但是老师不知道自己教哪些学生时,可用单向关联 1.2.创建Teacher类和Student ...
- Java进阶知识10 Hibernate一对多_多对一双向关联(Annotation+XML实现)
本文知识点(目录): 1.Annotation 注解版(只是测试建表) 2.XML版 的实现(只是测试建表) 3.附录(Annotation 注解版CRUD操作)[注解版有个问题:插入值时 ...
- Java进阶知识09 Hibernate一对多单向关联(Annotation+XML实现)
1.Annotation 注解版 1.1.在一的一方加Set 1.2.创建Customer类和Order类 package com.shore.model; import java.util.Hash ...
- Java进阶知识08 Hibernate多对一单向关联(Annotation+XML实现)
1.Annotation 注解版 1.1.在多的一方加外键 1.2.创建Customer类和Order类 package com.shore.model; import javax.persisten ...
- Java进阶知识07 Hibernate一对一双向外键关联(Annotation+XML实现)
1.Annotation 注解版 1.1.创建Husband类和Wife类 package com.shore.model; import javax.persistence.Entity; impo ...
- Java进阶知识06 Hibernate一对一单向外键关联(Annotation+XML实现)
1.Annotation 注解版 1.1.创建Husband类和Wife类 package com.shore.model; import javax.persistence.Entity; impo ...
随机推荐
- DP_Milking Time
Bessie is such a hard-working cow. In fact, she is so focused on maximizing her productivity that sh ...
- PostgreSQL练习3
select dname,count(ename),avg(sal),sum(sal) from emp e,dept d where e.deptno=d.deptno group by dname ...
- C++ STL String学习 (待续)
头文件:<string> 字符串类初始化: string s1="aabbba"; s2=string("bbb"); string s3=stri ...
- python以不同方式打印输出九九乘法表
参考:http://www.cnblogs.com/suiy-160428/p/5594389.htmlpython输出 9*9 乘法口诀表 矩形输出九九乘法表: for i in range(1,1 ...
- Kali Linux安装AWVS漏扫工具
Acunetix是全球排名前三的漏洞发现厂商,其全称(Acunetix Web Vulnerability Scanner)AWVS是业内领先的网络漏洞扫描器,其被广泛赞誉为包括最先进的SQL注入和X ...
- Web文件上传靶场 - 通关笔记
Web应用程序通常会提供一些上传功能,比如上传头像,图片资源等,只要与资源传输有关的地方就可能存在上传漏洞,上传漏洞归根结底是程序员在对用户文件上传时控制不足或者是处理的缺陷导致的,文件上传漏洞在渗透 ...
- NodeJS express框架的使用
首先,可以通过npm或者淘宝镜像cnpm全局安装epress框架,这里不具体说了 npm install -g expressnpm install -g express-generator 新建一个 ...
- js-回文数
回文数 设n是一任意自然数.若将n的各位数字反向排列所得自然数n1与n相等,则称n为一回文数. //回文数 let readline = require("readline-sync&quo ...
- Java基础加强-内部类及代理
/*内部类是一个编译时的概念,*/ 常规内部类.静态内部类.局部内部类.匿名内部类 1.常规内部类(常规内部类没有static修饰且定义在外部类类体中) 1.常规内部类中的方法可以直接使用外部类的实例 ...
- 网页接入dingding扫码登录
前言 有时候我们做了一些网页,希望只有某些人才能看的话,可以搞一个钉钉扫码登录,接入也比较简单,下面记录下接入的过程. 流程 我们先看看官方的文档:钉钉接入文档梳理一下官方的流程:1.先跳去一个扫码网 ...