openstack的glance、nova、cinder使用ceph做后端存储
块设备与 OPENSTACK
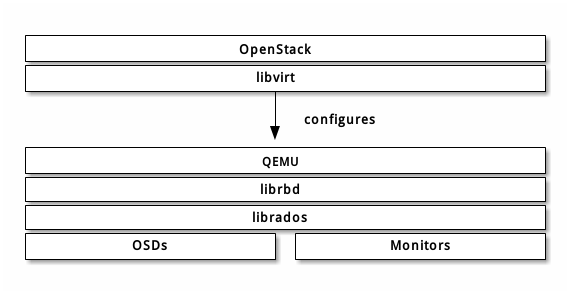
- 通过 libvirt 你可以把 Ceph 块设备用于 OpenStack ,它配置了 QEMU 到 librbd 的接口。 Ceph 把块设备映像条带化为对象并分布到集群中,这意味着大容量的 Ceph 块设备映像其性能会比独立服务器更好。
要把 Ceph 块设备用于 OpenStack ,必须先安装 QEMU 、 libvirt 和 OpenStack 。我们建议用一台独立的物理主机安装 OpenStack ,此主机最少需 8GB 内存和一个 4 核 CPU 。下面的图表描述了 OpenStack/Ceph 技术栈。
OpenStack 里有三个地方可以和 Ceph 块设备结合:
- Images: OpenStack 的 Glance 管理着 VM 的 image 。Image 相对恒定, OpenStack 把它们当作二进制文件、并以此格式下载。
- Volumes: Volume 是块设备, OpenStack 用它们引导虚拟机、或挂载到运行中的虚拟机上。 OpenStack 用 Cinder 服务管理 Volumes 。
- Guest Disks: Guest disks 是装有客户操作系统的磁盘。默认情况下,启动一台虚拟机时,它的系统盘表现为 hypervisor 文件系统的一个文件(通常位于 /var/lib/nova/instances//)。
前期配置
1.创建存储池
ceph osd pool create volumes 128

ceph osd pool create images 128

ceph osd pool create backups 128

ceph osd pool create vms 128
2.安装ceph客户端包
在运行着glance-api 、 cinder-volume 、 nova-compute 或 cinder-backup 的主机上进行安装
yum -y install python-rbd ceph
3.生成ceph配置文件
在ceph存储的管理节点上,将配置文件同步到ceph客户端
ssh {your-openstack-server} sudo tee /etc/ceph/ceph.conf </etc/ceph/ceph.conf
4.配置ceph客户端认证
如果ceph启用了客户端认证,则需要为 Nova/Cinder 和 Glance 创建新用户
ceph auth get-or-create client.cinder mon 'allow r' osd 'allow class-read object_prefix rbd_children, allow rwx pool=volumes, allow rwx pool=vms, allow rx pool=images'

ceph auth get-or-create client.glance mon 'allow r' osd 'allow class-read object_prefix rbd_children, allow rwx pool=images'

ceph auth get-or-create client.cinder-backup mon 'allow r' osd 'allow class-read object_prefix rbd_children, allow rwx pool=backups'
把 client.cinder 、 client.glance 和 client.cinder-backup 的密钥环复制到适当的节点,并更改所有权
ceph auth get-or-create client.glance | ssh {your-glance-api-server} sudo tee /etc/ceph/ceph.client.glance.keyring

ssh {your-glance-api-server} sudo chown glance:glance /etc/ceph/ceph.client.glance.keyring

ceph auth get-or-create client.cinder | ssh {your-volume-server} sudo tee /etc/ceph/ceph.client.cinder.keyring

ssh {your-cinder-volume-server} sudo chown cinder:cinder /etc/ceph/ceph.client.cinder.keyring

ceph auth get-or-create client.cinder-backup | ssh {your-cinder-backup-server} sudo tee /etc/ceph/ceph.client.cinder-backup.keyring

ssh {your-cinder-backup-server} sudo chown cinder:cinder /etc/ceph/ceph.client.cinder-backup.keyring
运行 nova-compute 的节点,其进程需要密钥环文件
ceph auth get-or-create client.cinder | ssh {your-nova-compute-server} sudo tee /etc/ceph/ceph.client.cinder.key
还得把 client.cinder 用户的密钥存进 libvirt 。 libvirt 进程从 Cinder 挂载块设备时要用它访问集群。
在运行 nova-compute 的节点上创建一个密钥的临时副本:
ceph auth get-key client.cinder | ssh {your-compute-node} tee client.cinder.key
然后,在计算节点上把密钥加进 libvirt 、然后删除临时副本:
uuidgen

457eb676-33da-42ec-9a8c-9293d545c337

cat > secret.xml <<EOF

<secret ephemeral='no' private='no'>

  <uuid>457eb676-33da-42ec-9a8c-9293d545c337</uuid>

  <usage type='ceph'>

        <name>client.cinder secret</name>

  </usage>

</secret>

EOF

sudo virsh secret-define --file secret.xml

Secret 457eb676-33da-42ec-9a8c-9293d545c337 created

sudo virsh secret-set-value --secret 457eb676-33da-42ec-9a8c-9293d545c337 --base64 $(cat client.cinder.key) && rm client.cinder.key secret.xml
保留密钥的 uuid ,稍后配置 nova-compute 时要用。
配置 OPENSTACK 使用 CEPH
配置glance
编辑/etc/glance/glance-api.conf
修改glance_store的section内容:
[glance_store]

stores = rbd

default_store = rbd

rbd_store_pool = images

rbd_store_user = glance

rbd_store_ceph_conf = /etc/ceph/ceph.conf

rbd_store_chunk_size = 8
如果你想允许使用 image 的写时复制克隆,再添加下列内容到 [DEFAULT] 段下
show_image_direct_url = True
重启glance API服务,并测试
systemctl restart openstack-glance-api.service  openstack-glance-registry.service

source admin-openrc.sh

glance image-create --name "centos6_ceph" --file /root/centos6.5-cloud.qcow2 --disk-format qcow2 --container-format bare   --visibility public --progress

openstack  image list
配置cinder
OpenStack 需要一个驱动和 Ceph 块设备交互。还得指定块设备所在的存储池名。编辑 OpenStack 节点上的 /etc/cinder/cinder.conf ,添加如下内容
[DEFAULT]

enabled_backends = ceph

[ceph]

volume_driver = cinder.volume.drivers.rbd.RBDDriver

rbd_pool = volumes

rbd_ceph_conf = /etc/ceph/ceph.conf

rbd_flatten_volume_from_snapshot = false

rbd_max_clone_depth = 5

rbd_store_chunk_size = 4

rados_connect_timeout = -1

glance_api_version = 2

rbd_user = cinder

rbd_secret_uuid = 43f7430d-cce0-46eb-a0fc-a593e27878c2
配置cinder backup
backup_driver = cinder.backup.drivers.ceph

backup_ceph_conf = /etc/ceph/ceph.conf

backup_ceph_user = cinder-backup

backup_ceph_chunk_size = 134217728

backup_ceph_pool = backups

backup_ceph_stripe_unit = 0

backup_ceph_stripe_count = 0

restore_discard_excess_bytes = true
重启cinder-volume服务
systemctl restart openstack-cinder-volume.service
在cinder管理节点查看:
[root@controller ~]# cinder-manage service list

Binary           Host                                 Zone             Status     State Updated At

cinder-scheduler controller                           nova             enabled    :-)   2016-09-19 12:44:50

cinder-volume    compute2@ceph                        nova             enabled    :-)   2016-09-19 12:44:49

cinder-volume    compute1@ceph                        nova             enabled    :-)   2016-09-19 12:44:49
配置nova
编辑所有计算节点上的 /etc/nova/nova.conf 文件,添加如下内容:
libvirt_images_type = rbd

libvirt_images_rbd_pool = vms

libvirt_images_rbd_ceph_conf = /etc/ceph/ceph.conf

libvirt_disk_cachemodes="network=writeback"

rbd_user = cinder

rbd_secret_uuid =43f7430d-cce0-46eb-a0fc-a593e27878c2

live_migration_flag="VIR_MIGRATE_UNDEFINE_SOURCE,VIR_MIGRATE_PEER2PEER,VIR_MIGRATE_LIVE,VIR_MIGRATE_PERSIST_DEST,VIR_MIGRATE_TUNNELLED"
注意修改rbd_secret_uuid 为你自己实际的id
最后重启nova-compute服务
systemctl restart openstack-nova-compute.service
问题汇总:
1.遇到删除云硬盘处于deleteing中,
经查询/var/log/cinder/volume.log日志发现提示一条[Errno 13] Permission denied: '/var/lock/cinder',于是在/var/lock目录下创建cinder目录,并赋予权限,重启cinder相关服务即可删掉。
2.从ceph启动虚拟机做磁盘影射时报错:
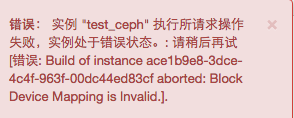
经检查发现cinder api 和volumes 之间已经断开通信,重启n遍也不行,最后发现时间同步,同步好时间之后,已可以
故障时:

修复后:

openstack的glance、nova、cinder使用ceph做后端存储的更多相关文章
- 配置nova服务使用ceph作为后端存储
在ceph监视器上执行 1.创建pool池 为nova服务创建pool池(因为我只有一个OSD节点,所以要将副本数设置为1) ceph osd pool create nova-vms 32 ceph ...
- 配置cinder-backup服务使用ceph作为后端存储
在ceph监视器上执行 CINDER_PASSWD='cinder1234!'controllerHost='controller'RABBIT_PASSWD='0penstackRMQ' 1.创建p ...
- 配置cinder-volume服务使用ceph作为后端存储
在ceph监视器上执行 CINDER_PASSWD='cinder1234!'controllerHost='controller'RABBIT_PASSWD='0penstackRMQ' 1.创建p ...
- 配置glance使用ceph作为后端存储
在ceph监视器上执行 1.创建pool池 为glance服务创建pool池(因为我只有一个OSD节点,所以要将副本数设置为1) ceph osd pool create glance-images ...
- k8s使用ceph作为后端存储挂载
一.在ceph集群上操作: 1.创建池(主要使用存储类来进行持久卷的挂载,其他的挂载方式不好使也太麻烦):ceph osd pool create k8s 64 二.在k8s上操作: 1.安装客户端( ...
- [k8s]k8s配置nfs做后端存储&配置多nginx共享存储&&statefulset配置
所有节点安装nfs yum install nfs-utils rpcbind -y mkdir -p /ifs/kubernetes echo "/ifs/kubernetes 192.1 ...
- 配置Ceph集群为OpenStack后端存储
配置Ceph存储为OpenStack的后端存储 1 前期配置 Ceph官网提供的配置Ceph块存储为OpenStack后端存储的文档说明链接地址:http://docs.ceph.com/docs/ ...
- Openstack使用NFS作为后端存储
续:Openstack块存储cinder安装配置 接上使用ISCSI作为后端存储,使用NFS作为后端存储配置 参考官方文档:https://wiki.openstack.org/wiki/How_to ...
- 高可用OpenStack(Queen版)集群-15.Glance&Cinder集成Ceph
参考文档: Install-guide:https://docs.openstack.org/install-guide/ OpenStack High Availability Guide:http ...
随机推荐
- js获取checkbox值的方法
js获取checkbox值的方法.分享给大家供大家参考.具体实现方法如下:<html> <head> <meta http-equiv="Content-Typ ...
- 风雪之隅(Laruence PHP开发组成员, Zend兼职顾问, Yaf, Yar, Yac, Opcache等项目作者、维护者.)
http://www.laruence.com/?from=inf&wvr=5&loc=infblog
- Java并发编程()阻塞队列和生产者-消费者模式
阻塞队列提供了可阻塞的put和take方法,以及支持定时的offer和poll方法.如果队列已经满了,那么put方法将阻塞直到有空间可用:如果队列为空,那么take方法将会阻塞直到有元素可用.队列可以 ...
- openwrt内核配置选项添加
摘自:http://blog.csdn.net/weiniliuchao/article/details/50295527 增加内核配置选项 openwrt的.config文件中,关于内核的选项都是形 ...
- 经典SQL回顾之晋级篇
上篇博文在说SQL基础的时候,有一个地方有点误导大家,文中说到SQL 中的substring()和C#中的substring()相同,这有点歧义.基本原理虽然相同,但是有一点很不一样,就是C#中索引是 ...
- namp命令详解
我将用两个不同的部分来涵盖大部分NMAP的使用方法,这是nmap关键的第一部分.在下面的设置中,我使用两台已关闭防火墙的服务器来测试Nmap命令的工作情况. 192.168.0.100 – serve ...
- 在Ubuntu中安装PHP,MySQL,Nginx和phpMyAdmin
apt install php apt-get install php7.0 apt-get -y install php7.0-fpm 缺少 mysqli 扩展.请检查 PHP 配置. apt in ...
- Node.js连接postgres
一.下载Node.js postgres驱动 Node.js里面没有postgres模块的,我们需要安装node-postgres模块. node-postgres模块的下载地址为:https://g ...
- 关于jsp,javascript,php等语言
技术一 jsp: java植入html 技术二 javascript(js)植入html 技术三早期php植入html 弱类型语言和强类型语言 弱类型语言无法实现函数重载,没办法
- 中国餐馆过程(Chinese restaurant process)
也就是说假设空桌子有a0个人,然后顾客选择桌子的概率和桌子上人数成正比. 性质: 改变用户的排列方式,桌子的排列方式,概率不变换.