
分享知识-快乐自己:FastDFS 图片服务器的搭建
使用一台虚拟机来模拟,只有一个Tracker、一个Storage服务,配置nginx访问图片。
1):安装依赖包
yum -y install zlib zlib-devel pcre pcre-devel gcc gcc-c++ openssl openssl-devel libevent libevent-devel perl unzip net-tools wget
2):软件包下载 已经提供好的软件包点我下载
或者
使用以下命令下载:
//默认下载到当前目录

wget https://github.com/happyfish100/libfastcommon/archive/V1.0.7.tar.gz

wget https://github.com/happyfish100/fastdfs/archive/V5.05.tar.gz

wget http://jaist.dl.sourceforge.net/project/fastdfs/FastDFS%20Nginx%20Module%20Source%20Code/fastdfs-nginx-module_v1.16.tar.gz

wget http://openresty.org/download/ngx_openresty-1.7.10.1.tar.gz

//这里我们下载目录为 /opt/tools/fastdfsTools 创建工具文件夹 mkdir -p /opt/tools/fastdfsTools

//解压目录为 /opt/fastdfs  创建解压目录 mkdir /opt/fastdfs/
3):安装libfastcommon-1.0.7
解压到指定目录:
[root@admin fastdfsTools]# tar -zxvf V1.0.7.tar.gz -C /opt/fastdfs/
切换到 libfastcommon-1.0.7 目录:
[root@admin opt]# cd /opt/fastdfs/libfastcommon-1.0.7
编译安装:
[root@admin libfastcommon-1.0.7]# ./make.sh

[root@admin libfastcommon-1.0.7]# ./make.sh install
4):安装Tracker服务
解压到指定目录:
[root@admin fastdfsTools]# tar -zxvf V5.05.tar.gz -C ../../fastdfs/
切换到 fastdfs-5.05 目录:
[root@admin fastdfsTools]# cd /opt/fastdfs/fastdfs-5.05/
编译安装:
[root@admin fastdfs-5.05]# ./make.sh

[root@admin fastdfs-5.05]# ./make.sh install
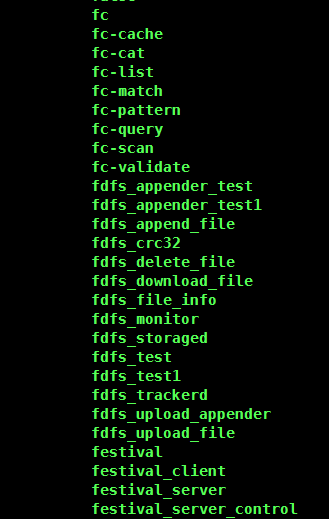
安装之后会在/usr/bin目录下看到fdfs开头的文件。
5):创建文件夹(用于存放后期生成的信息)
//切换到解压文件夹的根目录

cd /opt/fastdfs

//创建文件夹

mkdir -p data/fdfs/

mkdir -p data/nginx

mkdir -p data/nginx/logs

//这里有个坑后期指定 /opt/fastdfs/data/nginx/logs 的时候不会在文件夹下创建日志文件。所以这里事先创建好,并授予访问权限

chmod 777 /opt/fastdfs/data/nginx/logs/touch /opt/fastdfs/data/nginx/logs/log.log
拷贝配置文件:
cp /etc/fdfs/tracker.conf.sample /etc/fdfs/tracker.conf

cp /etc/fdfs/storage.conf.sample /etc/fdfs/storage.conf

cp /etc/fdfs/client.conf.sample /etc/fdfs/client.conf
配置tracker服务:修改 /etc/fdfs/tracker.conf 文件:
vim /etc/fdfs/tracker.conf
修改内容:
日志文件路径为/opt/fastdfs/data/fdfs

执行权限:root

base_path=/opt/fastdfs/data/fdfs

run_by_group=root

run_by_user=root
启动tracker:
/usr/bin/fdfs_trackerd /etc/fdfs/tracker.conf start

可以查看是否启动: ps aux|grep tracker
6):安装storage服务
修改/etc/fdfs/storage.conf文件:
vim /etc/fdfs/storage.conf
修改内容:
组名

执行权限

日志文件存储路径

tracker服务器地址

存储文件路径

group_name=group1

run_by_group=root

run_by_user=root

base_path=/opt/fastdfs/data/fdfs

tracker_server=192.168.31.202:22122

store_path0=/opt/fastdfs/data/fdfs
启动storage:
/usr/bin/fdfs_storaged /etc/fdfs/storage.conf start

//可以查看是否启动: ps aux|grep storage
7):配置storage测试
修改配置文件 /etc/fdfs/client.conf 文件:
vim /etc/fdfs/client.conf
修改内容:
日志文件存储路径

tracker服务器地址


base_path=/opt/fastdfs/data/fdfs

tracker_server=192.168.31.202:22122
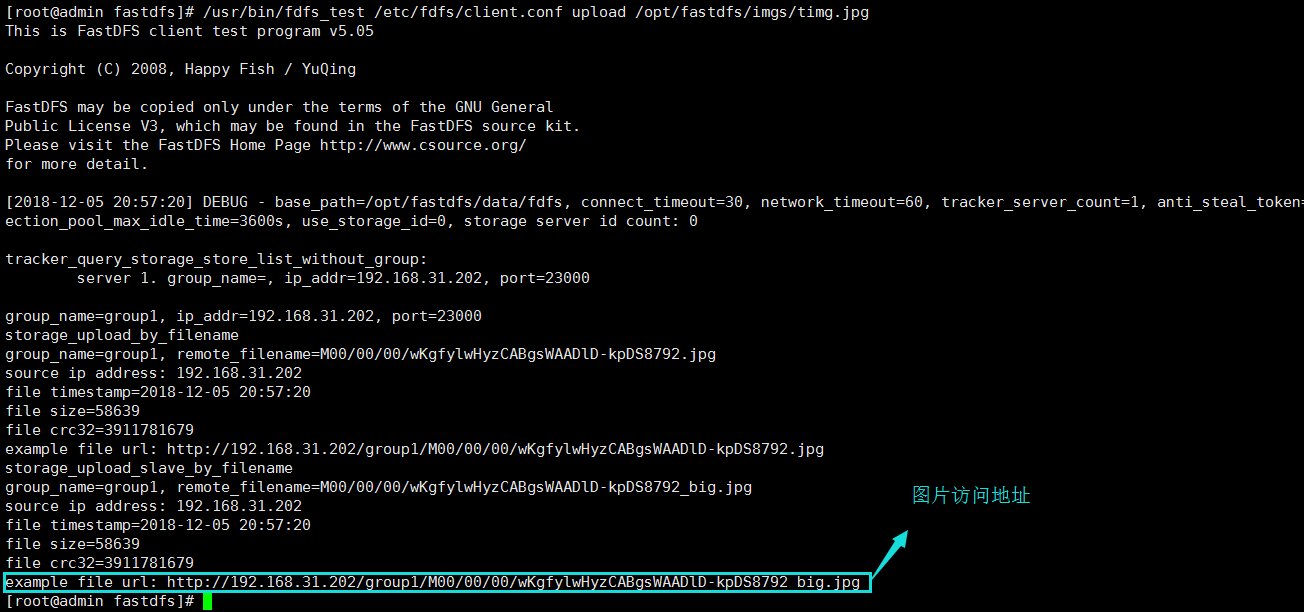
本地测试上传:
首先在 /opt/fastdfs/imgs 下放上 timg.jpg 这张图片

上传图片:

/usr/bin/fdfs_test /etc/fdfs/client.conf upload /opt/fastdfs/imgs/timg.jpg
8):搭建nginx_openresty
解压 fastdfs-nginx-module_v1.16.tar.gz 到指定目录:
[root@admin tools]# cd /opt/tools/fastdfsTools/

[root@admin fastdfsTools]# tar -zxvf fastdfs-nginx-module_v1.16.tar.gz -C ../../fastdfs/
切换到解压目录:
[root@admin fastdfs-nginx-module]# cd /opt/fastdfs/fastdfs-nginx-module/src/

[root@admin src]# vim config

 把其中的local去掉(总共有3个)

安装nginx_openresty包:
解压 ngx_openresty-1.7.10.1.tar.gz 到指定目录:
[root@admin tools]# cd /opt/tools/fastdfsTools/

[root@admin fastdfsTools]# tar -zxvf ngx_openresty-1.7.10.1.tar.gz -C ../../fastdfs/
切换目录:
[root@admin ngx_openresty-1.7.10.1]# cd /opt/fastdfs/ngx_openresty-1.7.10.1/
编译安装:
./configure --with-luajit --with-http_stub_status_module --with-http_ssl_module --with-http_realip_module --add-module=../fastdfs-nginx-module/src


gmake

gmake install
说明:
--with*** 安装一些内置/集成的模块
--with-http_realip_module 取用户真实ip模块
-with-pcre Perl兼容的达式模块
--with-luajit 集成luajit模块
--add-module 添加自定义的第三方模块,如此次的fastdfs-nginx-module
配置 mode_fastdfs.conf :
将mode_fastdfs.conf复制到/etc/fdfs目录下

cp /opt/fastdfs/fastdfs-nginx-module/src/mod_fastdfs.conf /etc/fdfs/
编辑配置文件:
vim /etc/fdfs/mod_fastdfs.conf
修改内容:这里注意要将[group1]下面的内容解放:
base_path=/opt/fastdfs/data/nginx

tracker_server=192.168.31.202:22122

group_name=group1

store_path0=/opt/fastdfs/data/fdfs

url_have_group_name = true

log_filename=/opt/fastdfs/data/nginx/logs/log.log

group_count =1

# group settings for group #1

# since v1.14

# when support multi-group, uncomment following section

[group1]

group_name=group1

storage_server_port=23000

store_path_count=1

store_path0=/opt/fastdfs/data/fdfs

#store_path1=/home/yuqing/fastdfs1
复制 http.conf 和 mime.types 文件到 /etc/fdfd/ :
[root@admin ngx_openresty-1.7.10.1]# cd /opt/fastdfs/fastdfs-5.05/conf

cp http.conf mime.types /etc/fdfs/
创建软连接:
ln -s /opt/fastdfs/data/fdfs/data /opt/fastdfs/data/fdfs/data/M00
编辑配置文件:
vim /usr/local/openresty/nginx/conf/nginx.conf
#user  nobody;

worker_processes  1;

error_log  logs/error.log;

#error_log  logs/error.log  notice;

#error_log  logs/error.log  info;

#pid        logs/nginx.pid;

events {

    worker_connections  1024;

}

http {

    include       mime.types;

    default_type  application/octet-stream;

    log_format  main  '$remote_addr - $remote_user [$time_local] "$request" '

                      '$status $body_bytes_sent "$http_referer" '

                      '"$http_user_agent" "$http_x_forwarded_for"';

    #access_log  logs/access.log  main;

    sendfile        on;

    #tcp_nopush     on;

    #keepalive_timeout  0;

    keepalive_timeout  65;

    #gzip  on;

    server {

        listen       80;

        server_name  localhost;

        charset utf-8;

        #access_log  logs/host.access.log  main;

       # location / {

       #     root   html;

       #     index  index.html index.htm;

       # }

        location ~ /group[0-9]/M00 {

            root  /opt/fastdfs/data/fdfs/data;

            ngx_fastdfs_module;

        }

        #error_page  404              /404.html;

        # redirect server error pages to the static page /50x.html

        #

        error_page   500 502 503 504  /50x.html;

        location = /50x.html {

            root   html;

        }

        # proxy the PHP scripts to Apache listening on 127.0.0.1:80

        #

        #location ~ \.php$ {

        #    proxy_pass   http://127.0.0.1;

        #}

        # pass the PHP scripts to FastCGI server listening on 127.0.0.1:9000

        #

        #location ~ \.php$ {

        #    root           html;

        #    fastcgi_pass   127.0.0.1:9000;

        #    fastcgi_index  index.php;

        #    fastcgi_param  SCRIPT_FILENAME  /scripts$fastcgi_script_name;

        #    include        fastcgi_params;

        #}

        # deny access to .htaccess files, if Apache's document root

        # concurs with nginx's one

        #

        #location ~ /\.ht {

        #    deny  all;

        #}

    }

    # another virtual host using mix of IP-, name-, and port-based configuration

    #

    #server {

    #    listen       8000;

    #    listen       somename:8080;

    #    server_name  somename  alias  another.alias;

    #    location / {

    #        root   html;

    #        index  index.html index.htm;

    #    }

    #}

    # HTTPS server

    #

    #server {

    #    listen       443 ssl;

    #    server_name  localhost;

    #    ssl_certificate      cert.pem;

    #    ssl_certificate_key  cert.key;

    #    ssl_session_cache    shared:SSL:1m;

    #    ssl_session_timeout  5m;

    #    ssl_ciphers  HIGH:!aNULL:!MD5;

    #    ssl_prefer_server_ciphers  on;

    #    location / {

    #        root   html;

    #        index  index.html index.htm;

    #    }

    #}

}
启动 Nginx 服务:
/usr/local/openresty/nginx/sbin/nginx
注意:
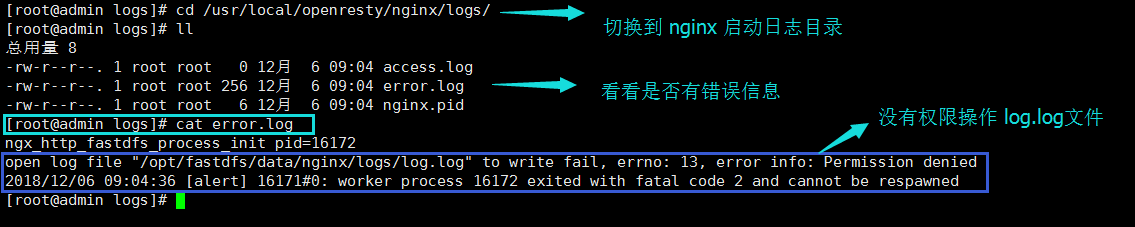
进行授权:
[root@admin logs]# chmod 777 /opt/fastdfs/data/nginx/logs/log.log

//重新启动
[root@admin logs]# /usr/local/openresty/nginx/sbin/nginx -s reopen
9):配置FastDFS开机自启
开机启动需要启动 fastdfs 和 nginx 在centos中,在/etc/rc.local文件中,就是配置开机启动项的。
我们在这个文件中添加下面的配置:我们在这个文件中添加下面的配置:
cd /etc

vim rc.local

/usr/bin/fdfs_trackerd /etc/fdfs/tracker.conf restart

/usr/bin/fdfs_storaged /etc/fdfs/storage.conf restart

/usr/local/openresty/nginx/sbin/nginx
这次在浏览器的地址栏中输入一下网址,就可以看到我们上传的图片了。


启动关闭命令:
/usr/bin/fdfs_trackerd /etc/fdfs/tracker.conf stop || start

/usr/bin/fdfs_storaged /etc/fdfs/storage.conf stop  ||  start

/usr/local/openresty/nginx/sbin/nginx -s stop  ||  start
分享知识-快乐自己:FastDFS 图片服务器的搭建的更多相关文章
- java连接Fastdfs图片服务器上传失败的解决方法
照着视频上做,但是却连接不了虚拟机linux上的图片服务器,估计是linux防火墙的问题(这个实在是神烦,前面有好几次连接不了都是因为linux防火墙),果不其然,关闭即可. Linux关闭防火墙的命 ...
- FastDFS图片服务器搭建
*FastDFS图片服务器搭建准备:1.需要libfastcommon安装包 选择最新稳定版(libfastcommon-1.0.36.tar.gz)2.需要FastDFS安装包 选择最新稳定版(fa ...
- FastDFS图片服务器(分布式文件系统)学习。
参考:https://blog.csdn.net/hiqingtian/article/details/79413471 https://blog.csdn.net/sinat_40399893/ar ...
- [转帖]FastDFS图片服务器单机安装步骤
FastDFS图片服务器单机安装步骤 https://www.cnblogs.com/yuesf/p/11847103.html 前面已经讲 一张图秒懂微服务的网络架构,通过此文章可以了解FastDF ...
- Nginx 独立图片服务器的搭建
为什么需要独立图片服务器? 如果你留心的话,可以发现,现在主流的网站都是有单独的图片服务器的,例如,人人网的为rrimg,淘宝的为taobaocdn,下面还有很多的二级域名. 独立的图片服务器有诸多好 ...
- fastdfs 图片服务器 使用java端作为客户端上传图片
之前有说道搭建fastdfs作为图片服务器,但是没有说明如何真正在代码里调用,那么今天大致讲一下,如何使用java客户端进行上传 首先你得要有一个客户端,导入到eclipse中即可 git地址如下: ...
- 【图片服务器】搭建Nginx图片服务器
一.安装Nginx 二.安装vsftpd 三.开始搭建Nginx图片服务器 1.效果 例如:图片通过ftp服务上传到/home/ftpuser/www/images目录下,我想通过访问Nginx服务器 ...
- FastDFS图片服务器java后台的简单调用
工具类: package com.liveyc.common.fdfs; import org.apache.commons.io.FilenameUtils; import org.csource. ...
- 分享知识-快乐自己:redis集群搭建
Redis介绍: 1.开源的NoSql数据库 2.C语言编写 3.基于内存运行,并且支持持久化 4.Key value存储 5.是主流的Nosql数据库之一 Redis优点: 1.内存使用方面,表现优 ...
随机推荐
- 通过google地图的webservice根据城市名称获取经纬度
谷歌Geocoding webservice接口获取经纬度信息,由于获取地点的数量级太大,2000多条记录,从response的xml格式中取出该地点的经纬度信息.google有访问限制,如果超出25 ...
- 图像处理之基础---傅立叶c实现
http://blog.csdn.net/lzhq28/article/details/7847047 http://blog.csdn.net/lishizelibin/article/detail ...
- unity中动态生成网格
以下是绘制正方形面片的一个例子,方便之后查阅: 效果如图所示: 红轴为x方向,蓝轴为z方向. 代码如下: using System.Collections; using System.Collecti ...
- Unity3D研究院之在开始学习拓展编辑器
Unity拥有非常丰富的拓展编辑器接口,如果是在网上下载过别人写的插件,你会发现为什么它的监测面板视图和普通的不一样?其实是他通过代码自己绘制的监测面板,这篇博文MOMO带大家来学习编辑器.如下图所示 ...
- 写出完美的snprintf
平时公司的代码安全扫描会给出不安全代码的告警,其中会检查代码中间的strcpy和sprintf函数,而要求使用strncpy和snprintf.今天我们讨论一下怎样写出完美的snprintf. snp ...
- jQuery Easy UI Draggable(拖动)组件
上文已经提到过了 jQuery EasyUI插件引用一般我们经常使用的有两种方式(排除easyload载入方式),所以本篇要总结的Draggable组件相同有两种方式载入: (1).使用class载入 ...
- 【BZOJ3784】树上的路径 点分治序+ST表
[BZOJ3784]树上的路径 Description 给定一个N个结点的树,结点用正整数1..N编号.每条边有一个正整数权值.用d(a,b)表示从结点a到结点b路边上经过边的权值.其中要求a< ...
- hdu_吃糖果(思维题)
吃糖果 Time Limit: 6000/3000 MS (Java/Others) Memory Limit: 65535/32768 K (Java/Others)Total Submiss ...
- DP(正解完全背包+容斥)
DP Time Limit:10000MS Memory Limit:165888KB 64bit IO Format:%lld & %llu Submit Status De ...
- EasyNVR无插件直播服务器软件接口调用返回“Unauthorized”最简单的处理方式
背景需求 对于EasyNVR的受众群体十分的广泛,不仅仅有将EasyNVR作为视频直播平台直接使用的,更多的是使用EasyNVR的对应功能集成到自身系统.对于前者,只需要将软件的使用功能搞清楚即可,对 ...