
【JavaScript数据结构系列】06-双向链表DoublyLinkedList
【JavaScript数据结构系列】06-双向链表DoublyLinkedList
码路工人 CoderMonkey
转载请注明作者与出处
1. 认识双向链表
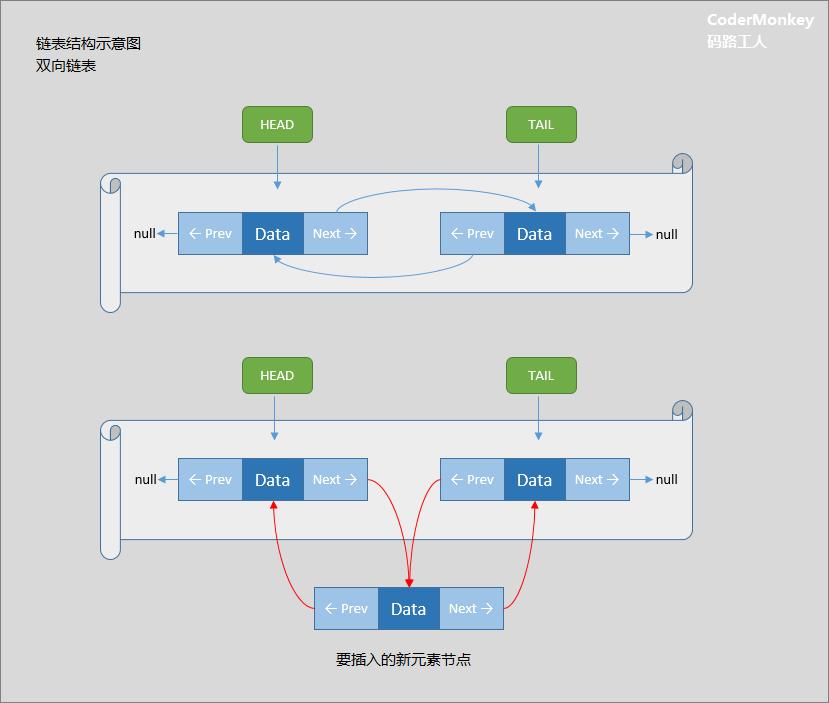
- 不同于普通链表/单向链表,双向链表最突出的区别就是,
每一个元素节点上,除了保存数据,还有两个地址引用的指针,
一个指向前一个元素,一个指向后一个元素。
- 我们比上一节还增加了一个 TAIL 的属性(末尾)
- 能够以 HEAD -> TAIL 的方向遍历
- 也能以 TAIL -> HEAD 的方向遍历
2. 常用方法
双向链表与单向链表非常相似,常用方法中除了方向遍历,其它都大致相同。
| 方法 | 描述 |
|---|---|
| append(data) | 向链表添加元素 |
| insert(position, data) | 向指定位置插入元素 |
| remove(data) | 删除元素 |
| removeAt(position) | 删除指定位置元素 |
| update(position, data) | 更新指定位置元素 |
| getItem(position) | 查找指定位置元素 |
| indexOf(data) | 获取元素位置 |
| forwardTraverse(cb) | 向Head方向遍历 |
| backwardTraverse(cb) | 向Tail方向遍历 |
| traverse(cb, reversal) | 指定方向遍历 |
| getHead() | 获取首元素数据 |
| getTail() | 获取尾元素数据 |
| size() | 获取链表大小 |
| isEmpty() | 判断链表是否为空 |
| clear() | 清空链表 |
| toString() | 字符串化 |
3. 代码实现
注:
ES6 版的代码实现请查看 npm 包 data-struct-js 代码
Github/Gitee 上都能找到npm install data-struct-js
封装双向链表类
/**

 * 链表:双向链表

 */

function DoublyLinkedList() {

  // 记录链表首元素

  this.__head = null

  // 记录链表尾元素

  this.__tail = null

  // 记录链表元素个数

  this.__count = 0

  // 用Node表示链表内部元素

  function Node(data) {

    this.data = data

    this.prev = null	// 指向前元素

    this.next = null	// 指向后元素

    Node.prototype.toString = function () {

      return this.data.toString()

    }

  }

}
3.1 append(data)
向链表添加元素
DoublyLinkedList.prototype.append = function (data) {

  var newNode = new Node(data)

  // 1.判断链表是否为空

  if (this.__count === 0) {

    // 新元素既是首也是尾

    this.__head = newNode

    this.__tail = newNode

  }

  // 2.非空链表时,添加到尾部

  else {

    this.__tail.next = newNode

    newNode.prev = this.__tail

    this.__tail = newNode

  }

  // 3.计数加1

  this.__count += 1

}
3.2 insert(position, data)
向链表中插入元素
DoublyLinkedList.prototype.insert = function (position, data) {

  // 1.边界检查(插入位置)

  if (position < 0 || position > this.__count) return false

  var newNode = new Node(data)

  // 2.插入元素时链表为空

  if (this.__count === 0) {

    this.__head = newNode

    this.__tail = newNode

  }

  // 3.链表非空

  else {

    // 3.1插入到链表头部

    if (position === 0) {

      newNode.next = this.__head

      this.__head.prev = newNode

      this.__head = newNode

    }

    // 3.2插入到链表尾部

    else if (position === this.__count) {

      this.__tail.next = newNode

      newNode.prev = this.__tail

      this.__tail = newNode

    }

    // 3.3以外

    else {

      var current = this.__head

      var index = 0

      while (index < position) {

        current = current.next

        index++

      }

      current.prev.next = newNode

      newNode.prev = current.prev

      newNode.next = current

      current.prev = newNode

    }

  }

  // 4.计数加1

  this.__count += 1

  return true

}
3.3 removeAt(position)
删除指定位置元素
DoublyLinkedList.prototype.removeAt = function (position) {

  // 1.边界检查

  if (position < 0 || position >= this.__count) return null

  var current = this.__head

  // 2.只有一个元素

  if (this.size() === 1) {

    this.__head = null

    this.__tail = null

  }

  // 3.多个元素的情况

  else {

    // 3.1 删首

    if (position === 0) {

      current = this.__head

      this.__head = current.next

      current.next.prev = null

    }

    // 3.2 删尾

    else if (position === this.__count - 1) {

      current = this.__tail

      this.__tail = current.prev

      this.__tail.next = null

    }

    // 3.3 以外

    else {

      var index = 0

      var current = this.__head

      while (index < position) {

        current = current.next

        index += 1

      }

      current.prev.next = current.next

      current.next.prev = current.prev

    }

  }

  // 4.计数减1

  this.__count -= 1

  return current.data

}
3.4 remove(data)
删除指定数据的元素
DoublyLinkedList.prototype.remove = function (data) {

  // 根据指定数据取得下标值

  var index = this.indexOf(data)

  // 检查下标值是否正常取到

  if (index === -1) return null

  // 根据取到的下标,调用 removeAt 方法进行删除

  return this.removeAt(index)

}
3.5 update(position, data)
更新指定位置元素的数据
DoublyLinkedList.prototype.update = function (position, data) {

  // 1.边界检查

  if (position < 0 || position >= this.__count) return false

  var current = this.__head

  var index = 0

  // 2.找到指定下标位置元素

  while (index < position) {

    current = current.next

  }

  // 3.修改数据

  current.data = data

  return true

}
3.6 getItem(position)
获取指定位置的元素数据
DoublyLinkedList.prototype.getItem = function (position) {

  // 1.边界检查

  if (position < 0 || position >= this.__count) return

  var current = this.__head

  var index = 0

  // 2.找到指定下标位置元素

  // => TODO:改善:根据position所在位置选择从Head还是从Tail开始查找

  while (index++ < position) {

    current = current.next

  }

  return current.data

}
3.7 indexOf(data)
获取指定数据的元素位置(下标)
DoublyLinkedList.prototype.indexOf = function (data) {

  var current = this.__head

  var index = 0

  // 查找指定数据的节点

  while (current) {

    if (current.data == data) {

      return index

    }

    current = current.next

    index += 1

  }

  // 没有找到

  return -1

}
3.8 backwardTraverse(cb)
向Head方向遍历,通过回调函数传出每一个元素数据
// Backward: Tail -> Head

DoublyLinkedList.prototype.backwardTraverse = function (cb) {

  // TODO: cb 参数检查(回调函数)

  var current = this.__tail

  while (current) {

    cb(current.data)

    current = current.prev

  }

}
3.9 forwardTraverse(cb)
向Tail方向遍历,通过回调函数传出每一个元素数据
// Forward: Head -> Tail

DoublyLinkedList.prototype.forwardTraverse = function (cb) {

  // TODO: cb 参数检查(回调函数)

  var current = this.__head

  while (current) {

    cb(current.data)

    current = current.next

  }

}
3.10 traverse(cb, reversal)
指定遍历方向,调用上面的两个单独的方法进行遍历
DoublyLinkedList.prototype.traverse = function (cb, reversal) {

  if (!reversal) return this.forwardTraverse(cb)

  return backwardTraverse(cb)

}
3.11 getHead()
获取首元素数据
DoublyLinkedList.prototype.getHead = function () {

  if (this.__head == null) return null

  return this.__head.data

}
3.12 getTail()
获取尾元素数据
DoublyLinkedList.prototype.getTail = function () {

  if (this.__tail == null) return null

  return this.__tail.data

}
3.13 size()
查看元素个数方法
DoublyLinkedList.prototype.size = function () {

  return this.__count

}
3.14 isEmpty()
判空方法
DoublyLinkedList.prototype.isEmpty = function () {

  return this.__count === 0

}
3.15 clear()
实现分析:
Head、Tail指向全都置空
计数清零
DoublyLinkedList.prototype.clear = function () {

  this.__head = null

  this.__tail = null

  this.__count = 0

}
3.16 toString()
为了方便查看实现的字符串化方法
DoublyLinkedList.prototype.toString = function () {

  var str = '[HEAD]'

  var current = this.__head

  while (current) {

    str += ' -> ' + current.data

    current = current.next

  }

  str += str == '[HEAD]' ?

    ' -> Null <- [TAIL]' :

  ' <- [TAIL]'

  return str

}
3.17 完整代码
/**

 * 链表:双向链表

 */

function DoublyLinkedList() {

  // 记录链表首元素

  this.__head = null

  // 记录链表尾元素

  this.__tail = null

  // 记录链表元素个数

  this.__count = 0

  // 用Node表示链表内部元素

  function Node(data) {

    this.data = data

    this.prev = null // 指向前元素

    this.next = null // 指向后元素

    Node.prototype.toString = function () {

      return this.data.toString()

    }

  }

  // 添加节点

  DoublyLinkedList.prototype.append = function (data) {

    var newNode = new Node(data)

    // 1.判断链表是否为空

    if (this.__count === 0) {

      // 新元素既是首也是尾

      this.__head = newNode

      this.__tail = newNode

    }

    // 2.非空链表时,添加到尾部

    else {

      this.__tail.next = newNode

      newNode.prev = this.__tail

      this.__tail = newNode

    }

    // 3.计数加1

    this.__count += 1

  }

  // 插入节点

  DoublyLinkedList.prototype.insert = function (position, data) {

    // 1.边界检查(插入位置)

    if (position < 0 || position > this.__count) return false

    var newNode = new Node(data)

    // 2.插入元素时链表为空

    if (this.__count === 0) {

      this.__head = newNode

      this.__tail = newNode

    }

    // 3.链表非空

    else {

      // 3.1插入到链表头部

      if (position === 0) {

        newNode.next = this.__head

        this.__head.prev = newNode

        this.__head = newNode

      }

      // 3.2插入到链表尾部

      else if (position === this.__count) {

        this.__tail.next = newNode

        newNode.prev = this.__tail

        this.__tail = newNode

      }

      // 3.3以外

      else {

        var current = this.__head

        var index = 0

        while (index < position) {

          current = current.next

          index++

        }

        current.prev.next = newNode

        newNode.prev = current.prev

        newNode.next = current

        current.prev = newNode

      }

    }

    // 4.计数加1

    this.__count += 1

    return true

  }

  // 删除指定位置节点

  DoublyLinkedList.prototype.removeAt = function (position) {

    // 1.边界检查

    if (position < 0 || position >= this.__count) return null

    var current = this.__head

    // 2.只有一个元素

    if (this.size() === 1) {

      this.__head = null

      this.__tail = null

    }

    // 3.多个元素的情况

    else {

      // 3.1 删首

      if (position === 0) {

        current = this.__head

        this.__head = current.next

        current.next.prev = null

      }

      // 3.2 删尾

      else if (position === this.__count - 1) {

        current = this.__tail

        this.__tail = current.prev

        this.__tail.next = null

      }

      // 3.3 以外

      else {

        var index = 0

        var current = this.__head

        while (index < position) {

          current = current.next

          index += 1

        }

        current.prev.next = current.next

        current.next.prev = current.prev

      }

    }

    // 4.计数减1

    this.__count -= 1

    return current.data

  }

  // 删除节点

  DoublyLinkedList.prototype.remove = function (data) {

    // 根据指定数据取得下标值

    var index = this.indexOf(data)

    // 检查下标值是否正常取到

    if (index === -1) return null

    // 根据取到的下标,调用 removeAt 方法进行删除

    return this.removeAt(index)

  }

  // 更新节点数据

  DoublyLinkedList.prototype.update = function (position, data) {

    // 1.边界检查

    if (position < 0 || position >= this.__count) return false

    var current = this.__head

    var index = 0

    // 2.找到指定下标位置元素

    while (index < position) {

      current = current.next

    }

    // 3.修改数据

    current.data = data

    return true

  }

  // 获取节点数据

  DoublyLinkedList.prototype.getItem = function (position) {

    // 1.边界检查

    if (position < 0 || position >= this.__count) return

    var current = this.__head

    var index = 0

    // 2.找到指定下标位置元素

    // => TODO:改善:根据position所在位置选择从Head还是从Tail开始查找

    while (index++ < position) {

      current = current.next

    }

    return current.data

  }

  // 获取下标

  DoublyLinkedList.prototype.indexOf = function (data) {

    var current = this.__head

    var index = 0

    // 查找指定数据的节点

    while (current) {

      if (current.data == data) {

        return index

      }

      current = current.next

      index += 1

    }

    // 没有找到

    return -1

  }

  DoublyLinkedList.prototype.traverse = function (cb, reversal) {

    if (!reversal) return this.forwardTraverse(cb)

    return backwardTraverse(cb)

  }

  // Backward: Tail -> Head

  DoublyLinkedList.prototype.backwardTraverse = function (cb) {

    // TODO: cb 参数检查(回调函数)

    var current = this.__tail

    while (current) {

      cb(current.data)

      current = current.prev

    }

  }

  // Forward: Head -> Tail

  DoublyLinkedList.prototype.forwardTraverse = function (cb) {

    // TODO: cb 参数检查(回调函数)

    var current = this.__head

    while (current) {

      cb(current.data)

      current = current.next

    }

  }

  DoublyLinkedList.prototype.getHead = function () {

    if (this.__head == null) return null

    return this.__head.data

  }

  DoublyLinkedList.prototype.getTail = function () {

    if (this.__tail == null) return null

    return this.__tail.data

  }

  DoublyLinkedList.prototype.size = function () {

    return this.__count

  }

  DoublyLinkedList.prototype.isEmpty = function () {

    return this.__count === 0

  }

  DoublyLinkedList.prototype.clear = function () {

    this.__head = null

    this.__tail = null

    this.__count = 0

  }

  DoublyLinkedList.prototype.toString = function () {

    var str = '[HEAD]'

    var current = this.__head

    while (current) {

      str += ' -> ' + current.data

      current = current.next

    }

    str += str == '[HEAD]' ?

      ' -> Null <- [TAIL]' :

    ' <- [TAIL]'

    return str

  }

}
4. 测试一下
// ---------------------------------------------

// Test: DoublyLinkedList

// ---------------------------------------------

console.log('----Test: DoublyLinkedList----')

var dLst = new DoublyLinkedList()

dLst.append('a')

dLst.append('b')

dLst.append('c')

dLst.forwardTraverse(function (val) {

    console.log('forward-traversing: ', val)

})

dLst.backwardTraverse(function (val) {

    console.log('backward-traversing: ', val)

})

dLst.insert(0, 'Insert-Index=0')

dLst.insert(3, 'Insert-Index=3')

dLst.insert(5, 'Insert-Index=Count')

console.log(dLst.toString())

console.log('getItem(5) => ', dLst.getItem(5))

console.log('remove("c") => ', dLst.remove('c'))

console.log('removeAt(3) => ', dLst.removeAt(3))

console.log('Result ↓ \r\n', dLst.toString())

dLst.clear()

console.log('After Clear : ', dLst.toString())
查看结果:
----Test: DoublyLinkedList----

forward-traversing:  c

forward-traversing:  b

forward-traversing:  a

backward-traversing:  a

backward-traversing:  b

backward-traversing:  c

[HEAD] -> Insert-Index=0 -> a -> b -> Insert-Index=3 -> c -> Insert-Index=Count <- [TAIL]

getItem(5) =>  Insert-Index=Count

remove("c") =>  c

removeAt(3) =>  Insert-Index=3

[removeAt(3)]--Result ↓

 [HEAD] -> Insert-Index=0 -> a -> b -> Insert-Index=Count <- [TAIL]

After Clear :  [HEAD] -> Null <- [TAIL]
确认无误,收工。
做了一份 npm 工具包 data-struct-js ,
基于 ES6 实现的 JavaScript 数据结构,
虽然这个小轮子很少会被使用,
也许对于初学者学习 JavaScript 会有点帮助。
只要简单 install 一下即可,感兴趣的话还可以去
GitHub / Gitee 看源码。(Star 表支持~)
npm install data-struct-js --save-dev
https://github.com/CoderMonkie/data-struct-js
https://gitee.com/coder-monkey/data-struct-js
最后,感谢您的阅读和支持~
-end-
【JavaScript数据结构系列】06-双向链表DoublyLinkedList的更多相关文章
- 【JavaScript数据结构系列】07-循环链表CircleLinkedList
[JavaScript数据结构系列]07-循环链表CircleLinkedList 码路工人 CoderMonkey 转载请注明作者与出处 1. 认识循环链表 首节点与尾节点相连的,就构成循环链表.其 ...
- 【JavaScript数据结构系列】00-开篇
[JavaScript数据结构系列]00-开篇 码路工人 CoderMonkey 转载请注明作者与出处 ## 0. 开篇[JavaScript数据结构与算法] 大的计划,写以下两部分: 1[JavaS ...
- JavaScript进阶系列06,事件委托
在"JavaScript进阶系列05,事件的执行时机, 使用addEventListener为元素同时注册多个事件,事件参数"中已经有了一个跨浏览器的事件处理机制.现在需要使用这个 ...
- 【JavaScript数据结构系列】03-队列Queue
[JavaScript数据结构系列]03-队列Queue 码路工人 CoderMonkey 转载请注明作者与出处 1. 认识队列Queue结构 队列,跟我们的日常生活非常贴近,我们前面举例了食堂排队打 ...
- 【JavaScript数据结构系列】05-链表LinkedList
[JavaScript数据结构系列]05-链表LinkedList 码路工人 CoderMonkey 转载请注明作者与出处 ## 1. 认识链表结构(单向链表) 链表也是线性结构, 节点相连构成链表 ...
- 【JavaScript数据结构系列】04-优先队列PriorityQueue
[JavaScript数据结构系列]04-优先队列PriorityQueue 码路工人 CoderMonkey 转载请注明作者与出处 ## 1. 认识优先级队列 经典的案例场景: 登机时经济舱的普通队 ...
- 【JavaScript数据结构系列】02-栈Stack
[JavaScript数据结构系列]02-栈Stack 码路工人 CoderMonkey 转载请注明作者与出处 ## 1. 认识栈结构 栈是非常常用的一种数据结构,与数组同属线性数据结构,不同于数组的 ...
- 【JavaScript数据结构系列】01-数组Array
[JavaScript数据结构系列]01-数组Array 码路工人 CoderMonkey 转载请注明作者与出处 # [JavaScript数据结构系列] # 01-数组Array 数组: 是有序的元 ...
- JavaScript进阶系列07,鼠标事件
鼠标事件有Keydown, Keyup, Keypress,但Keypress与Keydown和Keyup不同,如果按ctrl, shift, caps lock......等修饰键,不会触发Keyp ...
随机推荐
- 学习Vue第二节,v-cloak,v-text,v-html,v-bind,v-on使用
v-cloak,v-text,v-html,v-bind,v-on使用 <!DOCTYPE html> <html> <head> <meta charset ...
- 完全背包和多重背包的混合 F - The Fewest Coins
http://poj.org/problem?id=3260 这个题目有点小难,我开始没什么头绪,感觉很乱. 后来看了题解,感觉豁然开朗. 题目大意:就是这个人去买东西,东西的价格是T,这个人拥有的纸 ...
- 聚合类型与POD类型
Lippman在<深度探索C++对象模型>的前言中写道: I have heard a number of people over the years voice opinions sim ...
- 组合模式(c++实现)
组合模式 目录 组合模式 定义 动机 UML类图 场景拆解 源码实现 优点 缺点 定义 将对象组合成树形结构以表示"部分-整体"的层次结构.组合模式是的用户对单个对象和组合对象的使 ...
- Git使用教程之从远程库克隆项目(四)
我们接下来在本地新建一个文件夹,把刚刚github上创建的项目克隆下来,操作步骤如下: 1.克隆项目: 找到github上面的SSH地址,如图: 开始克隆: $ git clone git@githu ...
- xml(4)
schema约束 dtd语法:<!ELEMENT 元素名称 约束> schema符合xml的语法,xml语句 一个xml中可以有多个schema,多个schema用名称空间区分(类似jav ...
- JS理论-:一只tom猫告诉你构造函数 实例 实例原型 实例原型的实例原型是什么
参考地址:https://github.com/mqyqingfeng/Blog/issues/2 感谢这位大佬 下面说说我的理解: 第一,看下人物: tom--一只叫tom的猫 Cat()--猫的构 ...
- 【疑问】SQLServer_DNS注入数据库因为点号不能显示数据库的库名的方法[语音和音乐]
你好,欢迎关注我的网站: www.leosec.net
- Linux -- 在文件中添加信息的方法(转)
转自:https://www.cnblogs.com/ZGreMount/p/7645542.html 创建test 文件: touch test.txt 方法一:echo 命令法: echo &qu ...
- sql 取值时将字符串类型数字转化成整形
select cast(a.Vchcode as int) as avchcode,a.ptypeid,a.assqty,unit,b.pfullname,b.standard,b.type from ...