GLUT Trackball Demo
GLUT Trackball Demo
1.Introduction
在三维场景中建立模型后,为了方便用户从各个角度观察模型,从而需要对三维视图进行控制。常见的视图交互控制方式有:Trackball控制器、飞行控制器,还有三维游戏常用的第一人称控制器。这些视图控制器的根本是对模型视图矩阵MODELVIEW进行变换。
Trackball控制器以一种用户友好的交互方式来变换视图,原理是由Trackball激发,Trackball如下图所示:
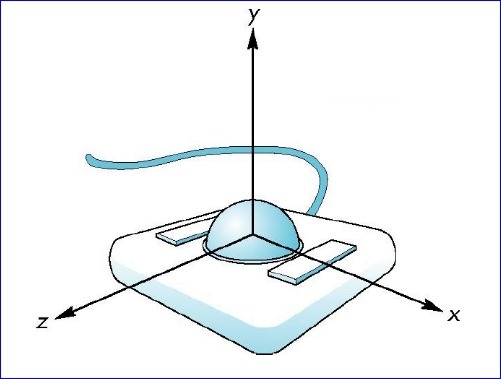
Figure 1. Trackball
通过手指在球面上滚动,就可以对三维视图进行控制。现在需要用鼠标的拖动来模拟Trackball以实现对三维视图的控制。在OpenGL中实现Trackball控制视图分为以下几步:
1.将鼠标移动时的屏幕坐标点映射到单位球上;
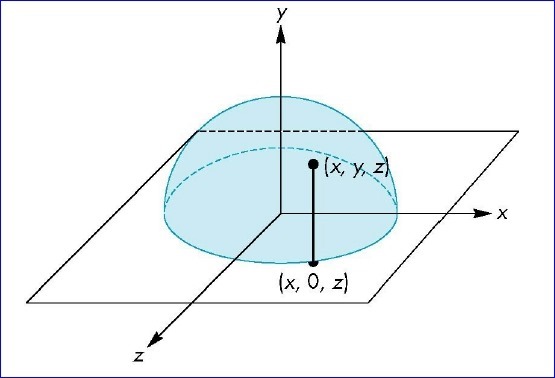
2.将开始旋转视图时鼠标点到球心的向量与鼠标移动过程中的坐标点球心的向量叉乘,即可得到旋转轴;
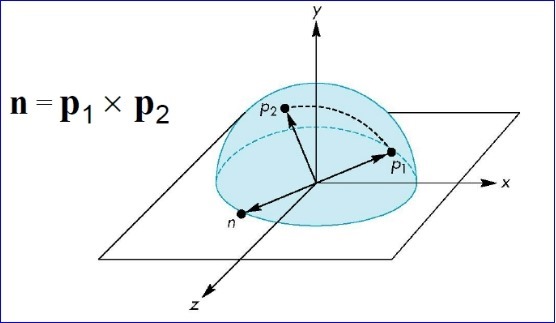 根据叉乘的定义,可以得到旋转角度:

有了旋转轴和旋转角度,就可以对视图进行旋转操作了。
2.GLUT Test
为了简明地说明Trackball的原理,这里只使用了GLUT库和OpenCASCADE中的四元数和向量相关的类。如果其他开源库也有向量计算和四元数据计算类,也可以将代码很快移植到使用其他库,如矩阵计算库Eigen等。下面给出GLUT的示例代码:
Code highlighting produced by Actipro CodeHighlighter (freeware)
http://www.CodeHighlighter.com/
-->/*
Copyright(C) 2017 Shing Liu(eryar@163.com)
Permission is hereby granted, free of charge, to any person obtaining a copy
of this software and associated documentation files(the "Software"), to deal
in the Software without restriction, including without limitation the rights
to use, copy, modify, merge, publish, distribute, sublicense, and / or sell
copies of the Software, and to permit persons to whom the Software is
furnished to do so, subject to the following conditions :
The above copyright notice and this permission notice shall be included in all
copies or substantial portions of the Software.
THE SOFTWARE IS PROVIDED "AS IS", WITHOUT WARRANTY OF ANY KIND, EXPRESS OR
IMPLIED, INCLUDING BUT NOT LIMITED TO THE WARRANTIES OF MERCHANTABILITY,
FITNESS FOR A PARTICULAR PURPOSE AND NONINFRINGEMENT.IN NO EVENT SHALL THE
AUTHORS OR COPYRIGHT HOLDERS BE LIABLE FOR ANY CLAIM, DAMAGES OR OTHER
LIABILITY, WHETHER IN AN ACTION OF CONTRACT, TORT OR OTHERWISE, ARISING FROM,
OUT OF OR IN CONNECTION WITH THE SOFTWARE OR THE USE OR OTHER DEALINGS IN THE
SOFTWARE.
*/
#include <gp_XYZ.hxx>
#include <gp_Trsf.hxx>
#include <gp_Quaternion.hxx>
#include <gl/glut.h>
#pragma comment(lib, "TKernel.lib")
#pragma comment(lib, "TKMath.lib")
GLint VIEWPORT_WIDTH = 0;
GLint VIEWPORT_HEIGHT = 0;
gp_XYZ U;
gp_XYZ V;
gp_Quaternion R;
gp_Quaternion Q;
void init(void)
{
GLfloat aSpecularMaterial[] = {1.0f, 1.0f, 1.0f, 1.0f};
GLfloat aLightPosition[] = {1.0, 1.0, 1.0, 0.0};
GLfloat aWhiteLight[] = {1.0, 1.0, 1.0, 1.0};
GLfloat aModelAmbient[] = {0.1, 0.1, 0.1, 1.0};
glClearColor(0.0, 0.0, 0.0, 0.0);
glShadeModel(GL_SMOOTH);
glMaterialfv(GL_FRONT, GL_SPECULAR, aSpecularMaterial);
glMaterialf(GL_FRONT, GL_SHININESS, 60.0);
glLightfv(GL_LIGHT0, GL_POSITION, aLightPosition);
glLightfv(GL_LIGHT0, GL_SPECULAR, aWhiteLight);
glLightfv(GL_LIGHT0, GL_DIFFUSE, aWhiteLight);
glLightModelfv(GL_LIGHT_MODEL_AMBIENT, aModelAmbient);
// Enable lighting
glEnable(GL_LIGHTING);
glEnable(GL_LIGHT0);
glEnable(GL_DEPTH_TEST);
}
void display(void)
{
glClear(GL_COLOR_BUFFER_BIT | GL_DEPTH_BUFFER_BIT);
glutSolidTeapot(1.0);
// draw mouse motion point.
glBegin(GL_LINES);
glVertex3f(0.0, 0.0, 0.0);
glVertex3f(U.X() * 2.0, U.Y() * 2.0, U.Z() * 2.0);
glEnd();
glutSwapBuffers();
}
void reshape(GLint theWidth, GLint theHeight)
{
VIEWPORT_WIDTH = theWidth;
VIEWPORT_HEIGHT = theHeight;
// Reset viewport and projection parameter
glViewport(0, 0, theWidth, theHeight);
glMatrixMode(GL_PROJECTION);
glLoadIdentity();
if (theWidth <= theHeight)
{
glOrtho(-1.5, 1.5, -1.5 * theHeight / theWidth, 1.5 * theHeight / theWidth, -10.0, 10.0);
}
else
{
glOrtho(-1.5 * theWidth / theHeight, 1.5 * theWidth / theHeight, -1.5, 1.5, -10.0, 10.0);
}
glMatrixMode(GL_MODELVIEW);
glLoadIdentity();
}
void mapToSphere(GLint theX, GLint theY, gp_XYZ& thePnt)
{
GLfloat aX = (theX - 0.5 * VIEWPORT_WIDTH) / VIEWPORT_WIDTH;
GLfloat aY = (0.5 * VIEWPORT_HEIGHT - theY) / VIEWPORT_HEIGHT;
GLfloat aSinx = sin(M_PI * aX * 0.5);
GLfloat aSiny = sin(M_PI * aY * 0.5);
GLfloat aSxy2 = aSinx * aSinx + aSiny * aSiny;
thePnt.SetX(aSinx);
thePnt.SetY(aSiny);
thePnt.SetZ(aSxy2 < 1.0 ? sqrt(1.0 - aSxy2) : 0.0);
}
void mouse(GLint theButton, GLint theState, GLint theX, GLint theY)
{
mapToSphere(theX, theY, U);
glutPostRedisplay();
}
void motion(GLint theX, GLint theY)
{
mapToSphere(theX, theY, V);
gp_XYZ W = U.Crossed(V);
if (W.Modulus() < gp::Resolution())
{
return;
}
GLfloat aAngle = W.Modulus() / (U.Modulus() * V.Modulus());
aAngle = asin(aAngle);
glRotatef(aAngle * 180.0 / M_PI, W.X(), W.Y(), W.Z());
glutPostRedisplay();
U = V;
}
int main(int argc, char* argv[])
{
glutInit(&argc, argv);
glutInitDisplayMode(GLUT_DOUBLE | GLUT_RGBA);
glutInitWindowSize(500, 300);
glutCreateWindow("Trackball Demo");
init();
glutDisplayFunc(display);
glutReshapeFunc(reshape);
glutMouseFunc(mouse);
glutMotionFunc(motion);
glutMainLoop();
return 0;
}
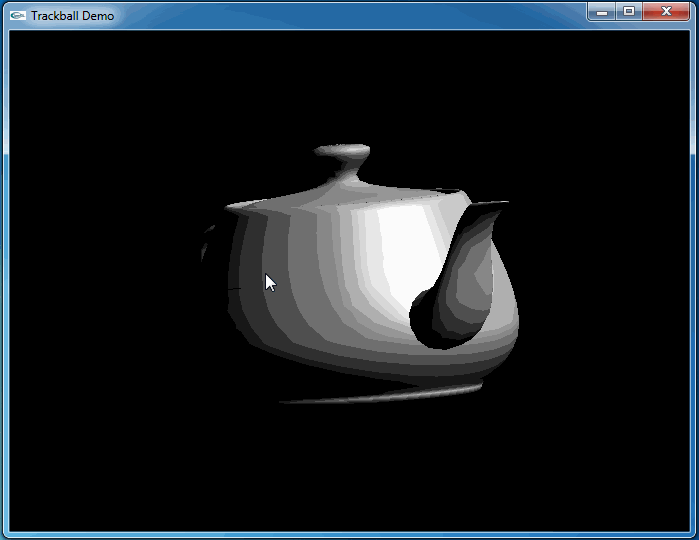
上述程序运行结果如下动图所示:
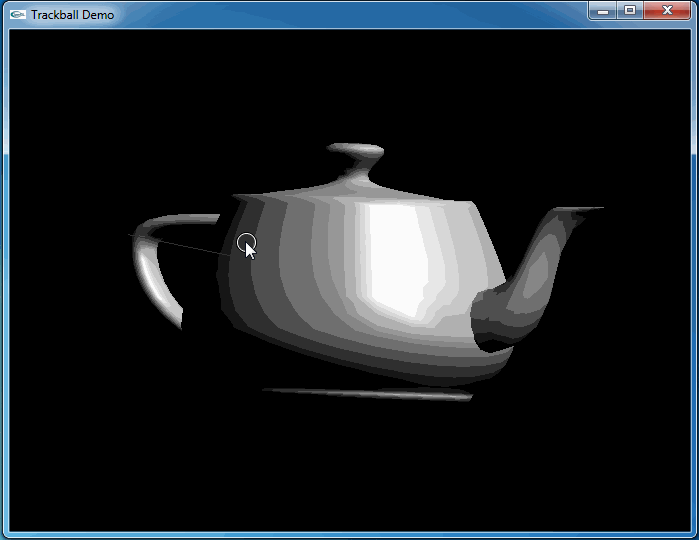
从上图可知,当旋转几次后视图并没有得到预期的结果。因为程序将鼠标映射后坐标与球心得到的向量进行了显示,发现当旋转几次后,这个向量并没有跟随鼠标。
3.Transform
通过观察上面代码程序运行的结果,可以发现鼠标映射函数得到的映射点始终是位于XOY平面上的一个半球面上。当视图被旋转后,视图的坐标系已经发生了变化,而映射点并没有。为了跟踪这个变换用四元数进行累乘来记录这一系列的旋转变换。最后在映射函数中将映射点变换到已经改变的视图坐标系中。
即在鼠标移动处理函数中增加记录变换:
Code highlighting produced by Actipro CodeHighlighter (freeware)
http://www.CodeHighlighter.com/
--> gp_Quaternion q(W, aAngle);
R.Multiply(q);
在mapToSphere函数中增加:
Code highlighting produced by Actipro CodeHighlighter (freeware)
http://www.CodeHighlighter.com/
-->gp_Trsf aTrsf;
aTrsf.SetRotation(Q.Inverted());
aTrsf.Transforms(thePnt);
列出升级后的全部代码如下所示:
Code highlighting produced by Actipro CodeHighlighter (freeware)
http://www.CodeHighlighter.com/
-->/*
Copyright(C) 2017 Shing Liu(eryar@163.com)
Permission is hereby granted, free of charge, to any person obtaining a copy
of this software and associated documentation files(the "Software"), to deal
in the Software without restriction, including without limitation the rights
to use, copy, modify, merge, publish, distribute, sublicense, and / or sell
copies of the Software, and to permit persons to whom the Software is
furnished to do so, subject to the following conditions :
The above copyright notice and this permission notice shall be included in all
copies or substantial portions of the Software.
THE SOFTWARE IS PROVIDED "AS IS", WITHOUT WARRANTY OF ANY KIND, EXPRESS OR
IMPLIED, INCLUDING BUT NOT LIMITED TO THE WARRANTIES OF MERCHANTABILITY,
FITNESS FOR A PARTICULAR PURPOSE AND NONINFRINGEMENT.IN NO EVENT SHALL THE
AUTHORS OR COPYRIGHT HOLDERS BE LIABLE FOR ANY CLAIM, DAMAGES OR OTHER
LIABILITY, WHETHER IN AN ACTION OF CONTRACT, TORT OR OTHERWISE, ARISING FROM,
OUT OF OR IN CONNECTION WITH THE SOFTWARE OR THE USE OR OTHER DEALINGS IN THE
SOFTWARE.
*/
#include <gp_XYZ.hxx>
#include <gp_Trsf.hxx>
#include <gp_Quaternion.hxx>
#include <gl/glut.h>
#pragma comment(lib, "TKernel.lib")
#pragma comment(lib, "TKMath.lib")
GLint VIEWPORT_WIDTH = 0;
GLint VIEWPORT_HEIGHT = 0;
gp_XYZ U;
gp_XYZ V;
gp_Quaternion R;
gp_Quaternion Q;
void init(void)
{
GLfloat aSpecularMaterial[] = {1.0f, 1.0f, 1.0f, 1.0f};
GLfloat aLightPosition[] = {1.0, 1.0, 1.0, 0.0};
GLfloat aWhiteLight[] = {1.0, 1.0, 1.0, 1.0};
GLfloat aModelAmbient[] = {0.1, 0.1, 0.1, 1.0};
glClearColor(0.0, 0.0, 0.0, 0.0);
glShadeModel(GL_SMOOTH);
glMaterialfv(GL_FRONT, GL_SPECULAR, aSpecularMaterial);
glMaterialf(GL_FRONT, GL_SHININESS, 60.0);
glLightfv(GL_LIGHT0, GL_POSITION, aLightPosition);
glLightfv(GL_LIGHT0, GL_SPECULAR, aWhiteLight);
glLightfv(GL_LIGHT0, GL_DIFFUSE, aWhiteLight);
glLightModelfv(GL_LIGHT_MODEL_AMBIENT, aModelAmbient);
// Enable lighting
glEnable(GL_LIGHTING);
glEnable(GL_LIGHT0);
glEnable(GL_DEPTH_TEST);
}
void display(void)
{
glClear(GL_COLOR_BUFFER_BIT | GL_DEPTH_BUFFER_BIT);
glutSolidTeapot(1.0);
// draw mouse motion point.
glBegin(GL_LINES);
glVertex3f(0.0, 0.0, 0.0);
glVertex3f(U.X() * 2.0, U.Y() * 2.0, U.Z() * 2.0);
glEnd();
glutSwapBuffers();
}
void reshape(GLint theWidth, GLint theHeight)
{
VIEWPORT_WIDTH = theWidth;
VIEWPORT_HEIGHT = theHeight;
// Reset viewport and projection parameter
glViewport(0, 0, theWidth, theHeight);
glMatrixMode(GL_PROJECTION);
glLoadIdentity();
if (theWidth <= theHeight)
{
glOrtho(-1.5, 1.5, -1.5 * theHeight / theWidth, 1.5 * theHeight / theWidth, -10.0, 10.0);
}
else
{
glOrtho(-1.5 * theWidth / theHeight, 1.5 * theWidth / theHeight, -1.5, 1.5, -10.0, 10.0);
}
glMatrixMode(GL_MODELVIEW);
glLoadIdentity();
}
void mapToSphere(GLint theX, GLint theY, gp_XYZ& thePnt)
{
GLfloat aX = (theX - 0.5 * VIEWPORT_WIDTH) / VIEWPORT_WIDTH;
GLfloat aY = (0.5 * VIEWPORT_HEIGHT - theY) / VIEWPORT_HEIGHT;
GLfloat aSinx = sin(M_PI * aX * 0.5);
GLfloat aSiny = sin(M_PI * aY * 0.5);
GLfloat aSxy2 = aSinx * aSinx + aSiny * aSiny;
thePnt.SetX(aSinx);
thePnt.SetY(aSiny);
thePnt.SetZ(aSxy2 < 1.0 ? sqrt(1.0 - aSxy2) : 0.0);
gp_Trsf aTrsf;
aTrsf.SetRotation(Q.Inverted());
aTrsf.Transforms(thePnt);
}
void mouse(GLint theButton, GLint theState, GLint theX, GLint theY)
{
mapToSphere(theX, theY, U);
Q = R;
glutPostRedisplay();
}
void motion(GLint theX, GLint theY)
{
mapToSphere(theX, theY, V);
gp_XYZ W = U.Crossed(V);
if (W.Modulus() < gp::Resolution())
{
return;
}
GLfloat aAngle = W.Modulus() / (U.Modulus() * V.Modulus());
aAngle = asin(aAngle);
glRotatef(aAngle * 180.0 / M_PI, W.X(), W.Y(), W.Z());
glutPostRedisplay();
gp_Quaternion q(W, aAngle);
R.Multiply(q);
U = V;
}
int main(int argc, char* argv[])
{
glutInit(&argc, argv);
glutInitDisplayMode(GLUT_DOUBLE | GLUT_RGBA);
glutInitWindowSize(500, 300);
glutCreateWindow("Trackball Demo");
init();
glutDisplayFunc(display);
glutReshapeFunc(reshape);
glutMouseFunc(mouse);
glutMotionFunc(motion);
glutMainLoop();
return 0;
}
这次程序运行和预期结果一致,旋转很流畅:
4.Conclusion
程序员总是有很强的控制欲,希望一切尽在掌握之中。在三维场景中建立模型后,如何对视图进行控制来方便地观察模型呢?最常见的控制方式就是Trackball. OpenSceneGraph、Eigen等开源库都有相关的实现。
Trackball的实现主要是将鼠标点映射到一个球面上,然后使用叉乘得到旋转轴和旋转角度。为了旋转的流畅,使用四元数记录了一系列的旋转变换,最后通过将映射点进行坐标变换得到满意的效果。
5.References
1. Virtual Trackball. http://gukewen.sdu.edu.cn/panrj/courses/4-AngelCGE2-Virtual-Trackball.pdf
2. Object Mouse Trackball https://www.khronos.org/opengl/wiki/Object_Mouse_Trackball
GLUT Trackball Demo的更多相关文章
- ubuntu下搭建openGL环境
1. 建立基本编译环境 sudo apt-get install build-essential 2. 安装OpenGL Library sudo apt-get install ...
- GLUT的简洁OO封装
毕业设计用到了OpenGL,由于不会用MFC和Win32API做窗口程序:自然选用了GLUT.GLUT很好用,就是每次写一堆Init,注册callback,觉得有点恶心,于是对他做了简单的OO封装.记 ...
- OpenGL2.0及以上版本中glm,glut,glew,glfw,mesa等部件的关系
OpenGL2.0及以上版本中gl,glut,glew,glfw,mesa等部件的关系 一.OpenGL OpenGL函数库相关的API有核心库(gl),实用库(glu),辅助库(aux).实用工具库 ...
- BZOJ1695 : [Usaco2007 Demo]Walk the Talk
观察单词表可以发现: 对于长度为3的单词,前两个字母相同的单词不超过7个 对于长度为4的单词,前两个字母相同的单词不超过35个 于是首先$O(26*26*nm)$预处理出 s1[x][i][j]表示( ...
- [转]glew, glee与 gl glu glut glx glext的区别和关系
原文地址:http://blog.csdn.net/delacroix_xu/article/details/5881942 因为也是初接触,所以就当了解,等深入学习后再回顾这篇文章观点. GLEW是 ...
- 建立第一个OpenGL工程(GLUT)
本文参考了<计算机图形学>(Donald Hearn著)的第2.9节. OpenGL基本函数库用来描述图元.属性.几何变换.观察变换和进行许多其他的操作.OpenGL被设计成与硬件无关,因 ...
- VS2012下基于Glut 矩阵变换示例程序:
也可以使用我们自己的矩阵运算来实现OpenGL下的glTranslatef相应的旋转变换.需要注意的是OpenGL下的矩阵是列优先存储的. 示例通过矩阵运算使得圆柱或者甜圈自动绕Y轴旋转,可以单击鼠标 ...
- VS2012下基于Glut 矩阵变换示例程序2:
在VS2012下基于Glut 矩阵变换示例程序:中我们在绘制甜圈或者圆柱时使用矩阵对相应的坐标进行变换后自己绘制甜圈或者圆柱.我们也可以使用glLoadMatrixf.glLoadMatrixd载入变 ...
- VS2012下基于Glut OpenGL glEdgeFlag示例程序:
glEdgeFlag (GLboolean flag)表示一个顶点是否应该被认为是多边形的一条边界边的起点.flag为GL_TRUE后面的点都被认为是边界上的点,flag为GL_FALSE则之后的点不 ...
随机推荐
- zepto.js介绍
是一个阉割版的jQuery zepto不支持jQuery过于复杂的选择器,比如:first :last :eq zepto如果要用动画必须再次引包 zepto能将css3中transition支持的动 ...
- DateTime.Now的一些用法
System.DateTime.Now.ToString("D"); //Tuesday, December 13, 2016 System.DateTime.Now.ToSt ...
- Linux 系统管理04--账号管理
Linux系统管理04--账号管理 一.用户账号管理 1.用户账号概述 (1)用户账号的常见分类: 1>超级用户:root uid=0 gid=0 权限最大. 2>普通用户:uid> ...
- ue4竖排文本显示
最近发现中国风游戏中,经常会遇到旁白文字竖着显示的需求. 于是我首先找了找控件蓝图中的text有没有相关类似横竖文本框的选项,然而并无所获. 突然间灵机一动! 竖着显示不就是每个字一换行嘛! 说干就干 ...
- WebService应用--使用java开发WebService程序
使用Eclipse开发第一个WebService程序,本示例采用的工具为Spring-Tool-Suite,和Eclipse没有本质的区别,开发环境jdk1.7 一.开发步骤: 1.新建名为WebSe ...
- My First GitHub
第一次使用github 在https://github.com/注册账号. 登陆之后,首先创建一个仓库(+ new repository),开源(public)的仓库是免费的,私人(private)的 ...
- Day2 Python的运算符及三大语句控制结构
Python的运算符 Python语言支持以下类型的运算符: 算术运算符 比较(关系)运算符 赋值运算符 逻辑运算符 位运算符 成员运算符 身份运算符 运算符优先级 Python的三大语句控制结构: ...
- 斗牛app上架应用宝、牛牛手机游戏推广、百人牛牛app应用开发、棋牌游戏上传、手游APP优化
联系QQ:305-710439斗牛app上架应用宝.牛牛手机游戏推广.百人牛牛app应用开发.棋牌游戏上传.手游APP优化 iOS开发iPhone/iPad平台安卓手机软件开发机型覆盖范围 超过113 ...
- Servlet的线程安全
Servlet的线程安全 一.什么是Servlet的线程安全 1.在Servlet的整个生命周期中,构造方法只被执行一次.也就是说,在Servlet的整个生命周期中,只存在一个Servlet实例对象. ...
- Gephi安装
Gephi for mac https://gephi.org/users/download/ 在官网上下载gephi-0.9.1-macos.dmg双击拖到Application里面就好了,注意有的 ...