
python测试开发django-10.django连接mysql
前言
Django 对各种数据库提供了很好的支持,包括:PostgreSQL、MySQL、SQLite、Oracle。本篇以mysql为例简单介绍django连接mysql进行数据操作
Django连mysql需要安装驱动mysqlclient
mysqlclient安装
先要安装数据库驱动mysqlclient,使用pip安装就行
pip install mysqlclient
   copying MySQLdb\constants\FLAG.py -> build\lib.win-amd64-3.6\MySQLdb\constants

    copying MySQLdb\constants\REFRESH.py -> build\lib.win-amd64-3.6\MySQLdb\constants

    running build_ext

    building '_mysql' extension

    error: Microsoft Visual C++ 14.0 is required. Get it with "Microsoft Visual C++ Build Tools": http://landinghub.visualstudio.com/visual-cpp-build-tools

    ----------------------------------------

Command "e:\python36\python.exe -u -c "import setuptools, tokenize;__file__='C:\\Users\\dell\\AppData\\Local\\Temp\\pip-install-trc0p4gc\\mysqlclient\\setup.py';f=getattr(tokenize, 'open', open)(__file__);code=f.read().replace('\r\n', '\n');f.close();exec(compile(code, __file__, 'exec'))" install --record C:\Users\dell\AppData\Local\Temp\pip-record-ulwogpct\install-record.txt --single-version-externally-managed --compile" failed with error code 1 in C:\Users\dell\AppData\Local\Temp\pip-install-trc0p4gc\mysqlclient\
这里我安装的时候出现了报错:“Microsoft Visual C++ 14.0 is required. Get it with "Microsoft Visual C++ Build Tools": http://landinghub.visualstudio.com/visual-cpp-build-tools” 打开报错给的地址404
解决办法,指定1.3.10版本安装
pip install mysqlclient==1.3.10
C:\Users\dell>pip install mysqlclient==1.3.10

Collecting mysqlclient==1.3.10

  Downloading https://files.pythonhosted.org/packages/c8/e0/e38c1fc71355bbc60e89401674bc0190f39a207f0235bb92b7e7b09948d0/mysqlclient-1.3.10-cp36-cp36m-win_amd64.whl (1.4MB)

    100% |████████████████████████████████| 1.4MB 466kB/s

Installing collected packages: mysqlclient

Successfully installed mysqlclient-1.3.10
django配置数据库
settings.py 文件中找到 DATABASES 配置项, django默认连接sqllite。ENGINE:是指连接数据库驱动的名称,有以下几种情况:
- django.db.backends.postgresql 连接 PostgreSQL
- django.db.backends.mysql 连接 mysql
- django.db.backends.sqlite3 连接 sqlite
- django.db.backends.oracle 连接 oracle
这里我们连接mysql需要账户密码,也就是之前安装mysql的root用户名,和自己设置的密码,NAME是数据库的名称,连接配置如下:
DATABASES = {

    'default': {

        'ENGINE': 'django.db.backends.mysql',  # 或者使用 mysql.connector.django

        'NAME': 'test',

        'USER': 'root',

        'PASSWORD': 'yoyo',

        'HOST':'localhost',

        'PORT':'3306',

    }

}
创建表,同步到mysql
类名代表了数据库表名,且继承了models.Model,类里面的字段代表数据表中的字段(name),数据类型则由CharField(相当于varchar)、DateField(相当于datetime), max_length 参数限定长度。
# models.py

from django.db import models

# Create your models here.

class Test(models.Model):

    name = models.CharField(max_length=20)
先创建表结构,在数据库里面新增一些表
python manage.py migrate
D:\web_djo\helloworld>python manage.py migrate

Operations to perform:

  Apply all migrations: admin, auth, contenttypes, hello, sessions

Running migrations:

  Applying contenttypes.0001_initial... OK

  Applying auth.0001_initial... OK

  Applying admin.0001_initial... OK

  Applying admin.0002_logentry_remove_auto_add... OK

  Applying admin.0003_logentry_add_action_flag_choices... OK

  Applying contenttypes.0002_remove_content_type_name... OK

  Applying auth.0002_alter_permission_name_max_length... OK

  Applying auth.0003_alter_user_email_max_length... OK

  Applying auth.0004_alter_user_username_opts... OK

  Applying auth.0005_alter_user_last_login_null... OK

  Applying auth.0006_require_contenttypes_0002... OK

  Applying auth.0007_alter_validators_add_error_messages... OK

  Applying auth.0008_alter_user_username_max_length... OK

  Applying auth.0009_alter_user_last_name_max_length... OK

  Applying hello.0001_initial... OK

  Applying hello.0002_auto_20181122_1025... OK

  Applying hello.0003_auto_20181122_1033... OK

  Applying sessions.0001_initial... OK
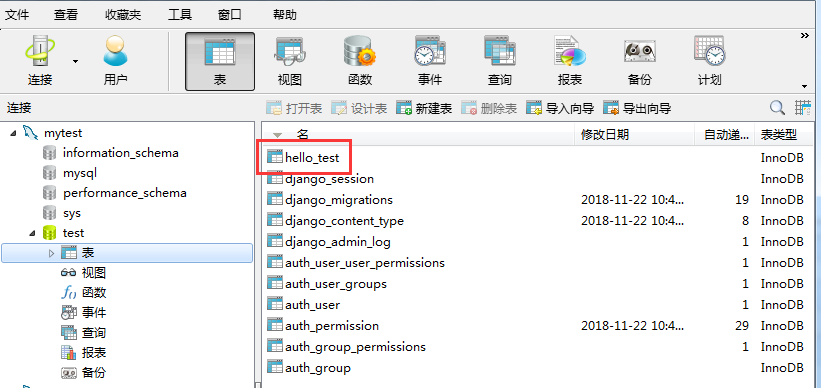
打开数据库,会发现多了一些表名称,hello_test就是上一步新建的表
接着让 Django 知道我们在我们的模型有一些变更
python manage.py makemigrations hello
D:\web_djo\helloworld>python manage.py makemigrations hello

No changes detected in app 'hello'
再创建hello这个app应用的表结构
python manage.py migrate hello
D:\web_djo\helloworld>python manage.py migrate hello

Operations to perform:

  Apply all migrations: hello

Running migrations:

  No migrations to apply.
操作数据库
在settings.py同一目录新建一个testdb.py文件
# -*- coding: utf-8 -*-

from django.http import HttpResponse

from hello.models import Test

# 数据库操作

def testdb(request):

    test1 = Test(name='yoyo1')

    test1.save()

    return HttpResponse("数据库hello_test添加name成功!看去看看吧")
urls.py配置访问地址
from django.conf.urls import url

from django.urls import re_path, path

from . import view, testdb

urlpatterns = [

    url(r'^testdb$', testdb.testdb),

]
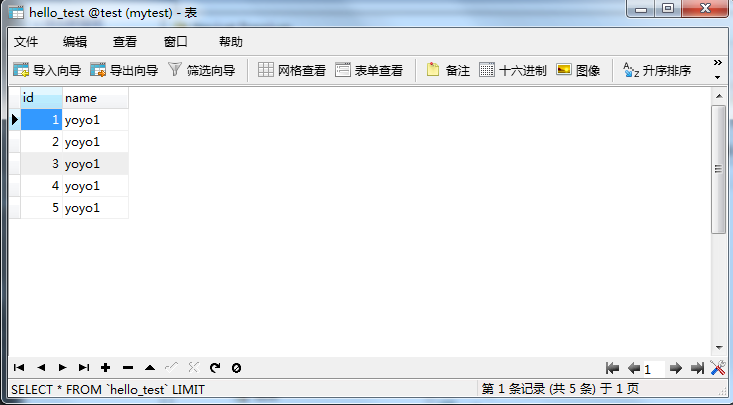
浏览器打开:http://127.0.0.1:8000/testdb 访问一次,数据库里面就会新增一条数据

查看数据库hello_test会新增数据
django交流QQ群:779429633
python测试开发django-10.django连接mysql的更多相关文章
- python测试开发django-9.使用navicat连接mysql
前言 navicat 是一个连接数据库的可视化工具,可以连接mysql和oracle做一些简单增删改查,对于初学者来说非常方便的 navicat安装 navicat版本比较多,分享一个我经常用的版本 ...
- 2019第一期《python测试开发》课程,10月13号开学
2019第一期<python测试开发>课程,10月13号开学! 主讲老师:上海-悠悠 上课方式:QQ群视频在线教学,方便交流 本期上课时间:10月13号-12月8号,每周六.周日晚上20: ...
- python测试开发django-36.一对一(OneToOneField)关系查询
前言 前面一篇在xadmin后台一个页面显示2个关联表(OneToOneField)的字段,使用inlines内联显示.本篇继续学习一对一(OneToOneField)关系的查询. 上一篇list_d ...
- python测试开发django-rest-framework-63.基于函数的视图(@api_view())
前言 上一篇讲了基于类的视图,在REST framework中,你也可以使用常规的基于函数的视图.它提供了一组简单的装饰器,用来包装你的视图函数, 以确保视图函数会收到Request(而不是Djang ...
- python测试开发django-16.JsonResponse返回中文编码问题
前言 django查询到的结果,用JsonResponse返回在页面上显示类似于\u4e2d\u6587 ,注意这个不叫乱码,这个是unicode编码,python3默认返回的编码 遇到问题 接着前面 ...
- python测试开发django-15.查询结果转json(serializers)
前言 django查询数据库返回的是可迭代的queryset序列,如果不太习惯这种数据的话,可以用serializers方法转成json数据,更直观 返回json数据,需要用到JsonResponse ...
- 《Python测试开发技术栈—巴哥职场进化记》—前言
写在前面 今年从4月份开始写一本讲Python测试开发技术栈的书,主要有两个目的,第一是将自己掌握的一些内容分享给大家,第二是希望自己能系统的梳理和学习Python相关的技术栈.当时我本来打算以故事体 ...
- python测试开发django-197.django-celery-beat 定时任务
前言 django-celery-beat 可以支持定时任务,把定时任务写到数据库. 接着前面这篇写python测试开发django-196.python3.8+django2+celery5.2.7 ...
- 【python测试开发栈】python基础语法大盘点
周边很多同学在用python,但是偶尔会发现有人对python的基础语法还不是特别了解,所以帮大家梳理了python的基础语法(文中的介绍以python3为例).如果你已然是python大牛,可以跳过 ...
- Python测试开发-创建模态框及保存数据
Python测试开发-创建模态框及保存数据 原创: fin 测试开发社区 前天 什么是模态框? 模态框是指的在覆盖在父窗体上的子窗体.可用来做交互,我们经常会看到模态框用来登录.确定等等,到底是怎 ...
随机推荐
- 20165333 学习基础和C语言学习基础
说实话,我并没有什么技能比90%以上的人更好,非要拿一个出来的话,篮球勉强好一点吧.最初接触篮球是小学的时候跟着哥哥看他打球,哥哥的球技在同龄人中算是好的,每次看他各种突破过人,我都觉得特别潇洒帅气, ...
- javascript json字符串转json对象方法
/* * @method 将拼接好字符串格式的json 转成json对象 * @param jsonData param fomart: * var jsonData = "{name1:' ...
- 编写一个简单的 JDBC 程序
连接数据库的步骤: 1.注册驱动(只做一次) 2.建立连接(Connection) 3.创建执行SQL的语句(Statement) 4.执行语句 5.处理执行结果(ResultSet) 6.释放资源 ...
- Ionic Js三:下拉刷新
在加载新数据的时候,我们需要实现下拉刷新效果,代码如下: HTML 代码 <body ng-app="starter" ng-controller="actions ...
- 海康威视 - 萤石云开放平台 js 版
开放平台 https://open.ys7.com/mobile/download.html API http://open.ys7.com/doc/zh/uikit/uikit_javascript ...
- “通用类型系统”(CTS)
一.什么是“通用类型系统”(CTS) 描述类型的定义和行为 二.CTS规范 一个类型可以包含零个或者多个成员1,成员①字段(Field)作为对象状态一部分的数据变量.字段根据名称和类型来区分②方法(M ...
- [leetcode tree]98. Validate Binary Search Tree
Given a binary tree, determine if it is a valid binary search tree (BST). Assume a BST is defined as ...
- 网络图片嗅探工具driftnet
网络图片嗅探工具driftnet 图片是网络数据传输的重要内容.Kali Linux内置了一款专用工具drifnet.该工具可以支持实时嗅探和离线嗅探.它可以从数据流中提取JPEG和GIF这两种网 ...
- CSS3组件化之单线箭头
<div class="parent-box"> <div class="top-arrow"></div> <div ...
- mysql_connect的$new_link参数
假设在127.0.0.1上有test1和test2两个库, 其中库test1库中有test1表,test2中有test2表 $servername = "127.0.0.1"; $ ...