[Kaggle] dogs-vs-cats之建立模型
建立神经网络模型,下面要建立的模型如下:
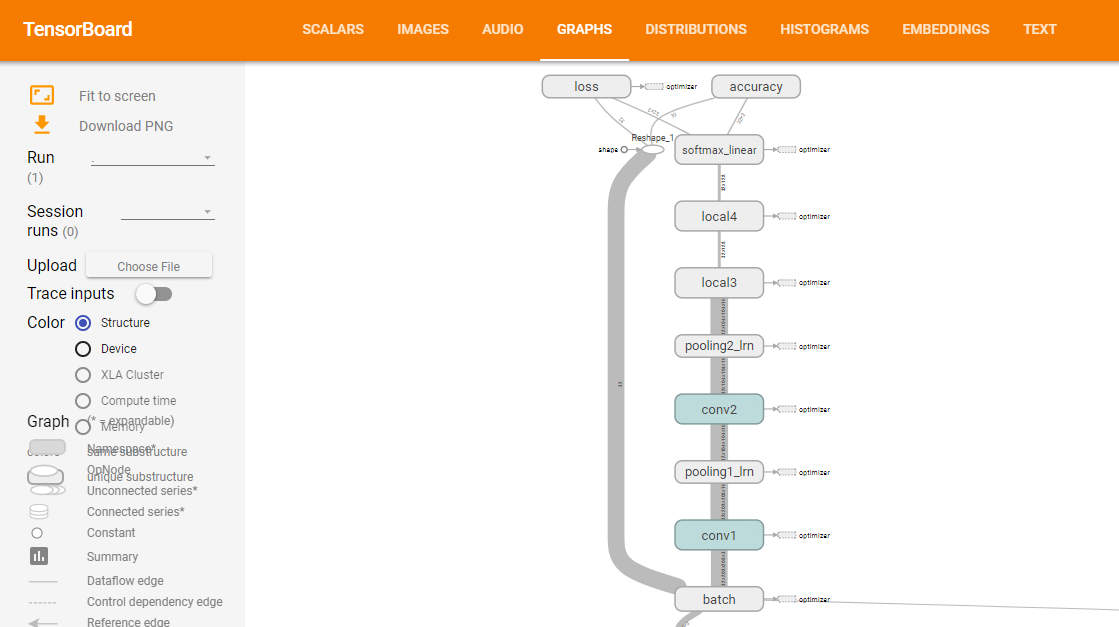
(上图来源:训练网络时,打开tensorboard即可观察网络结构,在下一节模型训练的时候会讲到)
下面为具体步骤:
Step 0:导入相关库
import tensorflow as tf
Step 1:定义网络结构
def inference(images, batch_size, n_classes):

    '''Build the model

    Args:

        images: image batch, 4D tensor, tf.float32, [batch_size, width, height, channels]

    Returns:

        output tensor with the computed logits, float, [batch_size, n_classes]

    '''

    #conv1, shape = [kernel size, kernel size, channels, kernel numbers]

    #卷积层1

    with tf.variable_scope('conv1') as scope:

        #变量初始化

        weights = tf.get_variable('weights',

                                  shape = [3,3,3, 16],

                                  dtype = tf.float32,

                                  initializer=tf.truncated_normal_initializer(stddev=0.1,dtype=tf.float32))

        biases = tf.get_variable('biases',

                                 shape=[16],

                                 dtype=tf.float32,

                                 initializer=tf.constant_initializer(0.1))

        conv = tf.nn.conv2d(images, weights, strides=[1,1,1,1], padding='SAME')

        pre_activation = tf.nn.bias_add(conv, biases)#加上偏置

        conv1 = tf.nn.relu(pre_activation, name= scope.name)#relu激活函数

    #pool1 and norm1

    with tf.variable_scope('pooling1_lrn') as scope:

        pool1 = tf.nn.max_pool(conv1, ksize=[1,3,3,1],strides=[1,2,2,1],

                               padding='SAME', name='pooling1')

        norm1 = tf.nn.lrn(pool1, depth_radius=4, bias=1.0, alpha=0.001/9.0,

                          beta=0.75,name='norm1')

    #conv2

    with tf.variable_scope('conv2') as scope:

        weights = tf.get_variable('weights',

                                  shape=[3,3,16,16],

                                  dtype=tf.float32,

                                  initializer=tf.truncated_normal_initializer(stddev=0.1,dtype=tf.float32))

        biases = tf.get_variable('biases',

                                 shape=[16],

                                 dtype=tf.float32,

                                 initializer=tf.constant_initializer(0.1))

        conv = tf.nn.conv2d(norm1, weights, strides=[1,1,1,1],padding='SAME')

        pre_activation = tf.nn.bias_add(conv, biases)

        conv2 = tf.nn.relu(pre_activation, name='conv2')

    #pool2 and norm2

    with tf.variable_scope('pooling2_lrn') as scope:

        norm2 = tf.nn.lrn(conv2, depth_radius=4, bias=1.0, alpha=0.001/9.0,

                          beta=0.75,name='norm2')

        pool2 = tf.nn.max_pool(norm2, ksize=[1,3,3,1], strides=[1,1,1,1],

                               padding='SAME',name='pooling2')

    #local3 #全连接层1

    with tf.variable_scope('local3') as scope:

        reshape = tf.reshape(pool2, shape=[batch_size, -1])#转换为一维

        dim = reshape.get_shape()[1].value#获取第二维的长度

        weights = tf.get_variable('weights',

                                  shape=[dim,128],

                                  dtype=tf.float32,

                                  initializer=tf.truncated_normal_initializer(stddev=0.005,dtype=tf.float32))

        biases = tf.get_variable('biases',

                                 shape=[128],

                                 dtype=tf.float32,

                                 initializer=tf.constant_initializer(0.1))

        local3 = tf.nn.relu(tf.matmul(reshape, weights) + biases, name=scope.name)

    #local4

    with tf.variable_scope('local4') as scope:

        weights = tf.get_variable('weights',

                                  shape=[128,128],

                                  dtype=tf.float32,

                                  initializer=tf.truncated_normal_initializer(stddev=0.005,dtype=tf.float32))

        biases = tf.get_variable('biases',

                                 shape=[128],

                                 dtype=tf.float32,

                                 initializer=tf.constant_initializer(0.1))

        local4 = tf.nn.relu(tf.matmul(local3, weights) + biases, name='local4')

    # softmax

    with tf.variable_scope('softmax_linear') as scope:

        weights = tf.get_variable('softmax_linear',

                                  shape=[128, n_classes],

                                  dtype=tf.float32,

                                  initializer=tf.truncated_normal_initializer(stddev=0.005,dtype=tf.float32))

        biases = tf.get_variable('biases',

                                 shape=[n_classes],

                                 dtype=tf.float32,

                                 initializer=tf.constant_initializer(0.1))

        softmax_linear = tf.add(tf.matmul(local4, weights), biases, name='softmax_linear')

    return softmax_linear
函数介绍:
1)tf.variable_scope
通过 tf.get_variable()为变量名指定命名空间。
2)tf.get_variable
通过所给的名字,创建或者返回一个变量。
以上两个函数详情参考:共享变量:http://wiki.jikexueyuan.com/project/tensorflow-zh/how_tos/variable_scope.html
3)tf.nn.conv2d
conv2d(
input,
filter,
strides,
padding,
use_cudnn_on_gpu=True,
data_format='NHWC',
name=None
)
作用:对给定的4-D输入和卷积核(filter)做2-D的卷积。
输入的张量(tensor)大小为[batch, in_height, in_width, in_channels],卷积核(filter/kernel)的大小为[filter_height,
filter_width, in_channels, out_channels]。
Strides一般为[1, stride, stride,
1];padding,取值"SAME", "VALID"。
4)tf.nn.bias_add
bias_add(

    value,

    bias,

    data_format=None,

    name=None

)
作用:将bias添加至value。
tf.nn.bias_add 是 tf.add 的一个特例,也即 tf.add 支持的操作比 tf.nn.bias_add 更多。二者均支持 broadcasting(广播机制),也即两个操作数最后一个维度保持一致。除了支持最后一个维度保持一致的两个操作数相加外,tf.add 还支持第二个操作数是一维的情况。
5)tf.nn.relu
relu(

    features,

    name=None

)
作用:是计算激活函数relu,即max(features, 0)。
6)tf.nn.max_pool
max_pool(

    value,

    ksize,

    strides,

    padding,

    data_format='NHWC',

    name=None

)
作用:计算池化区域中元素的最大值
输入参数:
value: 一个四维的Tensor。数据维度是 [batch, height, width, channels]。数据类型是float32,float64,qint8,quint8,qint32。
ksize: 一个长度不小于4的整型数组。每一位上面的值对应于输入数据张量中每一维的窗口对应值。
strides: 一个长度不小于4的整型数组。该参数指定滑动窗口在输入数据张量每一维上面的步长。
padding: 一个字符串,取值为 SAME 或者 VALID 。
name: (可选)为这个操作取一个名字。
7)tf.nn.lrn
作用:局部响应归一化
Step 2:定义损失函数
def losses(logits, labels):

    '''Compute loss from logits and labels

    Args:

        logits: logits tensor, float, [batch_size, n_classes]

        labels: label tensor, tf.int32, [batch_size]

    Returns:

        loss tensor of float type

    '''

    with tf.variable_scope('loss') as scope:#sparse  不需要one hot encoding

        cross_entropy = tf.nn.sparse_softmax_cross_entropy_with_logits\

                        (logits=logits, labels=labels, name='xentropy_per_example')

        loss = tf.reduce_mean(cross_entropy, name='loss')

        tf.summary.scalar(scope.name+'/loss', loss)

    return loss
函数介绍:
1) tf.nn.sparse_softmax_cross_entropy_with_logits
sparse_softmax_cross_entropy_with_logits(

    _sentinel=None,

    labels=None,

    logits=None,

    name=None

)
作用:计算logits和labels之间的softmax交叉熵。
第一个参数logits:就是神经网络最后一层的输出,如果有batch的话,它的大小就是[batchsize,num_classes],单样本的话,大小就是num_classes。
第二个参数labels以前也必须是[batch_size, num_classes]否则无法做Cross Entropy(softmax_cross_entropy_with_logits的用法),这个函数改为限制更强的[batch_size],而值必须是从0开始编码的int32或int64,而且值范围是[0, num_class)。
2) tf.reduce_mean
作用:计算输入tensor的均值
3)tf.summary.scalar
scalar(

    name,

    tensor,

    collections=None,

    family=None

)
作用:输出一个包含单个标量值的Summary protocol buffer 。
Step 3:定义训练方法
def trainning(loss, learning_rate):

    '''Training ops, the Op returned by this function is what must be passed to

        'sess.run()' call to cause the model to train.

    Args:

        loss: loss tensor, from losses()

    Returns:

        train_op: The op for trainning

    '''

    with tf.name_scope('optimizer'):

        optimizer = tf.train.AdamOptimizer(learning_rate= learning_rate)

        global_step = tf.Variable(0, name='global_step', trainable=False)

        train_op = optimizer.minimize(loss, global_step= global_step)

    return train_op
函数介绍:
1)tf.train.AdamOptimizer
__init__(

    learning_rate=0.001,

    beta1=0.9,

    beta2=0.999,

    epsilon=1e-08,

    use_locking=False,

    name='Adam'

)
作用:利用Adam algorithm来
2)optimizer.minimize
minimize(

    loss,

    global_step=None,

    var_list=None,

    gate_gradients=GATE_OP,

    aggregation_method=None,

    colocate_gradients_with_ops=False,

    name=None,

    grad_loss=None

)
作用:最小化loss。
global_step: Optional Variable to increment by one after the variables have been updated.
Step4:定义评估方法
def evaluation(logits, labels):

  """Evaluate the quality of the logits at predicting the label.

  Args:

    logits: Logits tensor, float - [batch_size, NUM_CLASSES].

    labels: Labels tensor, int32 - [batch_size], with values in the

      range [0, NUM_CLASSES).

  Returns:

    A scalar int32 tensor with the number of examples (out of batch_size)

    that were predicted correctly.

  """

  with tf.variable_scope('accuracy') as scope:

      correct = tf.nn.in_top_k(logits, labels, 1)

      correct = tf.cast(correct, tf.float16)

      accuracy = tf.reduce_mean(correct)

      tf.summary.scalar(scope.name+'/accuracy', accuracy)

  return accuracy
函数介绍:
1)tf.nn.in_top_k
in_top_k(

    predictions,

    targets,

    k,

    name=None

)
作用:返回targets是否位于前K个predictions中,True或者False。
Predictions:float32类型的Tensor,大小为batch_size x classes
Targets:必须是int32或者int64的Tensor。类id组成的batch_size大小的向量。
说明:
代码来自:https://github.com/kevin28520/My-TensorFlow-tutorials,略有修改
函数作用主要参考tensorflow官网。https://www.tensorflow.org/versions/master/api_docs/
[Kaggle] dogs-vs-cats之建立模型的更多相关文章
- 揭秘Keras推荐系统如何建立模型、获取用户爱好
你是否有过这样的经历?当你在亚马逊商城浏览一些书籍,或者购买过一些书籍后,你的偏好就会被系统学到,系统会基于一些假设为你推荐相关书目.为什么系统会知道,在这背后又藏着哪些秘密呢? 荐系统可以从百万甚至 ...
- django模型:为已存在的表建立模型
为已经存在的表建立模型:参考https://blog.csdn.net/opera95/article/details/78200024 为已经存在的表建立模型1.python manage.py i ...
- pytorch 建立模型的几种方法
利用pytorch来构建网络模型,常用的有如下三种方式 前向传播网络具有如下结构: 卷积层-->Relu层-->池化层-->全连接层-->Relu层 对各Conv2d和Line ...
- 中文代码之Django官方入门:建立模型
参考编写你的第一个 Django 应用,第 2 部分 创建项目后,首先用中文命名应用: $ python3 manage.py startapp 投票 之后在models.py建立模型,其他各种相关配 ...
- 【探索之路】机器人篇(3)-给mwRobot建立模型
在创建一个mwRobot_description程序包那一节中,我们添加了依赖roscpp rospy std_msgs 和 urdf , 现在我们再添加一个xacro依赖. 如何添加依赖? 打开程 ...
- 黑马程序员——ARC机制总结和用ARC建立模型
ARC 全称:Automatic Reference Counting 使用ARC 只需要在建立一个新的项目的时候把 下面的√打上 Xcode5以后都会默认建议开发者使用ARC机制 新的项目中如果有部 ...
- entity framework 新手入门篇(1)-建立模型
entity framework是微软官方免费提供给大家的一套ORM(Object Relational Mapping对象关系映射)解决方案.它不仅可以帮助我们解决数据缓存的问题,还能在最小的开销下 ...
- iOS开发之字典数据建立模型步骤
1. 在控制器属性的(questions)set方法中完成字典转模型的操作 - (NSArray *)questions { if (nil == _questions) { //1.加载plist文 ...
- SVM:随机产生100个点,建立模型,找出超平面方程——Jaosn niu
import numpy as np import pylab as pl from sklearn import svm # we create 40 separable points #np.ra ...
随机推荐
- 剑指Offer-孩子们的游戏(圆圈中最后剩下的数)
package Other; import java.util.LinkedList; /** * 孩子们的游戏(圆圈中最后剩下的数) * 每年六一儿童节,牛客都会准备一些小礼物去看望孤儿院的小朋友, ...
- 基于jQuery/zepto的单页应用(SPA)搭建方案
这里介绍一个基于jquery或zepto的单页面应用方案,遵循尽可能简单的原则,使大家一目了然,只需配置一个路由,之后完全按照jq日常写法即可完成.可做学习使用,也可修改后用于一些业务逻辑简单的spa ...
- Ubuntu 14.04下Hadoop2.4.1集群安装配置教程
一.环境 系统: Ubuntu 14.04 64bit Hadoop版本: hadoop 2.4.1 (stable) JDK版本: OpenJDK 7 台作为Master,另3台作为Slave. 所 ...
- python基础学习笔记二之列表
1.列表 ①列表的创建: ②列表的查询(索引): ③列表的切片操作: 此处要注意到:返回索引0到3的元素,顾头不顾尾. ④列表的增加: s.append() #直接在结尾追加 s.insert() ...
- Orcle查询优化改写-----单表查询
1.将空值转化为实际值 coalesce 返回第一个不是null的参数 2.查询满足多个条件的行 需要注意,对于多个条件组合,要使用括号,这样在更改维护语句时可以不吸烟再考虑优先级问题,而且可以很容 ...
- SQL中的DML、DDL以及DCL
DML(data manipulation language)是数据操纵语言:它们是SELECT.UPDATE.INSERT.DELETE,就象它的名字一样,这4条命令是用来对数据库里的数据进行操作的 ...
- 利用拷贝data目录文件的方式迁移mysql数据库
其实迁移数据库,一般用sql文件就行,把A服务器数据库的表结构和数据等等导出,然后导入到B服务器数据库, 但是这次数据文件过大,大约有40个G,使用命令行导入,效果不是很好,经常在执行过程中报错.卡死 ...
- 利用PCA降维
参考:<机器学习实战>- Machine Learning in Action 一. 基本思想 PCA(Principal Component Analysis),主成分分析.是目前应用 ...
- 冲刺No.4
Alpha冲刺第四天 站立式会议 项目进展 今日团队开始对项目的核心功能中的事务管理员模块与学生模块进行了编码,主要内容是对学生基本信息的增删改与事务管理员信息的增删改,这部分的内容是整个项目最基础的 ...
- 20162328蔡文琛week04
学号 20162328 <程序设计与数据结构>第4周学习总结 教材学习内容总结 本周学习了第四章和第七章,第四章中的内容已经有了初步定的掌握,布尔表达式的运用,是条件和循环语句的基础及数组 ...