机器学习-svd实现人脸识别
加载sklearn中的人脸数据集
from sklearn.datasets import fetch_lfw_people

faces = fetch_lfw_people()
执行上面的第二行程序,python会从网上下载labeled_face_wild people数据集,这个数据集大概200M,因为墙的原因下载很慢失败。
使用百度云下载该数据集,是个.tgz的压缩包
把下载好的压缩包放入C:\Users\Tim\scikit_learn_data\lfw_home,其中yyy是我的用户名,再次运行faces = fetch_lfw_people(),成功,jupyter notebook中的输出如下:
from sklearn.datasets import fetch_lfw_people

faces = fetch_lfw_people(min_faces_per_person=60)

print(faces.target_names)

print(faces.images.shape)
['Donald Rumsfeld' 'George W Bush' 'Gerhard Schroeder' 'Junichiro Koizumi'

 'Tony Blair']

(964, 62, 47)
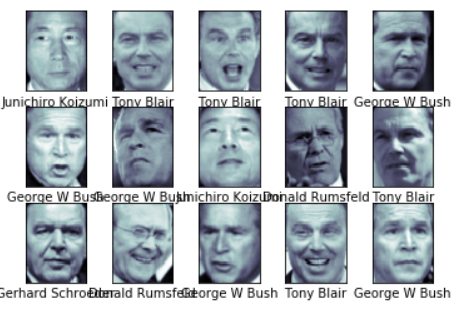
# 进行完上一步还可以看一下图片长什么样子
import matplotlib.pyplot as plt

%matplotlib inline

fig, ax = plt.subplots(3, 5)

for i, axi in enumerate(ax.flat):

    axi.imshow(faces.images[i], cmap='bone')

    axi.set(xticks=[], yticks=[],

            xlabel=faces.target_names[faces.target[i]])
解决人脸识别(jupyter)
人脸识别是一个分类问题,因为机器学习中svd属于王霸地位(深度学习不算),所以使用svd对图像进行训练。
# svc 支持向量解决分类问题

from sklearn.svm import SVC

# 图片的维度太高,降维

from sklearn.decomposition import PCA

# 管道

from sklearn.pipeline import make_pipeline

pca = PCA(n_components=150, whiten=True, random_state=42)

svc = SVC(kernel='rbf', class_weight='balanced')

model = make_pipeline(pca, svc)
和上一步一样看看我们数据的同时加载数据
from sklearn.datasets import fetch_lfw_people

faces = fetch_lfw_people(min_faces_per_person=60)

print(faces.target_names)

print(faces.images.shape)

import matplotlib.pyplot as plt

%matplotlib inline

fig, ax = plt.subplots(3, 5)

for i, axi in enumerate(ax.flat):

    axi.imshow(faces.images[i], cmap='bone')

    axi.set(xticks=[], yticks=[],

            xlabel=faces.target_names[faces.target[i]])
切分训练集和测试集
from sklearn.model_selection import train_test_split

Xtrain, Xtest, ytrain, ytest = train_test_split(faces.data, faces.target,

                                                random_state=40)
# 进行训练
from sklearn.model_selection import GridSearchCV

param_grid = {'svc__C': [1, 5, 10],

              'svc__gamma': [0.0001, 0.0005, 0.001]}

grid = GridSearchCV(model, param_grid)

%time grid.fit(Xtrain, ytrain)
GridSearchCV(cv='warn', error_score='raise-deprecating',

             estimator=Pipeline(memory=None,

                                steps=[('pca',

                                        PCA(copy=True, iterated_power='auto',

                                            n_components=150, random_state=42,

                                            svd_solver='auto', tol=0.0,

                                            whiten=True)),

                                       ('svc',

                                        SVC(C=1.0, cache_size=200,

                                            class_weight='balanced', coef0=0.0,

                                            decision_function_shape='ovr',

                                            degree=3, gamma='auto_deprecated',

                                            kernel='rbf', max_iter=-1,

                                            probability=False,

                                            random_state=None, shrinking=True,

                                            tol=0.001, verbose=False))],

                                verbose=False),

             iid='warn', n_jobs=None,

             param_grid={'svc__C': [1, 5, 10],

                         'svc__gamma': [0.0001, 0.0005, 0.001]},

             pre_dispatch='2*n_jobs', refit=True, return_train_score=False,

             scoring=None, verbose=0)
print(grid.best_params_)
{'svc__C': 10, 'svc__gamma': 0.0001}查看测试集的测试结果
model = grid.best_estimator_

yfit = model.predict(Xtest)

yfit.shape

import matplotlib as mpl

# 防止中文报错

mpl.rcParams["font.sans-serif"] = ["SimHei"]

mpl.rcParams["axes.unicode_minus"] = False

# 画图

fig, ax = plt.subplots(4, 6)

for i, axi in enumerate(ax.flat):

    # 调整像素为[62,47]

    axi.imshow(Xtest[i].reshape(62, 47), cmap='bone')

    axi.set(xticks=[], yticks=[])

    # 截取目标名字的最后一组字

    axi.set_ylabel(faces.target_names[yfit[i]].split()[-1],

                   color='black' if yfit[i] == ytest[i] else 'red')

fig.suptitle('预测错误的名字被红色标注', size=14);
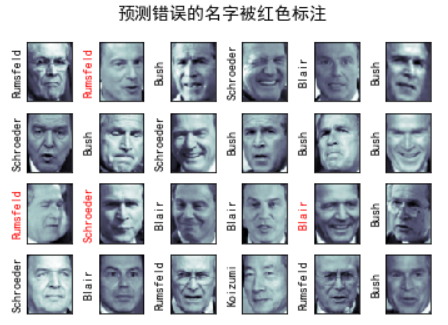
可以看到预测错误了四个,准确率欠佳,下面打印分类报告
from sklearn.metrics import classification_report

print(classification_report(ytest, yfit,

                            target_names=faces.target_names))
                   precision    recall  f1-score   support

  Donald Rumsfeld       0.75      0.87      0.81        31

    George W Bush       0.97      0.92      0.94       124

Gerhard Schroeder       0.80      0.83      0.81        29

Junichiro Koizumi       1.00      1.00      1.00        16

       Tony Blair       0.85      0.85      0.85        41

         accuracy                           0.90       241

        macro avg       0.87      0.89      0.88       241

     weighted avg       0.90      0.90      0.90       241
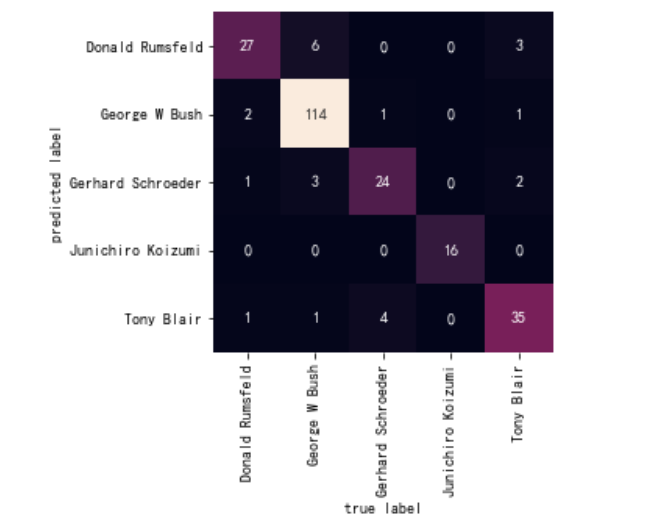
最后使用seaborn的heatmap打印混淆矩阵
import seaborn as sns

from sklearn.metrics import confusion_matrix

# 混淆矩阵

mat = confusion_matrix(ytest, yfit)

# 注意这里的混淆矩阵的画图

sns.heatmap(mat.T, square=True, annot=True, fmt='d', cbar=False,

            xticklabels=faces.target_names,

            yticklabels=faces.target_names)

plt.xlabel('true label')

plt.ylabel('predicted label');
对于svd不懂得可以转头看一下,svm原理
机器学习-svd实现人脸识别的更多相关文章
- 机器学习实战:用nodejs实现人脸识别
机器学习实战:用nodejs实现人脸识别 在本文中,我将向你展示如何使用face-recognition.js执行可靠的人脸检测和识别 . 我曾经试图找一个能够精确识别人脸的Node.js库,但是 ...
- 百度DMLC分布式深度机器学习开源项目(简称“深盟”)上线了如xgboost(速度快效果好的Boosting模型)、CXXNET(极致的C++深度学习库)、Minerva(高效灵活的并行深度学习引擎)以及Parameter Server(一小时训练600T数据)等产品,在语音识别、OCR识别、人脸识别以及计算效率提升上发布了多个成熟产品。
百度为何开源深度机器学习平台? 有一系列领先优势的百度却选择开源其深度机器学习平台,为何交底自己的核心技术?深思之下,却是在面对业界无奈时的远见之举. 5月20日,百度在github上开源了其 ...
- 写给程序员的机器学习入门 (十) - 对象识别 Faster-RCNN - 识别人脸位置与是否戴口罩
每次看到大数据人脸识别抓逃犯的新闻我都会感叹技术发展的太快了,国家治安水平也越来越好了
- 基于机器学习人脸识别face recognition具体的算法和原理
引自:http://blog.csdn.net/eclipsesy/article/details/78388468?utm_source=debugrun&utm_medium=referr ...
- 简单机器学习人脸识别工具face-recognition python小试,一行代码实现人脸识别
摘要: 1行代码实现人脸识别,1. 首先你需要提供一个文件夹,里面是所有你希望系统认识的人的图片.其中每个人一张图片,图片以人的名字命名.2. 接下来,你需要准备另一个文件夹,里面是你要识别的图片.3 ...
- 机器学习:PCA(人脸识别中的应用——特征脸)
一.思维理解 X:原始数据集: Wk:原始数据集 X 的前 K 个主成分: Xk:n 维的原始数据降维到 k 维后的数据集: 将原始数据集降维,就是将数据集中的每一个样本降维:X(i) . WkT = ...
- 机器学习 - 算法 - SVM 支持向量机 Py 实现 / 人脸识别案例
SVM 代码实现展示 相关模块引入 %matplotlib inline import numpy as np import matplotlib.pyplot as plt from scipy i ...
- [机器学习][face recognition] 一个视频人脸识别实现
开发环境和用到的库: Ubuntu jupyter notebook(python3.6) OpenCV Dlib face_recognition 实现效果如下(视频截图): #coding=utf ...
- 主成分分析 (PCA) 与其高维度下python实现(简单人脸识别)
Introduction 主成分分析(Principal Components Analysis)是一种对特征进行降维的方法.由于观测指标间存在相关性,将导致信息的重叠与低效,我们倾向于用少量的.尽可 ...
随机推荐
- avalon background-image写法
ms-css="{backgroundImage: 'url('+reportdata.avatar + ')'}"
- AT2306 Rearranging
有一个显然的,就是不互质的数的相对位置是不会改变的,那么我们把它们放到一个连通块里面去,然后我交换就是交换两个里面最小的对吧.直接连起来然后跑\(TopSort\)就行了. #include<s ...
- RK3288 修改ddr频率
转载请注明出处:https://www.cnblogs.com/lialong1st/p/10912334.html CPU:RK3288 系统:Android 5.1 RK3288 的 ddr 频率 ...
- numpy模块-渐入佳境
1.多维数组降为一维: numpy中的ravel().flatten().squeeze()的用法与区别 2. axis的理解 Python之NumPy(axis=0/1/2...)的透彻理解——通过 ...
- Java 内存模型学习笔记
1.Java类 public class Math { public static final Integer CONSTANT = 666; public int math(){ int a = 1 ...
- 【Oracle/Java】以Insert ALL方式向表中插入百万条记录,耗时9分17秒
由于按一千条一插程序长期无反应,之后改为百条一插方式,运行完发现插入百万记录需要9m17s,虽然比MySQL效率差,但比单条插入已经好不少了. 对Oracle的批量插入语法不明的请参考:https:/ ...
- Mac中好用的快捷键
1.safari safariy页面刷新:Command+R,类似于Win系统里面的F5
- ObjectAnimator简单示例
<?xml version="1.0" encoding="utf-8"?> <LinearLayout xmlns:android=&quo ...
- 基于Android的ADT目录
src: 源代码(重要) gen : 工具自动生成的代码 > BUildconfig 调试的开关,默认开启 > R.java 很多的静态的内部类 > 开发用的jar包 Android ...
- rf笔记
1.使用robot 用例绝对路径 可执行用例 2.robot --h 可以查看命令用法 3. 创建字典 *** Settings *** Library Collections *** ...