
实验 3:Mininet 实验——测量路径的损耗率
实验目的
在实验 2 的基础上进一步熟悉 Mininet 自定义拓扑脚本,以及与损耗率相关的设
定;初步了解 Mininet 安装时自带的 POX 控制器脚本编写,测试路径损耗率。
实验任务

h0 向 h1 发送数据包,由于在 Mininet 脚本中设置了连接损耗率,在传输过程中
会丢失一些包,本次实验的目的是展示如何通过控制器计算路径损耗速率(h0-
s0-s1-h1)。这里假设控制器预先知道网络拓扑。控制器将向 s0 和 s1 发送
flow_stats_request,当控制器接收到来自 s0 的 response 时,将特定流的数据包
数保存在 input_pkts 中,当控制器接收到来自 s1 的 response 时,将接收到特定
流的数据包数保存在 output_pkts 中,差值就是丢失的数据包数量。
基于上述拓扑,编写 Mininet 脚本,设置特定的交换机间的路径损耗速率,然后
编写 POX 控制器脚本,实现对路径的损耗率的测量。
实验步骤
实验环境
安装了 Ubuntu 18.04.5 Desktop amd64 的虚拟机
实验过程
SDNLAB 实验参考资料:https://www.sdnlab.com/15100.html
新建并编辑 pox 脚本 flowstat.py:

代码如下:
#!/usr/bin/python

# Copyright 2012 William Yu

# wyu@ateneo.edu

#

# This file is part of POX.

#

# POX is free software: you can redistribute it and/or modify

# it under the terms of the GNU General Public License as published by

# the Free Software Foundation, either version 3 of the License, or

# (at your option) any later version.

#

# POX is distributed in the hope that it will be useful,

# but WITHOUT ANY WARRANTY; without even the implied warranty of

# MERCHANTABILITY or FITNESS FOR A PARTICULAR PURPOSE. See the

# GNU General Public License for more details.

#

# You should have received a copy of the GNU General Public License

# along with POX. If not, see <http://www.gnu.org/licenses/>.

#

"""

This is a demonstration file created to show how to obtain flow

and port statistics from OpenFlow 1.0-enabled switches. The flow

statistics handler contains a summary of web-only traffic.

"""

# standard includes

from pox.core import core

from pox.lib.util import dpidToStr

import pox.openflow.libopenflow_01 as of

from pox.lib.addresses import IPAddr, EthAddr

# include as part of the betta branch

from pox.openflow.of_json import *

from pox.lib.recoco import Timer

import time

log = core.getLogger()

src_dpid = 0

dst_dpid = 0

input_pkts = 0

output_pkts = 0

def getTheTime():  #fuction to create a timestamp

  flock = time.localtime()

  then = "[%s-%s-%s" %(str(flock.tm_year),str(flock.tm_mon),str(flock.tm_mday))

  if int(flock.tm_hour)<10:

    hrs = "0%s" % (str(flock.tm_hour))

  else:

    hrs = str(flock.tm_hour)

  if int(flock.tm_min)<10:

    mins = "0%s" % (str(flock.tm_min))

  else:

    mins = str(flock.tm_min)

  if int(flock.tm_sec)<10:

    secs = "0%s" % (str(flock.tm_sec))

  else:

    secs = str(flock.tm_sec)

  then +="]%s.%s.%s" % (hrs,mins,secs)

  return then

# handler for timer function that sends the requests to all the

# switches connected to the controller.

def _timer_func ():

  for connection in core.openflow._connections.values():

    connection.send(of.ofp_stats_request(body=of.ofp_flow_stats_request()))

    connection.send(of.ofp_stats_request(body=of.ofp_port_stats_request()))

  log.debug("Sent %i flow/port stats request(s)", len(core.openflow._connections))

# handler to display flow statistics received in JSON format

# structure of event.stats is defined by ofp_flow_stats()

def _handle_flowstats_received (event):

   #stats = flow_stats_to_list(event.stats)

   #log.debug("FlowStatsReceived from %s: %s", dpidToStr(event.connection.dpid), stats)

   global src_dpid, dst_dpid, input_pkts, output_pkts

   #print "src_dpid=", dpidToStr(src_dpid), "dst_dpid=", dpidToStr(dst_dpid)

   for f in event.stats:

     if f.match.dl_type==0x0800 and f.match.nw_dst==IPAddr("192.168.123.2") and f.match.nw_tos==0x64 and event.connection.dpid==src_dpid:

       #print "input: ", f.byte_count, f.packet_count

       input_pkts = f.packet_count

     if f.match.dl_type==0x0800 and f.match.nw_dst==IPAddr("192.168.123.2") and f.match.nw_tos==0x64 and event.connection.dpid==dst_dpid:

       #print "output: ", f.byte_count, f.packet_count

       output_pkts = f.packet_count

       if input_pkts !=0:

         print getTheTime(), "Path Loss Rate =", (input_pkts-output_pkts)*1.0/input_pkts*100, "%"

# handler to display port statistics received in JSON format

def _handle_portstats_received (event):

   #print "\n<<<STATS-REPLY: Return PORT stats for Switch", event.connection.dpid,"at ",getTheTime()

   #for f in event.stats:

      #if int(f.port_no)<65534:

        #print "   PortNo:", f.port_no, " Fwd's Pkts:", f.tx_packets, " Fwd's Bytes:", f.tx_bytes, " Rc'd Pkts:", f.rx_packets, " Rc's Bytes:", f.rx_bytes

        #print "   PortNo:", f.port_no,  " TxDrop:", f.tx_dropped, " RxDrop:", f.rx_dropped, " TxErr:", f.tx_errors, " RxErr:", f.rx_errors, " CRC:", f.rx_crc_err, " Coll:", f.collisions

  stats = flow_stats_to_list(event.stats)

  log.debug("PortStatsReceived from %s: %s", dpidToStr(event.connection.dpid), stats)

def _handle_ConnectionUp (event):

  global src_dpid, dst_dpid

  print "ConnectionUp: ", dpidToStr(event.connection.dpid)

  for m in event.connection.features.ports:

    if m.name == "s0-eth0":

      src_dpid = event.connection.dpid

    elif m.name == "s1-eth0":

      dst_dpid = event.connection.dpid

  msg = of.ofp_flow_mod()

  msg.priority =1

  msg.idle_timeout = 0

  msg.match.in_port =1

  msg.actions.append(of.ofp_action_output(port = of.OFPP_ALL))

  event.connection.send(msg)

  msg = of.ofp_flow_mod()

  msg.priority =1

  msg.idle_timeout = 0

  msg.match.in_port =2

  msg.actions.append(of.ofp_action_output(port = of.OFPP_ALL))

  event.connection.send(msg)

  msg = of.ofp_flow_mod()

  msg.priority =10

  msg.idle_timeout = 0

  msg.hard_timeout = 0

  msg.match.dl_type = 0x0800

  msg.match.nw_tos = 0x64

  msg.match.in_port=1

  msg.match.nw_dst = "192.168.123.2"

  msg.actions.append(of.ofp_action_output(port = 2))

  event.connection.send(msg)

  msg = of.ofp_flow_mod()

  msg.priority =10

  msg.idle_timeout = 0

  msg.hard_timeout = 0

  msg.match.dl_type = 0x0800

  msg.match.nw_tos = 0x64

  msg.match.nw_dst = "192.168.123.1"

  msg.actions.append(of.ofp_action_output(port = 1))

  event.connection.send(msg)

# main functiont to launch the module

def launch ():

  # attach handsers to listners

  core.openflow.addListenerByName("FlowStatsReceived",

    _handle_flowstats_received)

  core.openflow.addListenerByName("PortStatsReceived",

    _handle_portstats_received)

  core.openflow.addListenerByName("ConnectionUp", _handle_ConnectionUp)

  # timer set to execute every five seconds

  Timer(1, _timer_func, recurring=True)
在 pox 安装目录下(Mininet 完整安装包含了 pox)执行以下命令运行 pox 脚本
$ ./pox.py flowstat

编辑 Mininet 脚本 mymininet3.py
参照拓扑图,新建并编辑 Mininet 脚本 mymininet3.py,控制器因为安装在本机,
所以需修改参考资料代码中的控制器地址为 127.0.0.1:6633。
switch.cmd( 'ovs-vsctl set-controller dp0 tcp:127.0.0.1:6633' )

switch1.cmd( 'ovs-vsctl set-controller dp1 tcp:127.0.0.1:6633' )
设置 s0 和 s1 之间链路的丢包率为 0
info( "*** Creating links\n" )

 linkopts0=dict(bw=100, delay='1ms', loss=0)

 linkopts1=dict(bw=100, delay='1ms', loss=0)

 link0=TCLink( h0, switch, **linkopts0)

 link1 = TCLink( switch, switch1, **linkopts1)

 link2 = TCLink( h1, switch1, **linkopts0)
代码为:
#!/usr/bin/python

from mininet.net import Mininet

from mininet.node import Node

from mininet.link import TCLink

from mininet.log import  setLogLevel, info

from threading import Timer

from mininet.util import quietRun

from time import sleep

def myNet(cname='controller', cargs='-v ptcp:'):

    "Create network from scratch using Open vSwitch."

    info( "*** Creating nodes\n" )

    controller = Node( 'c0', inNamespace=False )

    switch = Node( 's0', inNamespace=False )

    switch1 = Node( 's1', inNamespace=False )

    h0 = Node( 'h0' )

    h1 = Node( 'h1' )

    info( "*** Creating links\n" )

    linkopts0=dict(bw=100, delay='1ms', loss=0)

    linkopts1=dict(bw=100, delay='1ms', loss=0)

    link0=TCLink( h0, switch, **linkopts0)

    link1 = TCLink( switch, switch1, **linkopts1)

    link2 = TCLink( h1, switch1, **linkopts0)

    #print link0.intf1, link0.intf2

    link0.intf2.setMAC("0:0:0:0:0:1")

    link1.intf1.setMAC("0:0:0:0:0:2")

    link1.intf2.setMAC("0:1:0:0:0:1")

    link2.intf2.setMAC("0:1:0:0:0:2")

    info( "*** Configuring hosts\n" )

    h0.setIP( '192.168.123.1/24' )

    h1.setIP( '192.168.123.2/24' )

    info( "*** Starting network using Open vSwitch\n" )

    switch.cmd( 'ovs-vsctl del-br dp0' )

    switch.cmd( 'ovs-vsctl add-br dp0' )

    switch1.cmd( 'ovs-vsctl del-br dp1' )

    switch1.cmd( 'ovs-vsctl add-br dp1' )

    controller.cmd( cname + ' ' + cargs + '&' )

    for intf in switch.intfs.values():

        print intf

        print switch.cmd( 'ovs-vsctl add-port dp0 %s' % intf )

    for intf in switch1.intfs.values():

        print intf

        print switch1.cmd( 'ovs-vsctl add-port dp1 %s' % intf )

    # Note: controller and switch are in root namespace, and we

    # can connect via loopback interface

    switch.cmd( 'ovs-vsctl set-controller dp0 tcp:127.0.0.1:6633' )

    switch1.cmd( 'ovs-vsctl set-controller dp1 tcp:127.0.0.1:6633' )

    info( '*** Waiting for switch to connect to controller' )

    while 'is_connected' not in quietRun( 'ovs-vsctl show' ):

        sleep( 1 )

        info( '.' )

    info( '\n' )

    #info( "*** Running test\n" )

    h0.cmdPrint( 'ping -Q 0x64 -c 20 ' + h1.IP() )

    sleep( 1 )

    info( "*** Stopping network\n" )

    controller.cmd( 'kill %' + cname )

    switch.cmd( 'ovs-vsctl del-br dp0' )

    switch.deleteIntfs()

    switch1.cmd( 'ovs-vsctl del-br dp1' )

    switch1.deleteIntfs()

    info( '\n' )

if __name__ == '__main__':

    setLogLevel( 'info' )
再执行命令运行 Mininet 脚本 mymininet3.py
$ sudo python mymininet3.py

Ping 默认是每 1 秒钟测一次,ping 的结果会显示一个丢包率,这里的丢包率是根
据 ping 不通的次数占总次数的百分比计算得到的。上图中由于一共 ping 了 20
次,每次都能通,所以丢包率是 0。
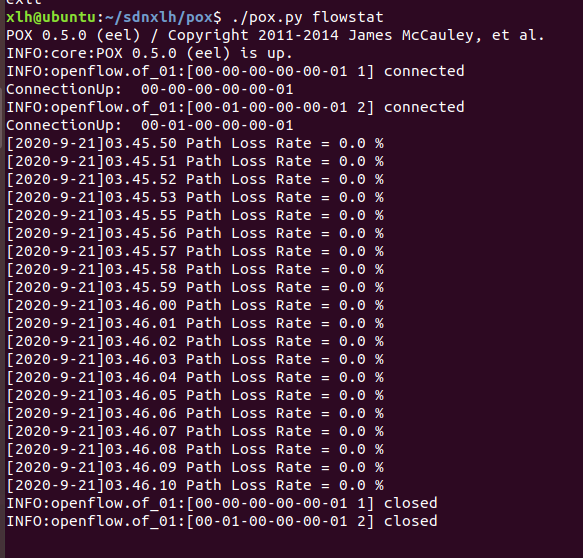
观察 pox 侧的实时状态更新
平均丢包率为 0,结果符合 Mininet 脚本中设置的损耗率,也有可能出现负值,
可以认为没有丢包。
如果修改代码中 s0 和 s1 之间链路的丢包率为 10。
 info( "*** Creating links\n" )

 linkopts0=dict(bw=100, delay='1ms', loss=0)

 linkopts1=dict(bw=100, delay='1ms', loss=10)

 link0=TCLink( h0, switch, **linkopts0)

 link1 = TCLink( switch, switch1, **linkopts1)

 link2 = TCLink( h1, switch1, **linkopts0)
重新运行 Mininet 脚本 mymininet3.py,20 秒时间的 ping 过程中有 icmp_seq 为
2/4/14/16/19/20 共 6 次 ping 不通,所以丢包率计算为 30%。

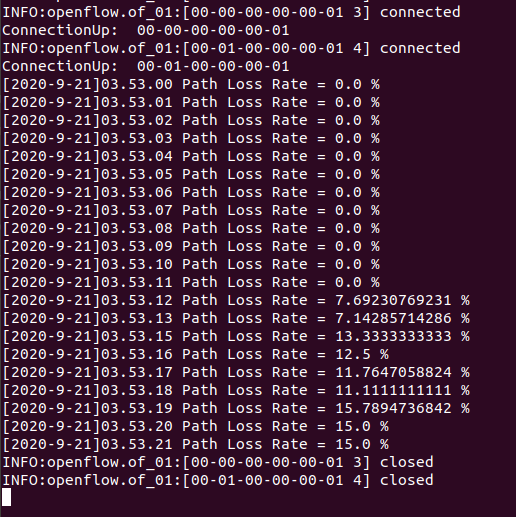
POX 端重新测试,会发现出现丢包现象,但是实际测量出的丢包率会有浮动,链
路的性能总体受到了限制。
实验总结
- 通过这次实验,我学会了测量路径的损耗率,熟悉了Mininet 自定义拓扑脚本,以及与损耗率相关的设定;初步了解 Mininet 安装时自带的 POX 控制器脚本编写。
实验 3:Mininet 实验——测量路径的损耗率的更多相关文章
- Mininet实验 基于Mininet测量路径的损耗率
实验原理 在SDN环境中,控制器可以通过对交换机下发流表操作来控制交换机的转发行为,此外,还可以利用控制器测量路径的损耗率.在本实验中,基于Mininet脚本,设置特定的交换机间的路径损耗速率,然后编 ...
- Mininet系列实验(四):基于Mininet测量路径的损耗率
1 实验目的 熟悉Mininet自定义拓扑脚本的编写与损耗率的设定: 熟悉编写POX脚本,测量路径损耗速率 2 实验原理 在SDN环境中,控制器可以通过对交换机下发流表操作来控制交换机的转发行为,此外 ...
- SDN实验 3: Mininet 实验——测量路径的损耗率
验 3:Mininet 实验--测量路径的损耗率 一.实验目的 在实验 2 的基础上进一步熟悉 Mininet 自定义拓扑脚本,以及与损耗率相关的设定:初步了解 Mininet 安装时自带的 POX ...
- 基于Mininet测量路径的损耗率
基于Mininet测量路径的损耗率 控制器采用POX,基于OVS仿真 Mininet脚本 创建Node mininet.node Node 创建链路连接 mininet.link TCLink 设置i ...
- 软件定义网络实验记录③--Mininet 实验——测量路径的损耗率
一.实验目的 在实验 2 的基础上进一步熟悉 Mininet 自定义拓扑脚本,以及与损耗率相关的设定: 初步了解 Mininet 安装时自带的 POX 控制器脚本编写,测试路径损耗率. 二.实验任务 ...
- 实验 3:Mininet 实验——测量路径的损耗率
一.实验目的 在实验 2 的基础上进一步熟悉 Mininet 自定义拓扑脚本,以及与损耗率相关的设定;初步了解 Mininet 安装时自带的 POX 控制器脚本编写,测试路径损耗率. 二.实验任务 h ...
- Mininet实验 基于Mininet实现BGP路径挟持攻击实验
参考:基于Mininet实现BGP路径挟持攻击实验 实验目的: 掌握如何mininet内模拟AS. 掌握BGP路径挟持的原理和分析过程. 实验原理: 互联网是由相互连接的自治系统AS组成的,通过一个通 ...
- 软件定义网络实验记录②--Mininet 实验——拓扑的命令脚本生成
一.实验目的 掌握 Mininet 的自定义拓扑生成方法:命令行创建.Python 脚本编写 二.实验任务 通过使用命令行创建.Python 脚本编写生成拓扑,熟悉 Mininet 的基本功能. 三. ...
- 实验 2:Mininet 实验——拓扑的命令脚本生成
一.实验目的 掌握 Mininet 的自定义拓扑生成方法:命令行创建.Python 脚本编写 二.实验任务 通过使用命令行创建.Python 脚本编写生成拓扑,熟悉 Mininet 的基本功能. 三. ...
随机推荐
- 解决VS Code安装golang相关插件失败问题
解决VS Code安装golang相关插件失败问题 VSCode作为一款优秀的编辑器,基本上前端开发,Python,markdown都可以用,真正是开发过程中的好帮手,所以学习go也当仁不让的要用vs ...
- wsgi的environ变量
The environ dictionary is required to contain these CGI environment variables, as defined by the Com ...
- cinder migrate基础内容-源码分析
一.cinder-api服务入口 D:\code-program\cinder-codejuno\api\contrib\admin_actions.py from cinder import vol ...
- Reinforcement Learning, Fast and Slow
郑重声明:原文参见标题,如有侵权,请联系作者,将会撤销发布! 1 DeepMind, London, UK2 University College London, London, UK3 Prince ...
- SPSSAU数据分析思维培养系列2:方法选择篇
大家好!在上篇文章中,我们一起学习了如何[掌握正确的数据处理思维].在完成数据准备和清理工作后,就要进入到正式分析阶段,而选择什么样的数据分析方法进行分析是关键. 想要进行科学和系统化的数据分析,分析 ...
- 玩转Spring——Spring IOC/DI
什么是IOCioc :Inversion of Control,即控制反转. 它不是一种技术,而是一种设计思想,即java程序中获取对象的方式发生反转,由最初的new方式创建,转变成由第三方框架创建. ...
- 区块链入门到实战(37)之Solidity – 循环语句
与其他语言类似,Solidity语言支持循环结构,Solidity提供以下循环语句. while do ... while for 循环控制语句:break.continue. Solidity – ...
- vim缩写
vim缩写可以简化输入,如在Python调试中的logging.warning可以缩写为lgw,在使用时会提高效率. 一.设置缩写 在~/.vimrc增加: :abbreviate lgw loggi ...
- seo兼职顾问多少钱
http://www.wocaoseo.com/thread-199-1-1.html 随着近几年搜索引挚市场迅猛的发展,网络营销已成为企业销售的一大趋势,越来越多的企业开始投身于网络市 ...
- CSP 202006-1 线性分类器python实现
思路 这题问题是对于这一群点和一条直线,我们也不知道直线上方的是A类还是直线下方的是A类.其实对于这个二分类问题,我们也没必要知道.我们只需要判断直线每一测的点是不是一类(A类或B类)就可以了. 至于 ...