实验 3:Mininet 实验——测量路径的损耗率
一、实验目的
在实验 2 的基础上进一步熟悉 Mininet 自定义拓扑脚本,以及与损耗率相关的设定;初步了解 Mininet 安装时自带的 POX 控制器脚本编写,测试路径损耗率。
二、实验任务
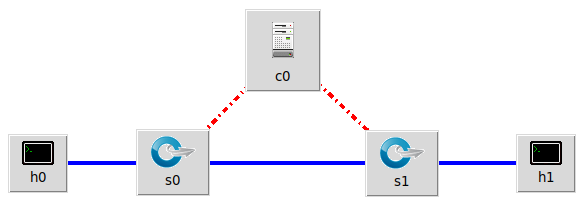
h0 向 h1 发送数据包,由于在 Mininet 脚本中设置了连接损耗率,在传输过程中会丢失一些包,本次实验的目的是展示如何通过控制器计算路径损耗速率(h0-s0-s1-h1)。这里假设控制器预先知道网络拓扑。控制器将向 s0 和 s1 发送flow_stats_request,当控制器接收到来自 s0 的 response 时,将特定流的数据包数保存在 input_pkts 中,当控制器接收到来自 s1 的 response 时,将接收到特定流的数据包数保存在 output_pkts 中,差值就是丢失的数据包数量。
基于上述拓扑,编写 Mininet 脚本,设置特定的交换机间的路径损耗速率,然后编写 POX 控制器脚本,实现对路径的损耗率的测量。
三、实验步骤
- 实验环境
安装了 Ubuntu 18.04.5 Desktop amd64 的虚拟机 - 实验过程
- 新建并编辑 pox 脚本 flow_stats.py:
# standard includes

from pox.core import core

from pox.lib.util import dpidToStr

import pox.openflow.libopenflow_01 as of

from pox.lib.addresses import IPAddr, EthAddr

# include as part of the betta branch

from pox.openflow.of_json import *

from pox.lib.recoco import Timer

import time

log = core.getLogger()

src_dpid = 0

dst_dpid = 0

input_pkts = 0

output_pkts = 0

def getTheTime():  #fuction to create a timestamp

  flock = time.localtime()

  then = "[%s-%s-%s" %(str(flock.tm_year),str(flock.tm_mon),str(flock.tm_mday))

  if int(flock.tm_hour)<10:

    hrs = "0%s" % (str(flock.tm_hour))

  else:

    hrs = str(flock.tm_hour)

  if int(flock.tm_min)<10:

    mins = "0%s" % (str(flock.tm_min))

  else:

    mins = str(flock.tm_min)

  if int(flock.tm_sec)<10:

    secs = "0%s" % (str(flock.tm_sec))

  else:

    secs = str(flock.tm_sec)

  then +="]%s.%s.%s" % (hrs,mins,secs)

  return then

# handler for timer function that sends the requests to all the

# switches connected to the controller.

def _timer_func ():

  for connection in core.openflow._connections.values():

    connection.send(of.ofp_stats_request(body=of.ofp_flow_stats_request()))

    connection.send(of.ofp_stats_request(body=of.ofp_port_stats_request()))

  log.debug("Sent %i flow/port stats request(s)", len(core.openflow._connections))

# handler to display flow statistics received in JSON format

# structure of event.stats is defined by ofp_flow_stats()

def _handle_flowstats_received (event):

   #stats = flow_stats_to_list(event.stats)

   #log.debug("FlowStatsReceived from %s: %s", dpidToStr(event.connection.dpid), stats)

   global src_dpid, dst_dpid, input_pkts, output_pkts

   #print "src_dpid=", dpidToStr(src_dpid), "dst_dpid=", dpidToStr(dst_dpid)

   for f in event.stats:

     if f.match.dl_type==0x0800 and f.match.nw_dst==IPAddr("192.168.123.2") and f.match.nw_tos==0x64 and event.connection.dpid==src_dpid:

       #print "input: ", f.byte_count, f.packet_count

       input_pkts = f.packet_count

     if f.match.dl_type==0x0800 and f.match.nw_dst==IPAddr("192.168.123.2") and f.match.nw_tos==0x64 and event.connection.dpid==dst_dpid:

       #print "output: ", f.byte_count, f.packet_count

       output_pkts = f.packet_count

       if input_pkts !=0:

         print getTheTime(), "Path Loss Rate =", (input_pkts-output_pkts)*1.0/input_pkts*100, "%"

# handler to display port statistics received in JSON format

def _handle_portstats_received (event):

   #print "\n<<<STATS-REPLY: Return PORT stats for Switch", event.connection.dpid,"at ",getTheTime()

   #for f in event.stats:

      #if int(f.port_no)<65534:

        #print "   PortNo:", f.port_no, " Fwd's Pkts:", f.tx_packets, " Fwd's Bytes:", f.tx_bytes, " Rc'd Pkts:", f.rx_packets, " Rc's Bytes:", f.rx_bytes

        #print "   PortNo:", f.port_no,  " TxDrop:", f.tx_dropped, " RxDrop:", f.rx_dropped, " TxErr:", f.tx_errors, " RxErr:", f.rx_errors, " CRC:", f.rx_crc_err, " Coll:", f.collisions

  stats = flow_stats_to_list(event.stats)

  log.debug("PortStatsReceived from %s: %s", dpidToStr(event.connection.dpid), stats)

def _handle_ConnectionUp (event):

  global src_dpid, dst_dpid

  print "ConnectionUp: ", dpidToStr(event.connection.dpid)

  for m in event.connection.features.ports:

    if m.name == "s0-eth0":

      src_dpid = event.connection.dpid

    elif m.name == "s1-eth0":

      dst_dpid = event.connection.dpid

  msg = of.ofp_flow_mod()

  msg.priority =1

  msg.idle_timeout = 0

  msg.match.in_port =1

  msg.actions.append(of.ofp_action_output(port = of.OFPP_ALL))

  event.connection.send(msg)

  msg = of.ofp_flow_mod()

  msg.priority =1

  msg.idle_timeout = 0

  msg.match.in_port =2

  msg.actions.append(of.ofp_action_output(port = of.OFPP_ALL))

  event.connection.send(msg)

  msg = of.ofp_flow_mod()

  msg.priority =10

  msg.idle_timeout = 0

  msg.hard_timeout = 0

  msg.match.dl_type = 0x0800

  msg.match.nw_tos = 0x64

  msg.match.in_port=1

  msg.match.nw_dst = "192.168.123.2"

  msg.actions.append(of.ofp_action_output(port = 2))

  event.connection.send(msg)

  msg = of.ofp_flow_mod()

  msg.priority =10

  msg.idle_timeout = 0

  msg.hard_timeout = 0

  msg.match.dl_type = 0x0800

  msg.match.nw_tos = 0x64

  msg.match.nw_dst = "192.168.123.1"

  msg.actions.append(of.ofp_action_output(port = 1))

  event.connection.send(msg)

# main functiont to launch the module

def launch ():

  # attach handsers to listners

  core.openflow.addListenerByName("FlowStatsReceived",

    _handle_flowstats_received)

  core.openflow.addListenerByName("PortStatsReceived",

    _handle_portstats_received)

  core.openflow.addListenerByName("ConnectionUp", _handle_ConnectionUp)

  # timer set to execute every five seconds

  Timer(1, _timer_func, recurring=True)
- 在 pox 安装目录下(Mininet 完整安装包含了 pox)执行以下命令运行 pox 脚本
$ ./pox.py flow_stats
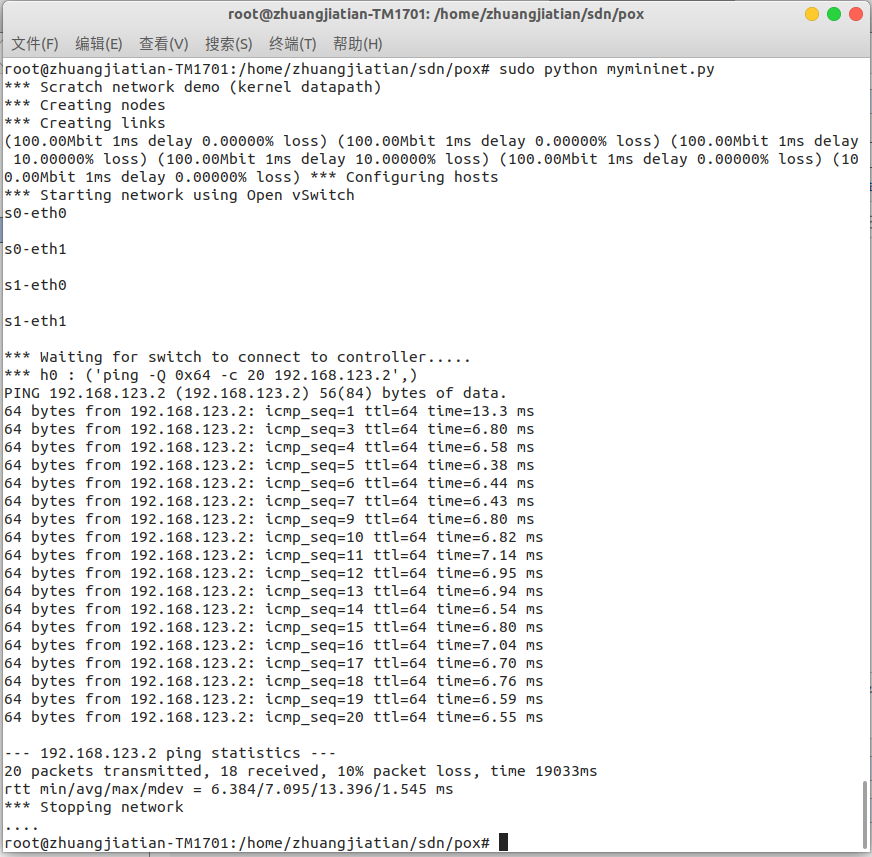
- 编辑 Mininet 脚本 mymininet.py
#!/usr/bin/python

from mininet.net import Mininet

from mininet.node import Node

from mininet.link import TCLink

from mininet.log import  setLogLevel, info

from threading import Timer

from mininet.util import quietRun

from time import sleep

def myNet(cname='controller', cargs='-v ptcp:'):

    "Create network from scratch using Open vSwitch."

    info( "*** Creating nodes\n" )

    controller = Node( 'c0', inNamespace=False )

    switch = Node( 's0', inNamespace=False )

    switch1 = Node( 's1', inNamespace=False )

    h0 = Node( 'h0' )

    h1 = Node( 'h1' )

    info( "*** Creating links\n" )

    linkopts0=dict(bw=100, delay='1ms', loss=0)

    linkopts1=dict(bw=100, delay='1ms', loss=0)

    link0=TCLink( h0, switch, **linkopts0)

    link1 = TCLink( switch, switch1, **linkopts1)

    link2 = TCLink( h1, switch1, **linkopts0)

    #print link0.intf1, link0.intf2

    link0.intf2.setMAC("0:0:0:0:0:1")

    link1.intf1.setMAC("0:0:0:0:0:2")

    link1.intf2.setMAC("0:1:0:0:0:1")

    link2.intf2.setMAC("0:1:0:0:0:2")

    info( "*** Configuring hosts\n" )

    h0.setIP( '192.168.123.1/24' )

    h1.setIP( '192.168.123.2/24' )

    info( "*** Starting network using Open vSwitch\n" )

    switch.cmd( 'ovs-vsctl del-br dp0' )

    switch.cmd( 'ovs-vsctl add-br dp0' )

    switch1.cmd( 'ovs-vsctl del-br dp1' )

    switch1.cmd( 'ovs-vsctl add-br dp1' )

    controller.cmd( cname + ' ' + cargs + '&' )

    for intf in switch.intfs.values():

        print intf

        print switch.cmd( 'ovs-vsctl add-port dp0 %s' % intf )

    for intf in switch1.intfs.values():

        print intf

        print switch1.cmd( 'ovs-vsctl add-port dp1 %s' % intf )

    # Note: controller and switch are in root namespace, and we

    # can connect via loopback interface

    switch.cmd( 'ovs-vsctl set-controller dp0 tcp:127.0.0.1:6633' )

    switch1.cmd( 'ovs-vsctl set-controller dp1 tcp:127.0.0.1:6633' )

    info( '*** Waiting for switch to connect to controller' )

    while 'is_connected' not in quietRun( 'ovs-vsctl show' ):

        sleep( 1 )

        info( '.' )

    info( '\n' )

    #info( "*** Running test\n" )

    h0.cmdPrint( 'ping -Q 0x64 -c 20 ' + h1.IP() )

    sleep( 1 )

    info( "*** Stopping network\n" )

    controller.cmd( 'kill %' + cname )

    switch.cmd( 'ovs-vsctl del-br dp0' )

    switch.deleteIntfs()

    switch1.cmd( 'ovs-vsctl del-br dp1' )

    switch1.deleteIntfs()

    info( '\n' )

if __name__ == '__main__':

    setLogLevel( 'info' )

    info( '*** Scratch network demo (kernel datapath)\n' )

    Mininet.init()

    myNet()!
- 执行命令运行 Mininet 脚本 mymininet.py
$ sudo python mymininet.py
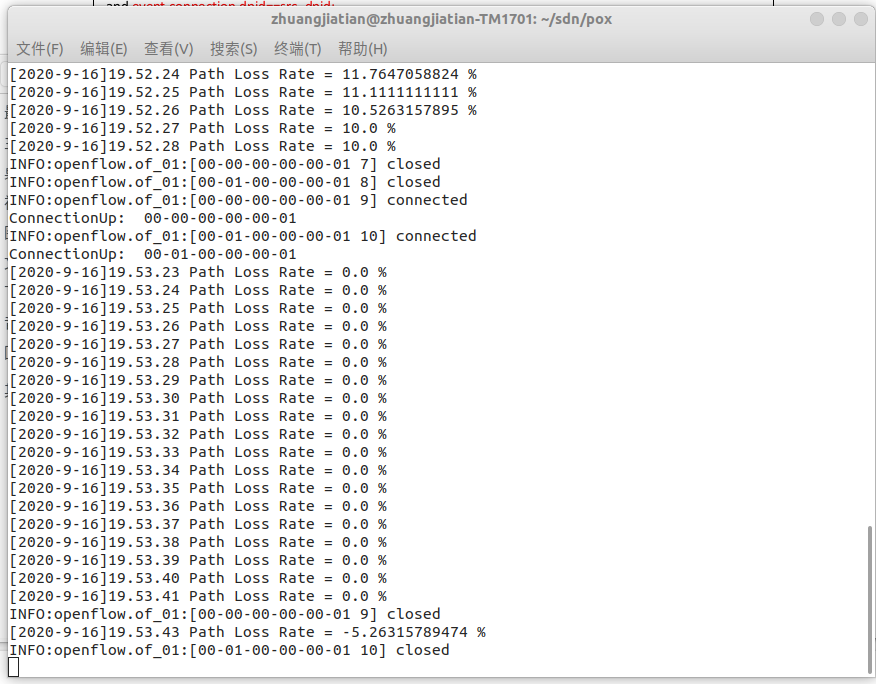

Ping 默认是每 1 秒钟测一次, ping 的结果会显示一个丢包率,这里的丢包率是根据 ping 不通的次数占总次数的百分比计算得到的。上图中由于一共 ping 了 20次,每次都能通,所以丢包率是 0。观察 pox 侧的实时状态更新平均丢包率为 0,结果符合 Mininet 脚本中设置的损耗率,也有可能出现负值,可以认为没有丢包。
如果修改代码中 s0 和 s1 之间链路的丢包率为 10。
info( "*** Creating links\n" )

linkopts0=dict(bw=100, delay='1ms', loss=0)

linkopts1=dict(bw=100, delay='1ms', loss=10)

link0=TCLink( h0, switch, **linkopts0)

link1 = TCLink( switch, switch1, **linkopts1)

link2 = TCLink( h1, switch1, **linkopts0)
重新运行 Mininet 脚本 mymininet3.py,20 秒时间的 ping 过程中有 icmp_seq 为
2/8 共 2 次 ping 不通,所以丢包率计算为 10%。

四、实验心得
通过本次实验,在实验2的基础上进一步熟悉Mininet自定义拓扑脚本,了解了Mininet安装时自带的POX控制器脚本编写,以及路径损耗率的测试方式。
实验 3:Mininet 实验——测量路径的损耗率的更多相关文章
- Mininet实验 基于Mininet测量路径的损耗率
实验原理 在SDN环境中,控制器可以通过对交换机下发流表操作来控制交换机的转发行为,此外,还可以利用控制器测量路径的损耗率.在本实验中,基于Mininet脚本,设置特定的交换机间的路径损耗速率,然后编 ...
- Mininet系列实验(四):基于Mininet测量路径的损耗率
1 实验目的 熟悉Mininet自定义拓扑脚本的编写与损耗率的设定: 熟悉编写POX脚本,测量路径损耗速率 2 实验原理 在SDN环境中,控制器可以通过对交换机下发流表操作来控制交换机的转发行为,此外 ...
- 实验 3:Mininet 实验——测量路径的损耗率
实验目的 在实验 2 的基础上进一步熟悉 Mininet 自定义拓扑脚本,以及与损耗率相关的设 定:初步了解 Mininet 安装时自带的 POX 控制器脚本编写,测试路径损耗率. 实验任务 h0 向 ...
- SDN实验 3: Mininet 实验——测量路径的损耗率
验 3:Mininet 实验--测量路径的损耗率 一.实验目的 在实验 2 的基础上进一步熟悉 Mininet 自定义拓扑脚本,以及与损耗率相关的设定:初步了解 Mininet 安装时自带的 POX ...
- 基于Mininet测量路径的损耗率
基于Mininet测量路径的损耗率 控制器采用POX,基于OVS仿真 Mininet脚本 创建Node mininet.node Node 创建链路连接 mininet.link TCLink 设置i ...
- 软件定义网络实验记录③--Mininet 实验——测量路径的损耗率
一.实验目的 在实验 2 的基础上进一步熟悉 Mininet 自定义拓扑脚本,以及与损耗率相关的设定: 初步了解 Mininet 安装时自带的 POX 控制器脚本编写,测试路径损耗率. 二.实验任务 ...
- Mininet实验 基于Mininet实现BGP路径挟持攻击实验
参考:基于Mininet实现BGP路径挟持攻击实验 实验目的: 掌握如何mininet内模拟AS. 掌握BGP路径挟持的原理和分析过程. 实验原理: 互联网是由相互连接的自治系统AS组成的,通过一个通 ...
- 软件定义网络实验记录②--Mininet 实验——拓扑的命令脚本生成
一.实验目的 掌握 Mininet 的自定义拓扑生成方法:命令行创建.Python 脚本编写 二.实验任务 通过使用命令行创建.Python 脚本编写生成拓扑,熟悉 Mininet 的基本功能. 三. ...
- 实验 2:Mininet 实验——拓扑的命令脚本生成
一.实验目的 掌握 Mininet 的自定义拓扑生成方法:命令行创建.Python 脚本编写 二.实验任务 通过使用命令行创建.Python 脚本编写生成拓扑,熟悉 Mininet 的基本功能. 三. ...
随机推荐
- sourse insight总是代码一写长了,就自动换行
sourse insight总是代码一写长了,就自动换行. Document Options里面Word Wrap选项不勾选.
- adb 打开手机端口进行无线模式调试
打开手机端口 让手机在指定的端口可以接收到TCP/IP连接. 确保手机开启了usb调试 用usb线把手机和电脑连接起来 执行命令:adb tcpip 5555 执行成功后就可以把usb线拔掉了,端口可 ...
- K - Queries for Number of Palindromes(区间dp+容斥)
You've got a string s = s1s2... s|s| of length |s|, consisting of lowercase English letters. There a ...
- Kubernetes K8S之资源控制器Job和CronJob详解
Kubernetes的资源控制器Job和CronJob详解与示例 主机配置规划 服务器名称(hostname) 系统版本 配置 内网IP 外网IP(模拟) k8s-master CentOS7.7 2 ...
- mysql通过经纬度查询400公里范围内的小区
mysql距离计算,单位m,以及排序 lng 经度 lat 纬度 一般地图上显示的坐标顺序为,纬度在前(范围-90~90),经度在后(范围-180~180) 传入参数 纬度 40.0497810000 ...
- 用Python写一个向数据库填充数据的小工具
一. 背景 公司又要做一个新项目,是一个合作型项目,我们公司出web展示服务,合作伙伴线下提供展示数据. 而且本次项目是数据统计展示为主要功能,并没有研发对应的数据接入接口,所有展示数据源均来自数据库 ...
- 使用 Promise 实现任务队列发送请求,实现最大请求数目限制
核心 设置最大请求数量,当前请求数量,待执行队列 调用时,创建一个新任务,然后判断是否达到最大请求数量,若达到则将任务追加到待执行队列,否则,则直接执行该任务.并返回Promise 创建任务时,需要返 ...
- apache常见错误:VC运行库(找不到 VCRUNTIME140.dll)
1. 安装apache为系统服务时报错:找不到 VCRUNTIME140.dll 解决方案:安装 VC2015 2. 下载并安装 VC2015 运行库, 运行 VC_redist.x64.exe 无脑 ...
- Oracle自动存储管理ASM
参考资料: https://docs.oracle.com/cd/B19306_01/server.102/b14231/storeman.htm#ADMIN036 什么是ASM? ASM是Autom ...
- TKE基于弹性网卡直连Pod的网络负载均衡
前言 Kubernetes在集群接入层设计并提供了两种原生资源Service和Ingress,分别负责四层和七层的网络接入层配置. 传统的做法是创建Ingress或LoadBalancer类型的Ser ...