Unity 编辑器开发SceneView GUI控制
前几天项目需要就做了个类似于Collider EditCollider的功能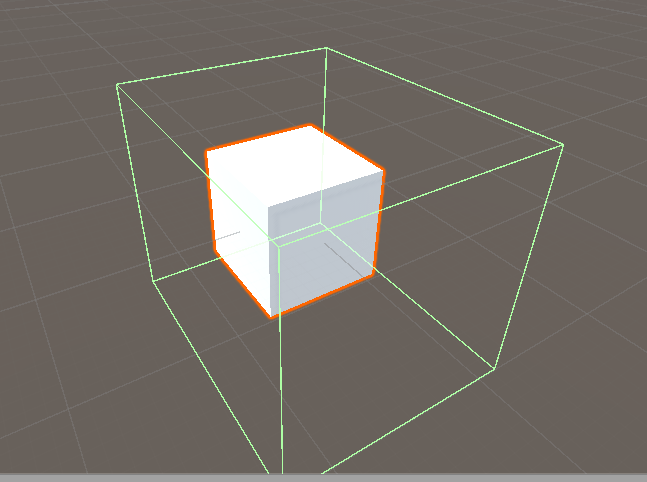
下面是我做的效果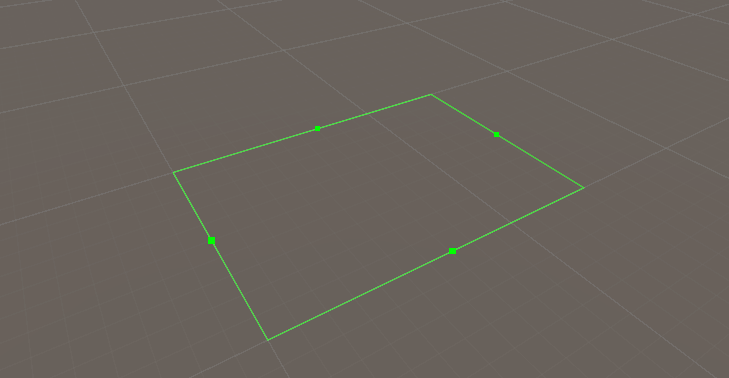
基础代码如下:
public class ExportCFGInputWindow : EditorWindow

{

    public static ExportCFGInputWindow instance;

    Vector3 dot1, dot2, dot3, dot4;

    void OnEnable() {

        instance = this;

        SceneView.duringSceneGui -= this.OnSceneGUI;

        SceneView.duringSceneGui += this.OnSceneGUI;

        dot1 = new Vector3(0, 0, 0);

        dot2 = new Vector3(0, 0, 1);

        dot3 = new Vector3(1, 0, 1);

        dot4 = new Vector3(1, 0, 0);

        mid1Cor = Color.green;

        mid2Cor = Color.green;

        mid3Cor = Color.green;

        mid4Cor = Color.green;

    }

    void OnDisable() {

        instance = null;

        SceneView.duringSceneGui -= this.OnSceneGUI;

    }

    void OnSceneGUI(SceneView sceneView)

    {

        Handles.color = Color.green;

        Handles.DrawAAPolyLine(2, dot1, dot2, dot3, dot4, dot1);

    }

}
 效果如图
效果如图
下面是我踩的坑
先不管先把小绿点画于是我在OnSceneGui方法里面插入了如下代码
void OnSceneGUI(SceneView sceneView)

    {

        Handles.color = Color.green;

        Handles.DrawAAPolyLine(2, dot1, dot2, dot3, dot4, dot1);

         Handles.DotHandleCap(0, new Vector3((dot1.x + dot2.x) * 0.5f, 0, (dot1.z + dot2.z) * 0.5f), Quaternion.identity, 0.005f * sceneView.size, EventType.Repaint);

      //0.005f * sceneView.size 的作用是让小绿点无论你把场景放大或者缩小都是一样大。
         Handles.DotHandleCap(0, new Vector3((dot2.x + dot3.x) * 0.5f, 0, (dot2.z + dot3.z) * 0.5f), Quaternion.identity, 0.005f * sceneView.size, EventType.Repaint);

         Handles.DotHandleCap(0, new Vector3((dot3.x + dot4.x) * 0.5f, 0, (dot3.z + dot4.z) * 0.5f), Quaternion.identity, 0.005f * sceneView.size, EventType.Repaint);

         Handles.DotHandleCap(0, new Vector3((dot4.x + dot1.x) * 0.5f, 0, (dot4.z + dot1.z) * 0.5f), Quaternion.identity, 0.005f * sceneView.size, EventType.Repaint);

    }
这是画完绿点的样子
虽然有了绿点但是没法控制于是我写了个方法来监听鼠标,这个方法在OnSceneGUI函数中调用。具体思路是:绿点的位置知道,只要监听鼠标在绿点下按下然后移动鼠标,我控制绿点两端的点跟着鼠标移动就可以完成了。
但是!万事都怕但是。出现了一个令我头大的问题:鼠标左键的EventType.MouseUp事件我监听不到(这个问题求好心人帮忙解释一下。)导致我无法停止对相应点的控制,当然鼠标中键和鼠标右键没有问题,但是鼠标中键和鼠标右键会在编辑器下有其他操作。于是我放弃了这个思路。(这里代码就不上了)
既然鼠标不行被逼无奈我就使用了键盘控制的方式 ,思路如下:
4键控制上图最左边的小绿点,8键控制最上面的小绿点,6键控制最右面的小绿点,2键控制最下面的小绿点。+键表示该点向外伸,-键表示该点向外内缩。
下面是代码
int ExportDir = 0;//移动方向
void CheckKey()//这个方法在OnSeneGui函数中调用

    {

        Event e = Event.current;

        if (e.type == EventType.KeyDown)

        {

            if (e.keyCode == KeyCode.Keypad4)

            {

                ExportDir = 4;

                mid1Cor = Color.red;

                mid2Cor = Color.green;

                mid3Cor = Color.green;

                mid4Cor = Color.green;

            }

            if (e.keyCode == KeyCode.Keypad6)

            {

                ExportDir = 6;

                mid1Cor = Color.green;

                mid2Cor = Color.green;

                mid3Cor = Color.red;

                mid4Cor = Color.green;

            }

            if (e.keyCode == KeyCode.Keypad2)

            {

                ExportDir = 2;

                mid1Cor = Color.green;

                mid2Cor = Color.green;

                mid3Cor = Color.green;

                mid4Cor = Color.red;

            }

            if (e.keyCode == KeyCode.Keypad8)

            {

                ExportDir = 8;

                mid1Cor = Color.green;

                mid2Cor = Color.red;

                mid3Cor = Color.green;

                mid4Cor = Color.green;

            }

            if (e.keyCode == KeyCode.KeypadPlus)

            {

                //ExportDir = 4;

                Plus(ExportDir);

            }

            if (e.keyCode == KeyCode.KeypadMinus)

            {

                //ExportDir = 4;

                Minus(ExportDir);

            }

        }

    }
  float EditorSpeed = 0.05f;

    void Plus(int dir)

    {

        if (dir == 4)

        {

            dot1.x -= EditorSpeed;

            dot2.x -= EditorSpeed;

        }

        else if (dir == 6)

        {

            dot3.x += EditorSpeed;

            dot4.x += EditorSpeed;

        }

        else if (dir == 2)

        {

            dot1.z -= EditorSpeed;

            dot4.z -= EditorSpeed;

        }

        else if (dir == 8)

        {

            dot2.z += EditorSpeed;

            dot3.z += EditorSpeed;

        }

        else

        {

            return;

        }

    }

    void Minus(int dir)

    {

        if (dir == 4)

        {

            dot1.x += EditorSpeed;

            dot2.x += EditorSpeed;

        }

        else if (dir == 6)

        {

            dot3.x -= EditorSpeed;

            dot4.x -= EditorSpeed;

        }

        else if (dir == 2)

        {

            dot1.z += EditorSpeed;

            dot4.z += EditorSpeed;

        }

        else if (dir == 8)

        {

            dot2.z -= EditorSpeed;

            dot3.z -= EditorSpeed;

        }

        else

        {

            return;

        }

    }
这样一来我先按下数字键4在按下+键最左边的点就会向左移动了
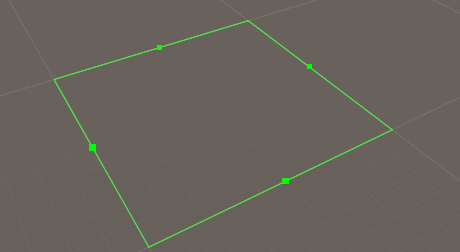
为了显示清楚我还对小绿点显示颜色左了相应的处理,当选择哪个点做动作时它就会变红,代码如下
Color    mid1Cor = Color.green;

Color    mid2Cor = Color.green;

Color    mid3Cor = Color.green;

Color    mid4Cor = Color.green;

void OnSceneGUI(SceneView sceneView)

    {

        Handles.color = Color.green;

        Handles.DrawAAPolyLine(2, dot1, dot2, dot3, dot4, dot1);

         Handles.color = mid1Cor;

         Handles.DotHandleCap(0, new Vector3((dot1.x + dot2.x) * 0.5f, 0, (dot1.z + dot2.z) * 0.5f), Quaternion.identity, 0.005f * sceneView.size, EventType.Repaint);

         Handles.color = mid2Cor;

         Handles.DotHandleCap(0, new Vector3((dot2.x + dot3.x) * 0.5f, 0, (dot2.z + dot3.z) * 0.5f), Quaternion.identity, 0.005f * sceneView.size, EventType.Repaint);

         Handles.color = mid3Cor;

         Handles.DotHandleCap(0, new Vector3((dot3.x + dot4.x) * 0.5f, 0, (dot3.z + dot4.z) * 0.5f), Quaternion.identity, 0.005f * sceneView.size, EventType.Repaint);

         Handles.color = mid4Cor;

         Handles.DotHandleCap(0, new Vector3((dot4.x + dot1.x) * 0.5f, 0, (dot4.z + dot1.z) * 0.5f), Quaternion.identity, 0.005f * sceneView.size, EventType.Repaint);

         CheckKey();

    }
效果如下: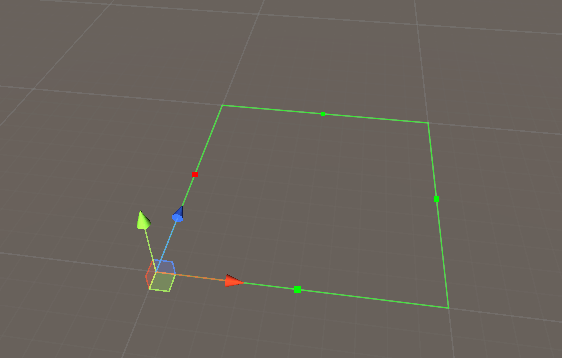
这个功能也能勉强满足需求,暂时就这样了。
后来有一天,我发现有人这样用
Handles.FreeMoveHandle(target.pos,Quaternion.identity,2.0,Vector3.zero,Handles.DrawRectangle);
Handles类的FreeMoveHandle函数我马上查了一下API发现
public static Vector3 FreeMoveHandle(Vector3 position, Quaternion rotation, float size, Vector3 snap, DrawCapFunction capFunc);
最后一个参数是个委托。我一下子就明白改怎么弄了。代码如下
 void OnSceneGUI(SceneView sceneView)

    {

        Handles.color = Color.green;

        Handles.DrawAAPolyLine(2, dot1, dot2, dot3, dot4, dot1);

         float m1px = Handles.FreeMoveHandle(new Vector3((dot1.x + dot2.x) * 0.5f, 0, (dot1.z + dot2.z) * 0.5f), Quaternion.identity, 0.005f * sceneView.size, Vector3.zero, Handles.DotCap).x;

         dot1 = new Vector3(m1px, 0, dot1.z);

         dot2 = new Vector3(m1px, 0, dot2.z);

         float m2px = Handles.FreeMoveHandle(new Vector3((dot2.x + dot3.x) * 0.5f, 0, (dot2.z + dot3.z) * 0.5f), Quaternion.identity, 0.005f * sceneView.size, Vector3.zero, Handles.DotCap).z;

         dot2 = new Vector3(dot2.x, 0, m2px);

         dot3 = new Vector3(dot3.x, 0, m2px);

         float m3px = Handles.FreeMoveHandle(new Vector3((dot3.x + dot4.x) * 0.5f, 0, (dot3.z + dot4.z) * 0.5f), Quaternion.identity, 0.005f * sceneView.size, Vector3.zero, Handles.DotCap).x;

         dot3 = new Vector3(m3px, 0, dot3.z);

         dot4 = new Vector3(m3px, 0, dot4.z);

         float m4px = Handles.FreeMoveHandle(new Vector3((dot4.x + dot1.x) * 0.5f, 0, (dot4.z + dot1.z) * 0.5f), Quaternion.identity, 0.005f * sceneView.size, Vector3.zero, Handles.DotCap).z;

         dot4 = new Vector3(dot4.x, 0, m4px);

         dot1 = new Vector3(dot1.x, 0, m4px);

    }
这样就达到了我想要的鼠标控制小绿点的效果。但是键盘控制的代码我也保留了,因为我觉得这是个教训,而且在有时候键盘控制也蛮方便的。
完整代码如下:
public class ExportCFGInputWindow : EditorWindow

{

    public static ExportCFGInputWindow instance;

    Vector3 dot1, dot2, dot3, dot4;

    Color mid1Cor, mid2Cor, mid3Cor, mid4Cor;

    int ExportDir = 0;

    float EditorSpeed = 0.05f;

    void OnEnable() {

        instance = this;

        SceneView.duringSceneGui -= this.OnSceneGUI;

        SceneView.duringSceneGui += this.OnSceneGUI;

        dot1 = new Vector3(0, 0, 0);

        dot2 = new Vector3(0, 0, 1);

        dot3 = new Vector3(1, 0, 1);

        dot4 = new Vector3(1, 0, 0);

        mid1Cor = Color.green;

        mid2Cor = Color.green;

        mid3Cor = Color.green;

        mid4Cor = Color.green;

    }

    void OnDisable() {

        instance = null;

        SceneView.duringSceneGui -= this.OnSceneGUI;

    }

    Vector3 m1, m2, m3, m4;

    void OnSceneGUI(SceneView sceneView)

    {

        Handles.color = Color.green;

        Handles.DrawAAPolyLine(2, dot1, dot2, dot3, dot4, dot1);

         #region 鼠标控制

         float m1px = Handles.FreeMoveHandle(new Vector3((dot1.x + dot2.x) * 0.5f, 0, (dot1.z + dot2.z) * 0.5f), Quaternion.identity, 0.005f * sceneView.size, Vector3.zero, Handles.DotCap).x;

         dot1 = new Vector3(m1px, 0, dot1.z);

         dot2 = new Vector3(m1px, 0, dot2.z);

         float m2px = Handles.FreeMoveHandle(new Vector3((dot2.x + dot3.x) * 0.5f, 0, (dot2.z + dot3.z) * 0.5f), Quaternion.identity, 0.005f * sceneView.size, Vector3.zero, Handles.DotCap).z;

         dot2 = new Vector3(dot2.x, 0, m2px);

         dot3 = new Vector3(dot3.x, 0, m2px);

         float m3px = Handles.FreeMoveHandle(new Vector3((dot3.x + dot4.x) * 0.5f, 0, (dot3.z + dot4.z) * 0.5f), Quaternion.identity, 0.005f * sceneView.size, Vector3.zero, Handles.DotCap).x;

         dot3 = new Vector3(m3px, 0, dot3.z);

         dot4 = new Vector3(m3px, 0, dot4.z);

         float m4px = Handles.FreeMoveHandle(new Vector3((dot4.x + dot1.x) * 0.5f, 0, (dot4.z + dot1.z) * 0.5f), Quaternion.identity, 0.005f * sceneView.size, Vector3.zero, Handles.DotCap).z;

         dot4 = new Vector3(dot4.x, 0, m4px);

         dot1 = new Vector3(dot1.x, 0, m4px);

         #endregion

         #region 键盘控制

         Handles.color = mid1Cor;

         Handles.DotHandleCap(0, new Vector3((dot1.x + dot2.x) * 0.5f, 0, (dot1.z + dot2.z) * 0.5f), Quaternion.identity, 0.005f * sceneView.size, EventType.Repaint);

         Handles.color = mid2Cor;

         Handles.DotHandleCap(0, new Vector3((dot2.x + dot3.x) * 0.5f, 0, (dot2.z + dot3.z) * 0.5f), Quaternion.identity, 0.005f * sceneView.size, EventType.Repaint);

         Handles.color = mid3Cor;

         Handles.DotHandleCap(0, new Vector3((dot3.x + dot4.x) * 0.5f, 0, (dot3.z + dot4.z) * 0.5f), Quaternion.identity, 0.005f * sceneView.size, EventType.Repaint);

         Handles.color = mid4Cor;

         Handles.DotHandleCap(0, new Vector3((dot4.x + dot1.x) * 0.5f, 0, (dot4.z + dot1.z) * 0.5f), Quaternion.identity, 0.005f * sceneView.size, EventType.Repaint);

         CheckKey();

         #endregion

    }

    void CheckKey()

    {

        Event e = Event.current;

        if (e.type == EventType.KeyDown)

        {

            if (e.keyCode == KeyCode.Keypad4)

            {

                ExportDir = 4;

                mid1Cor = Color.red;

                mid2Cor = Color.green;

                mid3Cor = Color.green;

                mid4Cor = Color.green;

            }

            if (e.keyCode == KeyCode.Keypad6)

            {

                ExportDir = 6;

                mid1Cor = Color.green;

                mid2Cor = Color.green;

                mid3Cor = Color.red;

                mid4Cor = Color.green;

            }

            if (e.keyCode == KeyCode.Keypad2)

            {

                ExportDir = 2;

                mid1Cor = Color.green;

                mid2Cor = Color.green;

                mid3Cor = Color.green;

                mid4Cor = Color.red;

            }

            if (e.keyCode == KeyCode.Keypad8)

            {

                ExportDir = 8;

                mid1Cor = Color.green;

                mid2Cor = Color.red;

                mid3Cor = Color.green;

                mid4Cor = Color.green;

            }

            if (e.keyCode == KeyCode.KeypadPlus)

            {

                //ExportDir = 4;

                Plus(ExportDir);

            }

            if (e.keyCode == KeyCode.KeypadMinus)

            {

                //ExportDir = 4;

                Minus(ExportDir);

            }

        }

    }

    void Plus(int dir)

    {

        if (dir == 4)

        {

            dot1.x -= EditorSpeed;

            dot2.x -= EditorSpeed;

        }

        else if (dir == 6)

        {

            dot3.x += EditorSpeed;

            dot4.x += EditorSpeed;

        }

        else if (dir == 2)

        {

            dot1.z -= EditorSpeed;

            dot4.z -= EditorSpeed;

        }

        else if (dir == 8)

        {

            dot2.z += EditorSpeed;

            dot3.z += EditorSpeed;

        }

        else

        {

            return;

        }

    }

    void Minus(int dir)

    {

        if (dir == 4)

        {

            dot1.x += EditorSpeed;

            dot2.x += EditorSpeed;

        }

        else if (dir == 6)

        {

            dot3.x -= EditorSpeed;

            dot4.x -= EditorSpeed;

        }

        else if (dir == 2)

        {

            dot1.z += EditorSpeed;

            dot4.z += EditorSpeed;

        }

        else if (dir == 8)

        {

            dot2.z -= EditorSpeed;

            dot3.z -= EditorSpeed;

        }

        else

        {

            return;

        }

    }

    private void OnGUI()

    {

        GUILayout.BeginVertical();

        //标签

        GUILayout.BeginHorizontal();

        GUILayout.Box("输入相应的参数", TitleBoxStyle(), GUILayout.Height(60),GUILayout.ExpandWidth(true));

        GUILayout.EndHorizontal();

        GUILayout.Space(10);

        GUILayout.BeginHorizontal();

        GUIStyle boxStyle = new GUIStyle();

        boxStyle.alignment = TextAnchor.MiddleCenter;

        GUILayout.Box("当前移动速度"+ EditorSpeed, boxStyle, GUILayout.Height(30), GUILayout.Width(80));

        GUILayout.Space(10);

        EditorSpeed = GUILayout.HorizontalSlider(EditorSpeed, 0.01f, 1);

        GUILayout.EndHorizontal();

        GUILayout.EndVertical();

    }

}
希望这次的分享对大家有点收获,不好的地方希望大家能帮我指出。
Unity 编辑器开发SceneView GUI控制的更多相关文章
- 喵的Unity游戏开发之路 - 玩家控制下的球的滑动
- Unity编辑器 - 编辑器控制特效播放
编辑器控制特效播放 Unity的动画编辑器不能预览粒子系统的播放,为了方便预览特效,设想制作一个预览特效的工具,通常一个特效有三种组件: - Animation - Animator - Partic ...
- 2017年Unity游戏开发视频教程(入门到精通)
本文是我发布的一个Unity游戏开发的学习目录,以后我会持续发布一系列的游戏开发教程,都会更新在这个页面上,适合人群有下面的几种: 想要做独立游戏的人 想要找游戏开发相关工作的人 对游戏开发感兴趣的人 ...
- Unity编辑器 - 输入控件聚焦问题
Unity编辑器整理 - 输入控件聚焦问题 EditorGUI的输入控件在聚焦后,如果在其他地方改变值,聚焦的框不会更新,而且无法取消聚焦,如下图: 在代码中取消控件的聚焦 取消聚焦的"时机 ...
- 全新的Unity跨平台开发 IDE JetBrains Rider 2019.2 x64特别版下载
Rider 基于 JetBrains 的平台,JetBrains 的平台很受那些使用 IntelliJ IDEA 的 Java 开发者和使用 WebStorm 的 JavaScript 开发者的欢迎. ...
- 喵的Unity游戏开发之路 - 互动环境(有影响的运动)
如图片.视频或代码格式等显示异常,请查看原文: https://mp.weixin.qq.com/s/Sv0FOxZCAHHUQPjT8rUeNw 很多童鞋没有系统的Unity3D游戏开发基础,也不知 ...
- unity 编辑器扩展简单入门
unity 编辑器扩展简单入门 通过使用编辑器扩展,我们可以对一些机械的操作实现自动化,而不用使用额外的环境,将工具与开发环境融为一体:并且,编辑器扩展也提供GUI库,来实现可视化操作:编辑器扩展甚至 ...
- 定制你的Unity编辑器
Unity的编辑器可以通过写脚本进行界面定制,包括添加功能菜单,今天写游戏Demo用到了记录一下. 为Unity添加子菜单 示例程序 [AddComponentMenu("Defend Ho ...
- Mobile Prototype Dev Res Collection(Unity原型开发资源储备)
资源储备 本文针对mobile原型开发阶段的资源收集 在做移动端的开发时,当有灵感想做些东西时,若是此时缺少美术资源和可用的脚本,此刻会有些纠结,今天在Assets Store上Mark了一些移动端开 ...
随机推荐
- Adobe Acrobat DC 安装
Adobe Acrobat DC 制作pdf模板 下载:http://www.downza.cn/soft/20562.html 安装出错解决: 可以将C:\Program Files (x86)\C ...
- NumPy排序
numpy.sort()函数 该函数提供了多种排序功能,支持归并排序,堆排序,快速排序等多种排序算法 使用numpy.sort()方法的格式为: numpy.sort(a,axis,kind,orde ...
- Java入门 - 高级教程 - 03.泛型
原文地址:http://www.work100.net/training/java-generic.html 更多教程:光束云 - 免费课程 泛型 序号 文内章节 视频 1 概述 2 泛型方法 3 泛 ...
- 【WPF on .NET Core 3.0】 Stylet演示项目 - 简易图书管理系统(4) - 图书列表界面
在前三章中我们完成了登录窗口, 并掌握了使用Conductor来切换窗口, 但这些其实都是在为我们的系统打基础. 而本章中我们就要开始开发系统的核心功能, 即图书管理功能了. 通过本章, 我们会接触到 ...
- .net core webapi搭建(1)
创建一个webapi项目 修改launchSettings.json 将launchSettings.json中的IIS启动删掉.别问我为啥 原因就是IISEXPRESS有时候需要我手动重启.我嫌麻 ...
- 【数据结构】FHQ Treap详解
FHQ Treap是什么? FHQ Treap,又名无旋Treap,是一种不需要旋转的平衡树,是范浩强基于Treap发明的.FHQ Treap具有代码短,易理解,速度快的优点.(当然跟红黑树比一下就是 ...
- Tensorflow下指定显卡占用比例参数配置
tensorflow在训练时默认占用所有GPU的显存. 可以通过以下方式解决该问题: 1.在构造tf.Session()时候通过传递tf.GPUOptions作为可选配置参数的一部分来显式地指定需要分 ...
- typescript step by step interface class
- selenium,统计某分支下有多少个同类子分支的方法(用于循环获取同类型子分支属性值)
利用selenium自动化统计微博阅读数 查看微博阅读数的元素路径 微博列表中第一条微博的元素路径“//*[@id="Pl_Official_MyProfileFeed__20"] ...
- http1.0、http1.x、http 2和https梳理
http1.0.http1.x.http 2和https梳理 Http1.x 线程阻塞,在同一时间,同一域名的请求有一定数量限制,超过限制数目的请求会被阻塞 http1.0 缺陷:浏览器与服务器只保持 ...