Multiple Instance .NET Windows Service
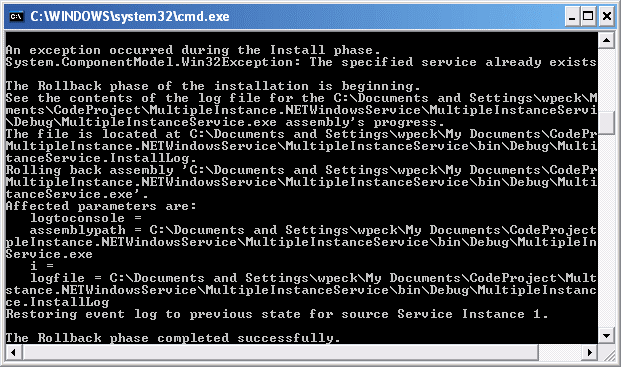
It's not readily apparent how to install a Windows Service multiple times on a single machine. At first glance, it seems like it's not supported by the operating system. When attempting to install a second instance of a service using InstallUtil on the same machine, you'll likely be presented with the following message:

Fortunately, there is a way around this. If you have a need to install multiple instances of the same service, then please read on.
The Problem
When reviewing the ServiceInstaller class using Reflector, you'll see it does a Win32 call to CreateServicein the ServiceInstaller.Install method. CreateService will return the ERROR_DUPLICATE_SERVICE_NAME return code whenever the method is called with a serviceName or displayName parameter that matches that of an already installed service. This is what causes the Win32Exception to be thrown in the above window and ultimately causes the second install to fail. You can view the complete documentation on the CreateService function here.
To get around this, all that needs to be done is to dynamically set the service name during installation and service startup to a known value and to make sure that value is different for each instance of the service you install.
The Solution
All that needs to be done is to make sure that the name of each service installation instance is unique. Then you need to have copies of installation directories for each service instance you'd like to have. Finally, you need to be able to set the service name dynamically during installation and startup. This will be facilitated using the app.config file.
Storing the Service Name
The cleanest and most readily available way of providing the service name is to use an app.config file for your service and create an appSettings key that can be read from to set the service name. An app.config file needs to be added to your solution if one doesn't already exist to store the unique service name in order to dynamically set the ServiceInstaller.ServiceName and the ServiceBase.ServiceName to the same service name value you added to your configuration.
Alternately, we could have provided a custom command line switch to the InstallUtil during installation like InstallUtil /i /servicename="Service Instance 1" MultipleInstanceService.exe. Then that would allow us to pull the servicename property off the Context.Parameters collection during installation. The reason I chose not to recommend this option is that it does not allow us to reliably set the ServiceBase.ServiceName to the exact value that was provided during installation. Someone installing the service could mistype the servicename they provide during install which wouldn't match the value set in configuration.
Hide Copy Code
<configuration>
<appSettings>
<add key="ServiceName" value="Service Instance 1"/>
</appSettings>
</configuration>
Reading the Service Name from Configuration
The app.config file needs to be accessible during the installation of the service as well as when the service starts up. This is cake while the service is running because the configuration file loaded into the configuration system will be the configuration file for your service. It is a little trickier during installation. The reason why it's more difficult during installation is the fact that InstallUtil which is used to install the service does not run in the same execution path your service does, instead it runs at <system drive>:\windows\Microsoft.NET\Framework\v2.0.50727\. So, we need to find another way to access the configuration file for our service.
The easiest and most reliable way I found to do this is to use the Assembly class in the System.Reflection namespace. Using the Location property of the Assembly, we can identify the installation path of the Windows Service and open that services configuration file as shown below.
Hide Copy Code
private string GetConfigurationValue(string key)
{
Assembly service = Assembly.GetAssembly(typeof(MultipleInstanceInstaller));
Configuration config = ConfigurationManager.OpenExeConfiguration(service.Location);
if (config.AppSettings.Settings[key] != null)
{
return config.AppSettings.Settings[key].Value;
}
else
{
throw new IndexOutOfRangeException
("Settings collection does not contain the requested key: " + key);
}
}
Now that the app.config file can be read during installation, all we need to do is create an instance of a ServiceInstaller class and set the ServiceName property to the value we have stored in configuration. Using the method in the code snippet above, this is an easy task.
Hide Copy Code
ServiceInstaller installer = new ServiceInstaller();
installer.ServiceName = GetConfigurationValue("ServiceName");
return installer;
Now that we've created our ServiceInstaller class instance as described above and added it to the Installers collection of our root System.Configuration.Install.Installer class marked with the RunInstaller(true) attribute of our Windows Service project, there's only one last thing to do. We need to set the ServiceBase.ServiceName of our service class instance when the service starts up. This time we'll use the ConfigurationManager class directly to read our services configuration file in the constructor of our service instance.
Hide Copy Code
public MultipleInstanceService()
{
InitializeComponent();
this.ServiceName = ConfigurationManager.AppSettings.Get("ServiceName");
}
Now all that is left to do is install this service at a few different locations on the same machine. Adding a new instance of the service becomes as simple as a copy/paste of the service installation directory and change of some configuration values.

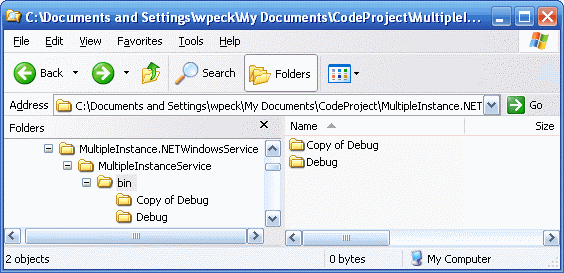
I just made a copy of the debug directory in order to have another service installation directory. It'd be better to use a different convention for directory names than I've done here, but this is just for illustration. Now that there are two copies of the same service on your machine all that is left to do is install them.

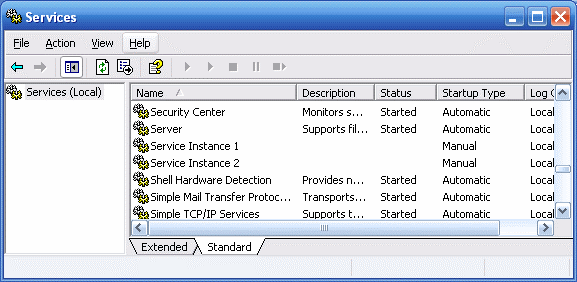
From a command prompt, you'll need to use InstallUtil to install both instances of your service. For instructions on how to use InstallUtil, see Installer Tool (InstallUtil.exe). Once you're done installing the service instances, you'll have something like the services console above where Service Instance 1 and Service Instance 2 are created from the same executable, only installed from different directory locations with a different service name.
Conclusion
Being able to use the services application model to manage your application's runtime is an invaluable asset. Using the pattern I've presented, you can now leverage multiple instances of the same service on a single machine with little effort. Hopefully you'll find this method as useful as I did.
From: https://www.codeproject.com/Articles/21320/Multiple-Instance-NET-Windows-Service
Multiple Instance .NET Windows Service的更多相关文章
- Windows Service--Write a Better Windows Service
原文地址: http://visualstudiomagazine.com/Articles/2005/10/01/Write-a-Better-Windows-Service.aspx?Page=1 ...
- WCF Windows Service Using TopShelf and ServiceModelEx z
http://lourenco.co.za/blog/2013/08/wcf-windows-service-using-topshelf-and-servicemodelex/ There are ...
- A basic Windows service in C++ (CppWindowsService)
A basic Windows service in C++ (CppWindowsService) This code sample demonstrates creating a basic Wi ...
- windows service宿主web api使用"依赖注入"和“控制反转”的技术实践
前言 自从几年前抛弃wcf,使用web api 来做服务器端开发之后,就不再迷惑了.但是因为本来从事传统行业管理软件开发,一般都以分布式应用开发为主.纯BS还是比较少,于是比较喜欢用windows s ...
- C# Windows Service中执行死循环轮询
用C#编写Windows Service时,执行轮询一般有两种方式,一种是用Timer,System.Timers或者是System.Thread下的,这种执行是按时间循环执行,缺点是也许上个执行还没 ...
- Aspnet Zero中使用Windows service (Topshelf)来承载Quartz.net任务
Aspnet Zero使用Windows service (Topshelf)来承载Quartz.net任务 网上有很多关于如何使用Topshelf创建ABP的Quartz windows服务,但很少 ...
- C#创建、安装、卸载、调试Windows Service(Windows 服务)的简单教程
前言:Microsoft Windows 服务能够创建在它们自己的 Windows 会话中可长时间运行的可执行应用程序.这些服务可以在计算机启动时自动启动,可以暂停和重新启动而且不显示任何用户界面.这 ...
- 如何利用mono把.net windows service程序迁移到linux上
How to migrate a .NET Windows Service application to Linux using mono? 写在最前:之所以用要把windows程序迁移到Linux上 ...
- 如何托管ASP.NET Core应用到Windows Service中
(此文章同时发表在本人微信公众号"dotNET开发经验谈",欢迎右边二维码来关注.) 题记:正在构思一个中间件的设计,考虑是否既可以使用最新的技术,也可以兼顾传统的部署模式.所以有 ...
随机推荐
- .net core中的高效动态内存管理方案
.net core在新增的System.Buffers中引入了一大堆高效内存管理的类,如span和memory.内存池.本文今天这里介绍一个高效动态内存访问方案. ReadOnlySequenceSe ...
- STM32 TIMER REGISTER
- TCP套接字端口复用SO_REUSEADDR
下面建立的套接字都是tcp套接字 1.进程创建监听套接字socket1,邦定一个指定端口,并接受了若干连接.那么进程创建另外一个套接口socket2,并试图邦定同一个端口时候,bind错误返回“Add ...
- MyEclipse使用总结——MyEclipse中配置WebLogic12c服务器
MyEclipse中配置WebLogic12c服务器的步骤如下: [Window]→[Preferences],如下图所示: 找到WebLogic的配置,如下图所示:
- 关于云计算基础架构IaaS层的几点看法
真实的云计算什么样? 云计算对普通用户来说,总是一个云里雾里的话题. 本文从最基础的概念開始科普,说明了四个常见的错误理解,和作者的四个猜想. IaaS(Infrastructure as a Ser ...
- Git 的 WindowsXP安装
文章1: http://blog.sina.com.cn/s/blog_5063e4c80100sqzq.html 一.安装必要客户端 1. TortoiseGit http://tortoisegi ...
- DELPHI新的变量的声明方法
DELPHI新的变量的声明方法 从DELPHI 10.3.1开始支持新的变量声明方法: procedure TForm1.查询1Click(Sender: TObject); begin var ur ...
- EBS 系统当前完成请求时间监测
/* Formatted on 2018/3/14 23:32:17 (QP5 v5.256.13226.35538) */ SELECT REQUEST_ID , PROGRAM , ROUND ( ...
- 美国恐怖故事第一季/全集American Horror Story 1全迅雷下载
第一季 American Horror Story Season 1 (2011)看点:心理治疗师Ben(迪伦·麦克德莫特 Dylan McDermott 饰)因与女学生有染被妻子Vivien(康妮· ...
- Xcode修改项目的Build Location
Xcode默认project通过build输出的目录,存放于目录 /Users/用户名/Library/Developer/Xcode/DerivedData/产品名称-hjwqiconnjhpjle ...
