
torchnet+VGG16计算patch之间相似度
torchnet+VGG16计算patch之间相似度
本来打算使用VGG实现siamese CNN的,但是没想明白怎么使用torchnet对模型进行微调。。。所以只好把VGG的卷积层单独做一个数据预处理模块,后面跟一个网络,将两个VGG输出的结果输入该网络中,仅训练这个浅层网络。
数据:使用了MOTChallenge数据库MOT16-02中的pedestrian
代码:
- -- ---------------------------------------------------------------------------------------
- -- 读取MOT16-02数据集的groundtruth,分成训练集和测试集
- -- ---------------------------------------------------------------------------------------
- require 'torch'
- require 'cutorch'
- torch.setdefaulttensortype('torch.FloatTensor')
- data_type = 'torch.CudaTensor' -- 设置数据类型,不适用GPU可以设置为torch.FloatTensor
- require 'image'
- local datapath = '/home/zwzhou/programFiles/2DMOT2015/MOT16/train/MOT16-02/'
- local tmp = image.load(datapath .. 'img1/000001.jpg',3,'byte')
- local width = tmp:size(3)
- local height = tmp:size(2)
- local num = 600
- local imgs = torch.Tensor(num,3,height,width)
- local file,_ = io.open('imgs.t7')
- if not file then
- for i=1,num do -- 读取视频帧
- imgs[i]=image.load(datapath .. 'img1/' .. string.format('%06d.jpg',i))
- end
- torch.save('imgs.t7',imgs)
- else
- imgs = torch.load('imgs.t7')
- end
- require'sys'
- local gt_path = datapath .. 'gt/gt.txt'
- local gt_info={}
- local i=0
- for line in io.lines(gt_path) do -- pedestrians的patch信息
- local v=sys.split(line,',')
- if tonumber(v[7]) ==1 and tonumber(v[9]) > 0.8 then -- 筛选有效的patch,是pedestrian且可见度>0.8
- table.insert(gt_info,{tonumber(v[1]),tonumber(v[2]),tonumber(v[3]),tonumber(v[4]),tonumber(v[5]),tonumber(v[6])})
- -- 对应的是frame index,track index, x, y, w, h
- end
- end
- -- 构建样本对,这里主要是为了正负样本个数相同,每个pedestrian选取25个相同id的patch,25个不同id的patch
- local pairwise={}
- for i=1,#gt_info do
- local count=0
- local iter=0
- repeat
- local j=torch.ceil(torch.rand(1)*(#gt_info))[1]
- if gt_info[i][2] == gt_info[j][2] then
- count=count+1
- table.insert(pairwise,{i,j})
- end
- iter=iter+1
- until(count >25 or iter>100)
- repeat
- local j=torch.ceil(torch.rand(1)*#gt_info)[1]
- if gt_info[i][2] ~= gt_info[j][2] then
- count=count-1
- table.insert(pairwise,{i,j})
- end
- until(count <0)
- end
- local function cast(x) return x:type(data_type) end -- 类型转换
- -- 加载pretrained VGG16 model
- require 'nn'
- require 'loadcaffe'
- local function getPretrainedModel()
- local proto = '/home/zwzhou/modelZoo/VGG_ILSVRC_16_layers_deploy.prototxt'
- local caffemodel = '/home/zwzhou/modelZoo/VGG_ILSVRC_16_layers.caffemodel'
- local VGG16 = loadcaffe.load(proto,caffemodel,'nn')
- for i = 1,3 do
- VGG16.modules[#VGG16.modules]=nil
- end
- return VGG16
- end
- -- 为了能够使用VGG,需要定义一些预处理方法
- local loadSize = {3,256,256}
- local sampleSize={3,224,224}
- local function adjustScale(input) -- VGG需要先将输入图片的最小边缩放到256,另一边保持纵横比
- if input:size(3) < input:size(2) then
- input = image.scale(input,loadSize[2],loadSize[3]*input:size(2)/input:size(3))
- else
- input = image.scale(input,loadSize[2]*input:size(3)/input:size(2),loadSize[3])
- end
- return input
- end
- local bgr_means = {103.939,116.779,123.68} -- VGG使用的均值,注意是BGR通道,image.load()获得的是rgb
- local function vggProcessing(img)
- local img2 = img:clone() -- 深度拷贝
- img2[{{1}}] = img[{{3}}]
- img2[{{3}}] = img[{{1}}] -- rgb -> bgr
- img2=img2:mul(255)
- for i=1,3 do
- img2[i]:add(-bgr_means[i])
- end
- return img2
- end
- local function centerCrop(input) -- 截取224*224大小
- local oH = sampleSize[2]
- local oW = sampleSize[3]
- local iW = input:size(3)
- local iH = input:size(2)
- local w1 = math.ceil((iW-oW)/2)
- local h1 = math.ceil((iH-oH)/2)
- local out = image.crop(input,w1,h1,w1+oW,h1+oH)
- return out
- end
- local file,_ = io.open('vgg_info.t7')
- local vgg_info={}
- if not file then
- local VGG16_model = getPretrainedModel()
- if data_type:match'torch.Cuda.*Tensor' then
- require 'cudnn'
- require 'cunn'
- cudnn.convert(VGG16_model,cudnn):cuda()
- cudnn.benchmark = true
- end
- cast(VGG16_model)
- for i=1, #gt_info do
- local idx=gt_info[i]
- local img = imgs[idx[1]]
- local x1 = math.max(idx[3],1)
- local y1 = math.max(idx[4],1)
- local x2 = math.min(idx[3]+idx[5],width)
- local y2 = math.min(idx[4]+idx[6],height)
- local patch = image.crop(img,x1,y1,x2,y2)
- patch = adjustScale(patch)
- patch = vggProcessing(patch)
- patch = centerCrop(patch)
- patch=cast(patch)
- table.insert(vgg_info,VGG16_model:forward(patch):float())
- end
- torch.save('vgg_info.t7',vgg_info)
- else
- vgg_info=torch.load('vgg_info.t7')
- end
- local function getPatchPair(tmp) -- 获得patch 对
- local pp = {}
- pp[1] = vgg_info[tmp[1]]
- pp[2] = vgg_info[tmp[2]]
- local t=torch.cat(pp[1],pp[2],1)
- return t
- end
- -- 定义datasetiterator
- local tnt=require'torchnet'
- local function getIterator(mode)
- -- 创建model
- local fc = nn.Sequential()
- fc:add(nn.View(-1,4096*2))
- fc:add(nn.Linear(4096*2,500))
- fc:add(nn.ReLU(true))
- fc:add(nn.Normalize(2))
- fc:add(nn.Linear(500,500))
- fc:add(nn.ReLU(true))
- fc:add(nn.Linear(500,1))
- -- print(fc:forward(torch.randn(2,4096*2)))
- if data_type:match'torch.Cuda.*Tensor' then
- require 'cudnn'
- require 'cunn'
- cudnn.convert(fc,cudnn):cuda()
- cudnn.benchmark = true
- end
- cast(fc)
- -- 构建训练引擎,使用OptimEngine
- require 'optim'
- local engine = tnt.OptimEngine()
- local criterion = cast(nn.MarginCriterion())
- -- 创建一些评估值
- local train_timer = torch.Timer()
- local test_timer = torch.Timer()
- local data_timer = torch.Timer()
- local meter = tnt.AverageValueMeter() -- 用于统计评估函数的输出
- local confusion = optim.ConfusionMatrix(2) -- 2类混淆矩阵
- local data_time_meter = tnt.AverageValueMeter()
- -- log
- local logtext=require 'torchnet.log.view.text'
- log = tnt.Log{
- keys = {'train_loss','train_acc','data_loading_time','epoch','test_acc','train_time','test_time'},
- onFlush={
- logtext{keys={'train_loss','train_acc','data_loading_time','epoch','test_acc','train_time','test_time'}}
- }
- }
- local inputs = cast(torch.Tensor())
- local targets = cast(torch.Tensor())
- -- 填一些hook函数,以便观察训练过程
- engine.hooks.onSample = function(state)
- if state.training then
- data_time_meter:add(data_timer:time().real)
- end
- inputs:resize(state.sample.input:size()):copy(state.sample.input)
- targets:resize(state.sample.target:size()):copy(state.sample.target)
- state.sample.input = inputs
- state.sample.target = targets
- end
- engine.hooks.onForwardCriterion = function(state)
- meter:add(state.criterion.output)
- confusion:batchAdd(state.network.output:gt(0):add(1),state.sample.target:gt(0):add(1))
- end
- local function test() -- 用于测试
- engine:test{
- network = fc,
- iterator = getIterator('test'),
- criterion=criterion,
- }
- confusion:updateValids()
- end
- engine.hooks.onStartEpoch = function(state)
- local epoch = state.epoch + 1
- print('===>' .. ' online epoch # ' .. epoch .. '[batchsize = 256]')
- meter:reset()
- confusion:zero()
- train_timer:reset()
- data_time_meter:reset()
- end
- engine.hooks.onEndEpoch = function(state)
- local train_loss = meter:value()
- confusion:updateValids()
- local train_acc = confusion.totalValid*100
- local train_time = train_timer:time().real
- meter:reset()
- print(confusion)
- confusion:zero()
- test_timer:reset()
- local cache = state.params:clone() -- 保存现场
- --state.params:copy(state.optim.ax)
- test()
- --state.params:copy(cache) -- 恢复现场
- log:set{
- train_loss = train_loss,
- train_acc = train_acc,
- data_loading_time = data_time_meter:value(),
- epoch = state.epoch,
- test_acc = confusion.totalValid*100,
- train_time = train_time,
- test_time = test_timer:time().real,
- }
- log:flush()
- end
- engine.hooks.onUpdate = function(state)
- data_timer:reset()
- end
- engine:train{
- network = fc,
- criterion = criterion,
- iterator = getIterator('train'),
- optimMethod = optim.sgd,
- config = {learningRate = 0.05,
- --weightDecay = 0.05,
- momentum = 0.9,
- --t0 = 1e+4,
- --eta0 =0.1
- },
- maxepoch = 30,
- }
- -- 保存模型
- local modelpath = 'SiaVGG16_model.t7'
- print('Saving to ' .. modelpath)
- torch.save(modelpath,fc:float():clearState())
- --]]
输出:
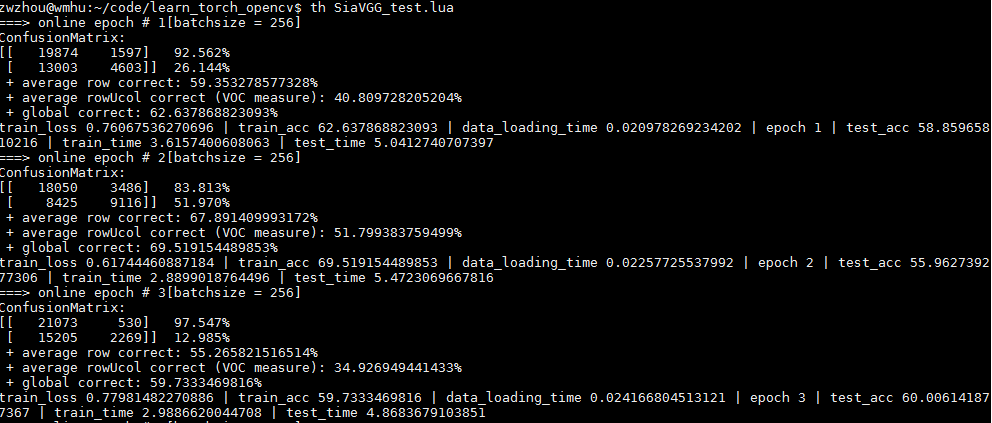
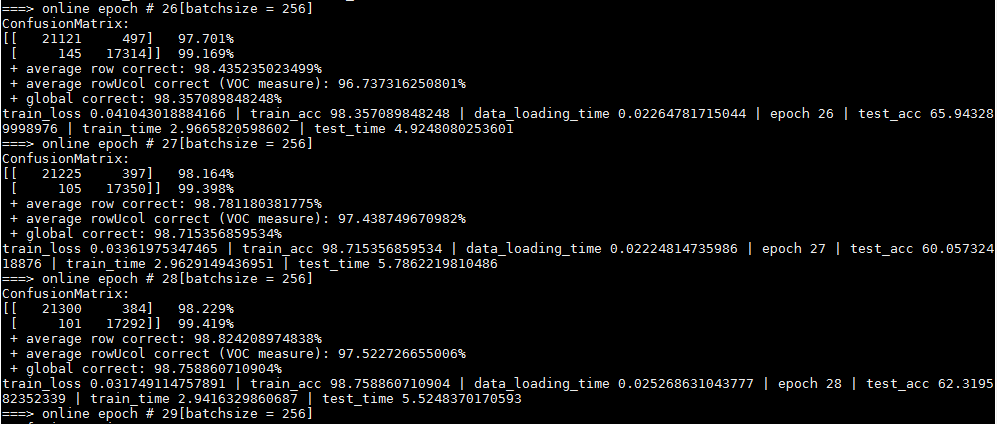
发现网络太容易过拟合,主要一方面是数据太少,另一方面是视频中就那么几个人,所以patch之间的相关性太大,对网络提供的信息太少。所以使用更多的数据测试结果应该会好许多。
这个代码主要是为了熟悉torchnet package,感受呢,
对于数据的预处理,确实方便多了
如果使用提供的Engine,虽然训练过程简单了但是也太模块化了,比如某些层的微调,比如每层设置不同的学习率
使用Iterator时,尤其要小心
torchnet+VGG16计算patch之间相似度的更多相关文章
- (转)c# math 计算两点之间的角度公式
计算两点之间的角度公式是: 假设点一(X1,Y1),点二(X2,Y2) double angleOfLine = Math.Atan2((Y2 - Y1), (X2 - X2)) * 180 / Ma ...
- python-Levenshtein几个计算字串相似度的函数解析
linux环境下,没有首先安装python_Levenshtein,用法如下: 重点介绍几个该包中的几个计算字串相似度的几个函数实现. 1. Levenshtein.hamming(str1, str ...
- sql server2008根据经纬度计算两点之间的距离
--通过经纬度计算两点之间的距离 create FUNCTION [dbo].[fnGetDistanceNew] --LatBegin 开始经度 --LngBegin 开始维度 --29.49029 ...
- C#面向对象思想计算两点之间距离
题目为计算两点之间距离. 面向过程的思维方式,两点的横坐标之差,纵坐标之差,平方求和,再开跟,得到两点之间距离. using System; using System.Collections.Gene ...
- 2D和3D空间中计算两点之间的距离
自己在做游戏的忘记了Unity帮我们提供计算两点之间的距离,在百度搜索了下. 原来有一个公式自己就写了一个方法O(∩_∩)O~,到僵尸到达某一个点之后就向另一个奔跑过去 /// <summary ...
- Jquery计算时间戳之间的差值,可返回年,月,日,小时等
/** * 计算时间戳之间的差值 * @param startTime 开始时间戳 * @param endTime 结束时间戳 * @param type 返回指定类型差值(year, month, ...
- Levenshtein Distance莱文斯坦距离算法来计算字符串的相似度
Levenshtein Distance莱文斯坦距离定义: 数学上,两个字符串a.b之间的莱文斯坦距离表示为levab(|a|, |b|). levab(i, j) = max(i, j) 如果mi ...
- <tf-idf + 余弦相似度> 计算文章的相似度
背景知识: (1)tf-idf 按照词TF-IDF值来衡量该词在该文档中的重要性的指导思想:如果某个词比较少见,但是它在这篇文章中多次出现,那么它很可能就反映了这篇文章的特性,正是我们所需要的关键词. ...
- numpy :: 计算特征之间的余弦距离
余弦距离在计算相似度的应用中经常使用,比如: 文本相似度检索 人脸识别检索 相似图片检索 原理简述 下面是余弦相似度的计算公式(图来自wikipedia): 但是,余弦相似度和常用的欧式距离的有所区别 ...
随机推荐
- javascript关闭网页的几种方法
js关闭当前页面(窗口)的几种方式总结,需要的朋友可以参考一下: 1. 不带任何提示关闭窗口的js代码 <a href="javascript:window.opener=null;w ...
- python及numpy,pandas易混淆的点
https://blog.csdn.net/happyhorizion/article/details/77894035 初接触python觉得及其友好(类似matlab),尤其是一些令人拍案叫绝不可 ...
- CentOS 6.4下Squid代理服务器的安装与配置(转)
add by zhj: 其实我们主要还是关注它在服务器端使用时,充当反向代理和静态数据缓存.至于普通代理和透明代理,其实相当于客户端做的事,和服务端没有什么关系.另外,Squid的缓存主要是缓存在硬盘 ...
- 正则表达式python
import re # re.match() 能够匹配出以xxx开头的字符串 ret = re.match(r"H", "Hello Python") # pr ...
- python技巧总结之set、日志、rsa加密
一.日志模块logging模块调用 1.日志模块使用原理 #!/usr/bin/python # -*- coding:utf-8 -*- import logging # 方式一: "&q ...
- WebDriver API 实例详解(二)
十一.双击某个元素 被测试网页的html源码: <html> <head> <meta charset="UTF-8"> </head&g ...
- Rails的HashWithIndifferentAccess
ruby 2.0 引入了keyword arguments,方法的参数可以这么声明 def foo(bar: 'default') puts bar end foo # => 'default' ...
- 587. Erect the Fence(凸包算法)
问题 给定一群树的坐标点,画个围栏把所有树围起来(凸包). 至少有一棵树,输入和输出没有顺序. Input: [[1,1],[2,2],[2,0],[2,4],[3,3],[4,2]] Output: ...
- IDFA踩坑记录
IDFA踩坑记录: 1.iOS10.0 以下,即使打开“限制广告跟踪”,依然可以读取idfa: 2.打开“限制广告跟踪”,然后再关闭“限制广告跟踪”,idfa会改变: 3.越狱机器安装开发证书打的包, ...
- TED #06# Questioning the universe
Stephen Hawking: Questioning the universe 1. 第一段: There is nothing bigger or older than the universe ...