Android L2TP Client Setup
原文链接:http://www.softether.org/4-docs/2-howto/9.L2TPIPsec_Setup_Guide_for_SoftEther_VPN_Server/3.Android_L2TP_Client_Setup
Android L2TP Client Setup
This document describes how to connect to your SoftEther VPN Server by using the L2TP/IPsec VPN Client which is bundled with Android.
On this instruction, every screen-shots are taken on Android 4.x. Other versions of Android 4.x are similar to be configured, however there might be minor different on UIs. Some third-parties customizes the configuration screens of Android.
These screen-shots are in English version Android iOS. If you use other language, you can still configure it easily by referring the following instructions.
1. Initial configurations (only once at the first time)
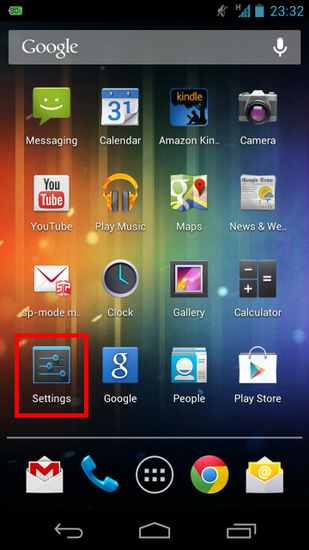
Start the "Settings" application on Android.
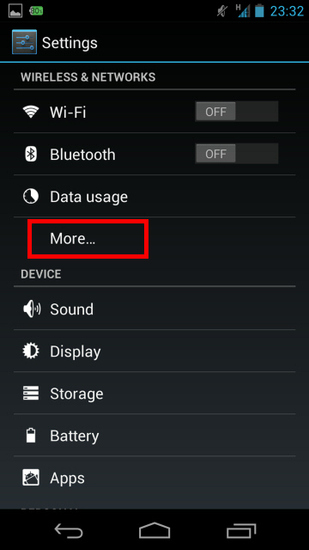
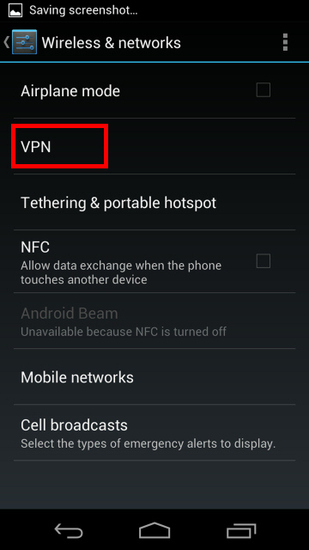
In the "Wireless & Networks" category, open "More..." and tap "VPN".
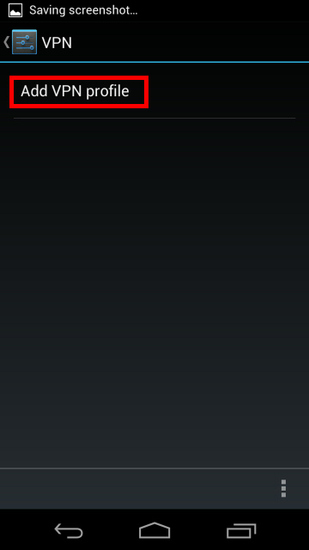
Click the "Add VPN profile" button to create a new VPN connection setting.
A new VPN connection setting editing screen will appear. Input something string on the "Name" field (e.g. "vpn" ), and choose "L2TP/IPSec PSK" in the "Type" field.
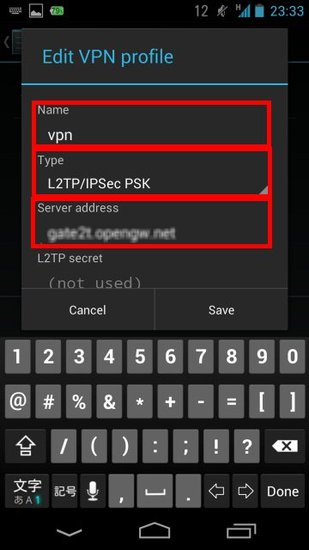
On this screen, you have to specify either hostname or IP address of the destination SoftEther VPN Server. You also have to enter the user-name, password and secret (pre-shared key) on the Android screen.
Scroll down the configuration screen, and tap the "Show advanced options" checkbox if appropriate.
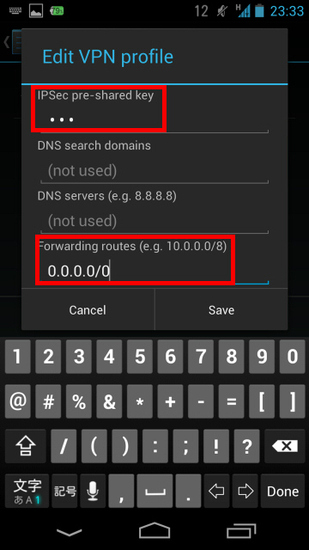
Enter the "IPSec pre-shared key" field.
Specify "0.0.0.0/0" (9-letters) on the "Forwarding routes" field. Make sure that you input the "Forwarding routes" field correctly. If not, you cannot communicate via VPN.
After all inputted, tap the "Save" button and save the VPN connection setting.
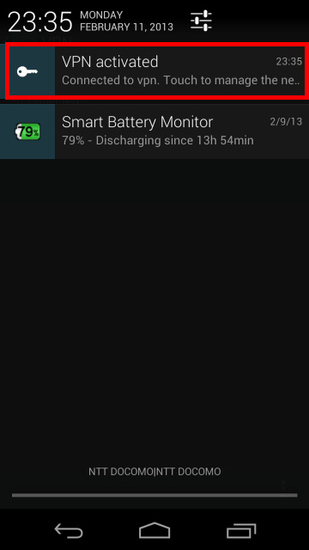
2. Connect a VPN
You can start a VPN connection by using a created VPN connection setting at any time. Open the VPN connection settings list and tap a setting, you will see the following screen.
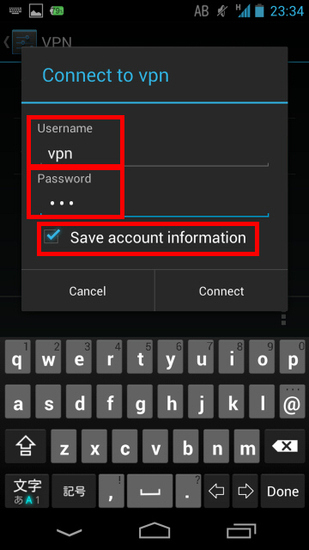
At the first time of using, you have to input "Username" and "Password" fields.
Tap "Connect" to start the VPN connection.
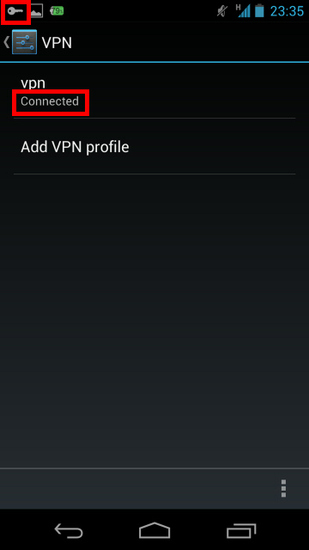
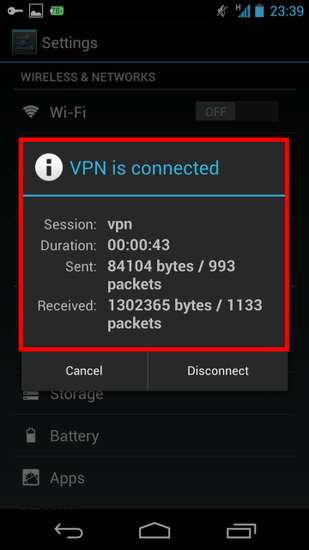
While VPN is established, you can see the status and connect time on the status screen. Your private IP address in VPN is also displayed. The "Connect to" IP address reports "1.0.0.1" , but it is not an unusual.
3. Enjoy VPN communication
While VPN is established, all communications will be relayed via the VPN Server. You can access to any local servers and workstation on the destination network.
Android L2TP Client Setup的更多相关文章
- Mac OS X L2TP Client Setup
原文链接:http://www.softether.org/4-docs/2-howto/9.L2TPIPsec_Setup_Guide_for_SoftEther_VPN_Server/5.Mac_ ...
- Windows L2TP Client Setup
原文链接:http://www.softether.org/4-docs/2-howto/9.L2TPIPsec_Setup_Guide_for_SoftEther_VPN_Server/4.Wind ...
- iPhone / iPad L2TP Client Setup
原文链接:http://www.softether.org/4-docs/2-howto/9.L2TPIPsec_Setup_Guide_for_SoftEther_VPN_Server/2.iPho ...
- Android源代码下载之《Android新闻client源代码》
介绍 Android新闻client源代码,功能上分为:新闻.关注.读报.微博.里面比較有特色的就是读报功能.真正安装报纸的排版进行读报.给人得感觉就像是在读真实的报纸.事实上即使首页的动态云标签很有 ...
- 开源:矿Android新闻client,快、小、支持离线阅读、操作简单、内容丰富,形式多样展示、的信息量、全功能 等待(离开码邮箱)
分享:矿Android新闻client.快.小.支持离线阅读.操作简单.内容丰富,形式多样展示.的信息量.全功能 等待(离开码邮箱) 历时30天我为了开发这个新闻clientAPP,下面简称觅闻 ht ...
- Android Netty Client
Android netty client Start a netty client on android Download netty Download url :https://netty.io/d ...
- Linux作为l2tp client 连接l2tp server
cat /etc/xl2tpd/xl2tpd.conf [global] debug tunnel = yes [lac name] lns = xxx.xxx.xxx.xxx pppoptfile ...
- android pbap client 蓝牙
一. 简介: 此功能具体使用的是bluetoothV2.1之后的Phone Book Access Profile功能,简称PBAP .目前MTK Android中只实现了server端的功能,并没 ...
- Android:解决client从server上获取数据乱码的方法
向server发送HTTP请求.接收到的JSON包为response,用String content = EntityUtils.toString(response.getEntity()," ...
随机推荐
- generator mybatis逆向工程
mybatis逆向工程:根据数据库中的表在项目中生成对应的 实体类,dao接口与mapper.xml映射文件 在eclipse中,以插件的形式的存在,把设置好的配置文件,直接通过eclipse中的插件 ...
- Linux 安装Python37
1.下载python3.7.0 https://www.python.org/downloads/release/python-370/ 2.创建Linux的python37目录 mkdir /usr ...
- login.html
<meta name="viewport" content="width=device-width, initial-scale=1,maximum-scale=1 ...
- GBDT的数学原理
一.GBDT的原理 GBDT(Gradient Boosting Decision Tree) 又叫 MART(Multiple Additive Regression Tree),是一种迭代的决策树 ...
- c#多线程thread实例详解
1. Thread线程启动 由于ThreadStart是一个委托,所以可以简化写法 static void Main(string[] args) { Console.WriteLine(" ...
- 关于Java方法重载
今天在做项目的时候发现一个问题,如果有两个方法是重载的,而且他们的参数一个是父类,一个是子类,那么调用的时候会调用哪个函数呢? 做了个测试,发现调用的是子类. 例子: public class Ani ...
- HTTP Status 500 - Error instantiating servlet class cn.it.bd.S011
HTTP Status 500 - Error instantiating servlet class cn.it.bd.S011 出现此报错的很大可能是因为 <servlet-class> ...
- re模块(正则表达式)
re,findall("匹配正则","内容") #所有满足条件的结果都返回到一个列表里 ret = re.search(“匹配规则”,“内容”) #返回 匹配到 ...
- nginx和resin一二三
最近听我们这边的开发讲解了一小下nginx和resin,现在Mark一下,可能不专业,但是对于我来说通俗易懂就好哈哈哈. 首先说服务器,服务器这个东西吧它是干啥的呢,你写的页面只能在你自己的电脑上打开 ...
- [转]CentOS7利用systemctl添加自定义系统服务
原文:https://www.cnblogs.com/saneri/p/7778756.html CentOS7自定义系统服务 CentOS7的服务systemctl脚本存放在:/usr/lib/sy ...