
Windows L2TP Client Setup
原文链接:http://www.softether.org/4-docs/2-howto/9.L2TPIPsec_Setup_Guide_for_SoftEther_VPN_Server/4.Windows_L2TP_Client_Setup
Windows L2TP Client Setup
Here is the instruction how to connect to your SoftEther VPN Server by using L2TP/IPsec VPN Client which is built-in on Windows XP, 7, 8, RT, Server 2003, 2008 and 2012.
On this instruction, we use Windows 7 screens. Windows XP and Windows 8 are similar, however there are a little number of changes.
1. Initial configurations (only once at the first time)
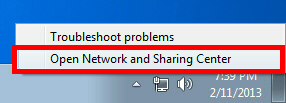
Right-click the network icon on the bottom-right side of Windows screen, and click "Open Network and Sharing Center" .
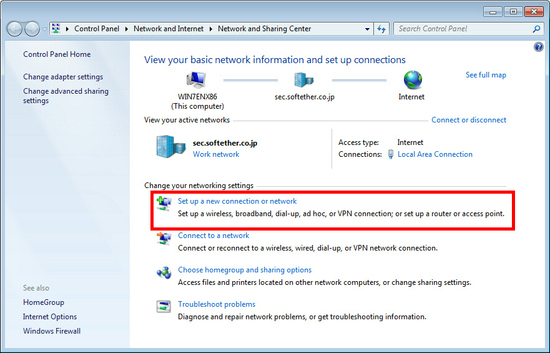
Click "Set up a new connection or network" on the "Network Sharing Center" .
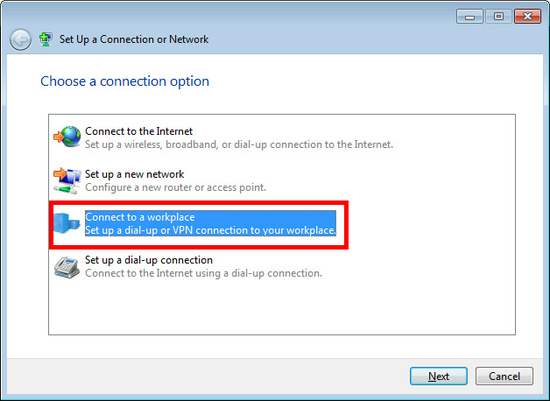
Select "Connect to a workplace" .
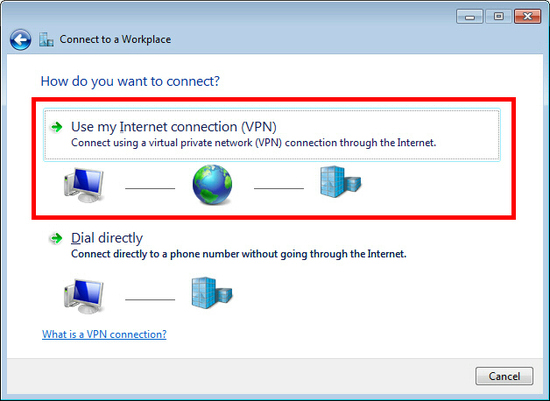
Select "Use my Internet connection (VPN)" .
You have to input the destination SoftEther VPN Server's IP address or hostname here.
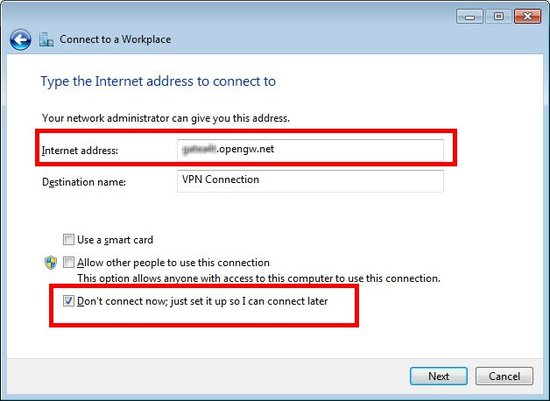
Enter either hostname or IP address on the "Internet address" field on the configuration wizard.
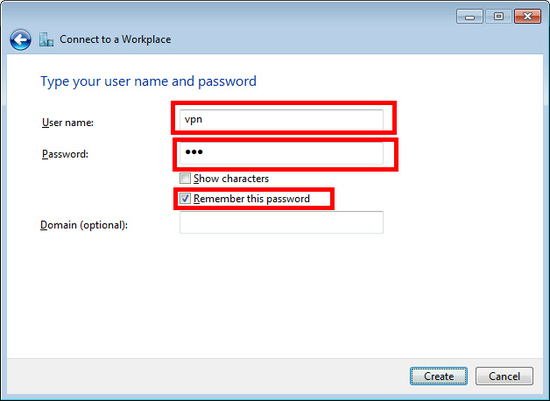
After you enter the "Internet address", check "Don't connect now; just set up so I can connect later" checkbox on the bottom of the screen surely.
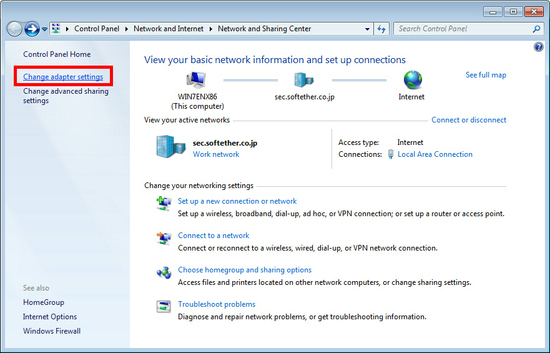
Go to "Network and Sharing Center" and click "Change adapter settings" .
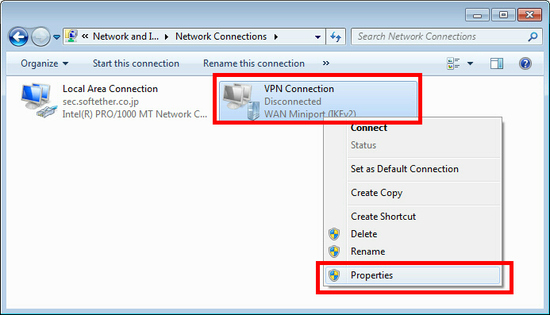
The currently defined VPN connection settings are listed. Right click the icon you created in the previous step, and click "Properties" .
On the Properties screen, switch to the "Security" tab. (In Windows XP, switch to the "Network" tab.) Choose "Layer 2 Tunneling Protocol with IPsec (L2TP/IPSec)" on the "Type of VPN" drop-down list.
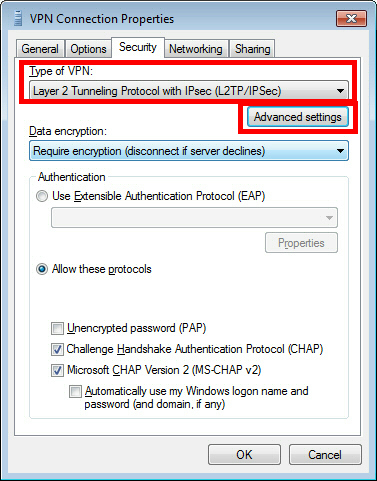
Next, click the "Advanced settings" button. (In Windows XP, click the "IPsec Settings" on the "Security" tab.)
The following screen will appear. Click "Use preshared key for authentication" and input the pre-shared key on the "Key" field.
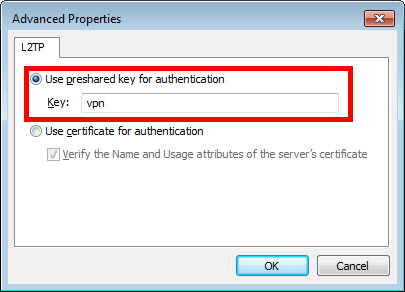
After the above configuration finished, click the "OK" button twice to close the property screen of the VPN connection setting.
2. Connect to the VPN Server
Click the "Connect" button to start the VPN connecting attempts.
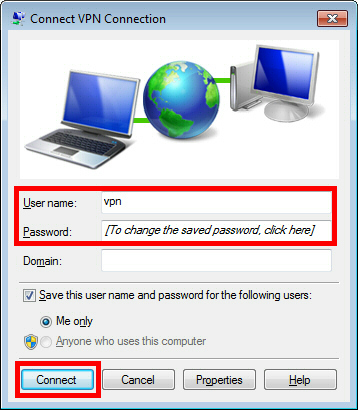
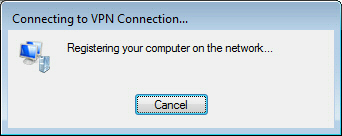
While the VPN is trying to be established, the following screen displays statuses. If an error occurs, confirm your settings make sure that the type of VPN is "L2TP/IPsec" , and the pre-shared key is correctly specified.
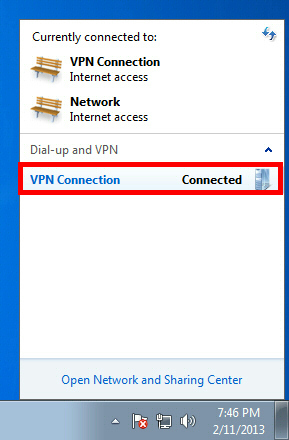
If the VPN connection is successfully established, a VPN connection icon will be listed on the screen which appears when you click the network icon on the bottom-right of Windows screen. The status of the VPN connection icon should be "Connected" .
By the way, you can initiate the VPN connection by simply clicking this VPN icon from now on.
3. Enjoy VPN communication
While VPN is established, all communications will be relayed via the VPN Server. You can access to any local servers and workstation on the destination network.
Windows L2TP Client Setup的更多相关文章
- Mac OS X L2TP Client Setup
原文链接:http://www.softether.org/4-docs/2-howto/9.L2TPIPsec_Setup_Guide_for_SoftEther_VPN_Server/5.Mac_ ...
- Android L2TP Client Setup
原文链接:http://www.softether.org/4-docs/2-howto/9.L2TPIPsec_Setup_Guide_for_SoftEther_VPN_Server/3.Andr ...
- iPhone / iPad L2TP Client Setup
原文链接:http://www.softether.org/4-docs/2-howto/9.L2TPIPsec_Setup_Guide_for_SoftEther_VPN_Server/2.iPho ...
- Mikrotik: Setup SSTP Server for Windows 10 Client
原文: http://www.dr0u.com/mikrotik-setup-sstp-server-for-windows-10-client/ Basic how-to on SSTP for a ...
- Windows OpenVPN Client and tls-auth
The official Windows OpenVPN client does not seem to work properly with the tls-auth option if a key ...
- Linux作为l2tp client 连接l2tp server
cat /etc/xl2tpd/xl2tpd.conf [global] debug tunnel = yes [lac name] lns = xxx.xxx.xxx.xxx pppoptfile ...
- windows系统激活-使用微软官方公布的kms client setup key安装或安装后使用slmgr导入
windows 10各版本: Windows 10 Professional W269N-WFGWX-YVC9B-4J6C9-T83GX Windows 10 Professional N MH37W ...
- WCF 与 Windows Store Client App
首先复习下WCF: WCF实际上是构建了一个框架,这个框架实现了在互联系统中各个Application之间如何通信.使得Developers和Architect在构建分布式系统中,无需在考虑如何去实现 ...
- windows下Inno Setup打包
基于inno setup的windos打包,主要脚本语言inno script.下载地址:https://jrsoftware.org/isdl.php相关打包教程:https://blog.csdn ...
随机推荐
- Visual Assist X 中使用doxygen的模板注释
http://blog.csdn.net/dhifnoju/article/details/44947213 Doxygen是一种开源跨平台的,以类似JavaDoc风格描述的文档系统,完全支持C.C+ ...
- mybatis(二)
一级缓存和二级缓存 mybatis一二级缓存测试实例: package com.atguigu.mybatis.test; import java.io.IOException; import jav ...
- jsapi 调起微信支付的的踩坑
问题: 公众微信号调起微信支付的时候,有的时候调起支付成功,有的时候调起支付失败.利用抓包工具抓取数据显示授权和调用后台的微信预支付订单接口都成功并且都返回正确的数据.但是调起支付的时候传入的data ...
- C# 索引和长度必须引用该字符串内的位置 LENGTH
今天遇到了 索引和长度必须引用该字符串内的位置 的问题. 原因是实用 Substring 对字符串进行了前五位的截取,但是忽略了字符串本身不足五位的情况. 如果不足五位,直接将整个字符串赋值过来,添加 ...
- MIME 参考手册
本文摘自http://www.w3school.com.cn/media/media_mimeref.asp MIME (Multipurpose Internet Mail Extensions) ...
- mongo中的游标与数据一致性的取舍
除了特殊注释外,本文的测试结果均基于 spring-data-mongodb:1.10.6.RELEASE(spring-boot-starter:1.5.6.RELEASE),MongoDB 3.0 ...
- unity UI如何开启(显示)或者关闭(隐藏)Panel界面最好?
https://segmentfault.com/a/1190000012357091 unity UI如何开启(显示)或者关闭(隐藏)Panel界面,相信大家都是知道的,但是如何做最好呢? 可能大家 ...
- Linux:Fedora系统的安装
新的一周,新的一天又来了!话不多说我们直接进入今天的系统安装吧!这次是Linux系统的第八期了,这款系统是可以当做家庭用途使用,非常强大的一款开发源操作系统. 安装Fedora系统 系统映像文件下载 ...
- Redux的工作流程
1.Redux 是一个专门用来管理数据业务或逻辑状态的框架,它也可以实现代码结构的规范化并提供组件之间通信的便利,而这两点,对于大型应用来说非常关键. 2.工作流程: Redux 三大原则 单一数据源 ...
- 《团队-爬虫豆瓣top250项目-团队一阶段互评》
团队名称:咣咣踹电脑 学号:2015035107217姓名:耿文浩 得分10 原因:组长带领的好,任务分配的好,积极帮助组员解决问题 学号:2015035107213姓名:周鑫 得分8 原因:勇于分担 ...