Nacos服务注册原理分析
在分布式服务中,原来的单体服务会被拆分成一个个微服务,服务注册实例到注册中心,服务消费者通过注册中心获取实例列表,直接请求调用服务。
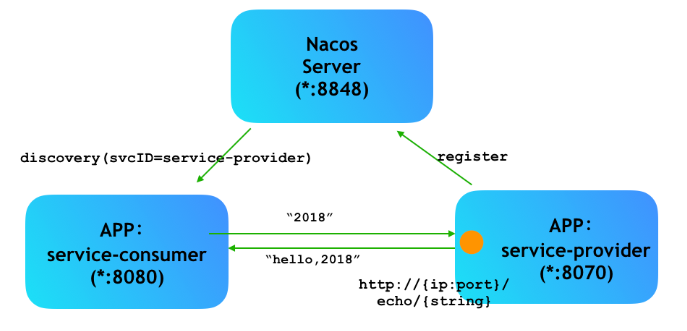
服务是如何注册到注册中心,服务如果挂了,服务是如何检测?带着这些问题,我们从源码上对服务注册进行简单的源码分析。
版本 2.1.1
Nacos Server:2.1.1spring-cloud-starter-alibaba:2.1.1.RELEASEspring-boot:2.1.1.RELEASE
方便统一版本,客户端和服务端版本号都为
2.1.1。
客户端
启动nacos服务注册和发现需要添加maven依赖:
<dependency>

    <groupId>com.alibaba.cloud</groupId>

    <artifactId>spring-cloud-starter-alibaba-nacos-discovery</artifactId>

    <version>${latest.version}</version>

</dependency>
根据maven依赖找到对应的spring.factories文件:
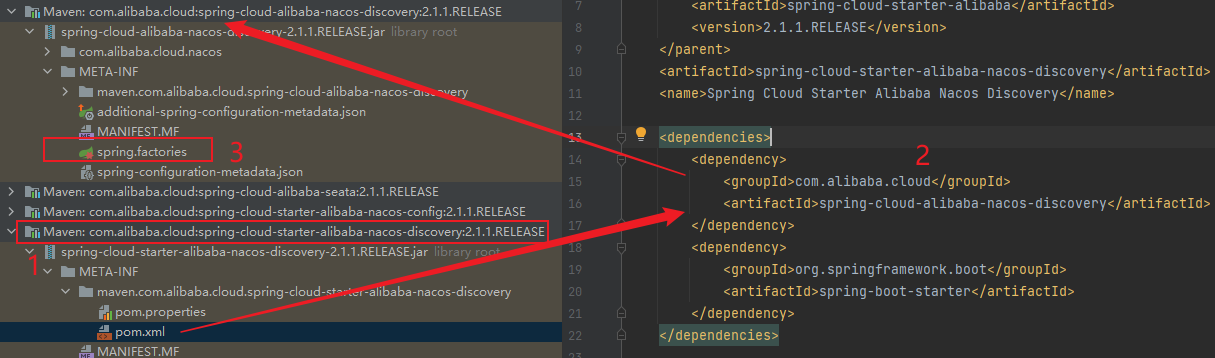
在spring.factories文件里找到启动配置类信息,SpringBoot服务启动时会将这些配置类信息注入到bean容器中。
org.springframework.boot.autoconfigure.EnableAutoConfiguration=\

  com.alibaba.cloud.nacos.NacosDiscoveryAutoConfiguration,\

  com.alibaba.cloud.nacos.ribbon.RibbonNacosAutoConfiguration,\

  com.alibaba.cloud.nacos.endpoint.NacosDiscoveryEndpointAutoConfiguration,\

  com.alibaba.cloud.nacos.discovery.NacosDiscoveryClientAutoConfiguration,\

  com.alibaba.cloud.nacos.discovery.configclient.NacosConfigServerAutoConfiguration

org.springframework.cloud.bootstrap.BootstrapConfiguration=\

  com.alibaba.cloud.nacos.discovery.configclient.NacosDiscoveryClientConfigServiceBootstrapConfiguration
服务注册的核心配置类为:NacosDiscoveryAutoConfiguration,该类配置三个bean对象:
NacosServiceRegistryNacosRegistrationNacosAutoServiceRegistration
NacosAutoServiceRegistration
NacosAutoServiceRegistration继承了抽象类AbstractAutoServiceRegistration。AbstractAutoServiceRegistration抽象类又实现了ApplicationListener接口。
实现ApplicationListener接口的方法,会在Spring容器初始化完成之后调用onApplicationEvent方法:
public void onApplicationEvent(WebServerInitializedEvent event) {

  bind(event);

}
调用bind方法:
public void bind(WebServerInitializedEvent event) {

		ApplicationContext context = event.getApplicationContext();

		if (context instanceof ConfigurableWebServerApplicationContext) {

			if ("management".equals(((ConfigurableWebServerApplicationContext) context)

					.getServerNamespace())) {

				return;

			}

		}

		this.port.compareAndSet(0, event.getWebServer().getPort());

    // 调用 start 方法

		this.start();

	}
调用了start方法:
public void start() {

  if (!isEnabled()) {

    if (logger.isDebugEnabled()) {

      logger.debug("Discovery Lifecycle disabled. Not starting");

    }

    return;

  }

  if (!this.running.get()) {

    this.context.publishEvent(

        new InstancePreRegisteredEvent(this, getRegistration()));

    register();

    if (shouldRegisterManagement()) {

      registerManagement();

    }

    this.context.publishEvent(

        new InstanceRegisteredEvent<>(this, getConfiguration()));

    this.running.compareAndSet(false, true);

  }

}
调用了register方法,最终调用的是NacosServiceRegistry类的register方法。
NacosServiceRegistry
根据上文可知,服务器启动后调用NacosServiceRegistry类的register方法,该方法实现将实例注册到服务端:
public void register(Registration registration) {

  if (StringUtils.isEmpty(registration.getServiceId())) {

    log.warn("No service to register for nacos client...");

    return;

  }

  String serviceId = registration.getServiceId();

  String group = nacosDiscoveryProperties.getGroup();

  // 创建实例

  Instance instance = getNacosInstanceFromRegistration(registration);

  try {

    // 注册实例

    namingService.registerInstance(serviceId, group, instance);

    log.info("nacos registry, {} {} {}:{} register finished", group, serviceId,

        instance.getIp(), instance.getPort());

  }

  catch (Exception e) {

    log.error("nacos registry, {} register failed...{},", serviceId,

        registration.toString(), e);

  }

}
创建实例,然后通过namingService.registerInstance方法注册实例,然后查看registerInstance方法:
@Override

public void registerInstance(String serviceName, String groupName, Instance instance) throws NacosException {

    if (instance.isEphemeral()) {

        // 封装心跳包

        BeatInfo beatInfo = new BeatInfo();

        beatInfo.setServiceName(NamingUtils.getGroupedName(serviceName, groupName));

        beatInfo.setIp(instance.getIp());

        beatInfo.setPort(instance.getPort());

        beatInfo.setCluster(instance.getClusterName());

        beatInfo.setWeight(instance.getWeight());

        beatInfo.setMetadata(instance.getMetadata());

        beatInfo.setScheduled(false);

        long instanceInterval = instance.getInstanceHeartBeatInterval();

        beatInfo.setPeriod(instanceInterval == 0 ? DEFAULT_HEART_BEAT_INTERVAL : instanceInterval);

        // 发送心跳包

        beatReactor.addBeatInfo(NamingUtils.getGroupedName(serviceName, groupName), beatInfo);

    }

    // 发送实例

    serverProxy.registerService(NamingUtils.getGroupedName(serviceName, groupName), groupName, instance);

}
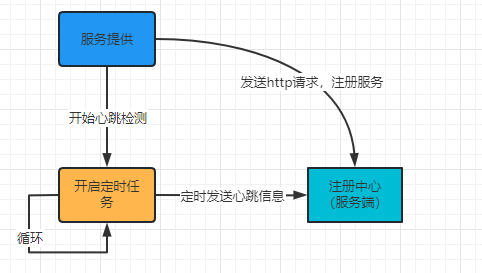
registerInstance主要做两件事:
- 发送心跳包
beatReactor.addBeatInfo使用定时服务,每隔5s向服务端发送一次心跳请求,通过http请求发送心跳信息,路径为/v1/ns/instance/beat。
心跳请求定时任务使用线程池ScheduledThreadPoolExecutor.schedule(),而该方法只会调用一次,定时任务的实现是在每次请求任务只会再调用一次ScheduledThreadPoolExecutor.schedule(),
简单说就是nacos在发送心跳的时候,会调用schedule方法,在schedule要执行的任务中,如果正常发送完心跳,会再次调用schedule方法。
那为什么不直接调用周期执行的线程池ScheduledThreadPoolExecutor.scheduleAtFixedRate()?可能是由于发送心跳服务发生异常后,定时任务还会继续执行,但是周期执行的线程池遇到报错后也不会重复调用执行的任务。
线程任务
BeatTask的run方法,,每次执行会先判断isStopped,如果是false,说明心跳停止,就不会触发下次执行任务。如果使用定时任务scheduleAtFixedRate,即使心跳停止还会继续执行任务,造成资源不必要浪费。
- 注册实例
registerService主要封装实例信息,比如ip、port、servicename,将这些信息通过http请求发送给服务端。路径为/v1/ns/instance。
根据上面流程,查看以下的流程图:
服务端
服务端就是注册中心,服务注册到注册中心,在https://github.com/alibaba/nacos/releases/tag/2.1.1下载源码部署到本地,方便调式和查看,部署方式详见我的另外一篇文章Nacos 源码环境搭建。
服务端主要接收两个信息:心跳包和实例信息。
心跳包
客户端向服务请求的路径为/v1/ns/instance/beat,对应的服务端为InstanceController类的beat方法:
@PutMapping("/beat")

@Secured(action = ActionTypes.WRITE)

public ObjectNode beat(HttpServletRequest request) throws Exception {

    ObjectNode result = JacksonUtils.createEmptyJsonNode();

    result.put(SwitchEntry.CLIENT_BEAT_INTERVAL, switchDomain.getClientBeatInterval());

    String beat = WebUtils.optional(request, "beat", StringUtils.EMPTY);

    RsInfo clientBeat = null;

    // 判断是否有心跳,存在心跳就转成RsInfo

    if (StringUtils.isNotBlank(beat)) {

        clientBeat = JacksonUtils.toObj(beat, RsInfo.class);

    }

    String clusterName = WebUtils

            .optional(request, CommonParams.CLUSTER_NAME, UtilsAndCommons.DEFAULT_CLUSTER_NAME);

    String ip = WebUtils.optional(request, "ip", StringUtils.EMPTY);

    int port = Integer.parseInt(WebUtils.optional(request, "port", "0"));

    if (clientBeat != null) {

        if (StringUtils.isNotBlank(clientBeat.getCluster())) {

            clusterName = clientBeat.getCluster();

        } else {

            // fix #2533

            clientBeat.setCluster(clusterName);

        }

        ip = clientBeat.getIp();

        port = clientBeat.getPort();

    }

    String namespaceId = WebUtils.optional(request, CommonParams.NAMESPACE_ID, Constants.DEFAULT_NAMESPACE_ID);

    String serviceName = WebUtils.required(request, CommonParams.SERVICE_NAME);

    NamingUtils.checkServiceNameFormat(serviceName);

    Loggers.SRV_LOG.debug("[CLIENT-BEAT] full arguments: beat: {}, serviceName: {}, namespaceId: {}", clientBeat,

            serviceName, namespaceId);

    // 获取实例信息

    BeatInfoInstanceBuilder builder = BeatInfoInstanceBuilder.newBuilder();

    builder.setRequest(request);

    int resultCode = getInstanceOperator()

            .handleBeat(namespaceId, serviceName, ip, port, clusterName, clientBeat, builder);

    result.put(CommonParams.CODE, resultCode);

    // 下次发送心跳包间隔

    result.put(SwitchEntry.CLIENT_BEAT_INTERVAL,

            getInstanceOperator().getHeartBeatInterval(namespaceId, serviceName, ip, port, clusterName));

    result.put(SwitchEntry.LIGHT_BEAT_ENABLED, switchDomain.isLightBeatEnabled());

    return result;

}
在handleBeat方法中执行线程任务ClientBeatProcessorV2的run方法,延长lastHeartBeatTime时间。注册中心会定时查询实例,当前时间 - lastHeartBeatTime > 设置时间(默认15秒),就标记实例为不健康实例。如果心跳实例不健康,发送通知给订阅方,变更实例。
服务端在
15秒没有收到心跳包会将实例设置为不健康,在30秒没有收到心跳包会将临时实例移除掉。
实例注册
客户端请求的地址是/nacos/v1/ns/instance, 对应的是服务端是在InstanceController类。找到类上对应的post请求方法上。
注册流程:
InstanceController#register ——>InstanceOperatorClientImpl#registerInstance ——>ClientOperationServiceProxy#registerInstance ——>EphemeralClientOperationServiceImpl#registerInstance
创建 Service
服务注册后,将服务存储在一个双层map集合中:
private final Map<String, Map<String, Service>> serviceMap = new ConcurrentHashMap<>();
通过是否存在ephemeral,true,走AP模式,否则走CP模式。
Nacos 默认就是采用的AP模式使用Distro协议实现。实现的接口是EphemeralConsistencyService对节点信息的持久化主要是调用put方法,
会先写入到DataStore中:
public void onPut(String key, Record value) {

    if (KeyBuilder.matchEphemeralInstanceListKey(key)) {

        Datum<Instances> datum = new Datum<>();

        datum.value = (Instances) value;

        datum.key = key;

        datum.timestamp.incrementAndGet();

         // 数据持久化到缓存中

        dataStore.put(key, datum);

    }

    if (!listeners.containsKey(key)) {

        return;

    }

    notifier.addTask(key, DataOperation.CHANGE);

}
总结
- 从依赖上找到需要启动的是要加载的服务注册类
NacosDiscoveryAutoConfiguration,主要配置三个对象NacosServiceRegistryNacosRegistrationNacosAutoServiceRegistration
NacosServiceRegistry类的register方法,封装实例和心跳信息- 通过
http请求,定时发送发送心跳包,默认时间间隔是5秒。 - 通过
http请求,发送实例信息。
- 通过
- 服务端
- 接收到心跳请求,更新心跳包最新时间。服务端在
15秒没有收到心跳包会将实例设为不健康,在30秒没有收到心跳包会将临时实例移除掉。 - 接收到服务注册接口,通过
ephemeral判断是否走AP还是走CP,AP模式使用Distro协议。通过调用EphemeralConsistencyService接口实现,持久化实例信息。
- 接收到心跳请求,更新心跳包最新时间。服务端在
参考
Nacos服务注册原理分析的更多相关文章
- Nacos 服务注册的原理
Nacos 服务注册需要具备的能力: 服务提供者把自己的协议地址注册到Nacos server 服务消费者需要从Nacos Server上去查询服务提供者的地址(根据服务名称) Nacos Serve ...
- 微服务架构 | *3.5 Nacos 服务注册与发现的源码分析
目录 前言 1. 客户端注册进 Nacos 注册中心(客户端视角) 1.1 Spring Cloud 提供的规范标准 1.2 Nacos 的自动配置类 1.3 监听服务初始化事件 AbstractAu ...
- nacos服务注册与发现原理解析
前言:nacos 玩过微服务的想必不会陌生,它是阿里对于springcloud孵化出来的产品,用来完成服务之间的注册发现和配置中心,其核心作用我就不废话了 大致流程:每个服务都会有一个nacos cl ...
- Spring Cloud Alibaba Nacos 服务注册与发现功能实现!
Nacos 是 Spring Cloud Alibaba 中一个重要的组成部分,它提供了两个重要的功能:服务注册与发现和统一的配置中心功能. 服务注册与发现功能解决了微服务集群中,调用者和服务提供者连 ...
- Spring Cloud Alibaba | Nacos服务注册与发现
目录 Spring Cloud Alibaba | Nacos服务注册与发现 1. 服务提供者 1.1 pom.xml项目依赖 1.2 配置文件application.yml 1.3 启动类Produ ...
- Spring Cloud Alibaba(一) 如何使用nacos服务注册和发现
Nacos介绍 Nacos 致力于帮助您发现.配置和管理微服务.Nacos 提供了一组简单易用的特性集,帮助您快速实现动态服务发现.服务配置.服务元数据及流量管理. Nacos 帮助您更敏捷和容易地构 ...
- Alibaba Nacos 学习(三):Spring Cloud Nacos Discovery - FeignClient,Nacos 服务注册与发现
Alibaba Nacos 学习(一):Nacos介绍与安装 Alibaba Nacos 学习(二):Spring Cloud Nacos Config Alibaba Nacos 学习(三):Spr ...
- SpringCloud Alibaba Nacos 服务注册
业务服务接入Nacos服务治理中心 启动Nacos访问地址为:http://101.200.201.195:8848/nacos/ 创建bom工程用于管理依赖(下方附加源码地址) 准备工作完成后开始接 ...
- springcloudalibaba与nacos服务注册流程图
springboot + springcloud + springcloudalibaba + nacos 服务注册流程图: springboot ①WebApplicationContext ②st ...
- 实战二:nacos服务注册与发现,openfeign服务调用
一,参照上一篇创建好微服务结构后,按业务需求编写各微服务逻辑 二,服务注册 1,安装nacos:下载,解压,运行startup.cmd 2,访问 http://localhost:8848/nacos ...
随机推荐
- spring源码解析(二) 结合源码聊聊FactoryBean
一.什么是FactoryBean FactoryBean是由spring提供的用来让用户可以自定bean创建的接口:实现该接口可以让你的bean不用经过spring复杂的bean创建过程,但同时也能做 ...
- zk,kafka,redis哨兵,mysql容器化
1. zookeeper,kafka容器化 1.1 zookeeper+kafka单机docker模式 docker pull bitnami/zookeeper:3.6.3-debian-11-r4 ...
- linux下进程的实际用户ID(有效组)和有效用户ID(有效组ID)
实际用户ID(实际组ID):标识当前用户(所属组)是谁,当用户登陆时取自口令文件. 有效用户ID(有效组ID):用来决定我们(当前进程)对文件的访问权(即实际该进程的是以那个用户运行的). 一般情况下 ...
- Spring Cloud Circuit Breaker 使用示例
Spring Cloud Circuit Breaker 使用示例 作者: Grey 原文地址: 博客园:Spring Cloud Circuit Breaker 使用示例 CSDN:Spring C ...
- EntityUtils MapStruct BeanCopier 数据实体类转换工具 DO BO VO DTO 附视频
一.序言 在实际项目开发过程中,总有数据实体类互相转换的需求,DO.BO.VO.DTO等数据模型转换经常发生.今天推荐几个好用的实体类转换工具,分别是EntityUtils MapStruct Bea ...
- C++ 动态规划:一维动态规划,背包问题,区间动态规划
C++ 动态规划 动态规划的定义 动态规划(Dynamic Programming,DP)是运筹学的一个分支,是求解决策过程最优化的过程.动态规划是一种在数学.管理科学.计算机科学.经济学和生物信息学 ...
- vue 中使用 this 更新数据的一次大坑
情景说明: 之前用 vue 做数据绑定更新时,发现一个莫名奇妙的问题. 我在 vue 实例中声明了一个数组属性如 books: [],在异步请求的回调函数中使用 this.books = res.da ...
- 浏览器直接修改网站的js代码
1.按下F12打开控制台,找到源代码,然后是替换 2.在本地创建一个文件夹,会提示风险,点击允许 3.再找到你要修改的js文件代码,右击选择保存并覆盖 这样代码会保存到你刚刚创建的本地文件夹当中,接着 ...
- 数电第六周周结_by_yc
时序逻辑电路的设计要点: ①只有时钟信号和复位信号可以放在敏感列表里: ②使用非阻塞赋值,即使用"<="; ③无需对所有分支进行描述,对于未描述的分支,变量将保持 ...
- <七>lambda表达式实现原理
C++11 函数对象的升级版=>lambda表达式 函数对象的缺点: 使用在泛型算法,参数传递, 比较性质/自定义操作 优先级队列, 需要专门定义出一个类 //lambda表达式语法: //[捕 ...