Android Studio 优秀插件: Parcelable Code Generator
这里假设我们已经会使用 Parcelable 序列化一个对象了~~
那么大家会发现 Parcelable 使用起来有些复杂,因为我们要自己复写 几个方法,而且当类的属性比较多的时候,我们就会难受了,又要注意不写错属性名,又要注意写对属性的类型,又要花不少的时间做重复的事情。
那么因为 Parcelable 有使用它的优势,我们又不能放弃,那该怎么办么?
Android Studio 提供给了我们 一个插件用来简化 给一个类 实现 Parcelable 接口的流程。
-----------------------------------------------------------------------------
现在学习下如何使用这个插件:
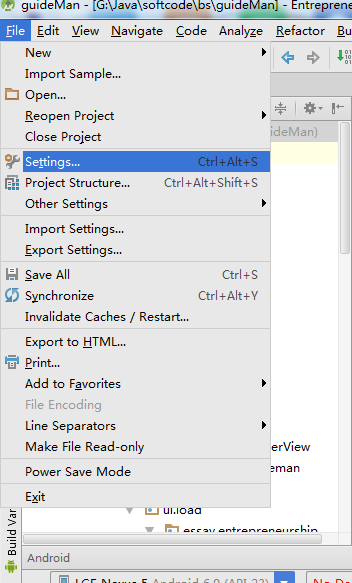
1、Android Studio 打开一个项目,点击左上角 File -->Settings... 进行设置
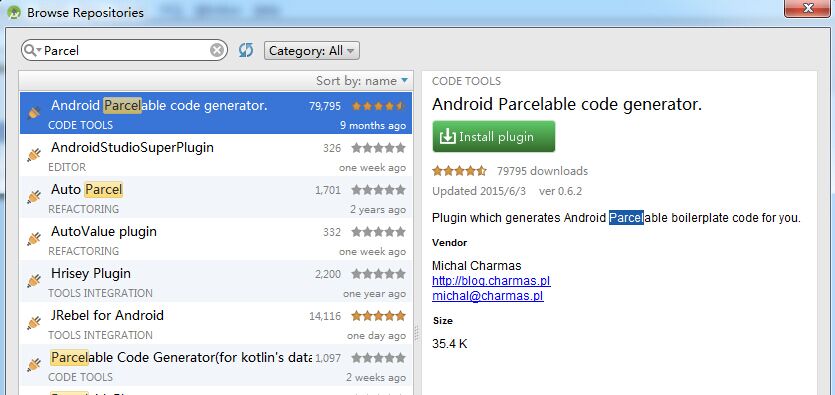
2、选择插件Plugins , 搜索Parcel,如果你没有下载过这个插件,那么搜索框下面会显示“Nothing to show.Click Browse to....”
3、那就点击蓝色字体的 Browse 吧 ,这个时候会出现如下图的界面,我们只需要在左边选中arcel然后点击右面 绿色按钮 "Install plugin" 就可以了
4、完成了上面三个步骤,就可以使用Parcelable Code Generator插件了
怎么用呢,
(1)创建一个类文件,类名是看你需求自定义写的,添加上你需要的属性
(2)快捷键 alt+insert ,会出现如下选择框,选择Parcelable 即可
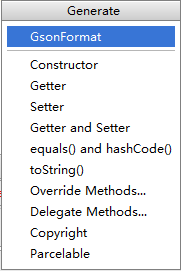
然后我们就看到代码,是不是比我们手动写要快的许多
public class People implements Parcelable {

    private int id;

    private String url;

    private int width;

    private int height;

    private int likeCount;

    private String description;

    private int time;

    private int replyCount;

    private int floorCount;

    private int likeUserCount;

    private int age;

    private String name;

    private String school;

    private int type;

    private String sax;

    private int userid;

    @Override

    public int describeContents() {

        return 0;

    }

    @Override

    public void writeToParcel(Parcel dest, int flags) {

        dest.writeInt(this.id);

        dest.writeString(this.url);

        dest.writeInt(this.width);

        dest.writeInt(this.height);

        dest.writeInt(this.likeCount);

        dest.writeString(this.description);

        dest.writeInt(this.time);

        dest.writeInt(this.replyCount);

        dest.writeInt(this.floorCount);

        dest.writeInt(this.likeUserCount);

        dest.writeInt(this.age);

        dest.writeString(this.name);

        dest.writeString(this.school);

        dest.writeInt(this.type);

        dest.writeString(this.sax);

        dest.writeInt(this.userid);

    }

    public People() {

    }

    protected People(Parcel in) {

        this.id = in.readInt();

        this.url = in.readString();

        this.width = in.readInt();

        this.height = in.readInt();

        this.likeCount = in.readInt();

        this.description = in.readString();

        this.time = in.readInt();

        this.replyCount = in.readInt();

        this.floorCount = in.readInt();

        this.likeUserCount = in.readInt();

        this.age = in.readInt();

        this.name = in.readString();

        this.school = in.readString();

        this.type = in.readInt();

        this.sax = in.readString();

        this.userid = in.readInt();

    }

    public static final Parcelable.Creator<People> CREATOR = new Parcelable.Creator<People>() {

        public People createFromParcel(Parcel source) {

            return new People(source);

        }

        public People[] newArray(int size) {

            return new People[size];

        }

    };

}
Android Studio 优秀插件: Parcelable Code Generator的更多相关文章
- Android项目实战(十九):Android Studio 优秀插件: Parcelable Code Generator
Android Studio 优秀插件系列: Android Studio 优秀插件(一):GsonFormat Android Studio 优秀插件(二): Parcelable Code Gen ...
- Android开发实战(十八):Android Studio 优秀插件:GsonFormat
Android Studio 优秀插件系列: Android Studio 优秀插件(一):GsonFormat Android Studio 优秀插件(二): Parcelable Code Gen ...
- Android Studio 优秀插件汇总
第一部分 插件的介绍 Google 在2013年5月的I/O开发者大会推出了基于IntelliJ IDEA java ide上的Android Studio.AndroidStudio是一个功能齐全的 ...
- 拿走不谢!22 个 Android Studio 优秀插件汇总
Google 在2013年5月的I/O开发者大会推出了基于IntelliJ IDEA java ide上的Android Studio.AndroidStudio是一个功能齐全的开发工具,还提供了第三 ...
- Android Studio 优秀插件:GsonFormat
作为一个Android程序猿,当你看到后台给你的json数据格式时: { "id":123, "url": "http://img.donever.c ...
- Android Studio优秀插件汇总
- Android Studio常用插件续
这个月因为各种事情在忙,包括赶项目,回老家,还有准备旅游的事,所以应该写不了四篇博客了.今天介绍一下关于Android Studio 的几个好用的插件,都是我在用的,它们或能帮你节省时间,或者让你心情 ...
- Android Studio/IDEA插件
1.android parcelable code generator 2.android code generator3.gson format4.android postfix completio ...
- Android Studio 实用插件整理
首先说一下安装方法: 上图片: 首先点击Android stuido 菜单 File->Settings 进入上图界面: 区域1:你当前已经安装了的插件 区域3:在线安装 区域2:其实和区域3是 ...
随机推荐
- 牛客第五场 G max 思维
链接:https://www.nowcoder.com/acm/contest/143/G来源:牛客网 Give two positive integer c, n. You need to find ...
- .NET Core 微信小程序支付——(统一下单)
最近公司研发了几个电商小程序,还有一个核心的电商直播,只要是电商一般都会涉及到交易信息,离不开支付系统,这里我们统一实现小程序的支付流程(与服务号实现步骤一样). 目录1.开通小程序的支付能力2.商户 ...
- Windows下升级Zabbix Agent
这段时间因工作上不太忙,就着手升级下zabbix,从3升级到最新版4.2,服务器端升级还挺快,就是客户端比较耗时了,往往就是看的越简单的东西越耗时间啊. Windows版本的zabbix agent下 ...
- mysql5.7指定字符集
在这个配置下面加上下面这行就可以 [mysqld] character_set_server=utf8 重启后: mysql> show variables like 'char%';+---- ...
- Could not calculate build plan :lugin org.apache.maven.plugins:maven-resources-plugin:2.6 or one of
eclipse中新建maven项目,出现 Could not calculate build plan :lugin org.apache.maven.plugins:maven-resources- ...
- Net基础篇_学习笔记_第九天_数组
结构:一次性存储不同类型的变量: 数组:一次性存储相同类型的变量: 数组的语法: 数组类型[ ] 数组名=new 数组类型[数组长度]: int[ ] nums=new int[10]; 数组初值都是 ...
- Hive介绍和安装部署
搭建环境 部署节点操作系统为CentOS,防火墙和SElinux禁用,创建了一个shiyanlou用户并在系统根目录下创建/app目录,用于存放 Hadoop等组件运行包.因为该目录用于安装h ...
- Lucene 全文检索入门
博客地址:http://www.moonxy.com 一.前言 Lucene 是 apache 软件基金会的一个子项目,由 Doug Cutting 开发,是一个开放源代码的全文检索引擎工具包,但它不 ...
- python安装第三方包的安装路径, dist-packages和site-packages区别
简单来说 如果是系统自带的python,会使用dist-packages目录 如果你手动安装python,它会直接使用目录site-packages 这允许你让两个安装隔离开来 dist-packag ...
- 使用PrepareStatement
包结构: 第一步:编写获取连接工具类 package com.atguigu.jdbc; import java.io.IOException; import java.io.InputStream; ...