Android五大布局详解——LinearLayout(线性布局)
Android五大布局
本篇开始介绍Android的五大布局的知识,一个丰富的界面显示总是要有众多的控件来组成的,那么怎样才能让这些控件能够按你的想法进行摆放,从而自定义你所想要的用户界面呢?这就牵涉到本章将要学习的知识————五大布局。本篇将依次对LinearLayout(线性布局)、RelativeLayout(相对布局)、TableLayout(表格布局)、FrameLayout(帧布局)、GridLayout(网格布局)进行介绍。
LinearLayout(线性布局)
这是一个非常常用的布局,它会将其中的控件在线性方向上依次排列,通过android:orientation属性指定其控件的排列方向,有vertical(垂直方向)以及horizontal(水平方向)排列。新建UILayoutTsetOne项目,其他设置保持默认。修改activity_main.xml中的代码:
<?xml version="1.0" encoding="utf-8"?>

<LinearLayout xmlns:android="http://schemas.android.com/apk/res/android"

    android:orientation="vertical"

    android:layout_width="match_parent"

    android:layout_height="match_parent">

    <Button

        android:layout_width="wrap_content"

        android:layout_height="wrap_content"

        android:text="Button 1" />

    <Button

        android:layout_width="wrap_content"

        android:layout_height="wrap_content"

        android:text="Button 2" />

    <Button

        android:layout_width="wrap_content"

        android:layout_height="wrap_content"

        android:text="Button 3" />

</LinearLayout>
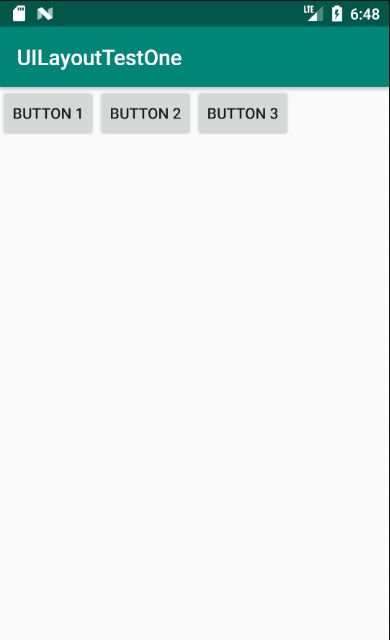
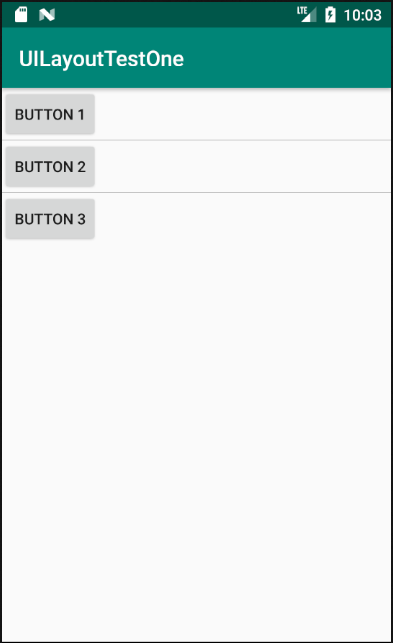
模拟器中运行结果如下图所示,从图中可以看出,定义的三个button控件按照vertical依次排列。

接下来将vertical参数改变为horizontal参数。
<?xml version="1.0" encoding="utf-8"?>

<LinearLayout xmlns:android="http://schemas.android.com/apk/res/android"

    android:orientation="horizontal"

    android:layout_width="match_parent"

    android:layout_height="match_parent">

    <Button

        android:layout_width="wrap_content"

        android:layout_height="wrap_content"

        android:text="Button 1" />

    <Button

        android:layout_width="wrap_content"

        android:layout_height="wrap_content"

        android:text="Button 2" />

    <Button

        android:layout_width="wrap_content"

        android:layout_height="wrap_content"

        android:text="Button 3" />

</LinearLayout>
运行程序,效果如下,从图中可以看出,定义的三个button组件按照horizontal依次排列。
attention!
倘若LinearLayout的排列方向指定为horizontal,则内部的控件就绝对不能将宽度指定为match_parent,因为如果这样设置,单独的控件将会将整个水平方向占满,其他控件将没有放置的位置了。
<?xml version="1.0" encoding="utf-8"?>

<LinearLayout xmlns:android="http://schemas.android.com/apk/res/android"

    android:orientation="horizontal"

    android:layout_width="match_parent"

    android:layout_height="match_parent">

    <Button

        android:layout_width="match_parent"

        android:layout_height="wrap_content"

        android:text="Button 1" />

    <Button

        android:layout_width="wrap_content"

        android:layout_height="wrap_content"

        android:text="Button 2" />

    <Button

        android:layout_width="wrap_content"

        android:layout_height="wrap_content"

        android:text="Button 3" />

</LinearLayout>
效果如图:

同样,倘若LinearLayout的排列方向指定为vertical,则内部的控件就绝对不能将高度指定为match_parent。
<?xml version="1.0" encoding="utf-8"?>

<LinearLayout xmlns:android="http://schemas.android.com/apk/res/android"

    android:orientation="vertical"

    android:layout_width="match_parent"

    android:layout_height="match_parent">

    <Button

        android:layout_width="wrap_content"

        android:layout_height="match_parent"

        android:text="Button 1" />

    <Button

        android:layout_width="wrap_content"

        android:layout_height="wrap_content"

        android:text="Button 2" />

    <Button

        android:layout_width="wrap_content"

        android:layout_height="wrap_content"

        android:text="Button 3" />

</LinearLayout>
效果如图:

下面来看两个长得很像的属性:android:gravity属性和android:layout_gravity属性。
- android:gravity属性:用于指定文字在控件中的对齐方式。可以选择的值有:top、bottom、left、right、center等,还可以用“|”来同时指定多个值,其中center值将相当于center_vertical|center_horizontal,表示文字在垂直和水平方向都居中对齐。
- android:layout_gravity属性:用于指定控件在布局中的对齐方式。其可选值和android:gravity属性差不多,需要注意的是,当LinearLayout的排列方向是horizontal时只有垂直方向上的对齐方式才会生效,因为此时水平方向上的长度是不固定的,每添加一个控件,水平方向上的长度都会改变,因而无法指定该方向上的对齐方式。同样,当LinearLayout的排列方向是vertical时,只有水平方向上的对齐方式才会生效。修改activity_main.xml中的代码:
<?xml version="1.0" encoding="utf-8"?>

<LinearLayout xmlns:android="http://schemas.android.com/apk/res/android"

    android:orientation="horizontal"

    android:layout_width="match_parent"

    android:layout_height="match_parent">

    <Button

        android:layout_width="wrap_content"

        android:layout_height="wrap_content"

        android:layout_gravity="top"

        android:text="Button 1" />

    <Button

        android:layout_width="wrap_content"

        android:layout_height="wrap_content"

        android:layout_gravity="center_vertical"

        android:text="Button 2" />

    <Button

        android:layout_width="wrap_content"

        android:layout_height="wrap_content"

        android:layout_gravity="bottom"

        android:text="Button 3" />

</LinearLayout>
运行效果如图:
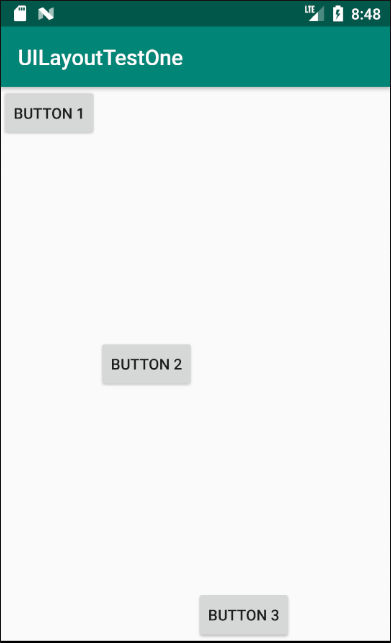
接下来,我们学习另一个重要属性:android:layout_weight,它允许我们使用比例的方式来指定控件的大小,在手机的适配性方面可以起到非常重要的作用。这里通过编写一个消息发送界面来做演示。所用到的控件有:一个文本编辑框和一个发送按钮。
修改activity_main.xml中的代码:
<?xml version="1.0" encoding="utf-8"?>

<LinearLayout xmlns:android="http://schemas.android.com/apk/res/android"

    android:orientation="horizontal"

    android:layout_width="match_parent"

    android:layout_height="match_parent">

    <EditText

        android:id="@+id/input_msg"

        android:layout_width="0dp"

        android:layout_height="wrap_content"

        android:layout_weight="1"

        android:hint="Type in Some words" />

    <Button

        android:id="@+id/send_button"

        android:layout_width="0dp"

        android:layout_height="wrap_content"

        android:layout_weight="1"

        android:text="send_msg" />

</LinearLayout>
运行程序,效果如图:
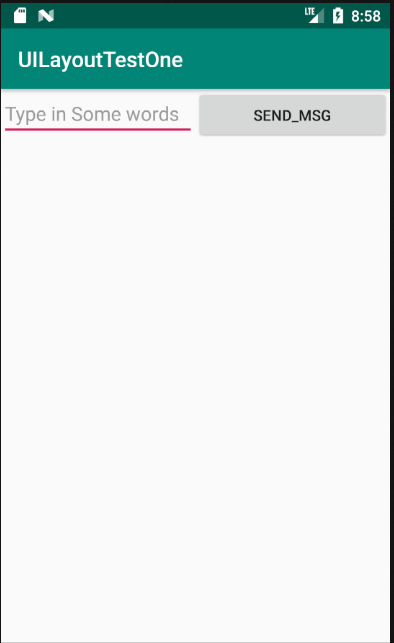
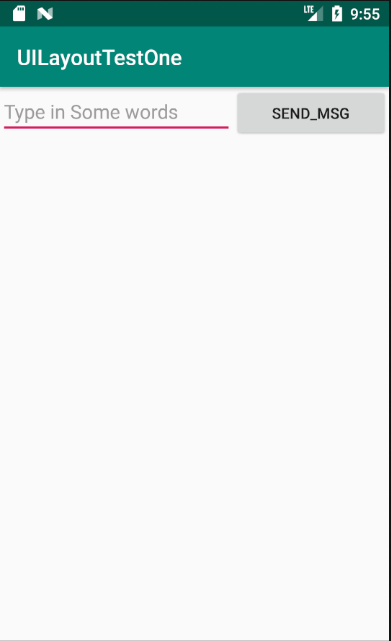
这里你会发现EditText和Button的宽度都被指定为了0dp,你可能会担心这样这两个控件还能正常的显示出来吗?不用担心,因为这里,使用了android:layout_weight属性,此时控件的宽度就不由android:layout_width来决定了,这里写成了0dp是一种比较标准的写法。另外,dp是Android中用于指定控件大小、间距等属性的单位。可以看到这里通过android:layout_weight属性将值指定为了1,这表示两个控件在水平方向上平分宽度。原理:系统会将所有控件指定的layout_weight值相加,得到一个总值,然后每个控件所占大小的比例就是用该控件指定的layout_weight值除以刚才算出的总值。因此如果想让EditText占据屏幕宽度的3/5,Button占据屏幕宽度的2/5,只需要将EditText的layout_weight改成3,Button的layout_weight改成2就可以了。重新运行程序,效果如图:
接着再来看一下如何实现在两个控件之间用分割线进行分割,效果如图:
实现这种效果有两种方式:
- 1.直接在布局中添加一个view,这个view的作用仅仅是显示出一条线,实现如下:
<View

        android:layout_width="match_parent"

        android:layout_height="1px"

        android:background="#000000" />
实现代码如下:
<?xml version="1.0" encoding="utf-8"?>

<LinearLayout xmlns:android="http://schemas.android.com/apk/res/android"

    android:orientation="vertical"

    android:layout_width="match_parent"

    android:layout_height="match_parent">

    <Button

        android:layout_width="wrap_content"

        android:layout_height="wrap_content"

        android:text="button 1" />

    <View

        android:layout_width="match_parent"

        android:layout_height="1px"

        android:background="#000000" />

    <Button

        android:layout_width="wrap_content"

        android:layout_height="wrap_content"

        android:text="button 2" />

    <View

        android:layout_width="match_parent"

        android:layout_height="1px"

        android:background="#000000" />

    <Button

        android:layout_width="wrap_content"

        android:layout_height="wrap_content"

        android:text="button 3" />

</LinearLayout>
- 2.使用LinearLayout的一个divider属性,直接为LinearLayout设置分割线,这里需要准备一张线的图片 1)android:divider设置作为分割线的图片 2)android:showDividers设置分割线的位置,none(无),beginning(开始),end(结束),middle(每两个组件间) 3)dividerPadding设置分割线的Padding
<LinearLayout xmlns:android="http://schemas.android.com/apk/res/android"

    xmlns:tools="http://schemas.android.com/tools"

    android:id="@+id/LinearLayout1"

    android:layout_width="match_parent"

    android:layout_height="match_parent"

    android:divider="@drawable/thread"

    android:orientation="vertical"

    android:showDividers="middle"

    android:dividerPadding="10dp"

    tools:context="com.example.uilayouttestone.MainActivity" >

    <Button

        android:layout_width="wrap_content"

        android:layout_height="wrap_content"

        android:text="Button 1" />

    <Button

        android:layout_width="wrap_content"

        android:layout_height="wrap_content"

        android:text="Button 2" />

    <Button

        android:layout_width="wrap_content"

        android:layout_height="wrap_content"

        android:text="Button 3" />

</LinearLayout>
Android五大布局详解——LinearLayout(线性布局)的更多相关文章
- Android 布局详解 -三表格布局(TableLayout)以及重要属性
TableLayout跟TableRow 是一组搭配应用的布局,TableLayout置底,TableRow在TableLayout的上方,而Button.TextView等控件就 ...
- Html5移动端页面自适应布局详解(阿里rem布局)
在移动设备上进行网页的重构或开发,首先得搞明白的就是移动设备上的viewport,通读网上的各种对于viewport的解释之后 大概viewport可以理解为三种 1.layout viewport ...
- Android 布局详解
Android 布局详解 1.重用布局 当一个布局文件被多处使用时,最好<include>标签来重用布局. 例如:workspace_screen.xml的布局文件,在另一个布局文件中被重 ...
- 2.2.1 LinearLayout(线性布局)
本节引言 本节开始讲Android中的布局,Android中有六大布局,分别是: LinearLayout(线性布局), RelativeLayout(相对布局), TableLayout(表格布局) ...
- Grid 网格布局详解
Grid网格布局详解: Grid布局与Flex布局有着一定的相似性,Grid布局是将容器划分成行和列,产生单元格,可以看做是二维布局. 基本概念: 采用网格布局的区域,称为"容器" ...
- Android布局管理详解(1)—— LinearLayout 线性布局
Android的布局方式共有6种,分别是LinearLayout(线性布局).TableLayout(表格布局).FrameLayout(帧布局).RelativeLayout(相对布局).GridL ...
- [置顶] Android系统五大布局详解Layout
我们知道Android系统应用程序一般是由多个Activity组成,而这些Activity以视图的形式展现在我们面前,视图都是由一个一个的组件构成的.组件就是我们常见的Button.TextEdit等 ...
- Android系统五大布局详解Layout
我们知道Android系统应用程序一般是由多个Activity组成,而这些Activity以视图的形式展现在我们面前, 视图都是由一个一个的组件构成的.组件就是我们常见的Button.TextEdit ...
- Android开发之详解五大布局
http://bbs.chinaunix.net/thread-3654213-1-1.html 为了适应各式各样的界面风格,Android系统提供了5种布局,这5种布局分别是: LinearLayo ...
随机推荐
- Java修炼——内部类详解
内部类详解 定义:将一个类定义在另一个类的内部,该类就称为内部类 类中定义的内部类特点: 内部类作为外部类的成员,可以直接访问外部类的成员 (包括 private 成员),反之则不行. 内部类做为外部 ...
- Codeforces Round #605 (Div. 3) E - Nearest Opposite Parity
题目链接:http://codeforces.com/contest/1272/problem/E 题意:给定n,给定n个数a[i],对每个数输出d[i]. 对于每个i,可以移动到i+a[i]和i-a ...
- Mysql基础02-约束
约束与索引 概念 1.数据完整性(Data Integrity)是指数据的精确性(Accuracy)和可靠性(Reliability). 实体完整性(Entity Integrity):例如,同一个表 ...
- C#实现在foreach遍历中删除集合中的元素(方法总结)
目录 方法一:采用for循环,并且从尾到头遍历 方法二:使用递归 方法三:通过泛型类实现IEnumerator 在foreach中删除元素时,每一次删除都会导致集合的大小和元素索引值发生变化,从而导致 ...
- pipelineDB学习笔记-2. Stream (流)
一.流的定义: 所谓的“流”(stream)在pipelineDB中是指那些被允许的数据库客服端推送到 Continuous View(连续视图) 的时序化数据的一种“抽象”.流中的每一个raw(数据 ...
- 搭建rsync+inotify实现实时备份
一.环境搭建说明 系统环境 CentOS7.5 备份节点 主机名:backup01 IP地址:172.16.2.41 数据节点 主机名:nfs-master IP地址:172.16.2.31 二.在备 ...
- cordova 打包出现transformClassesWithDexForDebug一类错误的解决办法
Cordova在添加了插件后,或者是本身文件很多,文件很大的情况下打包时候可能会出现 transformClassesWithDexForDebug或者transformClassesWithDexF ...
- webpack学习2.2webpack简介,初步了解
webpack V1功能进化 编译打包 HMR(模块热更新) 代码分割 文件处理(loader) webpack V2功能进化 tree shaking(并欸有在项目中使用的代码不会打包到里面,打包之 ...
- 牛客国庆集训派对Day1 L New Game!(堆优化dijkstra+建图)
链接:https://ac.nowcoder.com/acm/contest/201/L来源:牛客网 时间限制:C/C++ 1秒,其他语言2秒 空间限制:C/C++ 1048576K,其他语言2097 ...
- python基础知识第二篇(字符串)
基本数据类型 数字 整形 int ---int 将字符串 ...