springboot模板
1、thymeleaf模板
2.Freemarker模板
Thymeleaf模板
首先导入依赖
<dependency>

            <groupId>org.springframework.boot</groupId>

            <artifactId>spring-boot-starter-thymeleaf</artifactId>

</dependency>
Spring Boot官方文档建议在开发时将缓存关闭,那就在application.properties文件中加入下面这行
spring:

  thymeleaf:

    cache: true
user
package com.jt.springboot.entity;

import lombok.Data;

@Data

public class user {

    private Integer uid;

    private String uname;

    private String pwd;

    public user(Integer uid, String uname, String pwd) {

        this.uid = uid;

        this.uname = uname;

        this.pwd = pwd;

    }

    public user() {

    }

}
controller层
package com.jt.springboot.controller;

import com.jt.springboot.entity.user;

import org.springframework.stereotype.Controller;

import org.springframework.web.bind.annotation.RequestMapping;

import javax.servlet.http.HttpServletRequest;

import java.util.ArrayList;

import java.util.List;

@Controller

@RequestMapping("/thymeleaf")

public class UserController {

    @RequestMapping("/list")

    public String hello(HttpServletRequest request){

        request.setAttribute("msg","传单个字符");

        List<user> userList=new ArrayList<>();

        userList.add(new user(,"zs",""));

        userList.add(new user(,"ww",""));

        userList.add(new user(,"ss",""));

        request.setAttribute("userList",userList);

        request.setAttribute("htmlStr","<span style='color:red' >转译html代码块</span>");

        return "list";

    }

}
list.html
<!DOCTYPE html>

<html xmlns:th="http://www.thymeleaf.org">

<head>

    <meta charset="UTF-8">

    <title>thymeleaf模板介绍</title>

</head>

<body>

<div th:text="${msg}"></div>

</body>

</html>
html加入提示
<html xmlns:th="http://www.thymeleaf.org">
遍历
htlm页面
<!DOCTYPE html>

<html xmlns:th="http://www.thymeleaf.org">

<head>

    <meta charset="UTF-8">

    <title>thymeleaf模板介绍</title>

</head>

<body>

<div th:text="${msg}"></div>

<table width="60%" border="">

    <tr>

        <td>id</td>

        <td>用户名</td>

        <td>密码</td>

    </tr>

    <tr th:each="u : ${userList}">

        <td  th:text="${u.uid}"></td>

        <td  th:text="${u.uname}"></td>

        <td  th:text="${u.pwd}"></td>

    </tr>

</table>

<div th:utext="${htmlStr}"></div>

</body>

</html>
Freemarker模板
学习网站:http://freemarker.foofun.cn/
导入pom依赖
<dependency>

    <groupId>org.springframework.boot</groupId>

    <artifactId>spring-boot-starter-freemarker</artifactId>

   </dependency>
application.yml文件的默认配置
spring:

  thymeleaf:

    cache: false

  freemarker:

    # 设置模板后缀名

    suffix: .ftl

    # 设置文档类型

    content-type: text/html

    # 设置页面编码格式

    charset: UTF-

    # 设置页面缓存

    cache: false

    # 设置ftl文件路径,默认是/templates,为演示效果添加role

    template-loader-path: classpath:/templates/freemarker

  mvc:

    static-path-pattern: /static/**
list.ftl
<!DOCTYPE html>
<html lang="en">
<head>
<meta charset="UTF-8">
<title>Title</title>
</head>
<body>
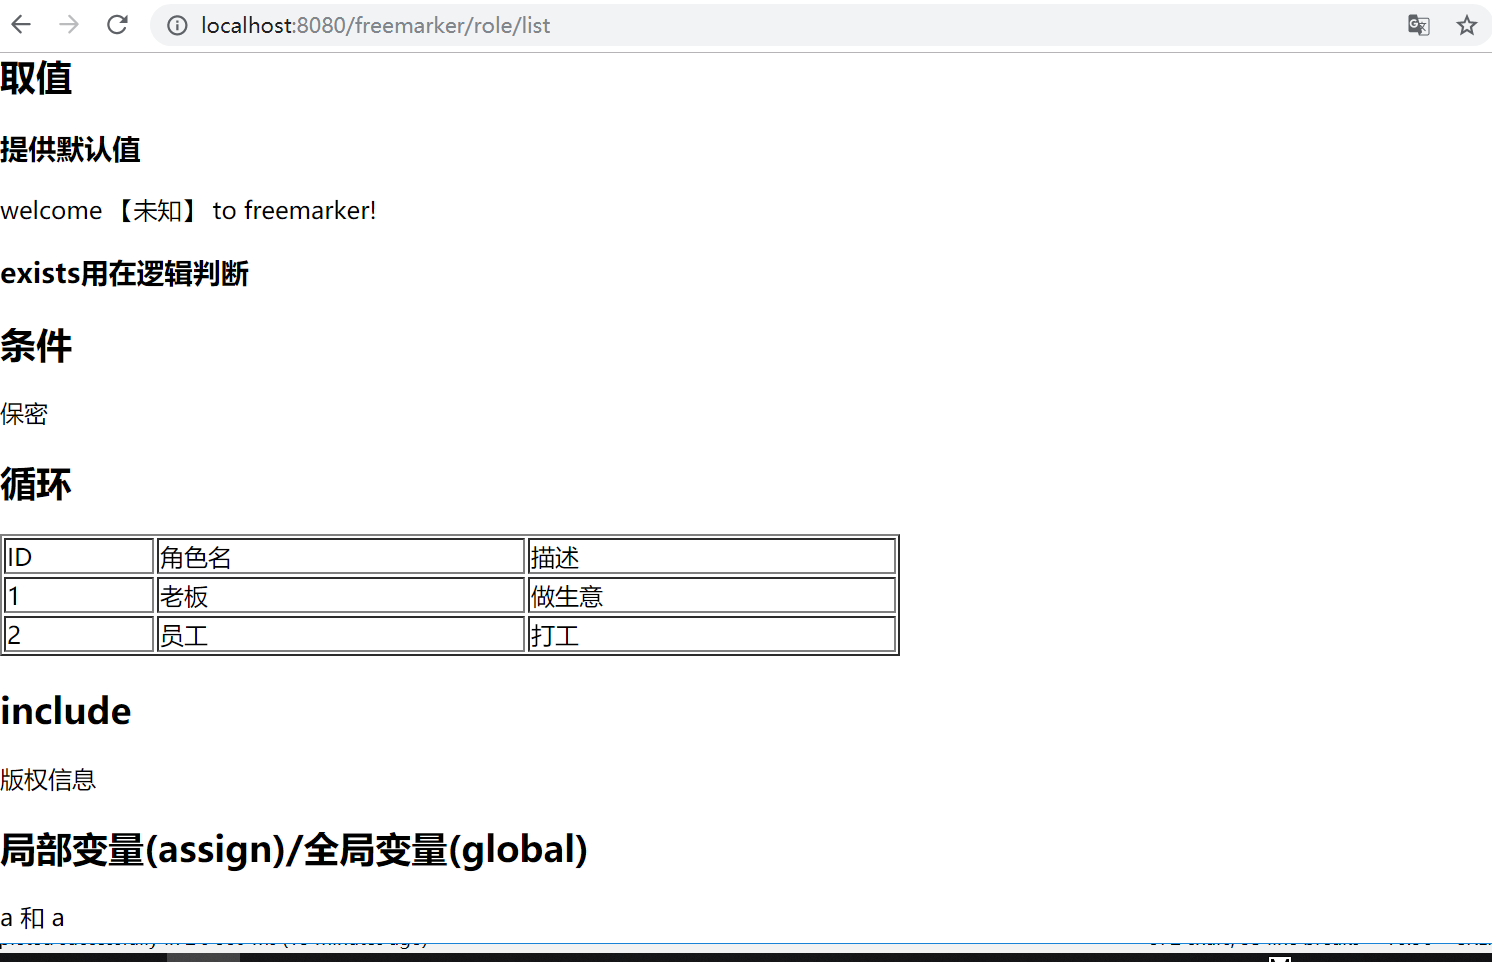
<h2>取值</h2>
<h3>提供默认值</h3>
welcome 【${name!'未知'}】 to freemarker! <h3>exists用在逻辑判断</h3>
<#if name?exists>
${name}
</#if> <h2>条件</h2>
<#if sex=='girl'>
女
<#elseif sex=='boy'>
男
<#else>
保密
</#if> <h2>循环</h2>
<table border="1px" width="600px">
<thead>
<tr>
<td>ID</td>
<td>角色名</td>
<td>描述</td>
</tr>
</thead>
<tbody>
<#list roles as role>
<tr>
<td>${role.rid}</td>
<td>${role.roleName}</td>
<td>${role.desc}</td>
</tr>
</#list>
</tbody>
</table> <h2>include</h2>
<#include 'foot.ftl'> <h2>局部变量(assign)/全局变量(global)</h2>
<#assign ctx1>
${springMacroRequestContext.contextPath}
</#assign> <#global ctx2>
${springMacroRequestContext.contextPath}
</#global>
a
${ctx1}和${ctx2}
a
</body>
</html>
foot.ftl
<!DOCTYPE html>

<html lang="en">

<head>

    <meta charset="UTF-8">

    <title>$Title$</title>

</head>

<body>

版权信息

</body>

</html>
common.html
<!DOCTYPE html>

<html lang="en">

<head>

    <meta charset="UTF-8">

    <title>Title</title>

</head>

<body>

<div th:fragment="h1">

    第一部分内容

</div>

<div th:fragment="h2">

    第二部分内容

</div>

<div th:fragment="h3">

    第三部分内容

</div>

</body>

</html>
RoleController
package com.jt.springboot.controller;

import com.jt.springboot.entity.Role;

import org.springframework.stereotype.Controller;

import org.springframework.web.bind.annotation.RequestMapping;

import org.springframework.web.servlet.ModelAndView;

import java.util.ArrayList;

import java.util.List;

@Controller

@RequestMapping("/freemarker")

public class RoleController {

    @RequestMapping("/role/list")

    public ModelAndView roleList(){

        ModelAndView mav = new ModelAndView();

        mav.setViewName("/list");

        mav.addObject("name",null);

        mav.addObject("sex","gay");

        List list = new ArrayList();

        list.add(new Role(,"老板","做生意"));

        list.add(new Role(,"员工","打工"));

        mav.addObject("roles",list);

        return mav;

    }

    @RequestMapping("toLogin")

    public String toLogin(){

        return "login";

    }

}
springboot模板的更多相关文章
- 8.SpringBoot 模板引擎 Thymeleaf
1.模板引擎原理 JSP.Velocity.Freemarker.Thymeleaf 都是模板引擎.SpringBoot推荐的Thymeleaf:语法更简单,功能更强大: Thymeleaf模板引擎 ...
- springboot模板(Freemarker与Thymeleaf)
Thymeleaf模板 Thymeleaf就是html页面 导入pom依赖 <dependency> <groupId>org.springframework.boot< ...
- Springboot模板(thymeleaf、freemarker模板)
目的: 1.thymeleaf模板 2.Freemarker模板 thymeleaf模板 thymeleaf 的优点: 支持html5标准,页面无须部署到servlet开发到服务器上,直接通过浏览器就 ...
- springboot 模板
参考:https://blog.csdn.net/wangb_java/article/details/71775637
- springboot的war和jar包
本篇和大家分享的是通过maven对springboot中打war包和jar包:war通常来说生成后直接放到tomcat的webapps下面就行,tomcat配置自动解压war,而jar一般通过命令行部 ...
- SpringBoot入门教程(二)CentOS部署SpringBoot项目从0到1
在之前的博文<详解intellij idea搭建SpringBoot>介绍了idea搭建SpringBoot的详细过程, 并在<CentOS安装Tomcat>中介绍了Tomca ...
- 带着萌新看springboot源码02
上一节讲到先创建maven项目,然后导入依赖,主配置类等步骤,现在来个快速创建一个springboot模板,不需要向上节那么繁琐. 1.快速创建springboot应用 IDEA---->fil ...
- 学习springboot
一般而言,写个Javaweb应用搭建环境都可能要几十分钟,下载个tomcat服务器,再加上各种xml配置等等,很烦躁,而且每个web应用的配置还差不多,都是什么web.xml,application. ...
- SpringBoot之静态资源放行
为了提高开发效率,编写对应的代码生成器.代码生成器主要有两个方面,一个是在线Web,另外一个是运行某个类. 使用的技术是SpringBoot+MyBatis-Plus+MySQL+JDK8. 在编写在 ...
随机推荐
- 1、在aspx.cs后台Response.Write()跳转路径,打开新窗口
1.Response.Write()打开新窗口 Response.Write(" <script type='text/JavaScript'>window.open('&quo ...
- 模电&数电知识整理(不定期更新)
模电总复习之爱课堂题目概念整理 Chapter 1 1) 设室温情况下某二极管的反偏电压绝对值为1V,则当其反偏电压值减少100mV时,反向电流的变化是基本不发生变化. 2) 二极管发生击穿后,在击穿 ...
- ARTS-S mac终端ftp命令行上传下载文件
上传 ftp -u ftp://root:123456@10.11.12.3/a.txt a.txt 下载 ftp -o a.txt ftp://root:123456@10.11.12.13/a.t ...
- 【MySQL】ERROR 1045 (28000): Access denied for user 'root'@'localhost' (using password: YES)
问题现象: ERROR 1045 (28000): Access denied for user 'root'@'localhost' (using password: YES) 拒绝访问root用户 ...
- vue-cli开发项目,调用html5+接口,hbuilder真机运行,打包
开发中使用vue-cli正常开发 将配置文件中的路径改为相对路径--否则在打包之后真机运行时无法找到指定路径 开发完或者开发途中想要查看调用h5+的api效果就需要打包了 npm run build ...
- 细解JavaScript ES7 ES8 ES9 新特性
题记:本文提供了一个在线PPT版本,方便您浏览 细解JAVASCRIPT ES7 ES8 ES9 新特性 在线PPT ver 本文的大部分内容译自作者Axel Rauschmayer博士的网站,想了解 ...
- hdu 1010 Tempter of the Bone(深搜+奇偶剪枝)
Tempter of the Bone Time Limit: 2000/1000 MS (Java/Others) Memory Limit: 65536/32768 K (Java/Othe ...
- 我的第一次面试 —— 腾讯 AI安全 一面总结
前言 在校两年半,没经历过面试的毒打,第一次面试给了腾讯,周二晚上学长帮推的简历周三下午就打电话来问周四晚上有没有空面试.那天下午还在赶着数据库的实验报告,脑子有点转不过来就说了有空,然后仔细一看好像 ...
- Maven pom.xml 全配置(一)常用配置
Maven pom.xml 全配置(一)常用配置 这里贴出一个Maven中出现频率较高的配置参数注释,方便理解项目中Maven的配置具体的作用.如果在此博文中没有找到你想看到的参数,可以移步Maven ...
- UWP 打开系统设置面板
由于UWP各种权限管理的比较严格,所以在执行某一个特殊的操作之前,最好先申请一下相应的权限,以便告知用户你使用了这个权限,而且可以有效的避免App崩溃. 比如你想让用户手动打开麦克风权限,那么可以执行 ...