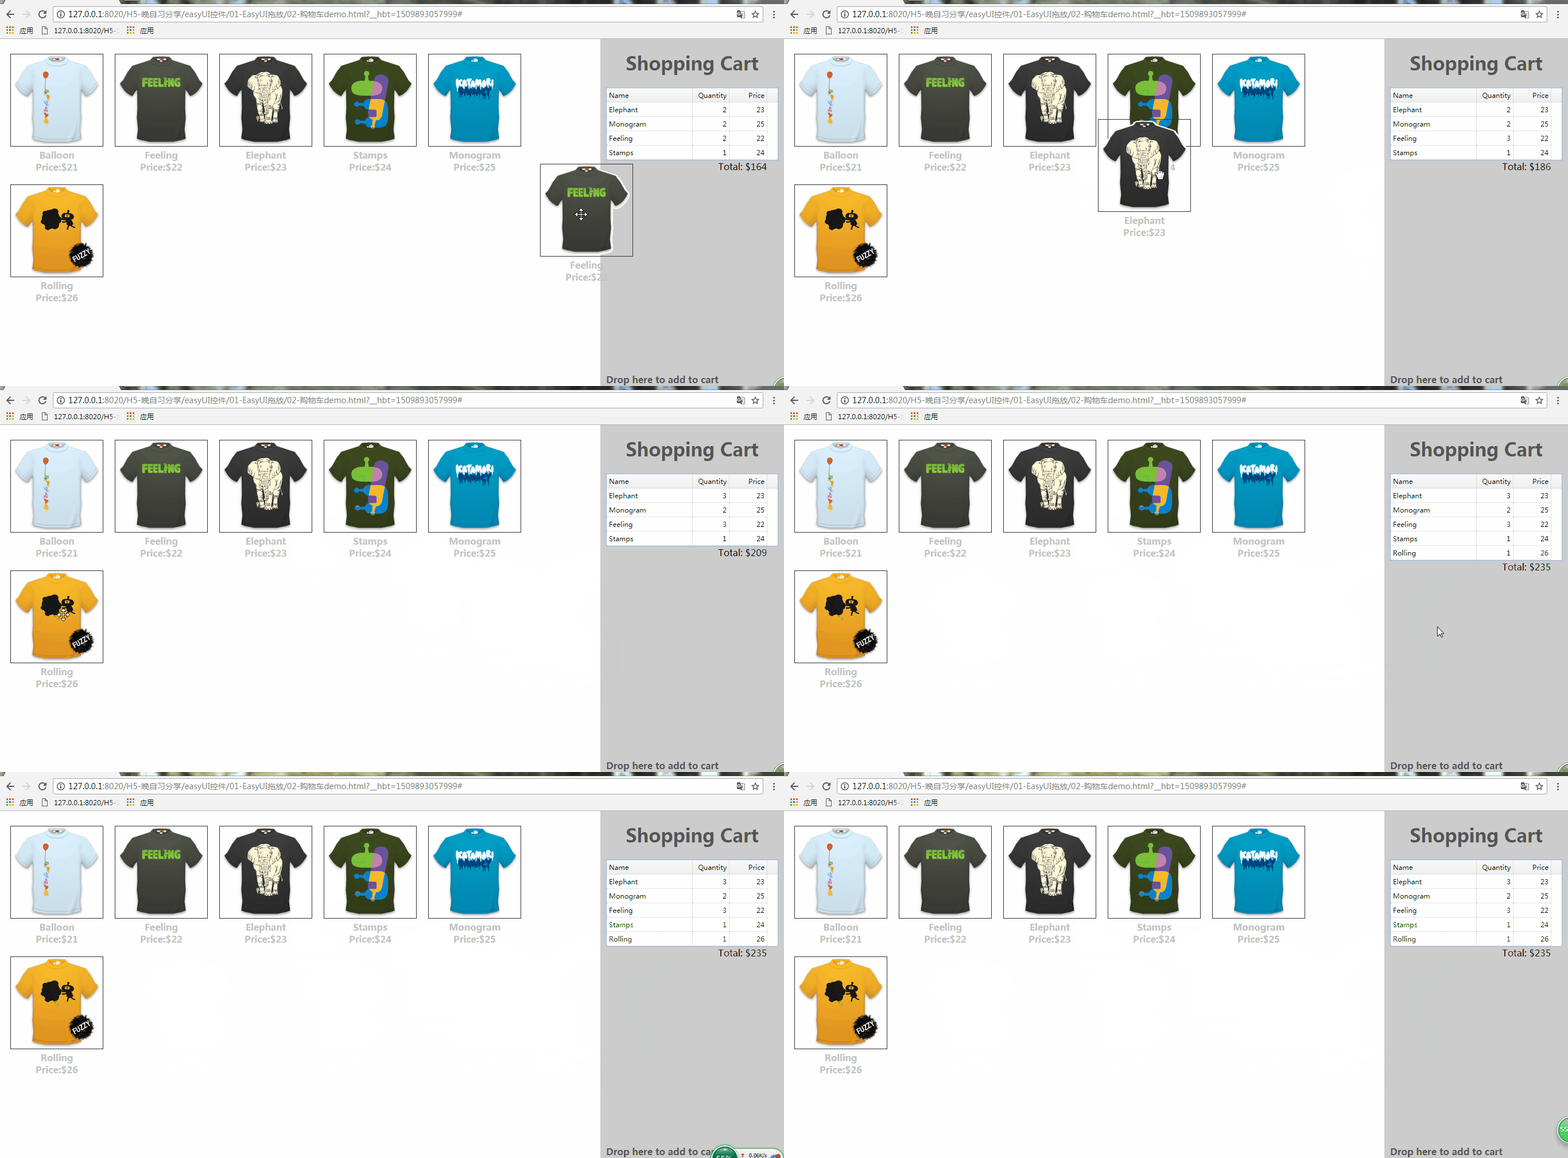
EasyUI实现购物车、菜单和窗口栏等最常用的用户界面功能
一、EasyUI
jQuery EasyUI 是一个基于 jQuery 的框架,集成了各种用户界面插件。
- easyui 提供建立现代化的具有交互性的 javascript 应用的必要的功能。
- 使用 easyui,您不需要写太多 javascript 代码,一般情况下您只需要使用一些 html 标记来定义用户界面。
- HTML 网页的完整框架。
- easyui 节省了开发产品的时间和规模。
- easyui 非常简单,但是功能非常强大。
二、EasyUI 实现购物车效果

完整代码如下,图拍你可以自行更换:
<!DOCTYPE html>
<html>
    <head>
        <meta charset="UTF-8">
        <title></title>
        <link rel="stylesheet" type="text/css" href="css/easyui.css">
        <script type="text/javascript" src="js/jquery-3.1.1.js"></script>
        <script type="text/javascript" src="js/jquery.easyui.min.js"></script>
        <style type="text/css">
        .products{
            list-style:none;
            margin-right:300px;
            padding:0px;
            height:100%;
        }
        .products li{
            display:inline;
            float:left;
            margin:10px;
        }
        .item{
            display:block;
            text-decoration:none;
        }
        .item img{
            border:1px solid #333;
        }
        .item p{
            margin:0;
            font-weight:bold;
            text-align:center;
            color:#c3c3c3;
        }
        .cart{
            position:fixed;
            right:0;
            top:0;
            width:300px;
            height:100%;
            background:#ccc;
            padding:0px 10px;
        }
        h1{
            text-align:center;
            color:#555;
        }
        h2{
            position:absolute;
            font-size:16px;
            left:10px;
            bottom:20px;
            color:#555;
        }
        .total{
            margin:0;
            text-align:right;
            padding-right:20px;
        }
    </style>
        <script>
        var data = {"total":0,"rows":[]};
        var totalCost = 0;

        $(function(){
            //是否能拖入
                $('#cartcontent').datagrid({
                    singleSelect:true
                });
            $('.item').draggable({
                //设置拖动后是否返回
                revert:true,
                proxy:'clone',

                onStartDrag:function(){
                    //
                    //(this).draggable('options').cursor = 'not-allowed';
                    //设置移动是图片的高度
                    $(this).draggable('proxy').css('z-index',10);
                },
                onStopDrag:function(){
                    //$(this).draggable('options').cursor='move';
                }
            });
            $('.cart').droppable({
                onDragEnter:function(e,source){
                    //$(source).draggable('options').cursor='auto';
                },
                onDragLeave:function(e,source){
                    //$(source).draggable('options').cursor='not-allowed';
                },
                onDrop:function(e,source){
                    var name = $(source).find('p:eq(0)').html();
                    var price = $(source).find('p:eq(1)').html();
                    //split(“char”); 将字符串通过指定字符分割为数组;如果传入””,则将所有字符放入数组
                    addProduct(name, parseFloat(price.split('$')[1]));

                }
            });
        });

        function addProduct(name,price){
            function add(){
                for(var i=0; i<data.total; i++){
                    var row = data.rows[i];
                    if (row.name == name){
                        row.quantity += 1;
                        return;
                    }
                }
                data.total += 1;
                data.rows.push({
                    name:name,
                    quantity:1,
                    price:price
                });
            }
            add();
            totalCost += price;
            $('#cartcontent').datagrid('loadData', data);
            $('div.cart .total').html('Total: $'+totalCost);
        }
    </script>
    </head>
    <body>
        <ul class="products">
        <li>
            <a href="#" class="item">
                <img src="img/shirt1.gif"/>
                <div>
                    <p>Balloon</p>
                    <p>Price:$21</p>
                </div>
            </a>
        </li>
        <li>
            <a href="#" class="item">
                <img src="img/shirt2.gif"/>
                <div>
                    <p>Feeling</p>
                    <p>Price:$22</p>
                </div>
            </a>
        </li>
        <li>
            <a href="#" class="item">
                <img src="img/shirt3.gif"/>
                <div>
                    <p>Elephant</p>
                    <p>Price:$23</p>
                </div>
            </a>
        </li>
        <li>
            <a href="#" class="item">
                <img src="img/shirt4.gif"/>
                <div>
                    <p>Stamps</p>
                    <p>Price:$24</p>
                </div>
            </a>
        </li>
        <li>
            <a href="#" class="item">
                <img src="img/shirt5.gif"/>
                <div>
                    <p>Monogram</p>
                    <p>Price:$25</p>
                </div>
            </a>
        </li>
        <li>
            <a href="#" class="item">
                <img src="img/shirt6.gif"/>
                <div>
                    <p>Rolling</p>
                    <p>Price:$26</p>
                </div>
            </a>
        </li>
    </ul>
    <div class="cart">
        <h1>Shopping Cart</h1>
        <div style="background:#fff">
        <table id="cartcontent" fitColumns="true" style="width:300px;height:auto;">
            <thead>
                <tr>
                    <th field="name" width=140>Name</th>
                    <th field="quantity" width=60 align="right">Quantity</th>
                    <th field="price" width=60 align="right">Price</th>
                </tr>
            </thead>
        </table>
        </div>
        <p class="total">Total: $0</p>
        <h2>Drop here to add to cart</h2>
    </div>

    </body>
</html>
三、EasyUI实现菜单自动播放

完整代码如下:
<!DOCTYPE html>
<html>

    <head>
        <meta charset="UTF-8">

        <title></title>
        <link rel="stylesheet" type="text/css" href="css/easyui.css">
        <link rel="stylesheet" type="text/css" href="css/icon.css ">

    </head>

    <body>
        <div id="tt" class="easyui-tabs" style="width:330px;height:270px;">
            <div title="Shirt1" style="padding:20px;">
                <img src="data:images/shirt1.gif">
            </div>
            <div title="Shirt2" style="padding:20px;">
                <img src="data:images/shirt2.gif">
            </div>
            <div title="Shirt3" style="padding:20px;">
                <img src="data:images/shirt3.gif">
            </div>
            <div title="Shirt4" style="padding:20px;" >
                <img src="data:images/shirt4.gif">
            </div>
            <div title="Shirt5" style="padding:20px;">
                <img src="data:images/shirt5.gif">
            </div>
        </div>
        <script type="text/javascript" src="js/jquery-3.1.1.js"></script>
        <script type="text/javascript" src="js/jquery.easyui.min.js"></script>
        <script type="text/javascript">
            $(function(){
            var index = 0;
            var t = $('#tt');
            var tabs = t.tabs('tabs');
            console.log(tabs[index].panel('options').title);
            //   .tabs("select",title);选中title名的tabs
    //        t.tabs("select","Shirt"+4);
            setInterval(function(){
                t.tabs('select', tabs[index].panel('options').title);
                index++;
                if (index >= tabs.length){
                    index = 0;
                }
            }, 1000);
        });

        </script>
    </body>

</html>
四、EasyUI实现左侧面板折叠功能

完整代码如下:
<!DOCTYPE html>
<html>

    <head>
        <meta charset="UTF-8">

        <title></title>
        <link rel="stylesheet" type="text/css" href="css/easyui.css">
        <link rel="stylesheet" type="text/css" href="css/icon.css ">
        <script type="text/javascript" src="js/jquery-3.1.1.js"></script>
        <script type="text/javascript" src="js/jquery.easyui.min.js"></script>
    </head>

    <body>

        <!--collapsible:是否可折叠
            collapsed:加载时候是否折叠
        -->

        <div style="width:200px;height:auto;background:#7190E0;padding:5px;">
            <div class="easyui-panel" title="Picture Tasks" collapsible="true" style="width:200px;height:auto;padding:10px;">
                View as a slide show<br/> Order prints online<br/> Print pictures
            </div>
            <br/>
            <div class="easyui-panel" title="File and Folder Tasks" collapsible="true" style="width:200px;height:auto;padding:10px;">
                Make a new folder<br/> Publish this folder to the Web<br/> Share this folder
            </div>
            <br/>
            <div class="easyui-panel" title="Other Places" collapsible="true" collapsed="true" style="width:200px;height:auto;padding:10px;">
                New York<br/> My Pictures<br/> My Computer<br/> My Network Places
            </div>
            <br/>
            <div class="easyui-panel" title="Details" collapsible="true" style="width:200px;height:auto;padding:10px;">
                My documents<br/> File folder<br/><br/> Date modified: Oct.3rd 2010
            </div>
        </div>

        <script type="text/javascript">
            .panel - body {
                    background: #f0f0f0;
                }
                .panel - header {
                    background: #fff url('images/panel_header_bg.gif') no - repeat top right;
                }
                .panel - tool - collapse {
                    background: url('images/arrow_up.gif') no - repeat 0 px - 3 px;
                }
                .panel - tool - expand {
                    background: url('images/arrow_down.gif') no - repeat 0 px - 3 px;
                }
        </script>
    </body>

</html>
五、EasyUI实现对话框

完整代码如下:
<!DOCTYPE html>
<html>

    <head>
        <meta charset="UTF-8">

        <title></title>
        <link rel="stylesheet" type="text/css" href="css/easyui.css">
        <link rel="stylesheet" type="text/css" href="css/icon.css ">
        <script type="text/javascript" src="js/jquery-3.1.1.js"></script>
        <script type="text/javascript" src="js/jquery.easyui.min.js"></script>
    </head>

    <body>
        <div id="dd" class="easyui-dialog" style="padding:5px;width:400px;height:200px;" title="My Dialog" iconCls="icon-ok" toolbar="#dlg-toolbar" buttons="#dlg-buttons">
            Dialog Content.
        </div>
        <div id="dlg-toolbar">
            <a href="#" class="easyui-linkbutton" iconCls="icon-add" plain="true" onclick="javascript:alert('Add')">Add</a>
            <a href="#" class="easyui-linkbutton" iconCls="icon-save" plain="true" onclick="javascript:alert('Save')">Save</a>
        </div>
        <div id="dlg-buttons">
            <a href="#" class="easyui-linkbutton" iconCls="icon-ok" onclick="javascript:alert('Ok')">Ok</a>
            <a href="#" class="easyui-linkbutton" iconCls="icon-cancel" onclick="javascript:$('#dd').dialog('close')">Cancel</a>
        </div>
    </body>

</html>
六、结束语
博主为了直观简洁,便没有对项目进行过多的解释,希望对大家能够有所帮助!
EasyUI实现购物车、菜单和窗口栏等最常用的用户界面功能的更多相关文章
- [转] 利用shell创建文本菜单与窗口部件的方法
[From] http://www.jb51.net/article/129460.htm 前言 创建交互式shell脚本最常用的方法是使用菜单.提供各种选项可以帮助脚本用户了解脚本能做什么,不能做什 ...
- Windows“储存并显示最近在开始菜单和任务栏中打开的项目”显示灰色问题解决
问题截图如下: 解决方法 打开"组策略",依次选择"用户配置"--"管理模板"--"开始菜单和任务栏"--"不 ...
- 第二百零七节,jQuery EasyUI,MenuButton(菜单按钮)组件
jQuery EasyUI,MenuButton(菜单按钮)组件 学习要点: 1.加载方式 2.属性列表 3.方法列表 本节课重点了解 EasyUI 中 MenuButton(菜单按钮)组件的使用方法 ...
- 第二百零六节,jQuery EasyUI,Menu(菜单)组件
jQuery EasyUI,Menu(菜单)组件 学习要点: 1.加载方式 2.菜单项属性 3.菜单属性 4.菜单事件 5.菜单方法 本节课重点了解 EasyUI 中 Menu(菜单)组件的使用方法, ...
- Flutter实战视频-移动电商-55.购物车_底部结算栏UI制作
55.购物车_底部结算栏UI制作 主要做下面结算这一栏目 cart_bottom.dart页面 先设置下内边距 拆分成三个子元素 全选 因为有一个文本框和一个全选的text文本,所以这里也用了Row布 ...
- EasyUI动态生成菜单
业务需求:不同角色有不同的权限,我们根据角色加载页面时展示不同的菜单.在easyUI中,菜单一般采用手风琴accordion组件进行展示,一级菜单下可以加载二级菜单,效果如下: 普通用户看到的菜: 管 ...
- easyui实现树形菜单Tab功能、layout布局
一:常见三种前端ui框架 在初学者入门的状态下,我们常见的前端框架有三种且都有自己的官方网站: 1.easyui:官方网站(http://www.jeasyui.net/) 基于jquery的用户页面 ...
- JQuery Easyui/TopJUI 用JS创建数据表格并实现增删改查功能
JQuery Easyui/TopJUI 用JS创建数据表格并实现增删改查功能 html <table id="productDg"></table> &l ...
- AndroidStudio制作底部导航栏以及用Fragment实现切换功能
前言 大家好,给大家带来AndroidStudio制作底部导航栏以及用Fragment实现切换功能的概述,希望你们喜欢 学习目标 AndroidStudio制作底部导航栏以及用Fragment实现切换 ...
随机推荐
- SQLServer 自动循环归档分区数据脚本
标签:SQL SERVER/MSSQL SERVER/数据库/DBA/表分区 概述 在很多业务场景下我们需要对一些记录量比较大的表进行分区,同时为了保证性能需要将一些旧的数据进行归档.在分区表很多的情 ...
- java 基础语法 2
一.语句
- SYSTEM_INFO
SYSTEM_INFO结构体包含了当前计算机的信息.这个信息包括计算机的体系结构.中央处理器的类型.系统中中央处理器的数量.页面的大小以及其他信息. SYSTEM_INFO,Win32 API函数Ge ...
- TEXT宏
TEXT宏是windows程序设计中经常遇到的宏,定义在 <winnt.h>中 TCHAR *P = TEXT("this is a const string"); 如 ...
- Python cPickle模块
新博客地址:http://gorthon.sinaapp.com/ 持久性就是指保持对象,甚至在多次执行同一程序之间也保持对象.通过本文,您会对 Python对象的各种持久性机制(从关系数据库到 Py ...
- python之路第四篇(基础篇)
一.冒泡算法实现: 方法一: li = [13,33,12,80,66,1] print li for m in range(4): num1 = li[m] num2 = li[m+1] if nu ...
- Oracle添加含有脏数据的约束
需求: 一个表的唯一约束被禁用期间,有脏数据进来,当启用约束时失败. 环境: -bash-4.1$ uname -a Linux dbtest1 2.6.32-279.el6.x86_64 #1 SM ...
- MVC中@RenderBody、@RenderSection、@RenderPage、@Html.RenderPartial、Html.RenderAction的作用和区别
1.@RenderBody() 作用和母版页中的服务器控件类似,当创建基于此布局页面的视图时,视图的内容会和布局页面合并,而新创建视图的内容会通过布局页面的@RenderBody()方法呈现在标签 ...
- 让asp.net网站支持多语言,使用资源文件
<%@ Page Language="C#" AutoEventWireup="true" CodeFile="test.aspx.cs&quo ...
- Linux系统初始化过程及运行级别简介
Linux开机过程: 1 开机自检(BIOS):初始化硬件,查找启动介质 2 MBR引导 3 GRUB引导菜单:GRUB程序安装在Bootloader 4 加载内核(kernel) 5 运行INIT进 ...
