Orchard模块开发全接触4:深度改造前台
这里,我们需要做一些事情,这些事情意味着深度改造前台:
1:为商品增加 添加到购物车 按钮,点击后功能实现;
2:商品排序;
3:购物车预览,以及添加 结算 按钮;
4:一个显式 购物车中有*个 商品 的widget;
一:添加到购物车 按钮
修改 Views/Parts/Product.cshtml:
@{
var price = (decimal)Model.Price;
var sku = (string)Model.Sku;
}
<article>
Price: @price<br />
Sku: @sku
<footer>
<button>Add to shoppingcart</button>
</footer>
</article>
现在,商品列表上已经有了这个按钮:
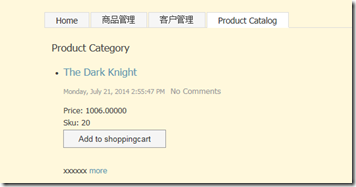
包括商品详细页面,也有这个按钮。
1.1 问题
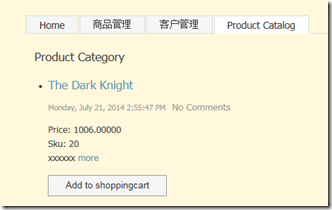
问题来了,我们发现,该按钮在商品介绍上面,如果我们想放到下面,该怎么做呢?
1.2 修改 Display 方法
protected override DriverResult Display(ProductPart part, string displayType, dynamic shapeHelper)
{
//return ContentShape("Parts_Product", () => shapeHelper.Parts_Product(
// Price: part.UnitPrice,
// Sku: part.Sku
// ));
return Combined(// Shape 1: Parts_Product
ContentShape("Parts_Product", () => shapeHelper.Parts_Product(
Price: part.UnitPrice,
Sku: part.Sku
)),// Shape 2: Parts_Product_AddButton
ContentShape("Parts_Product_AddButton", () => shapeHelper.Parts_Product_AddButton())
);
}
在修改后的方法内,我们创造了一个新的 Shape,叫做 Parts_Product_AddButton,同时,我们使用 Combined 方法,它返回的是依旧是 DriverResult,只不过,它组合了两个形状。
这个时候,我们知道,需要创建一个 Views/Parts/Product.Addbutton.cshtml 文件:
<button>@T("Add to shoppingcart")</button>
当然,我们得把原先的 Product.cshtml 中的代码给恢复过来。
然后,修改 placement.info,为:
<Placement>
<Place Parts_Product_Edit="Content:1" />
<Place Parts_Product="Content:0" />
<Place Parts_Product_AddButton="Content:after" />
</Placement>
然后,看到不一样了:
二:实现 添加到购物车 功能
2.1 前台准备
首先,我们创建文件夹 Controllers,然后控制器:
using System;
using System.Collections.Generic;
using System.Linq;
using System.Text;
using System.Threading.Tasks;
using System.Web.Mvc;namespace TMinji.Shop.Controllers
{
public class ShoppingCartController : Controller
{[HttpPost]
public ActionResult Add(int id)
{
return RedirectToAction("Index");
}
}}
然后,修改 Views/Parts/Product.AddButton.cshtml:,
@using (Html.BeginForm("Add", "ShoppingCart", new { id = -1 }))
{
<button type="submit">@T("Add to shoppingcart")</button>
}
让它变成一个表单,并且指向到 Add 方法。
注意到,我们这里传递的 id = -1,所以,我们还需要做一件事情,那就是把真是的商品 id 传递过来,才能添加商品。
于是乎,我们首先应该把 id 传递到 shape 中,修改,我们的 Display 方法,如下:
protected override DriverResult Display(ProductPart part, string displayType, dynamic shapeHelper)
{
//return ContentShape("Parts_Product", () => shapeHelper.Parts_Product(
// Price: part.UnitPrice,
// Sku: part.Sku
// ));
return Combined(// Shape 1: Parts_Product
ContentShape("Parts_Product", () => shapeHelper.Parts_Product(
Price: part.UnitPrice,
Sku: part.Sku
)),// Shape 2: Parts_Product_AddButton
ContentShape("Parts_Product_AddButton", () => shapeHelper.Parts_Product_AddButton(
ProductId: part.Id))
);
}
然后,前台 Views/Parts/Product.AddButton.cshtml 如下:
@{
var productId = (int)Model.ProductId;
}
@using (Html.BeginForm("Add", "ShoppingCart", new { id = productId }))
{
<button type="submit">@T("Add to shoppingcart")</button>
}
现在,就可以把值传递到控制器了,现在,我们需要实现业务逻辑部分。
2.2 业务逻辑之 Orchard Service
在 Models 目录下,增加 ShoppingCartItem 实体类:
[Serializable]
public sealed class ShoppingCartItem
{
public int ProductId { get; private set; }private int _quantity;
public int Quantity
{
get { return _quantity; }
set
{
if (value < 0)
throw new IndexOutOfRangeException();_quantity = value;
}
}public ShoppingCartItem()
{
}public ShoppingCartItem(int productId, int quantity = 1)
{
ProductId = productId;
Quantity = quantity;
}
}
创建 Services 文件夹,然后创建 IShoppingCart 接口,
public interface IShoppingCart : IDependency
{
IEnumerable<ShoppingCartItem> Items { get; }
void Add(int productId, int quantity = 1);
void Remove(int productId);
ProductPart GetProduct(int productId);
decimal Subtotal();
decimal Vat();
decimal Total();
int ItemCount();
void UpdateItems();
}
然后,其实现类:
using Orchard;
using Orchard.ContentManagement;
using System;
using System.Collections.Generic;
using System.Linq;
using System.Text;
using System.Threading.Tasks;
using System.Web;
using TMinji.Shop.Models;namespace TMinji.Shop.Services
{
public class ShoppingCart : IShoppingCart
{
private readonly IWorkContextAccessor _workContextAccessor;
private readonly IContentManager _contentManager;
public IEnumerable<ShoppingCartItem> Items { get { return ItemsInternal.AsReadOnly(); } }private HttpContextBase HttpContext
{
get { return _workContextAccessor.GetContext().HttpContext; }
}private List<ShoppingCartItem> ItemsInternal
{
get
{
var items = (List<ShoppingCartItem>)HttpContext.Session["ShoppingCart"];if (items == null)
{
items = new List<ShoppingCartItem>();
HttpContext.Session["ShoppingCart"] = items;
}return items;
}
}public ShoppingCart(IWorkContextAccessor workContextAccessor, IContentManager contentManager)
{
_workContextAccessor = workContextAccessor;
_contentManager = contentManager;
}public void Add(int productId, int quantity = 1)
{
var item = Items.SingleOrDefault(x => x.ProductId == productId);if (item == null)
{
item = new ShoppingCartItem(productId, quantity);
ItemsInternal.Add(item);
}
else
{
item.Quantity += quantity;
}
}public void Remove(int productId)
{
var item = Items.SingleOrDefault(x => x.ProductId == productId);if (item == null)
return;ItemsInternal.Remove(item);
}public ProductPart GetProduct(int productId)
{
return _contentManager.Get<ProductPart>(productId);
}public void UpdateItems()
{
ItemsInternal.RemoveAll(x => x.Quantity == 0);
}public decimal Subtotal()
{
return Items.Select(x => GetProduct(x.ProductId).UnitPrice * x.Quantity).Sum();
}public decimal Vat()
{
return Subtotal() * .19m;
}public decimal Total()
{
return Subtotal() + Vat();
}public int ItemCount()
{
return Items.Sum(x => x.Quantity);
}private void Clear()
{
ItemsInternal.Clear();
UpdateItems();
}
}
}
以上代码不再一一解释,相信大家能看明白,然后,相应的,修改控制器吧:
using Orchard;
using System;
using Orchard.Mvc;
using System.Collections.Generic;
using System.Linq;
using System.Text;
using System.Threading.Tasks;
using System.Web.Mvc;
using TMinji.Shop.Services;namespace TMinji.Shop.Controllers
{
public class ShoppingCartController : Controller
{private readonly IShoppingCart _shoppingCart;
private readonly IOrchardServices _services;public ShoppingCartController(IShoppingCart shoppingCart, IOrchardServices services)
{
_shoppingCart = shoppingCart;
_services = services;
}[HttpPost]
public ActionResult Add(int id)
{// Add the specified content id to the shopping cart with a quantity of 1.
_shoppingCart.Add(id, 1);// Redirect the user to the Index action (yet to be created)
return RedirectToAction("Index");
}public ActionResult Index()
{// Create a new shape using the "New" property of IOrchardServices.
var shape = _services.New.ShoppingCart();// Return a ShapeResult
return new ShapeResult(this, shape);
}}
}
在控制器中,我们看到了三点变化:
1:构造器接受了两个对象,它们是被注入的,这会由 Orchard 完成;
2:Add 方法可以添加商品到购物车了;
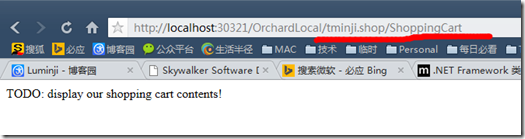
3:增加了一个 Index 方法。可以看到在这个方法中,我们又创建了一个 Shape,而这个 Shape 的名字叫做 ShoppingCart。注意哦,它和后台创建 Shape 不一样(记得吗,在 Display 方法 中),这个 shape 对于那个的 cshtml 文件为 Views/ShoppingCart.cshtml:
TODO: display our shopping cart contents!
如果我们这个时候运行代码,会发现点击 添加到购物车 后,变成 404 。这是因为,我们没有为路由加上 area,它是什么,是模块名,Orchard 会根据这个 area,路由到对于的模块中的 controller。故,我们应该修改 Views/Parts/Product.AddButton.cshtml:
@{
var productId = (int)Model.ProductId;
}
@using (Html.BeginForm("Add", "ShoppingCart", new { id = productId, area = "TMinji.Shop" }))
{
<button type="submit">@T("Add to shoppingcart")</button>
}
现在,继续运行代码,现在,我们得到错误:
The required anti-forgery form field "__RequestVerificationToken" is not present.
当然,这个错误,熟悉 MVC 的我们,已经知道怎么修改了,修改之:
@{
var productId = (int)Model.ProductId;
}
@using (Html.BeginFormAntiForgeryPost(Url.Action("Add", "ShoppingCart", new { id = productId, area = "TMinji.Shop" })))
{
<button type="submit">@T("Add to shoppingcart")</button>
}
再次运行:
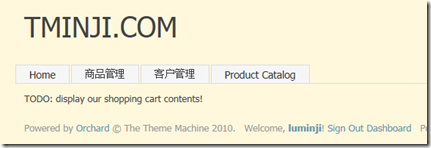
我们看到,这个页面没有包含当前的 Theme 的母版页,回到控制器,加一个 ThemedAttribute(当然,我们得 using Orchard.Themes;),如下:
[Themed]
public ActionResult Index()
{
// Create a new shape using the "New" property of IOrchardServices.
var shape = _services.New.ShoppingCart();// Return a ShapeResult
return new ShapeResult(this, shape);
}
这个时候,再次运行,得到了如下的理想效果:
总结
1:前台的展现,主要通过 MVC 的控制器来实现的,而后台则绕开了控制器;
2:业务逻辑,使用 Service 机制,而不是我们自己瞎写的类和逻辑(当然,也可以),但 Service 机制看上去更 Orchard;
3:前后台创建 Shape 的方式是不一样的。
Orchard模块开发全接触4:深度改造前台的更多相关文章
- Orchard模块开发全接触8:改造后台
后台默认提供了 Content 的管理,但是,所有的内容类型揉杂在一起,而我们需要更深度的定制一些功能,比如,我们只想管理订单,又比如,我们需要对注册用户进行管理.本篇的内容包括: 1:自定义 adm ...
- Orchard模块开发全接触1:起步
在<http://www.cnblogs.com/luminji/p/3831281.html>中简单介绍了 Orchard 的模块开发,接下来,我们需要做个更复杂的例子,Orchard ...
- Orchard模块开发全接触7:订单与支付之Event Bus
在这部分,我们要完成的工作有: 1:将购物车内的商品变成真正的订单: 2:理解 父子及一对多关系: 3:写一个针对 Event Bus 的扩展点: 4:实现一个针对该扩展点的模拟的 支付服务: 一:创 ...
- Orchard模块开发全接触5:深度改造前台第二部分
在这一部分,我们继续完善我们的购物车,我们要做以下一些事情: 1:完成 shoppingcart.cshtml: 2:让用户可以更新数量及从购物车删除商品: 3:创建一个 widget,在上面可以看到 ...
- Orchard模块开发全接触3:分类的实现及内容呈现(Display)
一:分类用现有技术怎么实现? 实际就是创建 Query 和 Projection,如果不知道怎么做,参考:Orchard之在前台显式一个属于自己的列表(在这篇里,还进行了稍稍拓展),当然,基础的知道, ...
- Orchard模块开发全接触2:新建 ProductPart
一:创建 Part 1:项目引用 Orchard.Framework: 2:创建 Models 文件夹: 3:在 Models 文件夹下创建类 ProductPartRecord,如下: public ...
- Orchard模块开发全接触6:自定义用户注册
我们都知道 Orchard 的用户注册相当简单,现在,我们需要一个自定义的用户注册,现在,开始吧. 一:定义实体 Models/CustomerPartRecord.cs: public class ...
- Orchard 模块开发学习笔记 (1)
创建模块 首先,打开Bin目录下的Orchard.exe 等到出现orchard>后, 看看命令列表中是否存在 codegen module 如果不存在,则需要先执行:feature enabl ...
- Odoo9.0模块开发全流程
构建Odoo模块 模块组成 业务对象 业务对象声明为Python类, 由Odoo自己主动加载. 数据文件 XML或CSV文件格式, 在当中声明了元数据(视图或工作流).配置数据(模块參数).演示数据等 ...
随机推荐
- 【LOJ】#2110. 「JLOI2015」管道连接
题解 我们先跑一个斯坦纳树出来 斯坦纳树是什么,是一个包含点集里的点联通所需要的最小的价值,显然他们联通的方式必然是一棵树 我们可以设一个状态为\(dis[i][S]\)表示以第i个点为根,点集为\( ...
- 开始使用KVM和QEMU
一. 简介 Quick Emulator(QEMU) 是QEMU/KVM虚拟化套件中的主要组成部分. 它提供了硬件的虚拟化和处理器的仿真. QEMU不用运行在内核,它是运行在用户空间的. QEMU支持 ...
- SpringBoot的搭建
一:搭建 1.环境要求 Java7及以上 Spring Framework4.1.5及以上 2.新建一个maven工程 3.pom.xml(生成) <!-- 必须引入spring-parent, ...
- 安装m4,autoconf,automake
###安装m4 wget http://mirrors.kernel.org/gnu/m4/m4-1.4.13.tar.gz \ && tar -xzvf m4-1.4.13.tar. ...
- 002.NFS相关配置项
一 配置文件(/etc/exports) 1.1 配置文件格式 <输出目录> [客户端1 选项(访问权限,用户映射,其他)] [客户端2 选项(访问权限,用户映射,其他)] 二 输出目录 ...
- 前端网页、php与mysql数据库字符编码(解决中文等乱码问题)
web开发中经常涉及前端网页——php——mysql之间的数据交互,当数据只有英文时通常不会有什么问题,但一旦涉及中文,三个地方的某一处字符编码不一致(如,网页使用的时gbk而mysql使用utf-8 ...
- 【BZOJ 4819】 4819: [Sdoi2017]新生舞会 (0-1分数规划、二分+KM)
4819: [Sdoi2017]新生舞会 Time Limit: 10 Sec Memory Limit: 128 MBSubmit: 601 Solved: 313 Description 学校 ...
- [BZOJ3585]mex(莫队+分块)
显然可以离线主席树,这里用莫队+分块做.分块的一个重要思想是实现修改与查询时间复杂度的均衡,这里莫队和分块互相弥补. 考虑暴力的分块做法,首先显然大于n的数直接忽略,于是将值域分成sqrt(n)份,每 ...
- 【BZOJ】3732: Network【Kruskal重构树】
3732: Network Time Limit: 10 Sec Memory Limit: 128 MBSubmit: 2812 Solved: 1363[Submit][Status][Dis ...
- bzoj 3999 线段树区间提取 有序链剖
看错题目了,想成每个城市都可以买一个东西,然后在后面的某个城市卖掉,问最大收益.这个可以类似维护上升序列的方法在O(nlog^3n)的时间复杂度内搞定 这道题用到的一些方法: 1. 可以将有关的线段提 ...