支持辉光效果的Label
支持辉光效果的Label
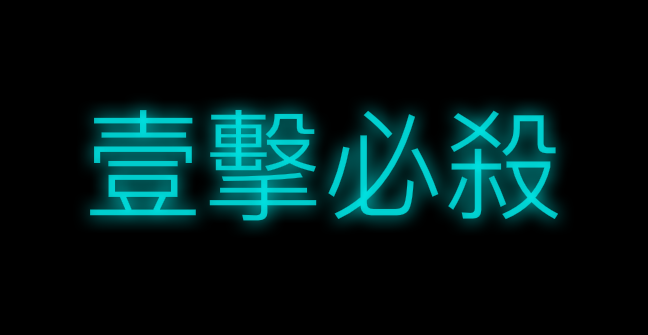
效果
源码
https://github.com/YouXianMing/UI-Component-Collection 中的 FBGlowLabel
//

//  FBGlowLabel.h

//

//  Created by YouXianMing on 16/8/3.

//  Copyright © 2016年 YouXianMing. All rights reserved.

//

//  https://github.com/lyokato/fbglowlabel

//

#import <UIKit/UIKit.h>

@interface FBGlowLabel : UILabel

/**

 *  Glow size, default is 0.f.

 */

@property (nonatomic) CGFloat glowSize;

/**

 *  Glow color, default is clear color.

 */

@property (nonatomic, strong) UIColor *glowColor;

/**

 *  Inner glow size, default is 0.f.

 */

@property (nonatomic) CGFloat innerGlowSize;

/**

 *  Inner glow color, default is clear color.

 */

@property (nonatomic, strong) UIColor *innerGlowColor;

@end
//

//  FBGlowLabel.m

//

//  Created by YouXianMing on 16/8/3.

//  Copyright © 2016年 YouXianMing. All rights reserved.

//

#import "FBGlowLabel.h"

@implementation FBGlowLabel

- (id)initWithFrame:(CGRect)frame {

    if (self = [super initWithFrame:frame]) {

        [self setup];

    }

    return self;

}

- (id)initWithCoder:(NSCoder *)coder {

    if (self = [super initWithCoder:coder]) {

        [self setup];

    }

    return self;

}

- (void)setup {

    self.glowSize       = 0.0f;

    self.glowColor      = [UIColor clearColor];

    self.innerGlowSize  = 0.0f;

    self.innerGlowColor = [UIColor clearColor];

}

- (void)drawTextInRectForIOS7:(CGRect)rect {

    CGContextRef ctx = UIGraphicsGetCurrentContext();

    UIGraphicsBeginImageContextWithOptions(rect.size, NO, 0.0);

    [super drawTextInRect:rect];

    UIImage *textImage = UIGraphicsGetImageFromCurrentImageContext();

    UIGraphicsEndImageContext();

    CGContextSaveGState(ctx);

    if (_glowSize > ) {

        CGContextSetShadow(ctx, CGSizeZero, _glowSize);

        CGContextSetShadowWithColor(ctx, CGSizeZero, _glowSize, _glowColor.CGColor);

    }

    [textImage drawAtPoint:rect.origin];

    CGContextRestoreGState(ctx);

    if (_innerGlowSize > ) {

        UIGraphicsBeginImageContextWithOptions(rect.size, NO, 0.0);

        CGContextRef ctx2 = UIGraphicsGetCurrentContext();

        CGContextSaveGState(ctx2);

        CGContextSetFillColorWithColor(ctx2, [UIColor blackColor].CGColor);

        CGContextFillRect(ctx2, rect);

        CGContextTranslateCTM(ctx2, 0.0, rect.size.height);

        CGContextScaleCTM(ctx2, 1.0, -1.0);

        CGContextClipToMask(ctx2, rect, textImage.CGImage);

        CGContextClearRect(ctx2, rect);

        CGContextRestoreGState(ctx2);

        UIImage *inverted = UIGraphicsGetImageFromCurrentImageContext();

        CGContextClearRect(ctx2, rect);

        CGContextSaveGState(ctx2);

        CGContextSetFillColorWithColor(ctx2, _innerGlowColor.CGColor);

        CGContextSetShadowWithColor(ctx2, CGSizeZero, _innerGlowSize, _innerGlowColor.CGColor);

        [inverted drawAtPoint:CGPointZero];

        CGContextTranslateCTM(ctx2, 0.0, rect.size.height);

        CGContextScaleCTM(ctx2, 1.0, -1.0);

        CGContextClipToMask(ctx2, rect, inverted.CGImage);

        CGContextClearRect(ctx2, rect);

        CGContextRestoreGState(ctx2);

        UIImage *innerShadow = UIGraphicsGetImageFromCurrentImageContext();

        UIGraphicsEndImageContext();

        [innerShadow drawAtPoint:rect.origin];

    }

}

- (void)drawTextInRectForIOS6:(CGRect)rect {

    CGContextRef ctx = UIGraphicsGetCurrentContext();

    CGContextSaveGState(ctx);

    if (self.glowSize > ) {

        CGContextSetShadow(ctx, CGSizeZero, _glowSize);

        CGContextSetShadowWithColor(ctx, CGSizeZero, _glowSize, _glowColor.CGColor);

    }

    [super drawTextInRect:rect];

    CGContextRestoreGState(ctx);

    if (_innerGlowSize > ) {

        UIGraphicsBeginImageContextWithOptions(rect.size, NO, 0.0);

        CGContextRef ctx2 = UIGraphicsGetCurrentContext();

        [super drawTextInRect:rect];

        UIImage *textImage = UIGraphicsGetImageFromCurrentImageContext();

        CGContextClearRect(ctx2, rect);

        CGContextSaveGState(ctx2);

        CGContextSetFillColorWithColor(ctx2, [UIColor blackColor].CGColor);

        CGContextFillRect(ctx2, rect);

        CGContextTranslateCTM(ctx2, 0.0, rect.size.height);

        CGContextScaleCTM(ctx2, 1.0, -1.0);

        CGContextClipToMask(ctx2, rect, textImage.CGImage);

        CGContextClearRect(ctx2, rect);

        CGContextRestoreGState(ctx2);

        UIImage *inverted = UIGraphicsGetImageFromCurrentImageContext();

        CGContextClearRect(ctx2, rect);

        CGContextSaveGState(ctx2);

        CGContextSetFillColorWithColor(ctx2, _innerGlowColor.CGColor);

        CGContextSetShadowWithColor(ctx2, CGSizeZero, _innerGlowSize, _innerGlowColor.CGColor);

        [inverted drawAtPoint:CGPointZero];

        CGContextTranslateCTM(ctx2, 0.0, rect.size.height);

        CGContextScaleCTM(ctx2, 1.0, -1.0);

        CGContextClipToMask(ctx2, rect, inverted.CGImage);

        CGContextClearRect(ctx2, rect);

        CGContextRestoreGState(ctx2);

        UIImage *innerShadow = UIGraphicsGetImageFromCurrentImageContext();

        UIGraphicsEndImageContext();

        [innerShadow drawAtPoint:rect.origin];

    }

}

- (void)drawTextInRect:(CGRect)rect {

    if (self.text == nil || self.text.length == ) {

        return;

    }

    if ([[[UIDevice currentDevice] systemVersion] compare:@"7.0" options:NSNumericSearch] != NSOrderedAscending) {

        [self drawTextInRectForIOS7:rect];

    } else {

        [self drawTextInRectForIOS6:rect];

    }

}

@end
//

//  ViewController.m

//  FBGlowLabel

//

//  Created by YouXianMing on 16/8/3.

//  Copyright © 2016年 YouXianMing. All rights reserved.

//

#import "ViewController.h"

#import "FBGlowLabel.h"

@interface ViewController ()

@end

@implementation ViewController

- (void)viewDidLoad {

    [super viewDidLoad];

    self.view.backgroundColor = [UIColor blackColor];

    FBGlowLabel *glowLabel    = [[FBGlowLabel alloc] initWithFrame:self.view.bounds];

    [self.view addSubview:glowLabel];

    glowLabel.text            = @"壹擊必殺";

    glowLabel.textAlignment   = NSTextAlignmentCenter;

    glowLabel.backgroundColor = [UIColor clearColor];

    glowLabel.font            = [UIFont fontWithName:@"Heiti SC" size:.f];

    glowLabel.textColor       = [[UIColor cyanColor] colorWithAlphaComponent:0.95f];

    glowLabel.glowSize       = ;

    glowLabel.glowColor      = [UIColor cyanColor];

    glowLabel.innerGlowSize  = ;

    glowLabel.innerGlowColor = [[UIColor blackColor] colorWithAlphaComponent:0.25f];

}

@end
支持辉光效果的Label的更多相关文章
- 使用CALayer制作View的辉光效果
使用CALayer制作View的辉光效果 实现以下的辉光效果: 思路是这样子的: 1. 创建好需要实现辉光效果的View 2. 对这个View进行截图 3. 将这个截图重新添加进View中 4. 对这 ...
- GraphicsLab Project之辉光(Glare,Glow)效果 【转】
作者:i_dovelemon 日期:2016 / 07 / 02 来源:CSDN 主题:Render to Texture, Post process, Glare, Glow, Multi-pass ...
- Shimmer辉光动画效果
Shimmer辉光动画效果 效果 源码 https://github.com/facebook/Shimmer https://github.com/YouXianMing/Animations // ...
- 辉光UIView的category
辉光UIView的category 本人视频教程系类 iOS中CALayer的使用 效果如下: 源码: UIView+GlowView.h 与 UIView+GlowView.m // // UI ...
- 辉光的UIView
辉光的UIView 辉光UIView使用了一个UIView的一个category,名为UIView+Glow,请自行到github上查找. 源码如下: // // RootViewController ...
- 闹钟AlarmAndMusic 和支持播放音乐效果《IT蓝豹》
闹钟AlarmAndMusic 和支持播放音乐效果的,上下滑动调整时间和页面旋转风车效果,由于制作的gif有些问题,效果不明显,欢迎下载使用看看真实的效果.本例子主要由AlertActivity和Al ...
- CSS3实现文字扫光效果
本篇文章由:http://xinpure.com/css3-text-light-sweep-effect/ CSS3 实现的文字扫光效果,几乎可以和 Flash 相媲美了 效果解析 我们分析一下实现 ...
- WPF 实现跑马灯效果的Label控件,数据绑定方式实现
原文:WPF 实现跑马灯效果的Label控件,数据绑定方式实现 项目中需要使用数据绑定的方式实现跑马灯效果的Label,故重构了Label控件:具体代码如下 using System; using S ...
- pixijs shader贴图扫光效果
pixijs shader贴图扫光效果 直接贴代码 const app = new PIXI.Application({ transparent: true }); document.body.app ...
随机推荐
- Shell 利用 curl 模拟登陆
-b 参数 指定使用cookie文件 -c是往cookie文件中写cookie -d 是指定此次登录所需的参数,通过httpfox查看 -L 指定页面自动跳转 #curl -c ck.txt --us ...
- js 相对路径转为绝对路径
有时为了唯一标识网址或其它开发需要,我们需要将相对的网址转换为绝对的网址.当然前人实现方式已经不少,但或多或少的存在缺点或兼容问题.下面我将总结已有实现并给出相对完美的实现. 常规实现:地址转换 因该 ...
- Codeforces Round #533 (Div. 2) E - Helping Hiasat 最大团
E - Helping Hiasat 裸的最大团,写了一种 2 ^ (m / 2) * (m / 2)的复杂度的壮压, 应该还有更好的方法. #include<bits/stdc++.h> ...
- spring过滤器
什么是过滤器 Spring 中不能处理用户请求,但可以用来提供过滤作用的一种Servlet规范.在请求进入容器之后,还未进入Servlet之前进行预处理,并且在请求结束返回给前端这之间进行后期处理.具 ...
- Python 项目实践三(Web应用程序) 第三篇
接着上节的继续学习,现在要显示所有主题的页面 有了高效的网页创建方法,就能专注于另外两个网页了:显示全部主题的网页以及显示特定主题中条目的网页.所有主题页面显示用户创建的所有主题,它是第一个需要使用数 ...
- C#开发Unity游戏教程之游戏对象的属性变量
C#开发Unity游戏教程之游戏对象的属性变量 Unity游戏对象的属性——变量 通过对上一章的学习,读者应该了解到了,游戏对象上的属性与脚本中的变量,建立联系的方式就是将脚本赋予游戏对象.上一章只是 ...
- 计蒜客 NOIP 提高组模拟竞赛第一试 补记
计蒜客 NOIP 提高组模拟竞赛第一试 补记 A. 广场车神 题目大意: 一个\(n\times m(n,m\le2000)\)的网格,初始时位于左下角的\((1,1)\)处,终点在右上角的\((n, ...
- 我希望我知道的七个JavaScript技巧
如果你是一个JavaScript新手或仅仅最近才在你的开发工作中接触它,你可能感到沮丧.所有的语言都有自己的怪癖(quirks)——但从基于强类型的服务器端语言转移过来的开发人员可能会感到困惑.我就曾 ...
- 【转】InitializingBean的作用
原文链接:http://blog.csdn.net/maclaren001/article/details/37039749 最近工作需要得到sping中的每个事物需要执行的sql,称机会简单研究了一 ...
- PS小技巧之完美抠图
具体详细步骤如下01.打开图片,ctrl+j复制一层得到图层1,点击红圈处新建图层2,放于图层1与背景层之间,填充你喜欢的颜色,作为检查效果和新的背景图层. 02.点击图层1,用“快速选择工具”大致做 ...