支持辉光效果的Label
支持辉光效果的Label
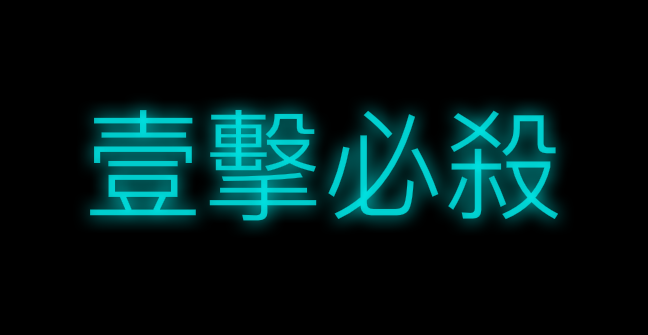
效果
源码
https://github.com/YouXianMing/UI-Component-Collection 中的 FBGlowLabel
//

//  FBGlowLabel.h

//

//  Created by YouXianMing on 16/8/3.

//  Copyright © 2016年 YouXianMing. All rights reserved.

//

//  https://github.com/lyokato/fbglowlabel

//

#import <UIKit/UIKit.h>

@interface FBGlowLabel : UILabel

/**

 *  Glow size, default is 0.f.

 */

@property (nonatomic) CGFloat glowSize;

/**

 *  Glow color, default is clear color.

 */

@property (nonatomic, strong) UIColor *glowColor;

/**

 *  Inner glow size, default is 0.f.

 */

@property (nonatomic) CGFloat innerGlowSize;

/**

 *  Inner glow color, default is clear color.

 */

@property (nonatomic, strong) UIColor *innerGlowColor;

@end
//

//  FBGlowLabel.m

//

//  Created by YouXianMing on 16/8/3.

//  Copyright © 2016年 YouXianMing. All rights reserved.

//

#import "FBGlowLabel.h"

@implementation FBGlowLabel

- (id)initWithFrame:(CGRect)frame {

    if (self = [super initWithFrame:frame]) {

        [self setup];

    }

    return self;

}

- (id)initWithCoder:(NSCoder *)coder {

    if (self = [super initWithCoder:coder]) {

        [self setup];

    }

    return self;

}

- (void)setup {

    self.glowSize       = 0.0f;

    self.glowColor      = [UIColor clearColor];

    self.innerGlowSize  = 0.0f;

    self.innerGlowColor = [UIColor clearColor];

}

- (void)drawTextInRectForIOS7:(CGRect)rect {

    CGContextRef ctx = UIGraphicsGetCurrentContext();

    UIGraphicsBeginImageContextWithOptions(rect.size, NO, 0.0);

    [super drawTextInRect:rect];

    UIImage *textImage = UIGraphicsGetImageFromCurrentImageContext();

    UIGraphicsEndImageContext();

    CGContextSaveGState(ctx);

    if (_glowSize > ) {

        CGContextSetShadow(ctx, CGSizeZero, _glowSize);

        CGContextSetShadowWithColor(ctx, CGSizeZero, _glowSize, _glowColor.CGColor);

    }

    [textImage drawAtPoint:rect.origin];

    CGContextRestoreGState(ctx);

    if (_innerGlowSize > ) {

        UIGraphicsBeginImageContextWithOptions(rect.size, NO, 0.0);

        CGContextRef ctx2 = UIGraphicsGetCurrentContext();

        CGContextSaveGState(ctx2);

        CGContextSetFillColorWithColor(ctx2, [UIColor blackColor].CGColor);

        CGContextFillRect(ctx2, rect);

        CGContextTranslateCTM(ctx2, 0.0, rect.size.height);

        CGContextScaleCTM(ctx2, 1.0, -1.0);

        CGContextClipToMask(ctx2, rect, textImage.CGImage);

        CGContextClearRect(ctx2, rect);

        CGContextRestoreGState(ctx2);

        UIImage *inverted = UIGraphicsGetImageFromCurrentImageContext();

        CGContextClearRect(ctx2, rect);

        CGContextSaveGState(ctx2);

        CGContextSetFillColorWithColor(ctx2, _innerGlowColor.CGColor);

        CGContextSetShadowWithColor(ctx2, CGSizeZero, _innerGlowSize, _innerGlowColor.CGColor);

        [inverted drawAtPoint:CGPointZero];

        CGContextTranslateCTM(ctx2, 0.0, rect.size.height);

        CGContextScaleCTM(ctx2, 1.0, -1.0);

        CGContextClipToMask(ctx2, rect, inverted.CGImage);

        CGContextClearRect(ctx2, rect);

        CGContextRestoreGState(ctx2);

        UIImage *innerShadow = UIGraphicsGetImageFromCurrentImageContext();

        UIGraphicsEndImageContext();

        [innerShadow drawAtPoint:rect.origin];

    }

}

- (void)drawTextInRectForIOS6:(CGRect)rect {

    CGContextRef ctx = UIGraphicsGetCurrentContext();

    CGContextSaveGState(ctx);

    if (self.glowSize > ) {

        CGContextSetShadow(ctx, CGSizeZero, _glowSize);

        CGContextSetShadowWithColor(ctx, CGSizeZero, _glowSize, _glowColor.CGColor);

    }

    [super drawTextInRect:rect];

    CGContextRestoreGState(ctx);

    if (_innerGlowSize > ) {

        UIGraphicsBeginImageContextWithOptions(rect.size, NO, 0.0);

        CGContextRef ctx2 = UIGraphicsGetCurrentContext();

        [super drawTextInRect:rect];

        UIImage *textImage = UIGraphicsGetImageFromCurrentImageContext();

        CGContextClearRect(ctx2, rect);

        CGContextSaveGState(ctx2);

        CGContextSetFillColorWithColor(ctx2, [UIColor blackColor].CGColor);

        CGContextFillRect(ctx2, rect);

        CGContextTranslateCTM(ctx2, 0.0, rect.size.height);

        CGContextScaleCTM(ctx2, 1.0, -1.0);

        CGContextClipToMask(ctx2, rect, textImage.CGImage);

        CGContextClearRect(ctx2, rect);

        CGContextRestoreGState(ctx2);

        UIImage *inverted = UIGraphicsGetImageFromCurrentImageContext();

        CGContextClearRect(ctx2, rect);

        CGContextSaveGState(ctx2);

        CGContextSetFillColorWithColor(ctx2, _innerGlowColor.CGColor);

        CGContextSetShadowWithColor(ctx2, CGSizeZero, _innerGlowSize, _innerGlowColor.CGColor);

        [inverted drawAtPoint:CGPointZero];

        CGContextTranslateCTM(ctx2, 0.0, rect.size.height);

        CGContextScaleCTM(ctx2, 1.0, -1.0);

        CGContextClipToMask(ctx2, rect, inverted.CGImage);

        CGContextClearRect(ctx2, rect);

        CGContextRestoreGState(ctx2);

        UIImage *innerShadow = UIGraphicsGetImageFromCurrentImageContext();

        UIGraphicsEndImageContext();

        [innerShadow drawAtPoint:rect.origin];

    }

}

- (void)drawTextInRect:(CGRect)rect {

    if (self.text == nil || self.text.length == ) {

        return;

    }

    if ([[[UIDevice currentDevice] systemVersion] compare:@"7.0" options:NSNumericSearch] != NSOrderedAscending) {

        [self drawTextInRectForIOS7:rect];

    } else {

        [self drawTextInRectForIOS6:rect];

    }

}

@end
//

//  ViewController.m

//  FBGlowLabel

//

//  Created by YouXianMing on 16/8/3.

//  Copyright © 2016年 YouXianMing. All rights reserved.

//

#import "ViewController.h"

#import "FBGlowLabel.h"

@interface ViewController ()

@end

@implementation ViewController

- (void)viewDidLoad {

    [super viewDidLoad];

    self.view.backgroundColor = [UIColor blackColor];

    FBGlowLabel *glowLabel    = [[FBGlowLabel alloc] initWithFrame:self.view.bounds];

    [self.view addSubview:glowLabel];

    glowLabel.text            = @"壹擊必殺";

    glowLabel.textAlignment   = NSTextAlignmentCenter;

    glowLabel.backgroundColor = [UIColor clearColor];

    glowLabel.font            = [UIFont fontWithName:@"Heiti SC" size:.f];

    glowLabel.textColor       = [[UIColor cyanColor] colorWithAlphaComponent:0.95f];

    glowLabel.glowSize       = ;

    glowLabel.glowColor      = [UIColor cyanColor];

    glowLabel.innerGlowSize  = ;

    glowLabel.innerGlowColor = [[UIColor blackColor] colorWithAlphaComponent:0.25f];

}

@end
支持辉光效果的Label的更多相关文章
- 使用CALayer制作View的辉光效果
使用CALayer制作View的辉光效果 实现以下的辉光效果: 思路是这样子的: 1. 创建好需要实现辉光效果的View 2. 对这个View进行截图 3. 将这个截图重新添加进View中 4. 对这 ...
- GraphicsLab Project之辉光(Glare,Glow)效果 【转】
作者:i_dovelemon 日期:2016 / 07 / 02 来源:CSDN 主题:Render to Texture, Post process, Glare, Glow, Multi-pass ...
- Shimmer辉光动画效果
Shimmer辉光动画效果 效果 源码 https://github.com/facebook/Shimmer https://github.com/YouXianMing/Animations // ...
- 辉光UIView的category
辉光UIView的category 本人视频教程系类 iOS中CALayer的使用 效果如下: 源码: UIView+GlowView.h 与 UIView+GlowView.m // // UI ...
- 辉光的UIView
辉光的UIView 辉光UIView使用了一个UIView的一个category,名为UIView+Glow,请自行到github上查找. 源码如下: // // RootViewController ...
- 闹钟AlarmAndMusic 和支持播放音乐效果《IT蓝豹》
闹钟AlarmAndMusic 和支持播放音乐效果的,上下滑动调整时间和页面旋转风车效果,由于制作的gif有些问题,效果不明显,欢迎下载使用看看真实的效果.本例子主要由AlertActivity和Al ...
- CSS3实现文字扫光效果
本篇文章由:http://xinpure.com/css3-text-light-sweep-effect/ CSS3 实现的文字扫光效果,几乎可以和 Flash 相媲美了 效果解析 我们分析一下实现 ...
- WPF 实现跑马灯效果的Label控件,数据绑定方式实现
原文:WPF 实现跑马灯效果的Label控件,数据绑定方式实现 项目中需要使用数据绑定的方式实现跑马灯效果的Label,故重构了Label控件:具体代码如下 using System; using S ...
- pixijs shader贴图扫光效果
pixijs shader贴图扫光效果 直接贴代码 const app = new PIXI.Application({ transparent: true }); document.body.app ...
随机推荐
- 【转】MySQL安全配置介绍
一.前言 很多文章中会说,数据库的权限按最小权限为原则,这句话本身没有错,但是却是一句空话.因为最小权限,这个东西太抽象,很多时候你并弄不清楚具体他需要哪些权限. 现在很多mysql用着root账户在 ...
- linux install weblogic
一.安装文件 wls1036_generic.jar weblogic 通用版本 jrockit-jdk1.6.0_45-R28.2.7-4.1.0-linux-x64 jdk ...
- AJAX请求时status返回状态明细表(转)
转自:http://www.cnblogs.com/wangking/p/6530904.html AJAX请求时status返回状态明细表 readyState的五种状态2010-03-04 18: ...
- Java编程的逻辑 (59) - 文件和目录操作
本系列文章经补充和完善,已修订整理成书<Java编程的逻辑>,由机械工业出版社华章分社出版,于2018年1月上市热销,读者好评如潮!各大网店和书店有售,欢迎购买,京东自营链接:http:/ ...
- IScroll5安卓重复点击兼容问题处理
最近在做移动web开发,使用IScroll 5 的时候出现了设备之间兼容的问题: 情景如下: Android手机:点击滚动区间内的选项时出现点击时间重叠(类似事件冒泡的行为)问题 Apple手机:木有 ...
- PHP 导出简单文本内容(word txt等)
PHP导出word文件,简单拓展可导出其他文本类文件 /** * PHP 导出简单文本内容(word txt等) * @param $content mixed 导出内容 (文本string / ht ...
- OLAP和OLTP基础知识
数据处理大致可以分成两大类:联机事务处理OLTP(on-line transaction processing).联机分析处理OLAP(On-Line Analytical Processing).O ...
- 025.Zabbix之SNMP监控
一 SNMP介绍及配置 1.1 SNMP介绍参考其他笔记 1.2 SNMP配置 [SW1]int vlan 1 [SW1-Vlanif1]ip address 172.24.8.13 24 [SW1- ...
- 【Ray Tracing in One Weekend 超详解】 光线追踪1-8 自定义相机设计
今天,我们来学习如何设计自定义位置的相机 ready 我们只需要了解我们之前的坐标体系,或者说是相机位置 先看效果 Chapter10:Positionable camera 这一章我们直接用概念 ...
- Java 内部类.md
Java 内部类 学习自 <Java编程思想> Overview 什么是内部类? Thinking In Java 中如此定义: 将一个类的定义放在里另一个类的定义的内部,这就是内部类. ...