gitlab-ci-runner安装
前言
什么是CI/CD?
CI (Continuous Integration) 持续集成, CD (Continuous Delivery) 持续部署
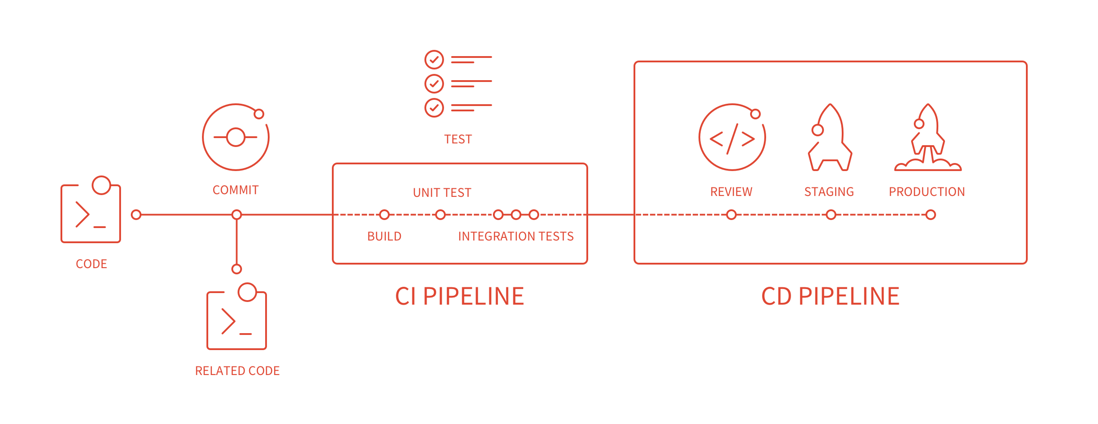
个人理解
本地开发代码, 提交远程仓库
仓库接收到提交操作,进入持续集成, 包括编译,自动化测试 (CI)
编译测试成功后,部署到线上服务器(CD)
gitlab-runner 介绍
gitlab 提供了一个持续集成的服务, 如果你在项目仓库里面加入.gitlab-ci.yml文件 同时给项目配置了gitlab-runner, 那么每一次push commit, 都会触发你的 CI pipeline (持续集成管道)
安装gitlab-runner
代理安装 gitlab-runner
如果机器能够正常访问外网,那么查阅官方文档进行安装
一般来说,内网与外网是处于隔断的情况,但是可以通过http代理服务器,允许内网访问外网的资源。
假设代理服务器机器的ip为: http://192.168.1.100:8000
具体步骤:
编辑 yum.conf
sudo vi /etc/yum.conf

# 追加一行

proxy=http://192.168.1.100:8000

#添加 GitLab's official repository (yum仓库)

http_proxy=http://192.168.1.100:8000 curl -L -x $http_proxy https://packages.gitlab.com/install/repositories/runner/gitlab-runner/script.rpm.sh | sed  "s#curl -sSf#curl -x $http_proxy -sSf#g" > script.rpm.sh

sudo bash script.rpm.sh
下载安装gitlab
# 查看gitlab-runner的版本

yum list gitlab-runner --showduplicates | sort -r

gitlab-runner.x86_64                10.5.0-1                runner_gitlab-runner

gitlab-runner.x86_64                10.4.0-1                runner_gitlab-runner

gitlab-runner.x86_64                10.3.1-1                runner_gitlab-runner

gitlab-runner.x86_64                10.3.0-1                runner_gitlab-runner

gitlab-runner.x86_64                10.2.1-1                runner_gitlab-runner

gitlab-runner.x86_64                10.2.0-1                runner_gitlab-runner

gitlab-runner.x86_64                10.1.1-1                runner_gitlab-runner

gitlab-runner.x86_64                10.1.0-1                runner_gitlab-runner

gitlab-runner.x86_64                10.0.2-1                runner_gitlab-runner

gitlab-runner.x86_64                10.0.1-1                runner_gitlab-runner

gitlab-runner.x86_64                10.0.0-1                runner_gitlab-runner

# 指定安装某个版本

sudo yum install gitlab-runner-10.1.1-1 -y
安装完成后, 出现一个/home/gitlab-runner 文件夹
gitlab-runner 命令
主要的命令操作有如下: install, start, stop, status, register, unregister
install 命令
安装配置 gitlab-runner, 如果使用yum install 则会默认安装
# --user 用户名

# --working-directory 工作目录

sudo gitlab-runner install --user=gitlab-runner --working-directory=/home/gitlab-runner
start 命令
sudo gitlab-runner start, 启动服务
stop 命令
sudo gitlab-runner stop, 关闭服务
status 命令
sudo gitlab-runner status, 查看服务运行状态
在仓库中查阅CI / CD Setting, 得到 CI token
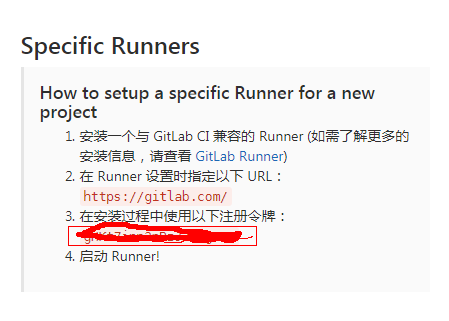
sudo gitlab-runner register

Please enter the gitlab-ci coordinator URL (e.g. https://gitlab.com/):

https://gitlab.com/

Please enter the gitlab-ci token for this runner:

gHKt7inn3nBzJ2m5gx-P

Please enter the gitlab-ci description for this runner:

hostname

Please enter the gitlab-ci tags for this runner (comma separated):

node,test

Whether to run untagged builds [true/false]:

true

Whether to lock the Runner to current project [true/false]:

false

Registering runner... succeeded                     runner=gHKt7inn

Please enter the executor: docker+machine, kubernetes, docker-ssh, ssh, shell, virtualbox, docker-ssh+machine, docker, parallels:

shell
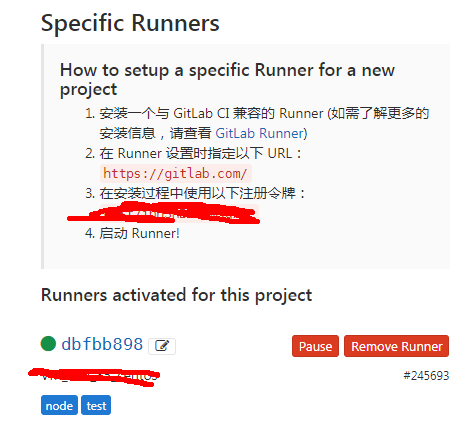
注册后使用 gitlab-runner list 查阅配置
sudo gitlab-runner list

Listing configured runners ConfigFile=/etc/gitlab-runner/config.toml

hostname Executor=shell Token=token URL=https://gitlab.com/
注册后,gitlab 页面将出现一个运行的runner
gitlab-runner unregister 命令
通过 url 和 token 取消注册 gitlab-runner unregister --url http://gitlab.example.com/ --token t0k3n
通过name取消注册 gitlab-runner unregister --name test-runner
删除所有注册runner gitlab-runner unregister --all-runners
gitlab-ci-runner安装的更多相关文章
- Docker搭建自己的Gitlab CI Runner
转载自:https://cloud.tencent.com/developer/article/1010595 1.Gitlab CI介绍 CI:持续集成,我们通常使用CI来做一些自动化工作,比如程序 ...
- 在 Kubernetes 上安装 Gitlab CI Runner Gitlab CI 基本概念以及 Runner 的安装
简介 从 Gitlab 8.0 开始,Gitlab CI 就已经集成在 Gitlab 中,我们只要在项目中添加一个.gitlab-ci.yml文件,然后添加一个Runner,即可进行持续集成.在介绍 ...
- 3.在 Kubernetes 上安装 Gitlab CI Runner
结合文章:1. 在 Kubernetes 上安装 Gitlab ,地址:https://www.cnblogs.com/sanduzxcvbnm/p/13852854.html 总结: 结合开头的文章 ...
- K8s 部署 Gitlab CI Runner
K8s 版本:1.20.6 GitLab CI 最大的作用是管理各个项目的构建状态.因此,运行构建任务这种浪费资源的事情交给一个独立的 Gitlab Runner 来做就会好很多,而且 Gitlab ...
- GitLab CI runner can't connect to tcp://localhost:2375 in kubernetes
报错的.gitlab-ci.yml配置如下 image: docker:latest services: - docker:dind variables: DOCKER_HOST: tcp://loc ...
- 使用GitLab CI + Capistrano部署CakePHP应用程序
使用GitLab CI + Capistrano部署CakePHP应用程序 摘要:本文描述了如使用GitLab CI + Capistrano部署CakePHP应用程序. 目录 1. 问题2. 解决方 ...
- Gitlab CI持续集成 - GitLab Runner 安装与注册
GitLab Runner安装 需要添加gitlab官方库: # For Debian/Ubuntu/Mint curl -L https://packages.gitlab.com/install/ ...
- Ubuntu Docker 安装和配置 GitLab CI 持续集成
相关文章: Ubuntu Docker 简单安装 GitLab 劈荆斩棘:Gitlab 部署 CI 持续集成 目的:在 Ubuntu 服务器上,使用 Docker 安装和配置 GitLab Runne ...
- [转] Gitlab 8.x runner安装与配置
[From]http://muchstudy.com/2018/07/13/Gitlab-8-x-runner%E5%AE%89%E8%A3%85%E4%B8%8E%E9%85%8D%E7%BD%AE ...
- docker-Gitlab、GitLab Runner安装
以下操作均在CentOs下操作 1.Gitlab install ① 启动gitlab docker run --detach \ --hostname 115.30.149.35 \ --publi ...
随机推荐
- cannot import name '_imaging' 与No module named PIL解决方法
今天学习廖雪峰的python 第三方模块pillow一章. 直接使用from PIL import Image 会报"No module named PIL",显然这是没有安装pi ...
- Cesium 云服务
前言 所有行业内都知道云是未来或者现在的趋势,但是真正的完完全全提供地理信息云服务的恐怕只有 Google 一家,然而今天我居然发现 Cesium 提供了云服务,你没有看错,就是曾经的开源 3D 渲染 ...
- Python函数式实现单例特性
传统的单例一般是基于类的特性实现,Python模块是天生的单例,下面来个简单的借助模块和函数实现单例特性: gdb = None def get_gdb(): global gdb if gdb is ...
- Android Studio 插件开发详解二:工具类
转载请标明出处:http://blog.csdn.net/zhaoyanjun6/article/details/78112856 本文出自[赵彦军的博客] 在插件开发过程中,我们按照开发一个正式的项 ...
- 使用Swashbuckle构建RESTful风格文档
本次和大家分享的是Swagger to WebApi的nuget包Swashbuckle:因为项目需要统一api文档的风格,并要支持多种开发语言(C#,java,python),所以首先想到的是swa ...
- 寻找DevExpress破解经历之旅
众所周知DevExpress是收费的,但是破解版的也不少,近期公司需要做发票套打的功能让我找个打印工具,我寻思着DevExpress这个软件好像挺不错的,功能强大,看了下价格方面,好吧!2W多呢,市面 ...
- Mego(05) - Mego for Visual Studio Extension
前言 可能对于一个新的框架而言使用入门对于陌生人而言是比较困难的,因此为了最大限度的为使用者提供便利性,我们给Mego框架开发了针对Visual Studio的集成开发工具,让大家可以像使用Entit ...
- python捕获异常、处理异常
https://blog.csdn.net/jmilk/article/details/50047457
- ASCII、 Unicode 和 UTF8
ASCII: 英文字母与数字编号的一一对应.每个英文字母对应一个编号.范围0~127 Unicode: 全世界所有语言中字符与数字编号的一一对应.也即为存在的每个字符指定一个唯一的编号.范围为0~0x ...
- PAT1047: Student List for Course
1047. Student List for Course (25) 时间限制 400 ms 内存限制 64000 kB 代码长度限制 16000 B 判题程序 Standard 作者 CHEN, Y ...