Spring的启动流程
spring的启动是建筑在servlet容器之上的,所有web工程的初始位置就是web.xml,它配置了servlet的上下文(context)和监听器(Listener),下面就来看看web.xml里面的配置:
  <!--上下文监听器,用于监听servlet的启动过程-->

  <listener>

        <description>ServletContextListener</description>

      <!--这里是自定义监听器,个性化定制项目启动提示-->

        <listener-class>com.trace.app.framework.listeners.ApplicationListener</listener-class>

    </listener>

  <!--dispatcherServlet的配置,这个servlet主要用于前端控制,这是springMVC的基础-->

    <servlet>

        <servlet-name>service_dispatcher</servlet-name>

        <servlet-class>org.springframework.web.servlet.DispatcherServlet</servlet-class>

        <init-param>

            <param-name>contextConfigLocation</param-name>

            <param-value>/WEB-INF/spring/services/service_dispatcher-servlet.xml</param-value>

        </init-param>

        <load-on-startup>1</load-on-startup>

    </servlet>

  <!--spring资源上下文定义,在指定地址找到spring的xml配置文件-->

    <context-param>

        <param-name>contextConfigLocation</param-name>

        <param-value>/WEB-INF/spring/application_context.xml</param-value>

    </context-param>

  <!--spring的上下文监听器-->

    <listener>

        <listener-class>

            org.springframework.web.context.ContextLoaderListener

        </listener-class>

    </listener>

  <!--Session监听器,Session作为公共资源存在上下文资源当中,这里也是自定义监听器-->

    <listener>

        <listener-class>

            com.trace.app.framework.listeners.MySessionListener

        </listener-class>

    </listener>
接下来就一点的来解析这样一个启动过程。
1. spring的上下文监听器
代码如下:
    <!--spring资源上下文定义,在指定地址找到spring的xml配置文件-->

    <context-param>

        <param-name>contextConfigLocation</param-name>

        <param-value>/WEB-INF/spring/application_context.xml</param-value>

    </context-param>

    <!--spring的上下文监听器-->

    <listener>

        <listener-class>

            org.springframework.web.context.ContextLoaderListener

        </listener-class>

    </listener>
spring的启动其实就是IOC容器的启动过程,通过上述的第一段配置<context-param>是初始化上下文,然后通过后一段的的<listener>来加载配置文件,其中调用的spring包中的ContextLoaderListener这个上下文监听器,ContextLoaderListener是一个实现了ServletContextListener接口的监听器,他的父类是 ContextLoader,在启动项目时会触发contextInitialized上下文初始化方法。下面我们来看看这个方法:
public void contextInitialized(ServletContextEvent event) {

        initWebApplicationContext(event.getServletContext());

}
可以看到,这里是调用了父类ContextLoader的initWebApplicationContext(event.getServletContext());方法,很显然,这是对ApplicationContext的初始化方法,也就是到这里正是进入了springIOC的初始化。
接下来再来看看initWebApplicationContext又做了什么工作,先看看代码:
    if (servletContext.getAttribute(WebApplicationContext.ROOT_WEB_APPLICATION_CONTEXT_ATTRIBUTE) != null) {

            throw new IllegalStateException(

                    "Cannot initialize context because there is already a root application context present - " +

                    "check whether you have multiple ContextLoader* definitions in your web.xml!");

        }

        Log logger = LogFactory.getLog(ContextLoader.class);

        servletContext.log("Initializing Spring root WebApplicationContext");

        if (logger.isInfoEnabled()) {

            logger.info("Root WebApplicationContext: initialization started");

        }

        long startTime = System.currentTimeMillis();

        try {

            // Store context in local instance variable, to guarantee that

            // it is available on ServletContext shutdown.

            if (this.context == null) {

                this.context = createWebApplicationContext(servletContext);

            }

            if (this.context instanceof ConfigurableWebApplicationContext) {

                ConfigurableWebApplicationContext cwac = (ConfigurableWebApplicationContext) this.context;

                if (!cwac.isActive()) {

                    // The context has not yet been refreshed -> provide services such as

                    // setting the parent context, setting the application context id, etc

                    if (cwac.getParent() == null) {

                        // The context instance was injected without an explicit parent ->

                        // determine parent for root web application context, if any.

                        ApplicationContext parent = loadParentContext(servletContext);

                        cwac.setParent(parent);

                    }

                    configureAndRefreshWebApplicationContext(cwac, servletContext);

                }

            }

            servletContext.setAttribute(WebApplicationContext.ROOT_WEB_APPLICATION_CONTEXT_ATTRIBUTE, this.context);

            ClassLoader ccl = Thread.currentThread().getContextClassLoader();

            if (ccl == ContextLoader.class.getClassLoader()) {

                currentContext = this.context;

            }

            else if (ccl != null) {

                currentContextPerThread.put(ccl, this.context);

            }

            if (logger.isDebugEnabled()) {

                logger.debug("Published root WebApplicationContext as ServletContext attribute with name [" +

                        WebApplicationContext.ROOT_WEB_APPLICATION_CONTEXT_ATTRIBUTE + "]");

            }

            if (logger.isInfoEnabled()) {

                long elapsedTime = System.currentTimeMillis() - startTime;

                logger.info("Root WebApplicationContext: initialization completed in " + elapsedTime + " ms");

            }

            return this.context;

        }

        catch (RuntimeException ex) {

            logger.error("Context initialization failed", ex);

            servletContext.setAttribute(WebApplicationContext.ROOT_WEB_APPLICATION_CONTEXT_ATTRIBUTE, ex);

            throw ex;

        }

        catch (Error err) {

            logger.error("Context initialization failed", err);

            servletContext.setAttribute(WebApplicationContext.ROOT_WEB_APPLICATION_CONTEXT_ATTRIBUTE, err);

            throw err;

        }
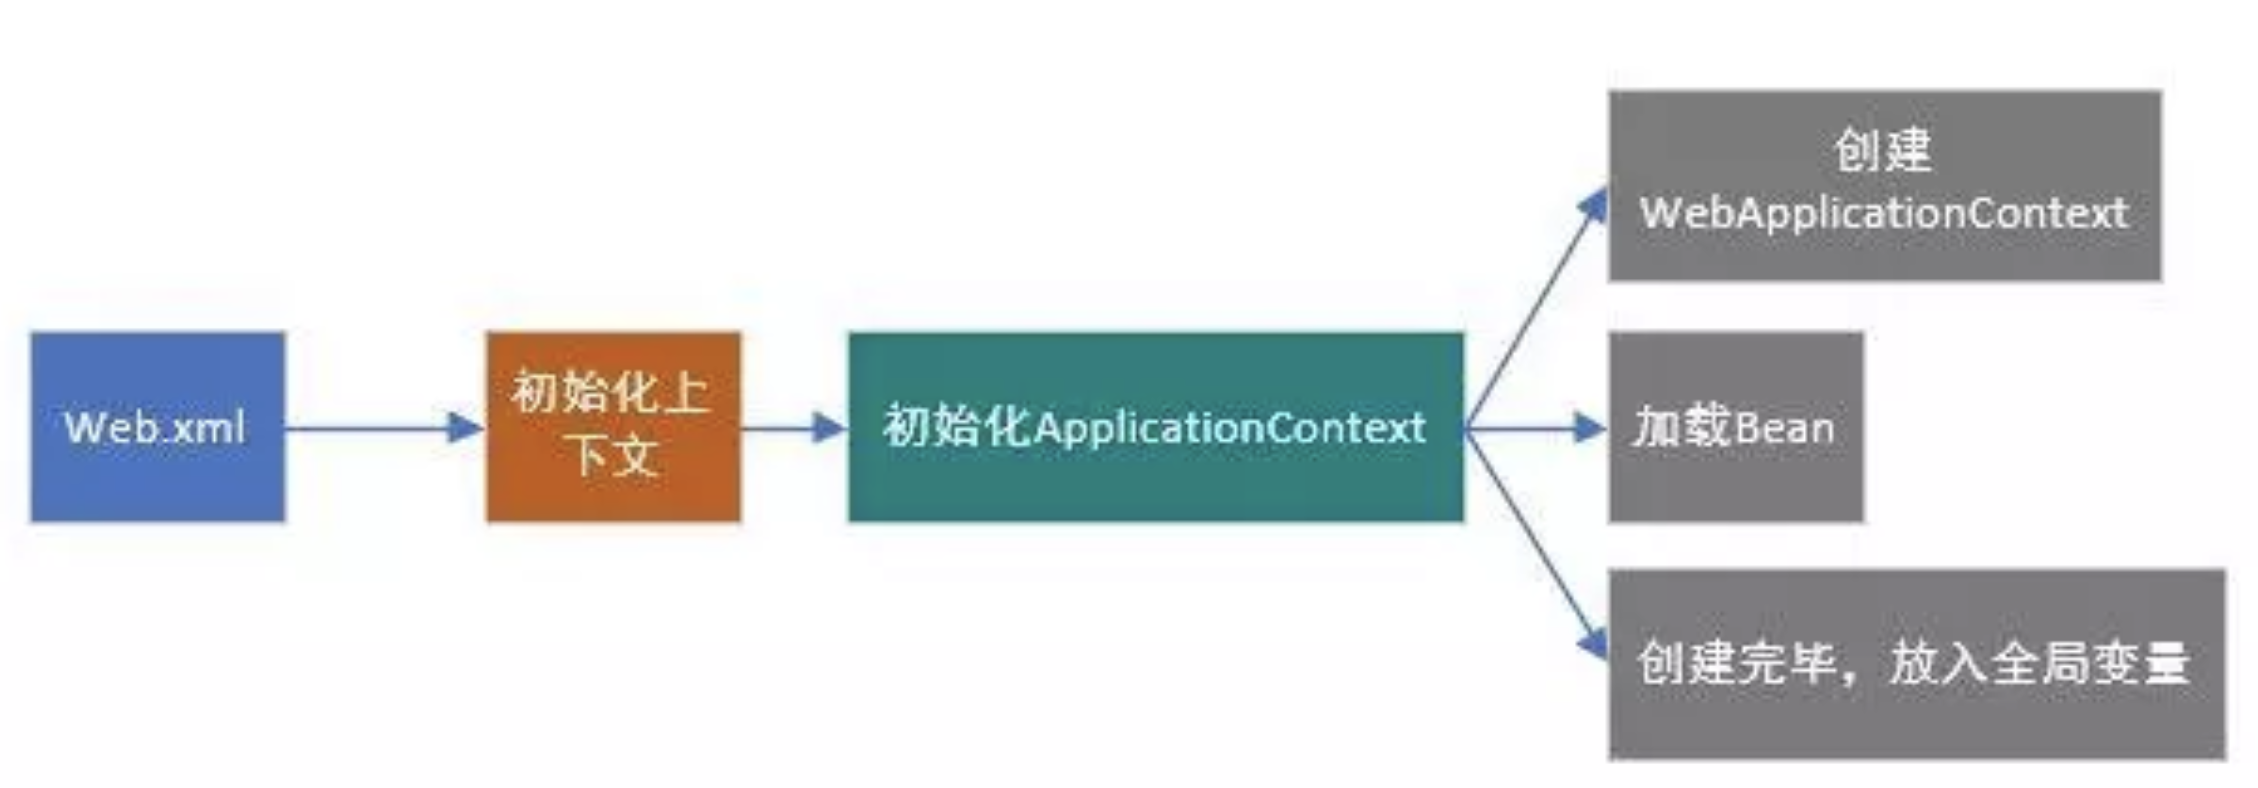
这个方法还是有点长的,其实仔细看看,出去异常错误处理,这个方法主要做了三件事:
- 创建WebApplicationContext。
- 加载对应的spring配置文件中的Bean。
- 将WebApplicationContext放入ServletContext(Java Web的全局变量)中。
上述代码中createWebApplicationContext(servletContext)方法即是完成创建WebApplicationContext工作,也就是说这个方法创建了上下文对象,支持用户自定义上下文对象,但必须继承ConfigurableWebApplicationContext,而Spring MVC默认使用ConfigurableWebApplicationContext作为ApplicationContext(它仅仅是一个接口)的实现。
再往下走,有一个方法configureAndRefreshWebApplicationContext就是用来加载spring配置文件中的Bean实例的。这个方法于封装ApplicationContext数据并且初始化所有相关Bean对象。它会从web.xml中读取名为 contextConfigLocation的配置,这就是spring xml数据源设置,然后放到ApplicationContext中,最后调用传说中的refresh方法执行所有Java对象的创建。
最后完成ApplicationContext创建之后就是将其放入ServletContext中,注意它存储的key值常量。
servletContext.setAttribute(WebApplicationContext.ROOT_WEB_APPLICATION_CONTEXT_ATTRIBUTE, this.context);
总结来说如下图:
2.SpringMVC的启动过程
web.xml的相关配置:
    <!--dispatcherServlet的配置,这个servlet主要用于前端控制,这是springMVC的基础-->

    <servlet>

        <servlet-name>service_dispatcher</servlet-name>

        <servlet-class>org.springframework.web.servlet.DispatcherServlet</servlet-class>

        <init-param>

            <param-name>contextConfigLocation</param-name>

            <param-value>/WEB-INF/spring/services/service_dispatcher-servlet.xml</param-value>

        </init-param>

        <load-on-startup>1</load-on-startup>

    </servlet>
这里采用这种自定义初始化参数的配置方式,当然也可以使用默认的。这里Spring Web MVC框架将加载“classpath:service_dispatcher-servlet.xml”来进行初始化上下文而不是“/WEB-INF/[servlet名字]-servlet.xml”。
通过上述配置文件很明显可以看出,springMVC的起始位置是DispatcherServlet(还是spring提供的)
public class DispatcherServlet extends FrameworkServlet {

          ... ...

}
这个类的父类是FrameworkServlet,FrameworkServlet又继承了HttpServletBean类,HttpServletBean又继承了HttpServlet,HttpServlet继承了GenericServlet。
public abstract class FrameworkServlet extends HttpServletBean implements ApplicationContextAware {

        ... ...

}

public abstract class HttpServletBean extends HttpServlet

        implements EnvironmentCapable, EnvironmentAware {

      ... ...

}

public abstract class HttpServlet extends GenericServlet

    implements java.io.Serializable

{

          ... ...

}
所以在这样一个web容器启动的时候会调用HttpServletBean的init方法,这个方法覆盖了GenericServlet中的init方法。让我我们来看看代码:
   @Override

    public final void init() throws ServletException {

        if (logger.isDebugEnabled()) {

            logger.debug("Initializing servlet '" + getServletName() + "'");

        }

        // Set bean properties from init parameters.

        try {

            PropertyValues pvs = new ServletConfigPropertyValues(getServletConfig(), this.requiredProperties);

            BeanWrapper bw = PropertyAccessorFactory.forBeanPropertyAccess(this);

            ResourceLoader resourceLoader = new ServletContextResourceLoader(getServletContext());

            bw.registerCustomEditor(Resource.class, new ResourceEditor(resourceLoader, getEnvironment()));

            initBeanWrapper(bw);

            bw.setPropertyValues(pvs, true);

        }

        catch (BeansException ex) {

            logger.error("Failed to set bean properties on servlet '" + getServletName() + "'", ex);

            throw ex;

        }

        // Let subclasses do whatever initialization they like.

        initServletBean();

        if (logger.isDebugEnabled()) {

            logger.debug("Servlet '" + getServletName() + "' configured successfully");

        }

    }
该初始化方法的主要作用:将Servlet初始化参数(init-param)设置到该组件上(如contextAttribute、contextClass、namespace、contextConfigLocation),通过BeanWrapper简化设值过程,方便后续使用;提供给子类初始化扩展点,initServletBean(),该方法由FrameworkServlet覆盖。
FrameworkServlet继承HttpServletBean,通过initServletBean()进行Web上下文初始化,该方法主要覆盖一下两件事情:初始化web上下文;提供给子类初始化扩展点。
   @Override

    protected final void initServletBean() throws ServletException {

        getServletContext().log("Initializing Spring FrameworkServlet '" + getServletName() + "'");

        if (this.logger.isInfoEnabled()) {

            this.logger.info("FrameworkServlet '" + getServletName() + "': initialization started");

        }

        long startTime = System.currentTimeMillis();

        try {

            this.webApplicationContext = initWebApplicationContext();

            initFrameworkServlet();

        }

        catch (ServletException ex) {

            this.logger.error("Context initialization failed", ex);

            throw ex;

        }

        catch (RuntimeException ex) {

            this.logger.error("Context initialization failed", ex);

            throw ex;

        }

        if (this.logger.isInfoEnabled()) {

            long elapsedTime = System.currentTimeMillis() - startTime;

            this.logger.info("FrameworkServlet '" + getServletName() + "': initialization completed in " +

                    elapsedTime + " ms");

        }

    }
DispatcherServlet继承FrameworkServlet,并实现了onRefresh()方法提供一些前端控制器相关的配置。
整个DispatcherServlet初始化的过程和做了些什么事情,具体主要做了如下两件事情:
1、初始化Spring Web MVC使用的Web上下文,并且指定父容器为WebApplicationContext(ContextLoaderListener加载了的根上下文);
2、初始化DispatcherServlet使用的策略,如HandlerMapping、HandlerAdapter等。
onRefresh方法代码如下:
    @Override

    protected void onRefresh(ApplicationContext context) {

        initStrategies(context);

    }

    /**

     * Initialize the strategy objects that this servlet uses.

     * <p>May be overridden in subclasses in order to initialize further strategy objects.

     */

    protected void initStrategies(ApplicationContext context) {

        initMultipartResolver(context);

        initLocaleResolver(context);

        initThemeResolver(context);

        initHandlerMappings(context);

        initHandlerAdapters(context);

        initHandlerExceptionResolvers(context);

        initRequestToViewNameTranslator(context);

        initViewResolvers(context);

        initFlashMapManager(context);

    }
总结
1. 首先,对于一个web应用,其部署在web容器中,web容器提供其一个全局的上下文环境,这个上下文就是ServletContext,其为后面的spring IoC容器提供宿主环境;
2. 其 次,在web.xml中会提供有contextLoaderListener。在web容器启动时,会触发容器初始化事件,此时 contextLoaderListener会监听到这个事件,其contextInitialized方法会被调用,在这个方法中,spring会初始化一个启动上下文,这个上下文被称为根上下文,即WebApplicationContext,这是一个接口类,确切的说,其实际的实现类是 XmlWebApplicationContext。这个就是spring的IoC容器,其对应的Bean定义的配置由web.xml中的 context-param标签指定。在这个IoC容器初始化完毕后,spring以WebApplicationContext.ROOTWEBAPPLICATIONCONTEXTATTRIBUTE为属性Key,将其存储到ServletContext中,便于获取;
3. 再 次,contextLoaderListener监听器初始化完毕后,开始初始化web.xml中配置的Servlet,这里是DispatcherServlet,这个servlet实际上是一个标准的前端控制器,用以转发、匹配、处理每个servlet请 求。DispatcherServlet上下文在初始化的时候会建立自己的IoC上下文,用以持有spring mvc相关的bean。在建立DispatcherServlet自己的IoC上下文时,会利用WebApplicationContext.ROOTWEBAPPLICATIONCONTEXTATTRIBUTE先从ServletContext中获取之前的根上下文(即WebApplicationContext)作为自己上下文的parent上下文。有了这个 parent上下文之后,再初始化自己持有的上下文。这个DispatcherServlet初始化自己上下文的工作在其initStrategies方 法中可以看到,大概的工作就是初始化处理器映射、视图解析等。这个servlet自己持有的上下文默认实现类也是 XmlWebApplicationContext。初始化完毕后,spring以与servlet的名字相关(此处不是简单的以servlet名为 Key,而是通过一些转换,具体可自行查看源码)的属性为属性Key,也将其存到ServletContext中,以便后续使用。这样每个servlet 就持有自己的上下文,即拥有自己独立的bean空间,同时各个servlet共享相同的bean,即根上下文(第2步中初始化的上下文)定义的那些 bean。
Spring的启动流程的更多相关文章
- Spring Boot启动流程分析
引言 早在15年的时候就开始用spring boot进行开发了,然而一直就只是用用,并没有深入去了解spring boot是以什么原理怎样工作的,说来也惭愧.今天让我们从spring boot启动开始 ...
- Spring Boot启动流程详解(一)
环境 本文基于Spring Boot版本1.3.3, 使用了spring-boot-starter-web. 配置完成后,编写了代码如下: @SpringBootApplication public ...
- Spring Boot启动流程详解
注:本文转自http://zhaox.github.io/java/2016/03/22/spring-boot-start-flow 环境 本文基于Spring Boot版本1.3.3, 使用了sp ...
- Spring|IOC启动流程
1.IOC启动流程 IOC的启动流程分为两个阶段,第一阶段是容器的启动阶段,第二阶段是Bean实例化阶段. 容器的启动阶段:加载配置信息,分析配置信息,其他 Bean实例化阶段:实例化对象,装配依赖, ...
- Spring MVC启动流程分析
本文是Spring MVC系列博客的第一篇,后续会汇总成贴子. Spring MVC是Spring系列框架中使用频率最高的部分.不管是Spring Boot还是传统的Spring项目,只要是Web项目 ...
- Spring Boot -- 启动流程分析之ApplicationContext 中
上一节我们已经分析到AbsractApplicationContext类refresh方法中的postProcessBeanFactory方法,在分析registerBeanPostProcessor ...
- Spring Boot(三):Spring Boot中的事件的使用 与Spring Boot启动流程(Event 事件 和 Listeners监听器)
前言:在讲述内容之前 希望大家对设计模式有所了解 即使你学会了本片的内容 也不知道什么时候去使用 或者为什么要这样去用 观察者模式: 观察者模式是一种对象行为模式.它定义对象间的一种一对多的依赖关系, ...
- web中spring框架启动流程第一发
web.xml中springmvc相关配置如下:<servlet> <servlet-name>springmvc</servlet-name> <servl ...
- Spring Boot启动流程
基础准备 1,BeanPostProcessor:这个接口的作用在于对于新构造的实例可以做一些自定义的修改.比如如何构造.属性值的修改.构造器的选择等等 2,BeanFactoryPostProces ...
随机推荐
- oracle数据库使用PL/sql导入excel数据
1.打开PL/SQL工具,菜单进入 工具>ODBC导入器(菜单列表倒数第二): 2.连接数据库与选择导入的excel文件表: 3.选择导入的表以及excel与数据库表字段之间的对应关系:
- C++ STL partial_sort_copy
#include <iostream>#include <deque>#include <algorithm>#include <vector> usi ...
- Qt编写自定义控件29-颜色选取面板
一.前言 这个控件主要是模仿QColorDialog对话框中的颜色选取面板,提供一个十字形状的标识器,鼠标按下开始选取颜色,移动到哪就选择该处的颜色值,对应右侧颜色条放大显示,本控件的难点就是如何绘制 ...
- OpenLDAP管理命令详解
一.OpenLDAP命令汇总 ldapsearch:搜索 OpenLDAP 目录树条目. ldapadd:通过 LDIF 格式,添加目录树条目. ldapdelete:删除 OpenLDAP 目录树条 ...
- golang struct组合,转型问题请教
type Action interface { OnHurt2(other Action) GetDamage() int } type Base struct { atk, hp int } fun ...
- 解决 nginx 单点问题的方案【h】
一.问题域 nginx.lvs.keepalived.f5.DNS轮询,每每提到这些技术,往往讨论的是接入层的这样几个问题: 1)可用性:任何一台机器挂了,服务受不受影响 2)扩展性:能否通过增加机器 ...
- Docker部署WordPress网站
WordPress是使用PHP语言开发的博客平台,用户可以在支持PHP和MySQL数据库的服务器上架设属于自己的网站,WordPress 不仅仅是一个博客程序,也是一款CMS,很多非博客网站也是用Wo ...
- 神经网络与数字货币量化交易系列(1)——LSTM预测比特币价格
首发地址:https://www.fmz.com/digest-topic/4035 1.简单介绍 深度神经网络这些年越来越热门,在很多领域解决了过去无法解决的难题,体现了强大的能力.在时间序列的预测 ...
- C#规范整理·异常与自定义异常
这里会列举在C#中处理CLR异常方面的规范,帮助大家构建和开发一个运行良好和可靠的应用系统. 前言 迄今为止,CLR异常机制让人关注最多的一点就是"效率"问题.其实,这里存在认 ...
- 生成SSH秘钥连接github(详细教程)
第一步.首先,检查下自己之前有没有已经生成: 在开始菜单中打开git下的git bash(当然,在其他目录下打开git bash也是一样的): 然后执行 cd ~/.ssh 第二步.如果能进入到.ss ...