FTP服务搭建与配置
FTP介绍

大企业用的基本都是自动化发布工具,会用GIT企业发布的版本上传到服务器,
使用vsftpd搭建ftp服务(上)
http://blog.csdn.net/qq_26941173/article/details/54575952
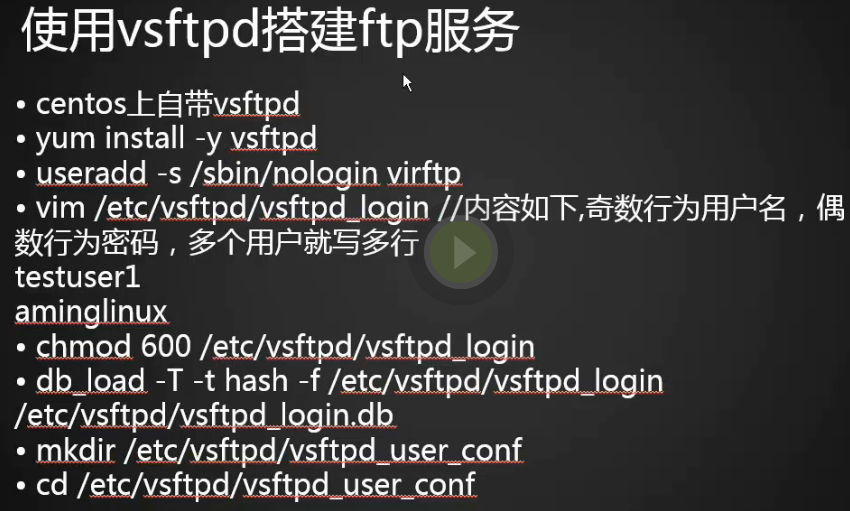
1.yum安装vsftpd包
[root@fuwuduan nfstestdir]# yum install -y vsftpd
2.建立账号
vsftp默认支持系统账号体系登录,但那样不安全,我们可以使用虚拟账号体系。
(一)建立与虚拟账号相关联的系统账号
[root@fuwuduan nfstestdir]# useradd -s /sbin/nologin virftp

[root@fuwuduan nfstestdir]#
3.创建ftp用户账号文件写入用户user1
[root@fuwuduan nfstestdir]# vim /etc/vsftpd/vsftpd_login

[root@fuwuduan nfstestdir]#
user1

user1
4.设置密码问题权限
[root@fuwuduan nfstestdir]# chmod 600 /etc/vsftpd/vsftpd_login

[root@fuwuduan nfstestdir]#
5.vsfptd使用的密码文件不是明文的,需要生成对应的库文件。
[root@fuwuduan nfstestdir]# db_load -T -t hash -f /etc/vsftpd/vsftpd_login /etc/vsftpd/vsftpd_login.db

[root@fuwuduan nfstestdir]#
6.发现生成了vsftpd_login.db文件
[root@fuwuduan nfstestdir]# ls -l /etc/vsftpd/

总用量 36

-rw-------. 1 root root   125 8月   3 2017 ftpusers

-rw-------. 1 root root   361 8月   3 2017 user_list

-rw-------. 1 root root  5030 8月   3 2017 vsftpd.conf

-rwxr--r--. 1 root root   338 8月   3 2017 vsftpd_conf_migrate.sh

-rw-------. 1 root root    12 2月  23 15:02 vsftpd_login

-rw-r--r--. 1 root root 12288 2月  23 15:04 vsftpd_login.db

[root@fuwuduan nfstestdir]#
7.创建虚拟用户配置文件所在目录
[root@fuwuduan nfstestdir]# mkdir /etc/vsftpd/vsftpd_user_conf

[root@fuwuduan nfstestdir]# cd /etc/vsftpd/vsftpd_user_conf/

[root@fuwuduan vsftpd_user_conf]#
8.创建和用户对应的配置文件,用户的配置文件时单独存在的,每一个用户都有一个自己的配置文件,文件名和用户名一致
[root@fuwuduan vsftpd_user_conf]# vim user1

[root@fuwuduan vsftpd_user_conf]#
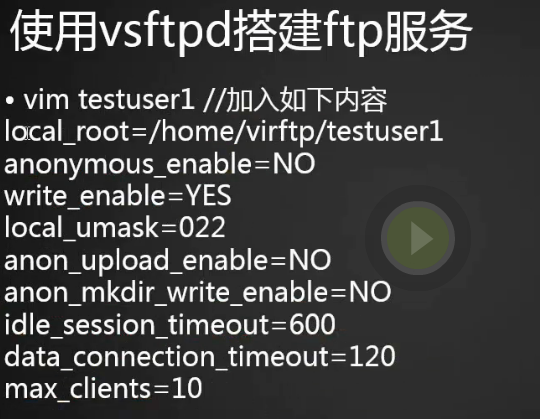
9.写入配置文件内容
local_root=/home/virftp/user1                  #虚拟用户的家目录

anonymous_enable=NO                         #是否允许匿名用户登录

write_enable=YES                           #是否可写

local_umask=022                            #指定umask值,创建新文件/目录的权限是什么

anon_upload_enable=NO                        #是否允许匿名用户可上传

anon_mkdir_write_enable=NO                    #是否允许匿名用户可写

idle_session_timeout=600                      #超过600秒需要重新登录

data_connection_timeout=120                    #数据传输的超时时间

max_clients=10                             #最大的链接客户多少
10.创建虚拟用户家目录
[root@fuwuduan vsftpd_user_conf]# mkdir /home/virftp/user1

[root@fuwuduan vsftpd_user_conf]# touch /home/virftp/user1/user1.txt

[root@fuwuduan vsftpd_user_conf]# chown -R virftp:virftp /home/virftp/
[root@fuwuduan vsftpd_user_conf]# vim /etc/pam.d/vsftpd (在最开始添加2行)

[root@fuwuduan vsftpd_user_conf]#
#%PAM-1.0

auth sufficient /lib64/security/pam_userdb.so db=/etc/vsftpd/vsftpd_login

account sufficient /lib64/security/pam_userdb.so db=/etc/vsftpd/vsftpd_login

session    optional     pam_keyinit.so    force revoke

auth       required     pam_listfile.so item=user sense=deny file=/etc/vsftpd/ftpusers onerr=succeed

auth       required     pam_shells.so

auth       include      password-auth

account    include      password-auth

session    required     pam_loginuid.so

session    include      password-auth
11.在centos7为64位系统,所以库文件路径为/lib64/security/pam_userdb.so。 (32位操作系统路为/lib/security/pam_userdb.so)
[root@fuwuduan vsftpd_user_conf]# ls /lib64/security/pam_userdb.so

/lib64/security/pam_userdb.so

[root@fuwuduan vsftpd_user_conf]#
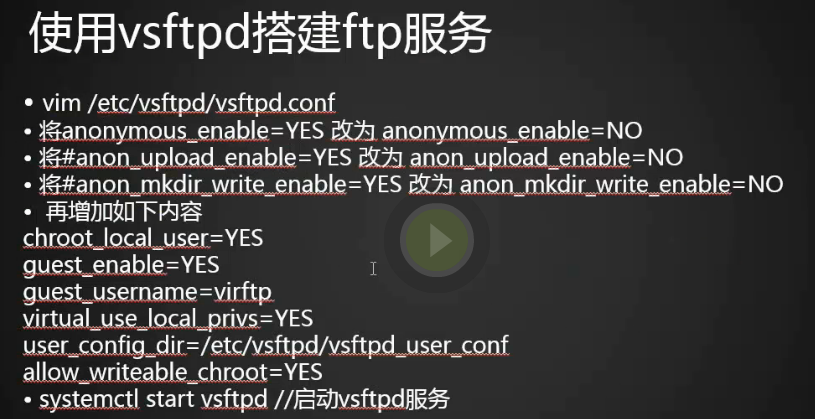
12.修改全局配置文件,首先编辑vsftpd.conf文件
anonymous_enable=YES      (YSE更改为NO)             #不允许匿名用户

anon_upload_enable=YES      (去掉#,YES改为NO)        #不允许上传

anon_mkdir_write_enable=YES    (去掉#,YES改为NO)       #不允许创建目录
在最后添加几行:

chroot_local_user=YES                         (将所有用户都限制在主目录)

guest_enable=YES                            (打开虚拟用户映射系统用户)

guest_username=virftp                        (映射到那个系统用户)

virtual_use_local_privs=YES                     (告诉服务我们使用的虚拟用户)

user_config_dir=/etc/vsftpd/vsftpd_user_conf        (虚拟配置文件所在路径)

allow_writeable_chroot=YES                      (登录以后默认在其家目录中)
13.启动服务,查看进程和监听的端口
[root@fuwuduan vsftpd_user_conf]# /usr/sbin/vsftpd (systemctl start vsftpd)

[root@fuwuduan vsftpd_user_conf]# ps aux|grep vsftp

root      68172  0.1  0.0  51140   568 ?        Ss   16:39   0:00 /usr/sbin/vsftpd

root      68174  0.0  0.0 112680   976 pts/2    R+   16:39   0:00 grep --color=auto vsftp

[root@fuwuduan vsftpd_user_conf]#
14.查看监听的端口
[root@fuwuduan vsftpd_user_conf]# netstat -lntp
tcp6 0 0 :::21 :::* LISTEN 68172/vsftpd
使用vsftpd搭建ftp服务(下)
1.安装lftp包
[root@fuwuduan vsftpd_user_conf]# yum install -y lftp
2.测试(如有错误可能配置文件中有空格,去掉就可以了)
[root@fuwuduan vsftpd_user_conf]# lftp user1@127.0.0.1

口令:

lftp user1@127.0.0.1:~> ls

-rw-r--r--    1 1003     1003            0 Feb 23 07:57 user1.txt

lftp user1@127.0.0.1:/>
3.输入?号可以看到支持的命令
lftp user1@127.0.0.1:/> ?

    !<shell-command>                     (commands)

    alias [<name> [<value>]]             attach [PID]

    bookmark [SUBCMD]                    cache [SUBCMD]

    cat [-b] <files>                     cd <rdir>

    chmod [OPTS] mode file...            close [-a]

    [re]cls [opts] [path/][pattern]      debug [<level>|off] [-o <file>]

    du [options] <dirs>                  exit [<code>|bg]

    get [OPTS] <rfile> [-o <lfile>]      glob [OPTS] <cmd> <args>             help [<cmd>]

    history -w file|-r file|-c|-l [cnt]  jobs [-v] [<job_no...>]

    kill all|<job_no>                    lcd <ldir>

    lftp [OPTS] <site>                   ln [-s] <file1> <file2>              ls [<args>]

    mget [OPTS] <files>                  mirror [OPTS] [remote [local]]

    mkdir [-p] <dirs>                    module name [args]                   more <files>

    mput [OPTS] <files>                  mrm <files>

    mv <file1> <file2>                   [re]nlist [<args>]

    open [OPTS] <site>                   pget [OPTS] <rfile> [-o <lfile>]

    put [OPTS] <lfile> [-o <rfile>]      pwd [-p]

    queue [OPTS] [<cmd>]                 quote <cmd>

    repeat [OPTS] [delay] [command]      rm [-r] [-f] <files>

    rmdir [-f] <dirs>                    scache [<session_no>]

    set [OPT] [<var> [<val>]]            site <site-cmd>                      source <file>

    torrent [-O <dir>] <file|URL>...     user <user|URL> [<pass>]             wait [<jobno>]

    zcat <files>                         zmore <files>

lftp user1@127.0.0.1:/>
4.get命令下载一个文件到当前目录
lftp user1@127.0.0.1:/> get user1.txt

lftp user1@127.0.0.1:/> quit

[root@fuwuduan vsftpd_user_conf]# ls -lt |head

总用量 4

-rw-r--r--. 1 root root 200 2月  23 17:53 user1

-rw-r--r--. 1 root root   0 2月  23 15:57 user1.txt

[root@fuwuduan vsftpd_user_conf]#
xshell使用xftp来传输文件
1.下载Xftp
同时按住crtl+alt+f,下载xftp服务
xshell使用xftp传输文件(xftp使用的也是ssh协议,监听的22端口)
同时按住crtl+alt+f ,xshell会跳出一个
进入下载xftp,会出现一个页面,(按照页面填好的内容写)
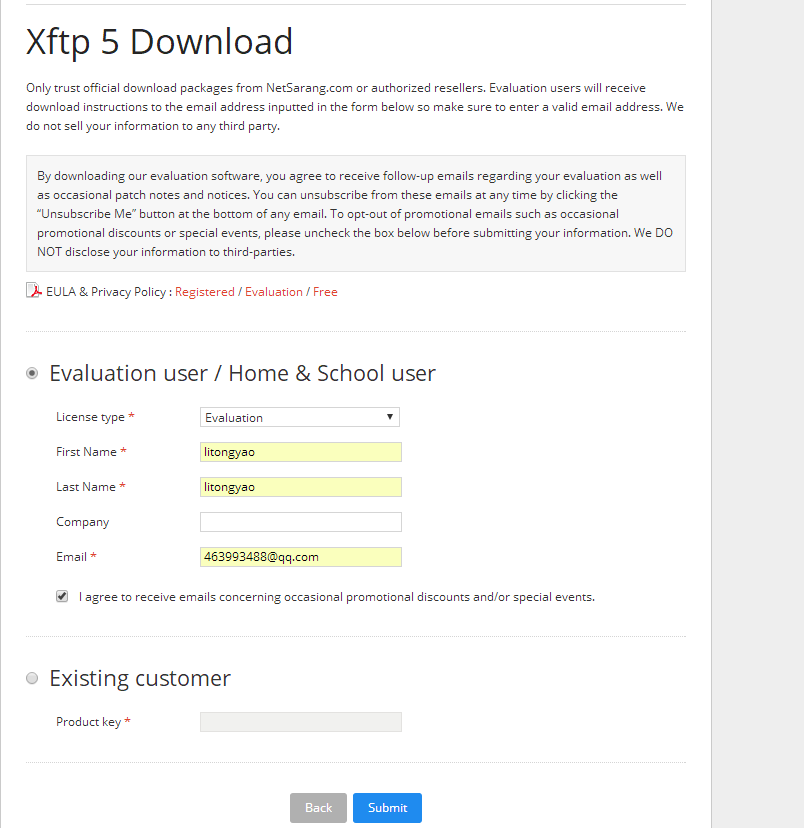
这时xshell会把下载地址发到你的邮箱内,在邮箱里点开链接即可。
下载并安装完成后,我们在打开xshell界面,同时按住crtl+alt+f,这时会弹出xftp的界面
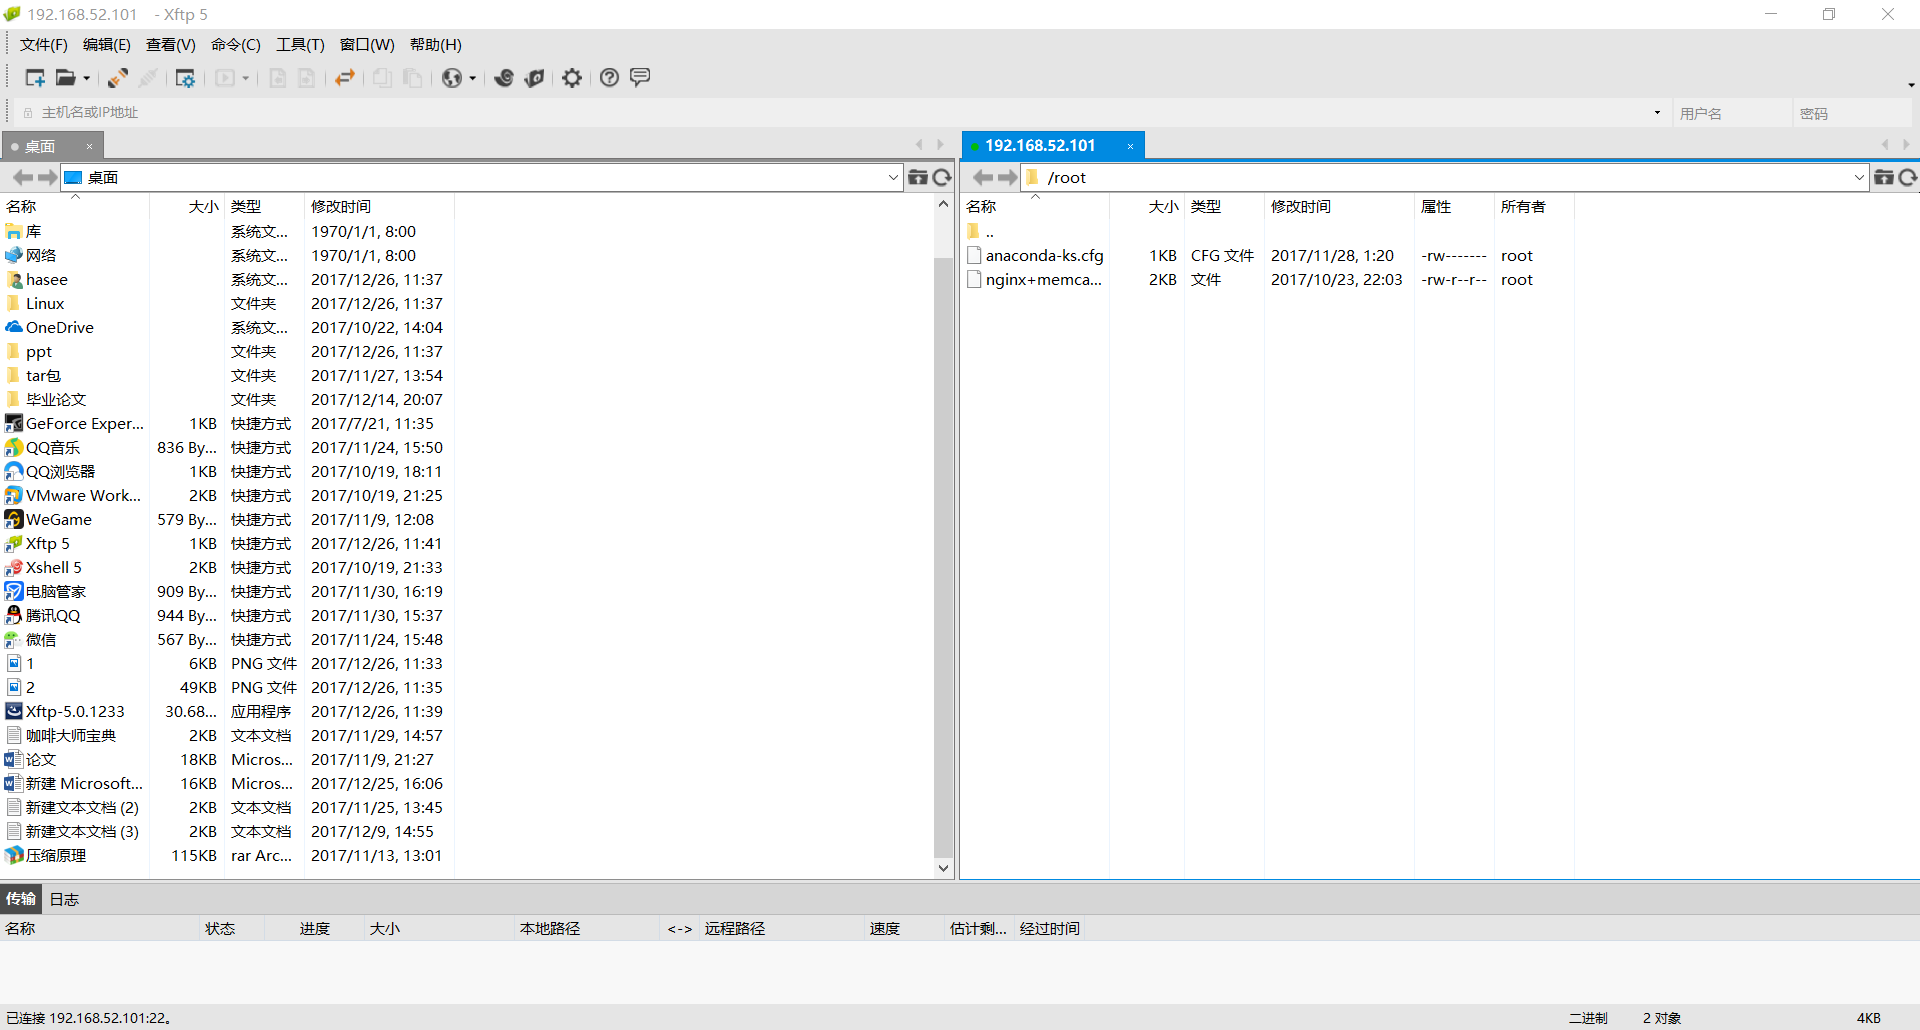
左边是我们的windows,右边是我们的linux。
想从Linux把文件拉倒windows或者windows拉倒linux。只需要把文件拉倒对方即可。
使用pure-ftpd搭建ftp服务
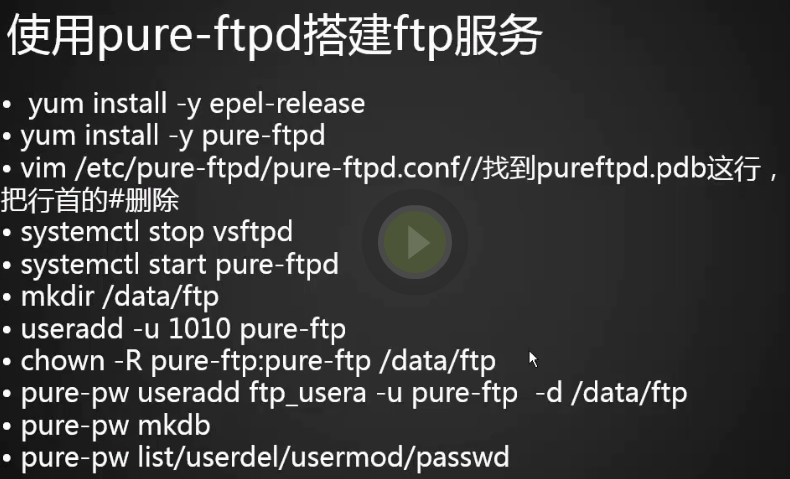
1.安装pure-ftpd包
[root@fuwuduan ~]# yum install -y pure-ftpd
2.修改配置文件
[root@fuwuduan ~]# vim /etc/pure-ftpd/pure-ftpd.conf

[root@fuwuduan ~]#

#PureDB                        /etc/pure-ftpd/pureftpd.pdb (去掉前面的#号,PureDB用户数据库文件)
3.启动pure-ftpd
[root@fuwuduan ~]# systemctl stop vsftpd

[root@fuwuduan ~]#

[root@fuwuduan ~]# ps aux|grep vsftpd

root     101522  0.0  0.0 112680   968 pts/2    S+   18:01   0:00 grep --color=auto vsftpd

[root@fuwuduan ~]# systemctl start pure-ftpd

[root@fuwuduan ~]# ps aux|grep vsftpd

root     101557  0.0  0.0 112680   968 pts/2    S+   18:01   0:00 grep --color=auto vsftpd

[root@fuwuduan ~]# ps aux|grep pure

root     101555  0.3  0.1 200332  1184 ?        Ss   18:01   0:00 pure-ftpd (SERVER)

root     101559  0.0  0.0 112680   972 pts/2    R+   18:01   0:00 grep --color=auto pure

[root@fuwuduan ~]#
4.给pure-ftp的用户创建目录
[root@fuwuduan ~]# mkdir /data/ftp

[root@fuwuduan ~]# useradd -u 1010 pure-ftp

[root@fuwuduan ~]# chown -R pure-ftp:pure-ftp /data/ftp

[root@fuwuduan ~]# pure-pw useradd ftp_usera -u pure-ftp -d /data/ftp/

Password:

Enter it again:

[root@fuwuduan ~]#
5.测试成功
[root@fuwuduan ~]# touch /data/ftp/123.txt

[root@fuwuduan ~]# lftp ftp_usera@127.0.0.1

口令:

lftp ftp_usera@127.0.0.1:~> ls

drwxr-xr-x    2 1010       pure-ftp           20 Feb 24 18:18 .

drwxr-xr-x    2 1010       pure-ftp           20 Feb 24 18:18 ..

-rw-r--r--    1 0          0                   0 Feb 24 18:18 123.txt

lftp ftp_usera@127.0.0.1:/>
FTP服务搭建与配置的更多相关文章
- linux之FTP服务搭建 ( ftp文件传输协议 VSFTPd虚拟用户)
FTP服务搭建 配置实验之前关闭防火墙 iptables -F iptables -X iptables -Z systemctl stop firewalld setenforce 0 1.ftp简 ...
- syslog-ng日志收集分析服务搭建及配置
syslog-ng日志收集分析服务搭建及配置:1.网上下载eventlog_0.2.12.tar.gz.libol-0.3.18.tar.gz.syslog-ng_3.3.5.tar.gz三个软件: ...
- CentOS7 FTP服务搭建(虚拟用户访问FTP服务)
概述 最近在搞Oracle在Linux系统下集群,针对Linux系统,笔人也是一片空白.Liunx外部文件的传输,避免不了使用FTP服务,所以现在就整理下,CentOS7环境下,FTP服务的搭建.FT ...
- FTP服务-filezilla server 配置
一.下载Filezilla Server 官网网址:https://filezilla-project.org/download.php?type=server 二.安装Filezilla Ser ...
- linux下FTP服务搭建(1)
1.FTP介绍: FTP (File Transfer Protocol,文件传输协议)主要用来文件传输,尤其适用于大文件传输,提供上传下载功能 FTP官方网站:https://filezilla-p ...
- FTP服务搭建配置笔记
1.什么是文件共享服务? 简单来说就是文件域存储块设备可以共享给他人使用. 1.1 实现文件共享服务的三种方式 FTP:属于应用层服务,可以跨平台使用 NFS:属于内核模式,不可以跨平台使用 Samb ...
- ftp服务搭建
文件传输服务 主配置文件目录/etc/vsftpd/vsftpd.conf 首先安装ftp服务器 yum install vsftpd 默认存放文件的目录 /var/ftp/pub 匿名登陆 创建一 ...
- NFS服务搭建与配置
启动NFS SERVER之前,首先要启动RPC服务(CentOS5.8下为portmap服务,CentOS6.6下为rpcbind服务,下同),否则NFS SERVER就无法向RPC服务注册了.另外, ...
- Debian系统下的ftp服务搭建
安装vsftpd服务 $ sudo apt install vsftpd 配置参数 命令输入 $ vim /etc/vsftpd.conf 使用如下配置 # Example config file / ...
随机推荐
- springBoot单元测试-基础单元测试
1)在pom文件中加入junit支持 <!-- spring-boot-starter-test 单元测试 --> <dependency> <groupId>or ...
- Code Review: 超越“审、查、评”的代码回顾
http://news.cnblogs.com/n/532148/ 文/TWInsights-伍斌 Code Review 应该是软件开发团队“共同学习.识别模式和每日持续”的过程,而不是带有“审.查 ...
- WinCE6.0 2012年补丁下载地址
Windows CE6.0 2012年补丁包WinCEPB60-121231-Product-Update-Rollup-Armv4I.msi下载地址:http://www.microsoft.com ...
- PHP版本切换
前言 php是为了快速构建一个web页面而迅速被大家广为接受的开源语言,通过不断发展已经有了很多的php开源系统,满足了目前大部分用户的站点需求.1995年初php诞生到现在已经存在多个版本,并且每个 ...
- PostgreSQL配置文件--日志和错误
6 错误操作和日志 ERROR REPORTING AND LOGGING 6.1 日志写到哪里 Where to Log 6.1.1 log_destination 字符串 默认: log_dest ...
- Shell合并两个文件成一个文件的两列paste,awk
Shell合并两个文件成一个文件的两列 发布时间:2014-07-20 编辑:www.jquerycn.cn Shell合并两个文件成一个文件的两列,提供了两种方法,普通shell脚本,awk脚本 ...
- [转]Configure logging in SSIS packages
本文转自:http://learnsqlwithbru.com/2009/11/26/configure-logging-in-ssis-packages/ n this article we wil ...
- 如何理解redo和undo
redo和undo的区别 redo--> undo-->datafileinsert一条记录时, 表跟undo的信息都会放进 redo 中, 在commit 或之前, redo 的信 ...
- Newtonsoft.Json.4.5.11使用方法总结---反序列化json字符串
写在开头: 最近项目需求,需要在C#中处理json字符串,毫不犹豫的下载了Newtonsoft.Json 4.5.11(2012.12.17)http://json.codeplex.com/,然后百 ...
- dubbo forbid 注意的几种方式
1.检查所调用的项目模块是否起来了 2.如果起来后,检查该模块配置是否正确 3.服务端起来后与管理端的项目内容不一致(比如服务端增加了东西,管理端没有更新)