
Android 编辑框插入表情图片

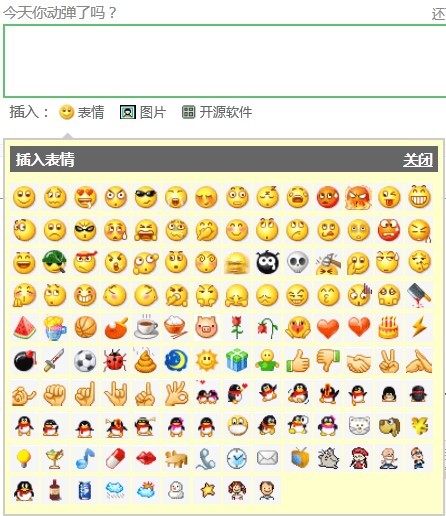
首先,把整理好的表情图片以及布局用到的一些图片导入到项目的res/drawable目录中。
然后,编辑res/layout目录下布局.xml文件,这里我把oschina客户端的布局代码贴上来,供大家参考:
tweet_pub.xml
<?xml version="1.0" encoding="utf-8"?>

<LinearLayout xmlns:android="http://schemas.android.com/apk/res/android"

    android:layout_width="fill_parent"

    android:layout_height="fill_parent"

    android:orientation="vertical"

    android:background="@color/white">

    <FrameLayout

        android:id="@+id/tweet_pub_form"

        android:layout_width="fill_parent"

        android:layout_height="fill_parent"

        android:layout_weight="">

        <EditText

            android:id="@+id/tweet_pub_content"

            android:layout_width="fill_parent"

            android:layout_height="fill_parent"

            android:autoLink="web"

            android:gravity="top"

            android:hint="请输入动弹内容"

            android:background="@null"/>

        <ImageView

            android:id="@+id/tweet_pub_image"

            android:layout_width="60.0dip"

            android:layout_height="45.0dip"

            android:layout_marginLeft="5.0dip"

            android:layout_marginBottom="5.0dip"

            android:layout_gravity="left|bottom"

            android:clickable="true"

            android:visibility="gone"/>

        <LinearLayout

            android:id="@+id/tweet_pub_clearwords"

            android:layout_width="wrap_content"

            android:layout_height="wrap_content"

            android:layout_marginRight="5.0dip"

            android:layout_marginBottom="5.0dip"

            android:layout_gravity="right|bottom"

            android:gravity="center"

            android:background="@drawable/clearwords_bg"

            android:clickable="true">

            <TextView

                android:id="@+id/tweet_pub_numberwords"

                android:layout_width="wrap_content"

                android:layout_height="wrap_content"

                android:textColor="@color/black"

                android:text=""/>

            <ImageView

                android:layout_width="wrap_content"

                android:layout_height="wrap_content"

                android:layout_marginLeft="3dip"

                android:src="@drawable/clearwords_icon"/>

        </LinearLayout>

    </FrameLayout>

    <include layout="@layout/tweet_pub_footer"/>

</LinearLayout>
tweet_pub_footer.xml
<?xml version="1.0" encoding="utf-8"?>

<LinearLayout xmlns:android="http://schemas.android.com/apk/res/android"

    android:orientation="vertical"

    android:layout_width="fill_parent"

    android:layout_height="wrap_content">

    <LinearLayout

        android:orientation="horizontal"

        android:layout_width="fill_parent"

        android:layout_height="wrap_content"

        android:gravity="center_horizontal"

        android:background="@drawable/widget_bar_bg">

        <ImageView

            android:id="@+id/tweet_pub_footbar_face"

            style="@style/main_footbar_image"

            android:src="@drawable/widget_bar_face"/>

        <ImageView

            style="@style/main_footbar_cutline"

            android:src="@drawable/widget_bar_cut_off"/>

        <ImageView

            android:id="@+id/tweet_pub_footbar_photo"

            style="@style/main_footbar_image"

            android:src="@drawable/widget_bar_photo"/>

        <ImageView

            style="@style/main_footbar_cutline"

            android:src="@drawable/widget_bar_cut_off"/>

        <ImageView

            android:id="@+id/tweet_pub_footbar_atme"

            style="@style/main_footbar_image"

            android:src="@drawable/widget_bar_atme"/>

        <ImageView

            style="@style/main_footbar_cutline"

            android:src="@drawable/widget_bar_cut_off"/>

        <ImageView

            android:id="@+id/tweet_pub_footbar_software"

            style="@style/main_footbar_image"

            android:src="@drawable/widget_bar_soft"/>

    </LinearLayout>

    <GridView

        android:id="@+id/tweet_pub_faces"

        android:layout_width="fill_parent"

        android:layout_height="220dip"

        android:numColumns="auto_fit"

        android:columnWidth="50dip"

        android:stretchMode="columnWidth"

        android:gravity="center"

        android:fadingEdge="none"

        android:scrollingCache="false"

        android:background="@color/face_bg"

        android:visibility="gone"/>

</LinearLayout>
通过上面布局代码可以看出,我把整个编辑界面分成了2个.xml文件。主布局文件tweet_pub.xml通过<include>标签把底 部工具栏tweet_pub_footer.xml加载进视图。这样做的好处是把一个较复杂的布局细分成几个小布局,让布局更清晰,维护起来更加方便。
接下来,创建一个Activity类,并在AndroidManifest.xml中注册,对该Activity添加一个属性:
android:windowSoftInputMode="stateVisible|adjustResize"
该属性在Activity启动显示的时候,软键盘也自动弹出显示,这样方便用户可直接对EditText编辑框进行输入文字操作。
下面贴出Activity的完整代码:
public class MainActivity extends Activity {

    private EditText mContent;

    private ImageView mFace;

    private LinearLayout mClearwords;

    private TextView mNumberwords;

    private GridView mGridView;

    private GridViewFaceAdapter mGVFaceAdapter;

    private InputMethodManager imm;

    private static final int MAX_TEXT_LENGTH = ;//最大输入字数

    @Override

    public void onCreate(Bundle savedInstanceState) {

        super.onCreate(savedInstanceState);

        setContentView(R.layout.tweet_pub);

        //软键盘管理类

        imm = (InputMethodManager)getSystemService(INPUT_METHOD_SERVICE);

        //初始化基本视图

        this.initView();

        //初始化表情视图

        this.initGridView();

    }

    //初始化视图控件

    private void initView()

    {

        mContent = (EditText)findViewById(R.id.tweet_pub_content);

        mFace = (ImageView)findViewById(R.id.tweet_pub_footbar_face);

        mClearwords = (LinearLayout)findViewById(R.id.tweet_pub_clearwords);

        mNumberwords = (TextView)findViewById(R.id.tweet_pub_numberwords);

        //设置控件点击事件

        mFace.setOnClickListener(faceClickListener);

        mClearwords.setOnClickListener(clearwordsClickListener);

        //编辑器添加文本监听

        mContent.addTextChangedListener(new TextWatcher() {

            public void onTextChanged(CharSequence s, int start, int before, int count) {

                //显示剩余可输入的字数

                mNumberwords.setText((MAX_TEXT_LENGTH - s.length()) + "");

            }

            public void beforeTextChanged(CharSequence s, int start, int count, int after) {}

            public void afterTextChanged(Editable s) {}

        });

        //编辑器点击事件

        mContent.setOnClickListener(new View.OnClickListener() {

            public void onClick(View v) {

                //显示软键盘

                showIMM();

            }

        });

        //设置最大输入字数

        InputFilter[] filters = new InputFilter[];

        filters[] = new InputFilter.LengthFilter(MAX_TEXT_LENGTH);

        mContent.setFilters(filters);

    }

    //初始化表情控件

    private void initGridView() {

        mGVFaceAdapter = new GridViewFaceAdapter(this);

        mGridView = (GridView)findViewById(R.id.tweet_pub_faces);

        mGridView.setAdapter(mGVFaceAdapter);

        mGridView.setOnItemClickListener(new AdapterView.OnItemClickListener(){

            public void onItemClick(AdapterView<?> parent, View view, int position, long id) {

                //插入的表情

                SpannableString ss = new SpannableString(view.getTag().toString());

                Drawable d = getResources().getDrawable((int)mGVFaceAdapter.getItemId(position));

                d.setBounds(, , , );//设置表情图片的显示大小

                ImageSpan span = new ImageSpan(d, ImageSpan.ALIGN_BOTTOM);

                ss.setSpan(span, , view.getTag().toString().length(), Spannable.SPAN_EXCLUSIVE_EXCLUSIVE);

                //在光标所在处插入表情

                mContent.getText().insert(mContent.getSelectionStart(), ss);

            }

        });

    }

    private void showIMM() {

        mFace.setTag();

        showOrHideIMM();

    }

    private void showFace() {

        mFace.setImageResource(R.drawable.widget_bar_keyboard);

        mFace.setTag();

        mGridView.setVisibility(View.VISIBLE);

    }

    private void hideFace() {

        mFace.setImageResource(R.drawable.widget_bar_face);

        mFace.setTag(null);

        mGridView.setVisibility(View.GONE);

    }

    private void showOrHideIMM() {

        if(mFace.getTag() == null){

            //隐藏软键盘

            imm.hideSoftInputFromWindow(mFace.getWindowToken(), );

            //显示表情

            showFace();

        }else{

            //显示软键盘

            imm.showSoftInput(mContent, );

            //隐藏表情

            hideFace();

        }

    }

    //表情控件点击事件

    private View.OnClickListener faceClickListener = new View.OnClickListener() {

        public void onClick(View v) {

            showOrHideIMM();

        }

    };

    //清除控件点击事件

    private View.OnClickListener clearwordsClickListener = new View.OnClickListener() {

        public void onClick(View v) {

            String content = mContent.getText().toString();

            if(content != ""){

                AlertDialog.Builder builder = new AlertDialog.Builder(v.getContext());

                builder.setTitle("清除文字吗?");

                builder.setPositiveButton("确定", new DialogInterface.OnClickListener() {

                    public void onClick(DialogInterface dialog, int which) {

                        dialog.dismiss();

                        //清除文字

                        mContent.setText("");

                        mNumberwords.setText(String.valueOf(MAX_TEXT_LENGTH));

                    }

                });

                builder.setNegativeButton("取消", new DialogInterface.OnClickListener() {

                    public void onClick(DialogInterface dialog, int which) {

                        dialog.dismiss();

                    }

                });

                builder.show();

            }

        }

    };

}
这里说明下,GridViewFaceAdapter类是我自定义的适配器类,继承了BaseAdapter。下面我也将该类的完整代码贴出来,给大家参考:
public class GridViewFaceAdapter extends BaseAdapter

{

    // 定义Context

    private Context mContext;

    // 定义整型数组 即图片源

    private int[] mImageIds;

    public GridViewFaceAdapter(Context c)

    {

        mContext = c;

        mImageIds = new int[]{

            R.drawable.f001,R.drawable.f002,R.drawable.f003,R.drawable.f004,R.drawable.f005,R.drawable.f006,

            R.drawable.f007,R.drawable.f008,R.drawable.f009,R.drawable.f010,R.drawable.f011,R.drawable.f012,

            R.drawable.f013,R.drawable.f014,R.drawable.f015,R.drawable.f016,R.drawable.f017,R.drawable.f018,

            R.drawable.f019,R.drawable.f020,R.drawable.f021,R.drawable.f022,R.drawable.f023,R.drawable.f024,

            R.drawable.f025,R.drawable.f026,R.drawable.f027,R.drawable.f028,R.drawable.f029,R.drawable.f030,

            R.drawable.f031,R.drawable.f032,R.drawable.f033,R.drawable.f034,R.drawable.f035,R.drawable.f036,

            R.drawable.f037,R.drawable.f038,R.drawable.f039,R.drawable.f040,R.drawable.f041,R.drawable.f042,

            R.drawable.f043,R.drawable.f044,R.drawable.f045,R.drawable.f046,R.drawable.f047,R.drawable.f048,

            R.drawable.f049,R.drawable.f050,R.drawable.f051,R.drawable.f052,R.drawable.f053,R.drawable.f054,

            R.drawable.f055,R.drawable.f056,R.drawable.f057,R.drawable.f058,R.drawable.f059,R.drawable.f060,

            R.drawable.f061,R.drawable.f062,R.drawable.f063,R.drawable.f064,R.drawable.f065,R.drawable.f067,

            R.drawable.f068,R.drawable.f069,R.drawable.f070,R.drawable.f071,R.drawable.f072,R.drawable.f073,

            R.drawable.f074,R.drawable.f075,R.drawable.f076,R.drawable.f077,R.drawable.f078,R.drawable.f079,

            R.drawable.f080,R.drawable.f081,R.drawable.f082,R.drawable.f083,R.drawable.f084,R.drawable.f085,

            R.drawable.f086,R.drawable.f087,R.drawable.f088,R.drawable.f089,R.drawable.f090,R.drawable.f091,

            R.drawable.f092,R.drawable.f093,R.drawable.f094,R.drawable.f095,R.drawable.f096,R.drawable.f097,

            R.drawable.f098,R.drawable.f099,R.drawable.f100,R.drawable.f101,R.drawable.f103,R.drawable.f104,

            R.drawable.f105

        };

    }

    // 获取图片的个数

    public int getCount()

    {

        return mImageIds.length;

    }

    // 获取图片在库中的位置

    public Object getItem(int position)

    {

        return position;

    }

    // 获取图片ID

    public long getItemId(int position)

    {

        return mImageIds[position];

    }

    public View getView(int position, View convertView, ViewGroup parent)

    {

        ImageView imageView;

        if (convertView == null)

        {

            imageView = new ImageView(mContext);

            // 设置图片n×n显示

            imageView.setLayoutParams(new GridView.LayoutParams(, ));

            // 设置显示比例类型

            imageView.setScaleType(ImageView.ScaleType.CENTER);

        }

        else

        {

            imageView = (ImageView) convertView;

        }

        imageView.setImageResource(mImageIds[position]);

        if(position < )

            imageView.setTag("["+position+"]");

        else if(position < )

            imageView.setTag("["+(position+)+"]");

        else

            imageView.setTag("["+(position+)+"]");

        return imageView;

    }

}
对上面GridViewFaceAdapter类的代码做下说明:
1.我将所有的表情图片对应的资源ID,用一个整数数组封装了。
2.getView方法里的下面这段代码:
mageView.setImageResource(mImageIds[position]);

if(position < )

    imageView.setTag("["+position+"]");

else if(position < )

    imageView.setTag("["+(position+)+"]");

else

    imageView.setTag("["+(position+)+"]");
代码:这里
Android 编辑框插入表情图片的更多相关文章
- Android 编辑框(EditText)属性学习
EditText的属性很多,这里介绍几个:android:hint="请输入数字!"//设置显示在空间上的提示信息android:numeric="integer&quo ...
- Android -- 编辑框更改样式
1. 效果图
- Android实现EditText插入表情、超链接等格式
参考:https://www.jianshu.com/p/84067ad289d2 参考:https://www.jianshu.com/p/d82ac2edc7e8
- 【转】怎么给javascript + div编辑框光标位置插入表情文字等?
最近刚好碰到这个问题,虽然离提出问题已经过了半年了,本着前人栽树后人乘凉的精神,还是回答一下.效果: &amp;amp;lt;img src="https://pic2.zh ...
- 2.Android之按钮Button和编辑框EditText学习
今天学习android一些基本控件:button和edittext使用,我们平时网页或者手机登录一般都会有登录框,这里面就用到这两个部件. 如图: 所对应XML文件: 一般第二个编辑框都是输入密码,所 ...
- 自定义编辑框VC,可加载更改字体,添加背景图片,显示输入提示信息
搞了一天终于弄了个完整的编辑框控件出来了, 哎,,,搞界面开发还是有点复杂的. #pragma once #include "AdvEdit.h" // CBkgEditBox c ...
- Android EditText弹出软键盘实现页面标题头不动,软键盘弹出在编辑框下面
为了实现EditText编辑的时候弹出软键盘标题头不动,底部编辑框,上移在这总结: RelativeLayout在弹出软键盘的时候先寻找android:layout_alignParentBottom ...
- 在线编辑Word——插入图片、图形
在Word中支持插入图片.图形等元素,同时支持对插入的图片和图形进行格式化操作,如裁剪.调整尺寸大小.调成颜色.阴影.倾斜角度.透明度等等.本文,将通过使用Spire.Cloud Word在线编辑器来 ...
- 新浪微博客户端(47)-在TextView中插入表情
DJEmotionPageView.m // 发送点击广播(和android类似,区别在于android的广播是只要有上下文对象context,就可以发送) // iOS中的通知发送和接收都是通过NS ...
随机推荐
- rbac - 介绍
找到了上学期末压箱底的rbac组件,这里总结下. 介绍: rbac组件:一个基于角色的权限访问控制系统的组件. 目录:
- 搭建django环境
一.安装django(两种方式) 1.pip install django 2.python setup.py install(下载gjango包:https://www.djangoproject. ...
- FreeRTOS-07内核控制函数
根据正点原子FreeRTOS视频整理 单片机:STM32F207VC FreeRTOS源码版本:v10.0.1 内核控制函数:
- C# TCPClient简单示例
示例使用方法参考 示例 以下一个简单的异步事件TCP客户端实现 using Newtonsoft.Json; using Newtonsoft.Json.Linq; using System; usi ...
- windows7用WMware安装Linux虚拟机详细步骤
一.安装环境 windows7操作系统物理机VMware Workstation 软件(可以在网上下载)CentOS6.5镜像文件(其他版本都大同小异,这里以CentOS6.5为例)Cnetos6.5 ...
- WindowsServer2008安装IIS相关服务
控制面板->程序->打开或关闭Windows功能 添加角色,选择IIS服务器,选择以下角色服务,如果添加过就选择添加角色服务 如果出现500错误,这个跟程序没有多大关系,可以试一下以下操作 ...
- Java Servlet 缺点
1.web.xml配置比较多 2.servlet具有容器依赖性(tomcat没有启动,就没有用)
- redis中save和bgsave区别
转自:redis中save和bgsave区别 SAVE 和 BGSAVE 两个命令都会调用 rdbSave 函数,但它们调用的方式各有不同: SAVE 直接调用 rdbSave ,阻塞 Redis 主 ...
- iOS仿今日头条滑动导航
之前写了篇博客网易首页导航封装类.网易首页导航封装类优化,今天在前两个的基础上仿下今日头条. 1.网易首页导航封装类中主要解决了上面导航的ScrollView和下面的页面的ScrollView联动的问 ...
- IOS项目之分层MVVM
在做.Net时,有用到三层架构,使项目分层.ios项目使用AFNetWork把网络层这块也放进了ViewController中,数据解析缓存这些也在里面,这样层次结构可能不够清楚,今天就试着分离了一下 ...