springmvc(二) ssm框架整合的各种配置
ssm:springmvc、spring、mybatis这三个框架的整合,有耐心一步步走。
--WZY
一、SSM框架整合
1.1、整合思路
从底层整合起,也就是先整合mybatis与spring,然后在编写springmvc。
1.2、开发需求
查询商品列表(从数据库中查询)
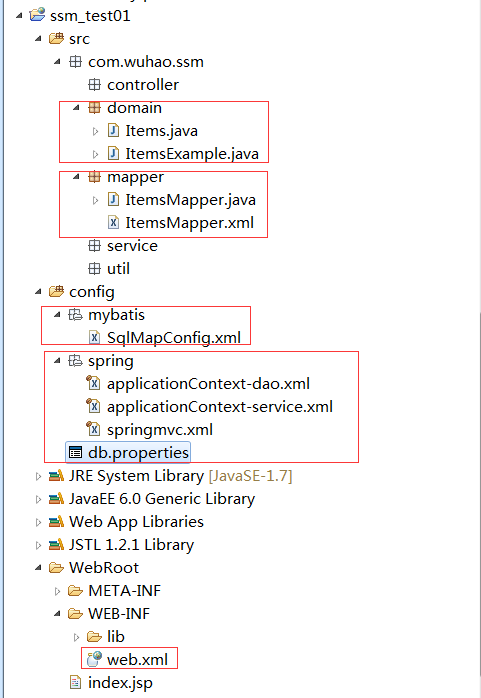
1.3、创建web工程

现在ssm的工程创建就有区别于原先的dao、service、web这样的三层目录了,现在是mapper、service、controller这样的目录,mapper就相当于以前的dao、controller相当于以前的web,改变了名称而已。不要因此看不懂了。
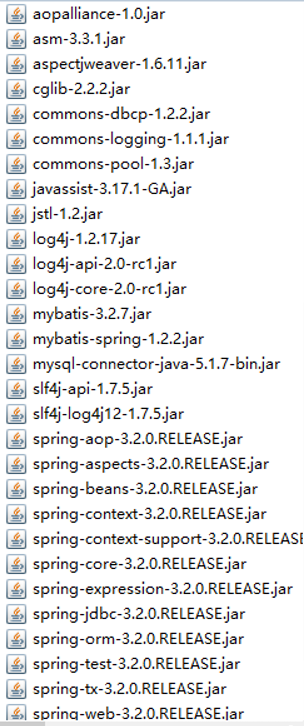
1.4、添加jar包
这种jar包,上网直接百度ssm整合的jar包即可
数据库驱动、Mybatis的核心、依赖包、Mybatis与spring的整合包、Dbcp连接池包、Spring的包(包括springmvc的包)、Aop的依赖包、Jstl包、Common-logging包
1.5、开始整合mapper(mybatis与spring的整合)
详细的整合思路讲解:mybatis与spring的整合 这里我直接上代码。步骤
1.5.1、SqlMapConfig.xml
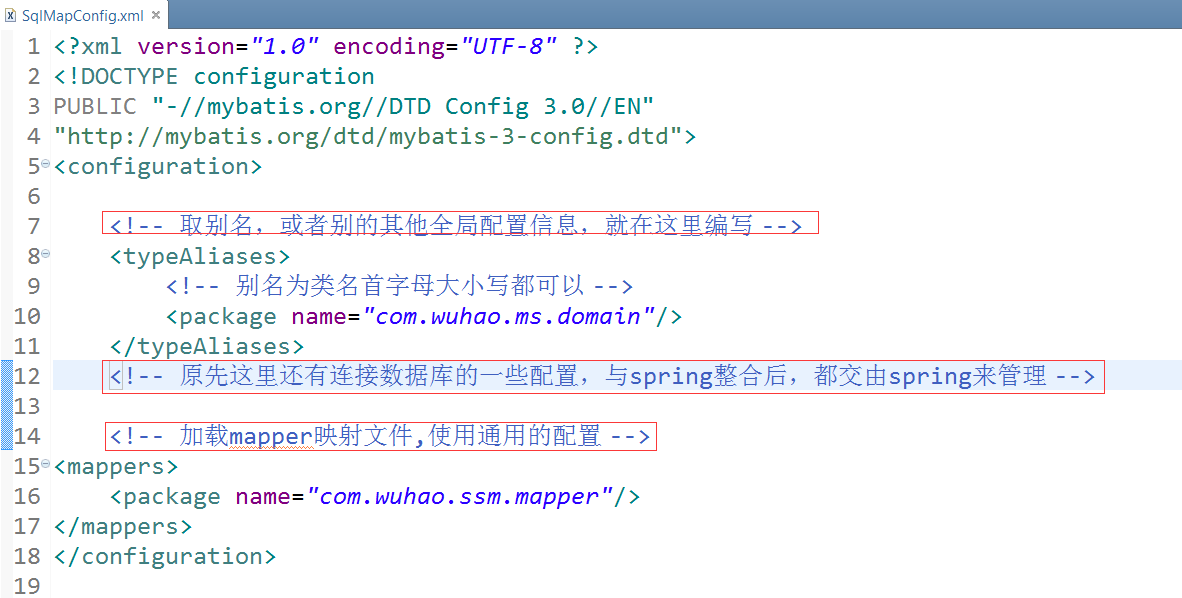
<?xml version="1.0" encoding="UTF-8" ?>

<!DOCTYPE configuration

PUBLIC "-//mybatis.org//DTD Config 3.0//EN"

"http://mybatis.org/dtd/mybatis-3-config.dtd">

<configuration>

    <!-- 取别名,或者别的其他全局配置信息,就在这里编写 -->

    <typeAliases>

        <!-- 别名为类名首字母大小写都可以 -->

        <package name="com.wuhao.ms.domain"/>

    </typeAliases>

    <!-- 原先这里还有连接数据库的一些配置,与spring整合后,都交由spring来管理 -->

    <!-- 加载mapper映射文件,使用通用的配置 -->

<mappers>

    <package name="com.wuhao.ssm.mapper"/>

</mappers>

</configuration>
SqlMapConfig.xml
1.5.2、applicationContext-dao.xml的配置
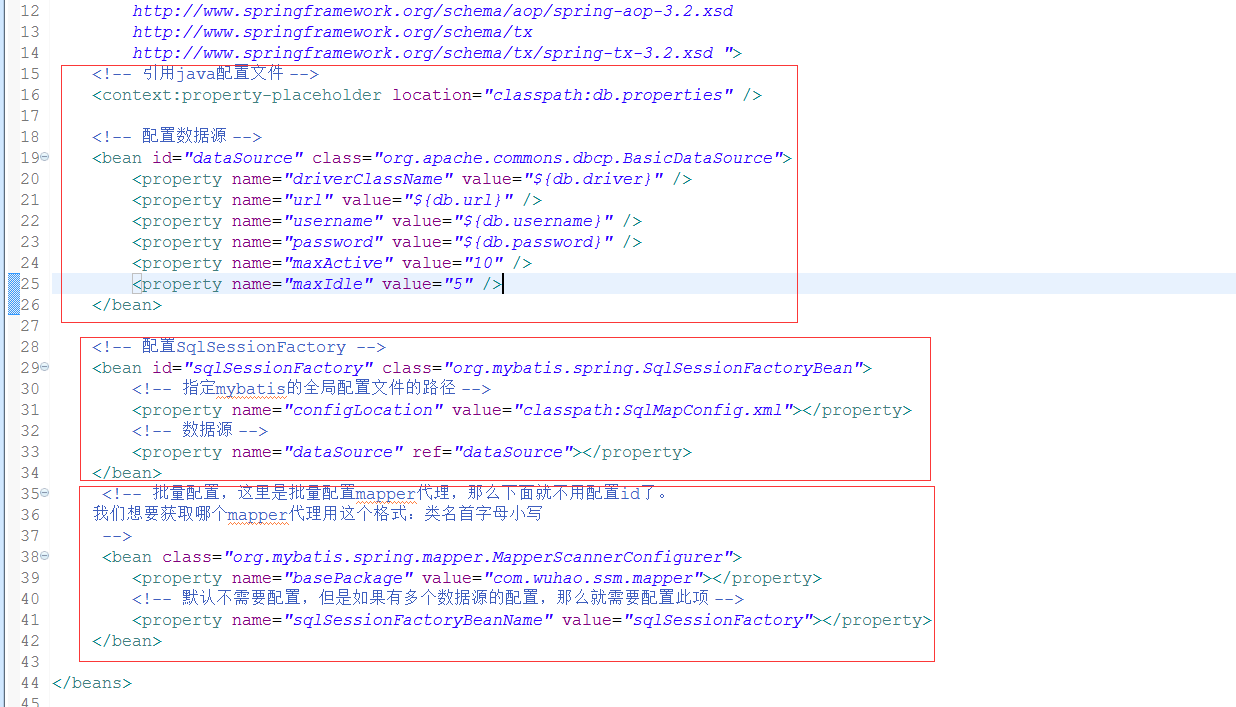
这里需要注意一点,在指定mybatis的全局配置文件的路径的时候,也就是在value="classpath:SqlMapConfig.xml"时,如果在创建的config的配置文件目录下还有层级目录,则这里需要加上,比如,config下面分为了mybatis和spring,那么这里就需要写value="classpath:mybatis/SqlMapConfig.xml",看根据你自己的需求来编写

<beans xmlns="http://www.springframework.org/schema/beans"

    xmlns:xsi="http://www.w3.org/2001/XMLSchema-instance" xmlns:mvc="http://www.springframework.org/schema/mvc"

    xmlns:context="http://www.springframework.org/schema/context"

    xmlns:aop="http://www.springframework.org/schema/aop" xmlns:tx="http://www.springframework.org/schema/tx"

    xsi:schemaLocation="http://www.springframework.org/schema/beans

        http://www.springframework.org/schema/beans/spring-beans-3.2.xsd

        http://www.springframework.org/schema/mvc

        http://www.springframework.org/schema/mvc/spring-mvc-3.2.xsd

        http://www.springframework.org/schema/context

        http://www.springframework.org/schema/context/spring-context-3.2.xsd

        http://www.springframework.org/schema/aop

        http://www.springframework.org/schema/aop/spring-aop-3.2.xsd

        http://www.springframework.org/schema/tx

        http://www.springframework.org/schema/tx/spring-tx-3.2.xsd ">

    <!-- 引用java配置文件 -->

    <context:property-placeholder location="classpath:db.properties" />

    <!-- 配置数据源 -->

    <bean id="dataSource" class="org.apache.commons.dbcp.BasicDataSource">

        <property name="driverClassName" value="${db.driver}" />

        <property name="url" value="${db.url}" />

        <property name="username" value="${db.username}" />

        <property name="password" value="${db.password}" />

        <property name="maxActive" value="10" />

        <property name="maxIdle" value="5" />

    </bean>

    <!-- 配置SqlSessionFactory -->

    <bean id="sqlSessionFactory" class="org.mybatis.spring.SqlSessionFactoryBean">

        <!-- 指定mybatis的全局配置文件的路径 -->

        <property name="configLocation" value="classpath:SqlMapConfig.xml"></property>

        <!-- 数据源 -->

        <property name="dataSource" ref="dataSource"></property>

    </bean>

     <!-- 批量配置,这里是批量配置mapper代理,那么下面就不用配置id了。

        我们想要获取哪个mapper代理用这个格式:类名首字母小写

     -->

     <bean class="org.mybatis.spring.mapper.MapperScannerConfigurer">

        <property name="basePackage" value="com.wuhao.ssm.mapper"></property>

        <!-- 默认不需要配置,但是如果有多个数据源的配置,那么就需要配置此项 -->

        <property name="sqlSessionFactoryBeanName" value="sqlSessionFactory"></property>

    </bean>

</beans>
applicationContext-dao.xml
1.5.3、db.properties配置

db.driver=com.mysql.jdbc.Driver

db.url=jdbc:mysql://localhost:3306/test?useUnicode=true&characterEncoding=utf8

db.username=root

db.password=root
db.properties
1.5.4、开发mapper,将逆向工程生成的添加进来
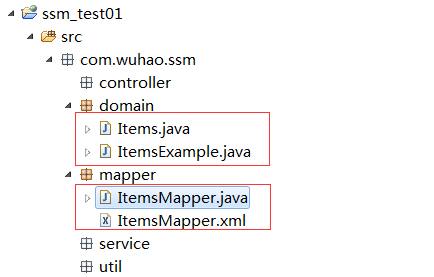
注意:Mapper开发时,先要根据需求进行分析,是否匹配逆向工程生成的代码,如果匹配成功,则不需要再开发mapper;如果不匹配,再去扩展一个新的mapper接口和mapper映射文件来处理该需求,通俗点讲,就是逆向工程生成的mapper接口中的定义的功能是否满足我们开发的需求,因为逆向工程生成的都是对于单表进行操作的,而我们有时候需要的是更复杂的查询,所以如果有需要我们在自己创建mapper接口和mapper映射文件,其实就是扩展功能。
1.6、整合service
添加applicationContext-service.xml配置文件,用来处理事务,
applicationContext-service.xml:如果不懂其中的代码的意思,就查看之前讲解spring管理事务的文章。这里直接复制粘帖即可,修改一些包名称等
<beans xmlns="http://www.springframework.org/schema/beans"
xmlns:xsi="http://www.w3.org/2001/XMLSchema-instance" xmlns:mvc="http://www.springframework.org/schema/mvc"
xmlns:context="http://www.springframework.org/schema/context"
xmlns:aop="http://www.springframework.org/schema/aop" xmlns:tx="http://www.springframework.org/schema/tx"
xsi:schemaLocation="http://www.springframework.org/schema/beans
http://www.springframework.org/schema/beans/spring-beans-3.2.xsd
http://www.springframework.org/schema/mvc
http://www.springframework.org/schema/mvc/spring-mvc-3.2.xsd
http://www.springframework.org/schema/context
http://www.springframework.org/schema/context/spring-context-3.2.xsd
http://www.springframework.org/schema/aop
http://www.springframework.org/schema/aop/spring-aop-3.2.xsd
http://www.springframework.org/schema/tx
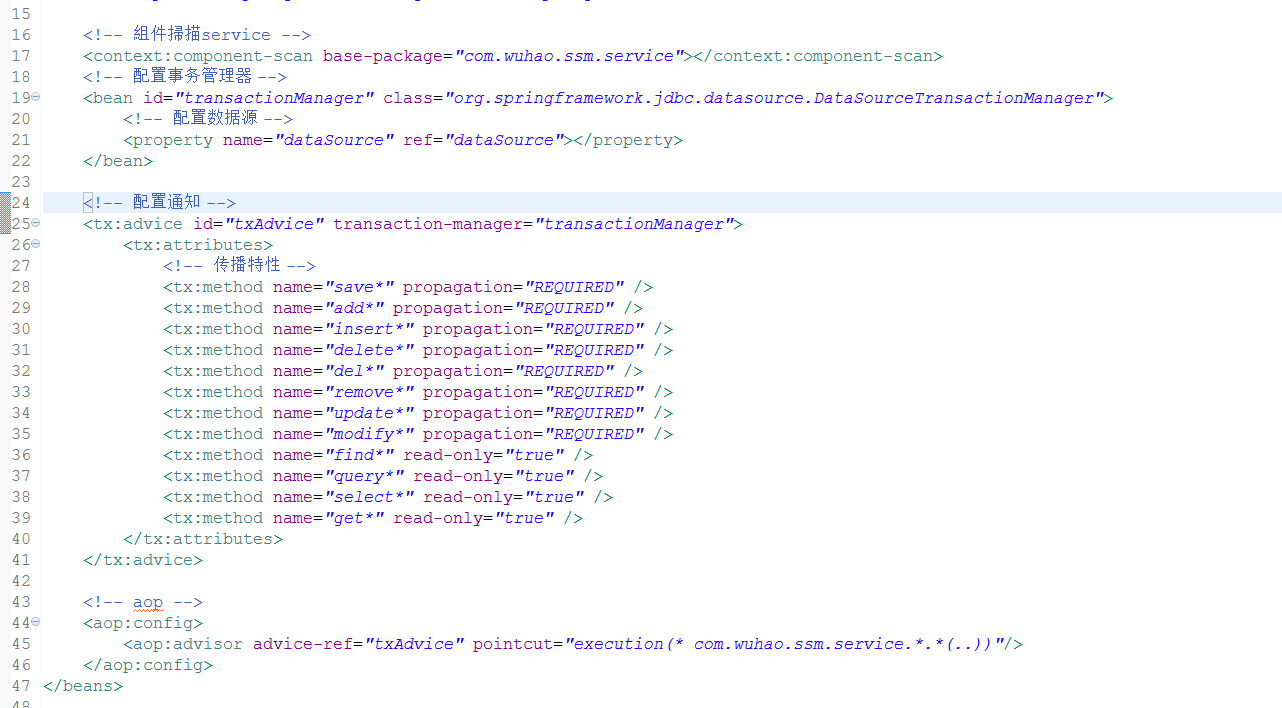
http://www.springframework.org/schema/tx/spring-tx-3.2.xsd "> <!-- 組件掃描service -->
<context:component-scan base-package="com.wuhao.ssm.service"></context:component-scan>
<!-- 配置事务管理器 -->
<bean id="transactionManager" class="org.springframework.jdbc.datasource.DataSourceTransactionManager">
<!-- 配置数据源 -->
<property name="dataSource" ref="dataSource"></property>
</bean> <!-- 配置通知 -->
<tx:advice id="txAdvice" transaction-manager="transactionManager">
<tx:attributes>
<!-- 传播特性 -->
<tx:method name="save*" propagation="REQUIRED" />
<tx:method name="add*" propagation="REQUIRED" />
<tx:method name="insert*" propagation="REQUIRED" />
<tx:method name="delete*" propagation="REQUIRED" />
<tx:method name="del*" propagation="REQUIRED" />
<tx:method name="remove*" propagation="REQUIRED" />
<tx:method name="update*" propagation="REQUIRED" />
<tx:method name="modify*" propagation="REQUIRED" />
<tx:method name="find*" read-only="true" />
<tx:method name="query*" read-only="true" />
<tx:method name="select*" read-only="true" />
<tx:method name="get*" read-only="true" />
</tx:attributes>
</tx:advice> <!-- aop -->
<aop:config>
<aop:advisor advice-ref="txAdvice" pointcut="execution(* com.wuhao.ssm.service.*.*(..))"/>
</aop:config>
</beans>
applicationContext-service.xml
1.7、整合controller
也就是使用springmvc了。非常简单。
1.7.1、在web.xml中配置前端控制器DispatcherServlet
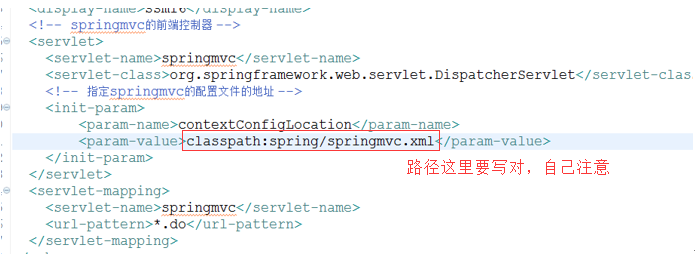
 <!-- springmvc 的前端控制器 -->

  <servlet>

      <servlet-name>springmvc</servlet-name>

      <servlet-class>org.springframework.web.servlet.DispatcherServlet</servlet-class>

  <!-- 指定springmvc的配置文件的地址 -->

      <init-param>

          <param-name>contextConfigLocation</param-name>

          <param-value>classpath:spring/springmvc.xml</param-value>

      </init-param>

  </servlet>

  <servlet-mapping>

      <servlet-name>springmvc</servlet-name>

      <!-- 这里有三种配置url-pattern方案

          1、*.do:后缀为.do的请求才能够访问到该servlet[用这个]

          2、/ :所有请求都能够访问到该servlet(除jsp),包括静态请求(处理会有问题,不用)

          3、/* :有问题,因为访问jsp也会到该servlet,而访问jsp时,我们不需要这样,也不用

       -->

      <url-pattern>*.do</url-pattern>

  </servlet-mapping>
web.xml中前端控制器DispatcherServlet的配置
1.7.2、配置springmvc.xml
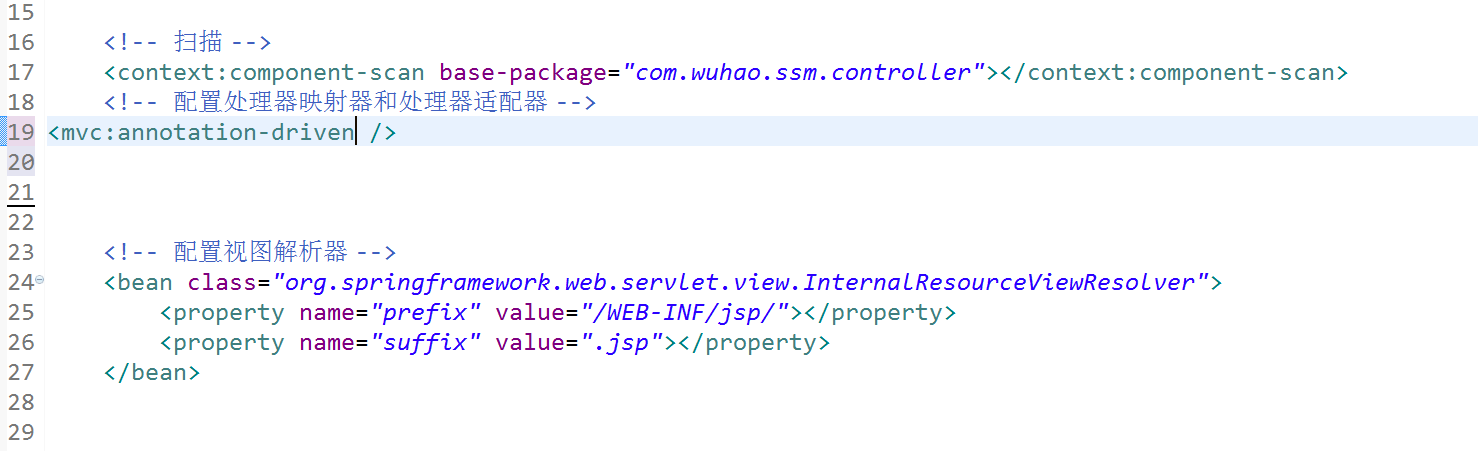
<beans xmlns="http://www.springframework.org/schema/beans"

    xmlns:xsi="http://www.w3.org/2001/XMLSchema-instance" xmlns:mvc="http://www.springframework.org/schema/mvc"

    xmlns:context="http://www.springframework.org/schema/context"

    xmlns:aop="http://www.springframework.org/schema/aop" xmlns:tx="http://www.springframework.org/schema/tx"

    xsi:schemaLocation="http://www.springframework.org/schema/beans

        http://www.springframework.org/schema/beans/spring-beans-3.2.xsd

        http://www.springframework.org/schema/mvc

        http://www.springframework.org/schema/mvc/spring-mvc-3.2.xsd

        http://www.springframework.org/schema/context

        http://www.springframework.org/schema/context/spring-context-3.2.xsd

        http://www.springframework.org/schema/aop

        http://www.springframework.org/schema/aop/spring-aop-3.2.xsd

        http://www.springframework.org/schema/tx

        http://www.springframework.org/schema/tx/spring-tx-3.2.xsd ">

    <!-- 扫描 -->

    <context:component-scan base-package="com.wuhao.ssm.controller"></context:component-scan>

    <!-- 配置处理器映射器和处理器适配器 -->

<mvc:annotation-driven />

    <!-- 配置视图解析器 -->

    <bean class="org.springframework.web.servlet.view.InternalResourceViewResolver">

        <property name="prefix" value="/WEB-INF/jsp/"></property>

        <property name="suffix" value=".jsp"></property>

    </bean>

</beans>
springmvc.xml
1.8、整合spring配置文件
就是将所有的spring的配置文件都进行加载启动。也就是在web.xml中配置spring的监听器

 <!-- 加载spring容器 -->

   <!-- 配置监听器,用于加载spring 配置文件 -->

   <context-param>

        <param-name>contextConfigLocation</param-name>

        <param-value>classpath:applicationContext-*.xml</param-value>

    </context-param>

     <listener>

         <listener-class>org.springframework.web.context.ContextLoaderListener</listener-class>

    </listener>
web.xml中配置加载spring容器和监听器
1.9、总结所有的配置如下图
1.10、部署测试
1.10.1、查询商品列表(从数据库中查询)
1、编写service层
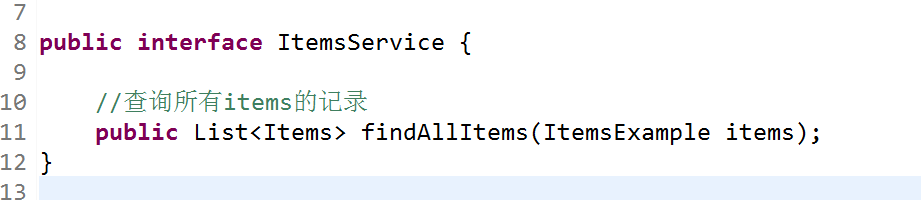
ItemsService 接口
ItemsServiceImpl 实现类 不使用注解开发
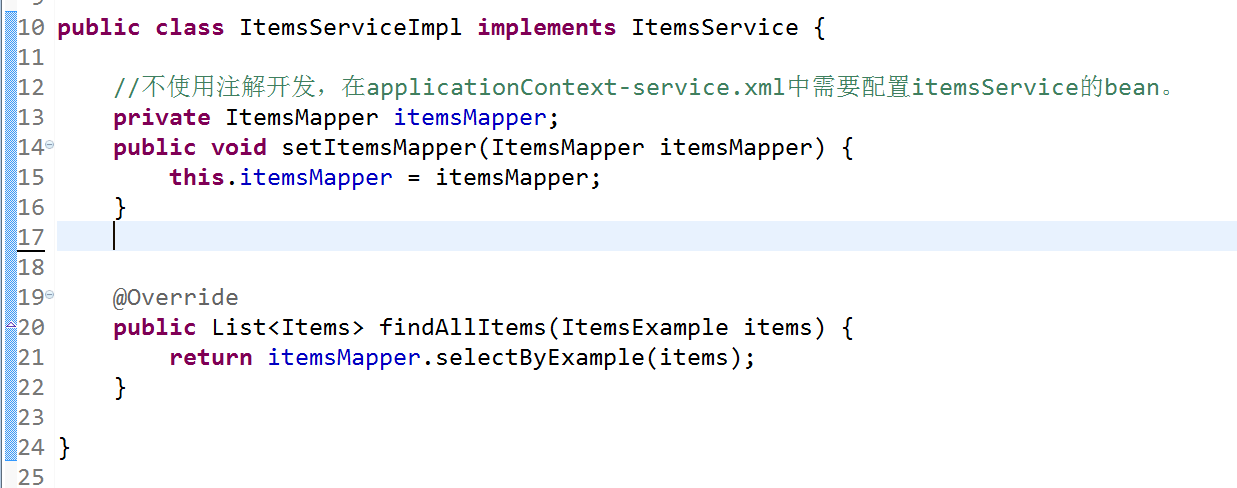
applicationContext-service.xml中配置该service的bean

ItemsServiceImpl 实现类 使用注解的话,就不需要在applicationContext-service.xml中配置该service的bean了

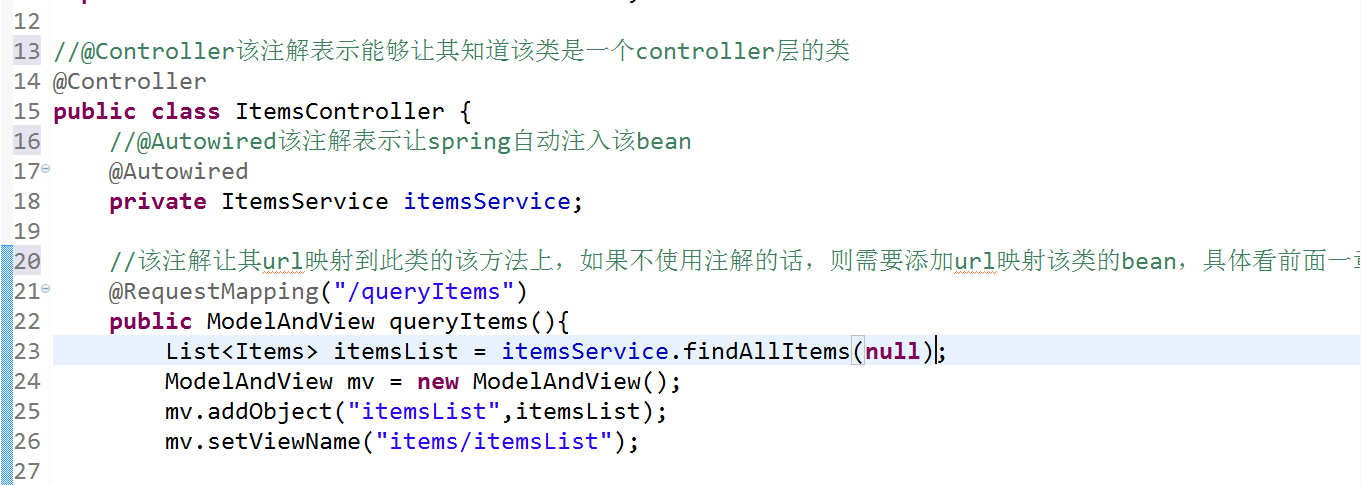
2、编写controller层
该层的编写有很多中方式,我记得前一节讲解过,比如实现Controller接口,使用注解等,一般直接使用注解。
ItemsController
3、添加jsp页面

<%@ page language="java" contentType="text/html; charset=UTF-8"

    pageEncoding="UTF-8"%>

<%@ taglib uri="http://java.sun.com/jsp/jstl/core" prefix="c" %>

<%@ taglib uri="http://java.sun.com/jsp/jstl/fmt"  prefix="fmt"%>

<!DOCTYPE html PUBLIC "-//W3C//DTD HTML 4.01 Transitional//EN" "http://www.w3.org/TR/html4/loose.dtd">

<html>

<head>

<meta http-equiv="Content-Type" content="text/html; charset=UTF-8">

<title>查询商品列表</title>

</head>

<body>

<form action="${pageContext.request.contextPath }/item/queryItem.action" method="post">

查询条件:

<table width="100%" border=1>

<tr>

<td><input type="submit" value="查询"/></td>

</tr>

</table>

商品列表:

<table width="100%" border=1>

<tr>

    <td>商品名称</td>

    <td>商品价格</td>

    <td>生产日期</td>

    <td>商品描述</td>

    <td>操作</td>

</tr>

<c:forEach items="${itemsList }" var="item">

<tr>

    <td>${item.name }</td>

    <td>${item.price }</td>

    <td><fmt:formatDate value="${item.createtime}" pattern="yyyy-MM-dd HH:mm:ss"/></td>

    <td>${item.detail }</td>

    <td><a href="${pageContext.request.contextPath }/editItems.do?id=${item.id}">修改</a></td>

</tr>

</c:forEach>

</table>

</form>

</body>

</html>
itemsList.jsp
4、测试
http://localhost:8080/ssm_test01/queryItems.do 如下图,即成功

二、总结
这样,ssm的框架整合就结束了,非常简单,按步骤,先整合mybatis与spring,然后在整合springmvc。自己练习几遍就会了。接下来的文章就会以此为基础,讲解springmvc的各种小功能,比如,springmvc的参数绑定、springmvc的校验器,图片的上传等。
springmvc(二) ssm框架整合的各种配置的更多相关文章
- SpringMVC详解及SSM框架整合项目
SpringMVC ssm : mybatis + Spring + SpringMVC MVC三层架构 JavaSE:认真学习,老师带,入门快 JavaWeb:认真学习,老师带,入门快 SSM框架: ...
- SSM框架整合模板
SSM框架整合--MAVEN依赖 spring方面(包含了springmvc): spring-webmvc:spring与mvc的整合依赖,主要包括spring的核心包和springmvc需要的包 ...
- SpringMVC--从理解SpringMVC执行流程到SSM框架整合
前言 SpringMVC框架是SSM框架中继Spring另一个重要的框架,那么什么是SpringMVC,如何用SpringMVC来整合SSM框架呢?下面让我们详细的了解一下. 注:在学习SpringM ...
- SSM框架-----------SpringMVC+Spring+Mybatis框架整合详细教程
1.基本概念 1.1.Spring Spring是一个开源框架,Spring是于2003 年兴起的一个轻量级的Java 开发框架,由Rod Johnson 在其著作Expert One-On-One ...
- SpringMVC札集(10)——SSM框架整合
自定义View系列教程00–推翻自己和过往,重学自定义View 自定义View系列教程01–常用工具介绍 自定义View系列教程02–onMeasure源码详尽分析 自定义View系列教程03–onL ...
- SSM框架整合过程总结
-----------------------siwuxie095 SSM 框架整合过程总结 1.导入相关 jar 包( ...
- SSM框架整合搭建教程
自己配置了一个SSM框架,打算做个小网站,这里把SSM的配置流程详细的写了出来,方便很少接触这个框架的朋友使用,文中各个资源均免费提供! 一. 创建web项目(eclipse) File-->n ...
- 使用IntelliJ IDEA创建Maven聚合工程、创建resources文件夹、ssm框架整合、项目运行一体化
一.创建一个空的项目作为存放整个项目的路径 1.选择 File——>new——>Project ——>Empty Project 2.WorkspaceforTest为项目存放文件夹 ...
- SpringMVC笔记——SSM框架搭建简单实例
落叶枫桥 博客园 首页 新随笔 联系 订阅 管理 SpringMVC笔记——SSM框架搭建简单实例 简介 Spring+SpringMVC+MyBatis框架(SSM)是比较热门的中小型企业级项目开发 ...
随机推荐
- 秒懂HTTPS
http和https HTTP:超文本传输协议(英文:HyperText Transfer Protocol,缩写:HTTP)是一种用于分布式.协作式和超媒体信息系统的应用层协议.HTTP是万维网的数 ...
- JavaScript基础笔记(十二)Ajax
Ajax 一.XMLHttpRequest对象 一)XHR用法 var xhr = new XMLHttpRequest(); //open()方法,参数一:发送方法,参数二:请求的URL,参数三:是 ...
- c# Array、ArrayList、List
1.Array:在内存中连续存储.索引速度快.赋值,修改元素简单. 不足:(1)插入数据麻烦 (2)声明时必须指定长度 2.ArrayList:解决了Array的不足 不足:(1)类型不安全 (2)存 ...
- 最近公共祖先 LCA 倍增算法
树上倍增求LCA LCA指的是最近公共祖先(Least Common Ancestors),如下图所示: 4和5的LCA就是2 那怎么求呢?最粗暴的方法就是先dfs一次,处理出每个点的深度 ...
- python数据类型内置方法 字符串和列表
1.字符串 内置方法操作# a = 'qqssf'#1. print(a[-1:]) #按索引取,正向从0开始,反向从-1开始# print(len(a)) #取长度# a = 'qqssf'# 2. ...
- python系统编程(七)
多线程-共享全局变量 from threading import Thread import time g_num = 100 def work1(): global g_num for i in r ...
- ES6 模板字面量
模板字面量 解决的问题 1.多行字符串 一个正式的多行字符串的概念 2.基本的字符串格式化 将变量的值嵌入字符串的能力 3.HTML转义 向HTML插入安全转换后的字符串的能力 (1)基础语法 相当于 ...
- bzoj1051: [HAOI2006]受欢迎的牛(tarjan板子)
1051: [HAOI2006]受欢迎的牛 Time Limit: 10 Sec Memory Limit: 162 MBSubmit: 6064 Solved: 3179[Submit][Sta ...
- Eclipse Maven pom.xml 警告No grammar constraints (DTD or XML schema)
消除警告方案: <?xml version="1.0" encoding="UTF-8" standalone="no"?> & ...
- Java 集合总体框架介绍
Java集合是java提供的工具包,包含了常用的数据结构:集合.链表.队列.栈.数组.映射等.Java集合工具包位置是java.util.*Java集合主要可以划分为4个部分:List列表.Set集合 ...