Nginx unit 源码安装初体验
Nginx unit 源码安装初体验
上次介绍了从yum的安装方法(https://www.cnblogs.com/wang-li/p/9684040.html),这次将介绍源码安装,目前最新版为1.4,()Current latest version is 1.4, released on September 20, 2018.
我们就安装1.4,然后搭配PHP 7
PHP安装
略过,给编译参数即可
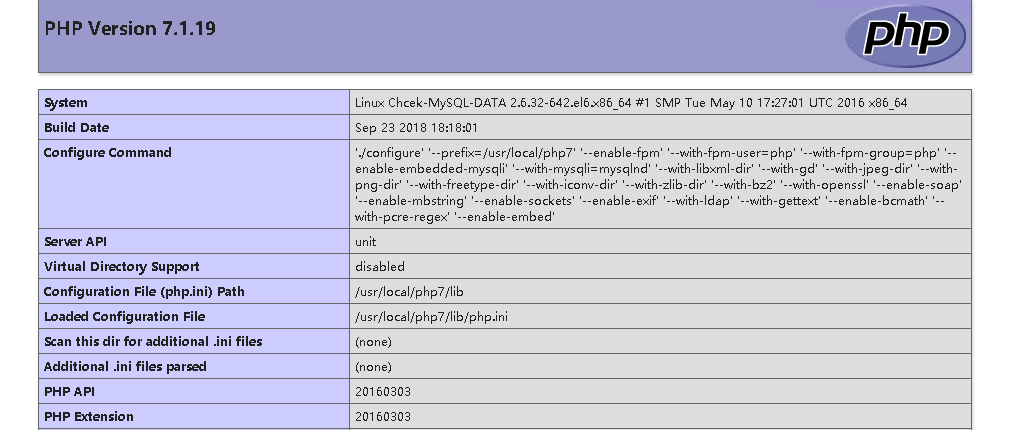
# /usr/local/php7/bin/php -i | grep config
Configure Command =>  './configure'  '--prefix=/usr/local/php7' '--enable-fpm' '--with-fpm-user=php' '--with-fpm-group=php' '--enable-embedded-mysqli' '--with-mysqli=mysqlnd' '--with-libxml-dir' '--with-gd' '--with-jpeg-dir' '--with-png-dir' '--with-freetype-dir' '--with-iconv-dir' '--with-zlib-dir' '--with-bz2' '--with-openssl' '--enable-soap' '--enable-mbstring' '--enable-sockets' '--enable-exif' '--with-ldap' '--with-gettext' '--enable-bcmath' '--with-pcre-regex' '--enable-embed'
#
Nginx Unit介绍
Nginx Unit是一个动态Web和应用程序服务器,旨在以多种语言运行应用程序。单位是轻量级,多语言,并通过API动态配置。服务器的设计允许根据工程或操作的需要重新配置特定的应用参数。
支持的语言:
Python
PHP
Go
Perl
Ruby
JavaScript/Node.js 和 Java 即将推出
构建工具make gcc的安装
# yum install gcc make -y
下载nginx unit包,地址:https://unit.nginx.org/download/
# wget https://unit.nginx.org/download/unit-1.4.tar.gz
目前最新版的就是1.4(当前时间,2018-09-24 00:10:53)
下载之后,利用tar解压,可以用./configure --help 查看帮助
安装:
unit 安装
# ./configure --prefix=/usr/local/unit
# make
# make install

unit-php安装
查看帮助
# ./configure php --help
如果操作系统存在多个php,可以使用--config参数指定php-config相应的版本即可

安装
# ./configure php

如果出现如下报错:
# ./configure php
configuring PHP module
checking for PHP ... found
+ PHP SAPI: [cli embed fpm phpdbg cgi]
checking for PHP embed SAPI ... not found

./configure: error: no PHP embed SAPI found.

#

因为为系统没有发现php对应sapi,如果安装完php后,请将libphp.so拷贝至系统lib目录下,如我的机器:
# cp -a /usr/local/php7/lib/libphp7.so /usr/lib64/但是必须要保证一点,PHP编译参数中必须包含--enable-embed才行,否则不会产生so文件

/usr/local/php7 是我php源码安装的地址
/usr/lib64/ 是系统放.so文件地方

然后执行make && make install
使用unit
注册unit
启动程序
监听的端口是127.0.0.1的8224端口
# ./sbin/unitd --control
获取8224的内容,可以看到,内容为空
# curl
{
    "listeners": {},
    "applications": {}
}
我们将会写我们的unit配置json文档,例如:http://unit.nginx.org/configuration/ 要运行程序,最低得配置必须至少包含一个侦听器和关联的应用程序
# cat /etc/unit/start.json
{
    "listeners": {
        "*:8300": {
            "application": "blogs"
        }
    },

    "applications": {
        "blogs": {
            "type": "php7",
            ,
            "root": "/usr/local/nginx/php",
            "index": "index.php",

        "user": "php",
        "group": "php",

        "options": {
            "file": "/usr/local/php7/lib/php.ini"
            }
        }
    }
}
#
当然,root路径的值,在服务器是有内容的:
# cat /usr/local/nginx/php/index.php
<?php
    phpinfo();
?>
#
当json编写完毕后,可以试着用如下网页工具进行对json的检测:http://www.bejson.com/
顺便提一下,如果需要使用curl的unix-socket的话,需要将curl软件升级不低于7.4的才可以,curl下载地址:https://curl.haxx.se/download/
下载
# wget https://curl.haxx.se/download/curl-7.55.0.tar.gz
安装
# ./configure
# make
# make install
查看版本
如果在编译的时候不指定安装目录,则会安装到/usr/local/bin下面
# /usr/local/bin/curl --version
curl  (x86_64-pc-linux-gnu) libcurl/ OpenSSL/
Release-Date: --
Protocols: dict file ftp ftps gopher http https imap imaps pop3 pop3s rtsp smb smbs smtp smtps telnet tftp
Features: IPv6 Largefile NTLM NTLM_WB SSL libz UnixSockets HTTPS-proxy
#
将json put至我们的unit刚刚启动的方法中
# /usr/local/bin/curl -X PUT -d@/etc/unit/start.json '127.0.0.1:8224/config'
{
"success": "Reconfiguration done."
}
#
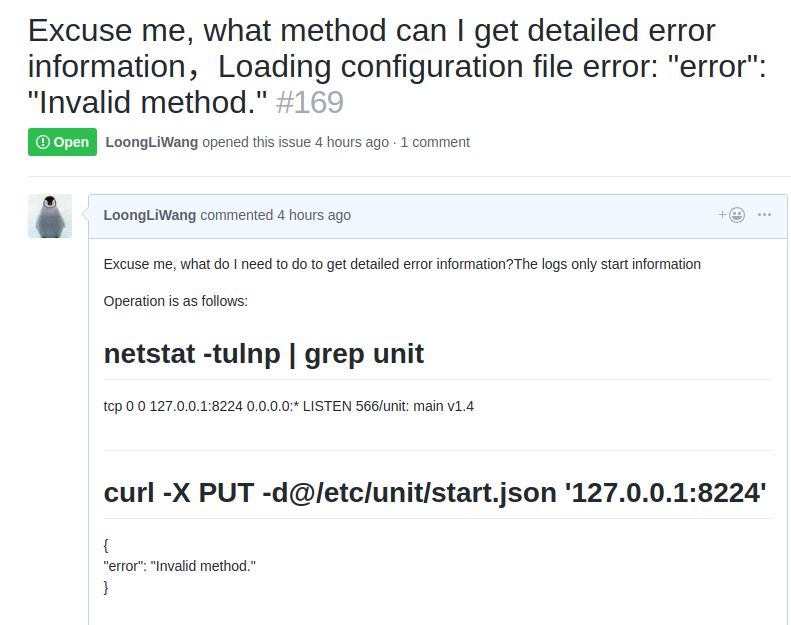
注意,我们不能将json文件put至127.0.0.1:8224上,应该put至127.0.0.1:8224/config上才行,否则的话,会报错Invalid method,我曾遇到过此问题,于是乎在github上询问了一下,大佬告诉我的方法(https://github.com/nginx/unit/issues/169)

接下来我们访问ip+端口的方法,试着能不能打开网页,可以看到,我们通过域名+8300的形式,可以打开网页

与nginx集成
没有安装nginx可以参考文档:https://www.cnblogs.com/wang-li/p/9030718.html
配置一下nginx conf
# sed -n '194,200p' nginx.conf
        location / {
        root php;
                index  index.php index.html index.htm;
        proxy_pass http://127.0.0.1:8300;
             proxy_set_header Host $host;
              proxy_set_header X-Forwarded-For $proxy_add_x_forwarded_for;
        }
#
检查语法,平滑重启nginx
# /usr/local/nginx/sbin/nginx -t
nginx: the configuration file /usr/local/nginx/conf/nginx.conf syntax is ok
nginx: configuration file /usr/local/nginx/conf/nginx.conf test is successful
# /usr/local/nginx/sbin/nginx -s reload
#
通过访问Nginx的方式,也可以获取相应的网页:
查看Nginx的log可以看到:

下次我将尝试着用unit代替之前的php-fpm,
Nginx unit 源码安装初体验的更多相关文章
- 关于nginx的源码安装方式
Nginx(engine x)是一款是由俄罗斯的程序设计师Igor Sysoev所开发高性能的 Web和 反向代理 服务器, 也是一个 IMAP/POP3/SMTP 代理服务器.在高连接并发的情况下, ...
- 编译nginx的源码安装subs_filter模块
使用nginx的反向代理功能搭建nuget镜像服务器时,需要针对官方nuget服务器的响应内容进行字符串替换,比如将www.nuget.org替换为镜像服务器的主机名,将https://替换为http ...
- nginx 的源码安装
安装nginx之前要做的准备工作有:安装如下库 (1)gzip模块需要 zlib 库 (2)rewrite模块需要 pcre 库 (3)ssl 功能需要openssl库 还有一种简单的方法就是 yum ...
- NFS, web,负载均衡,Nginx yum 源码安装
作业一:nginx服务1.二进制安装nginx 2.作为web服务修改配置文件 3.让配置生效,验证配置 [root@localhost ~]# systemctl stop firewalld.s ...
- linux应用之nginx的源码安装及配置(centos)
1.准备工作选首先安装这几个软件:GCC,PCRE(Perl Compatible Regular Expression),zlib,OpenSSL.Nginx是C写的,需要用GCC编译:Nginx的 ...
- zabbix,php,nginx,mysql源码安装 神仙操作
→软件包 mkdir /soft/ cd /soft ♦下载以下软件包 nginx-1.14.2.tar.gz wget http://nginx.org/download/nginx-1.14.2. ...
- linux nginx+php源码安装
PHP安装 1)下载 wget http://cn2.php.net/distributions/php-5.6.30.tar.gz 2)解压 tar –xf php-5.6.30 3)进入目录 cd ...
- Nginx源码安装及调优配置
导读 由于Nginx本身的一些优点,轻量,开源,易用,越来越多的公司使用nginx作为自己公司的web应用服务器,本文详细介绍nginx源码安装的同时并对nginx进行优化配置. Nginx编译前的优 ...
- nginx在Centos7.5下源码安装和配置
安装nginx 安装nginx依赖包 yum install -y pcre-devel zlib-devel openssl-devel wget gcc tree vim 进入目录/root/se ...
随机推荐
- SpringBoot入门篇--关于properties和yml两种配置文件的一些事情
我们在使用SpringBoot这个框架的时候都一定使用或者说是见到过application.properties或者是application.yml,经不住有人就会问这俩文件到底是什么情况,其实说白了 ...
- Source Code Pro 编程字体
Source Code Pro :是 Adobe 公司号称最佳的编程字体,而且还是开源的 它非常适合用于阅读代码,支持 Linux.Mac OS X 和 Windows 等操作系统,而且无论商业或个人 ...
- 63.(原65)纯 CSS 创作一个摇摇晃晃的 loader
原文地址:https://segmentfault.com/a/1190000015424389 修改后地址:https://scrimba.com/c/cqKv4VCR HTML code: < ...
- leetcode142
public class Solution { public ListNode detectCycle( ListNode head ) { if( head == null || head.next ...
- Django之Auth模块 实现登录,退出,自带session 与认证功能的一个重要的模块
Auth模板 1. 什么是Auth模块,有什么用? django的auth的模块的使用: auth 是集合注册,登录,注销,session 多个功能集合在一起的模块 2. 使用Auth组件的默认aut ...
- css选择器querySelectorAll
* querySelectorAll(css的选择器)* 通过css的选择器获取到的一组元素* 获取的也是类数组** 主语* document 从整个页面去获取一组元素* 父级 从父级下去获取一组元素 ...
- servlet3.1
Servlet3.1新增的新特性强制更改sessionId 由HttpServletRequest 的changeSessionId()方法实现 非阻塞式IO 非阻塞式IO我们应该知道Servlet底 ...
- MFC笔记8
1.在循环使用数组时需要清理数组 CString str; memset(str,0,strlen(str)); 判断两个字符串包含数字大小是否相等 CString str="22" ...
- 2018面向对象程序设计(Java)第16周学习指导及要求
2018面向对象程序设计(Java)第16周学习指导及要求(2018.12.13-2018.12.16) 学习目标 (1) 掌握线程概念: (2) 掌握线程创建的两种技术: (3) 理解和掌握线程 ...
- servlet中的请求响应与重定向区别
一.概念 请求响应(转发):将客户端请求转发另一个servlet或者jsp页面------------------------getRequestDispatcher()方法 重定向: 返回一个连接给 ...