
吴裕雄 python深度学习与实践(7)
import cv2

import numpy as np

img = np.mat(np.zeros((,)))

cv2.imshow("test",img)

cv2.waitKey()
import cv2

import numpy as np

img = np.mat(np.zeros((,),dtype=np.uint8))

cv2.imshow("test",img)

cv2.waitKey()
import cv2

import numpy as np

image = np.mat(np.zeros((,)))

imageByteArray = bytearray(image)

print(imageByteArray)

imageBGR = np.array(imageByteArray).reshape(,)

cv2.imshow("cool",imageBGR)

cv2.waitKey()
import os

import cv2

import numpy as np

randomByteArray = bytearray(os.urandom())

flatNumpyArray = np.array(randomByteArray).reshape(,)

cv2.imshow("cool",flatNumpyArray)

cv2.waitKey()
import cv2

import numpy as np

img = np.zeros((,))

img[,] =

cv2.imshow("img",img)

cv2.waitKey()
import cv2

import numpy as np

img = np.zeros((300,300))

img[:,10] = 255

img[10,:] = 255

cv2.imshow("img",img)

cv2.waitKey(0)
import cv2

import numpy as np

from scipy import ndimage

kernel33 = np.array([[-1,-1,-1],

                     [-1,8,-1],

                     [-1,-1,-1]])

kernel33_D = np.array([[1,1,1],

                       [1,-8,1],

                       [1,1,1]])

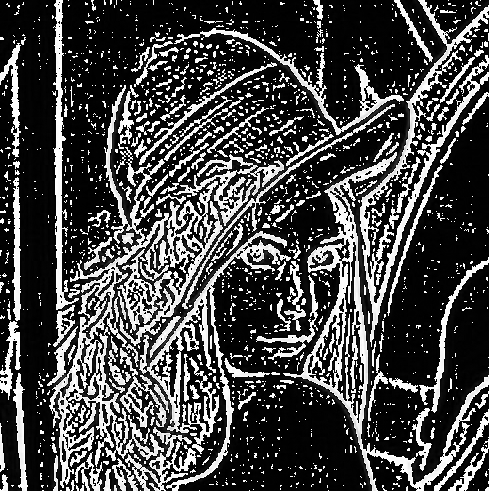
img = cv2.imread("G:\\MyLearning\\TensorFlow_deep_learn\\data\\lena.jpg",0)

linghtImg = ndimage.convolve(img,kernel33_D)

cv2.imshow("img",linghtImg)

cv2.waitKey()

import numpy as np

import cv2

from scipy import ndimage

img = cv2.imread("lena.jpg",0)

blurred = cv2.GaussianBlur(img,(11,11),0)

gaussImg = img - blurred

cv2.imshow("img",gaussImg)

cv2.waitKey()
import numpy as np

def convolve(dateMat,kernel):

    m,n = dateMat.shape

    km,kn = kernel.shape

    newMat = np.ones(((m - km + 1),(n - kn + 1)))

    tempMat = np.ones(((km),(kn)))

    for row in range(m - km + 1):

        for col in range(n - kn + 1):

            for m_k in range(km):

                for n_k in range(kn):

                    tempMat[m_k,n_k] = dateMat[(row + m_k),(col + n_k)] * kernel[m_k,n_k]

            newMat[row,col] = np.sum(tempMat)

    return newMat

dateMat = np.mat([

    [1,2,1,2,0,1,0,1,1],

    [0,3,1,1,0,0,1,0,1],

    [1,2,1,0,2,1,1,0,0],

    [2,2,0,1,1,1,1,1,0],

    [3,1,1,0,1,1,0,0,1],

    [1,0,1,1,1,0,0,1,1],

    [1,1,1,1,0,1,1,1,1],

    [1,0,1,1,0,1,0,1,0],

    [0,1,1,1,1,2,0,1,0]

])

kernel = np.mat([

    [1,0,1],

    [0,-4,0],

    [1,0,1]

])

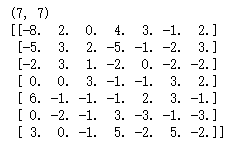
newMat = convolve(dateMat,kernel)

print(np.shape(newMat))

print(newMat)
吴裕雄 python深度学习与实践(7)的更多相关文章
- 吴裕雄 python深度学习与实践(18)
# coding: utf-8 import time import numpy as np import tensorflow as tf import _pickle as pickle impo ...
- 吴裕雄 python深度学习与实践(17)
import tensorflow as tf from tensorflow.examples.tutorials.mnist import input_data import time # 声明输 ...
- 吴裕雄 python深度学习与实践(16)
import struct import numpy as np import matplotlib.pyplot as plt dateMat = np.ones((7,7)) kernel = n ...
- 吴裕雄 python深度学习与实践(15)
import tensorflow as tf import tensorflow.examples.tutorials.mnist.input_data as input_data mnist = ...
- 吴裕雄 python深度学习与实践(14)
import numpy as np import tensorflow as tf import matplotlib.pyplot as plt threshold = 1.0e-2 x1_dat ...
- 吴裕雄 python深度学习与实践(13)
import numpy as np import matplotlib.pyplot as plt x_data = np.random.randn(10) print(x_data) y_data ...
- 吴裕雄 python深度学习与实践(12)
import tensorflow as tf q = tf.FIFOQueue(,"float32") counter = tf.Variable(0.0) add_op = t ...
- 吴裕雄 python深度学习与实践(11)
import numpy as np from matplotlib import pyplot as plt A = np.array([[5],[4]]) C = np.array([[4],[6 ...
- 吴裕雄 python深度学习与实践(10)
import tensorflow as tf input1 = tf.constant(1) print(input1) input2 = tf.Variable(2,tf.int32) print ...
- 吴裕雄 python深度学习与实践(9)
import numpy as np import tensorflow as tf inputX = np.random.rand(100) inputY = np.multiply(3,input ...
随机推荐
- centos7.5 安装mysql8.0.13
在Linux系统上使用rpm包管理器安装mysql Installing MySQL on Linux Using RPM Packages 环境:CentOS Linux release 7.4.1 ...
- Python全栈之路----三元运算
· 三元运算又称三目运算,是对简单条件语句的简写,如: 简单条件语句: if 条件成立: val = 1 else: val = 2 改成三元运算: val = 1 if 条件成立 else 2 &g ...
- document.ready(function(){}),window.onload,$(function(){})的区别
https://blog.csdn.net/qkzhx0516/article/details/79236514
- C语言求行列式的值
#include "stdafx.h" #include <stdio.h> #include <stdlib.h> #include <window ...
- golang-grpc-Unimplemented-desc
golang 调用grpc 服务方法时候提示:"rpc error: code = Unimplemented desc ="的错误, 这是由于pb中的package name 被 ...
- spring IOC 和AOP 方面
spring 的2大核心 是Ioc 和 aop spring的依赖注入:在程序运行期间,由外部容器动态的将依赖对象注入到组件中 IOC: 实例化spring容器的二种方法 第一种:在类路径下寻找配 ...
- 《Linux内核原理与分析》第四次作业
跟踪分析Linux内核的启动过程 使用实验楼的虚拟机打开shell 使用 gdb 跟踪调试内核 使用 qemu qemu -kernel linux-3.18.6 /arch/x86/boot/baI ...
- 用a标签实现submit提交按钮的效果
今天做了一个小项目练手,要求点击a标签后实现post提交的效果,看到这个的时候心理还是有一丝丝懵逼的,不过在朕的十秒钟思考之后有了头绪... 首先表单 <form action="te ...
- C#.NET XML报文签名与验签
-- MD5Util: using System; using System.Collections.Generic; using System.Security.Cryptography; usin ...
- UML 序列图详解
现在是二月,而且到如今你或许已经读到.或听到人们谈论UML 2.0 —— 包括若干进步的 UML 的新规范,所做的变化.考虑到新规范的重要性,我们也正在修改这个文章系列的基础,把我们的注意力从 OMG ...