Orchard模块开发全接触2:新建 ProductPart
一:创建 Part
1:项目引用 Orchard.Framework;
2:创建 Models 文件夹;
3:在 Models 文件夹下创建类 ProductPartRecord,如下:
public class ProductPartRecord : ContentPartRecord
{
public virtual decimal UnitPrice { get; set; }
public virtual string Sku { get; set; }}
注意,为 virtual,因为 orchard 的 NHIBERNATE 需要这样。
以及 ProductRecord:
public class ProductPart : ContentPart<ProductPartRecord>
{
public decimal UnitPrice
{
get { return Record.UnitPrice; }
set { Record.UnitPrice = value; }
}public string Sku
{
get { return Record.Sku; }
set { Record.Sku = value; }
}
}
二:更新数据库
更新数据库,依赖于一个叫 Migrations 的类型,我们需要创建在 根目录下,如下:
public class Migrations : DataMigrationImpl
{
public int Create()
{SchemaBuilder.CreateTable("ProductPartRecord", table => table
// The following method will create an "Id" column for us and set it is the primary key for the table
.ContentPartRecord()
// Create a column named "UnitPrice" of type "decimal"
.Column<decimal>("UnitPrice")
// Create the "Sku" column and specify a maximum length of 50 characters
.Column<string>("Sku", column => column.WithLength(50))
);// Return the version that this feature will be after this method completes
return 1;
}
}
如果不知道 Migrations 的用法,可参考:Orchard之Module升级,现在,我们查询数据库:
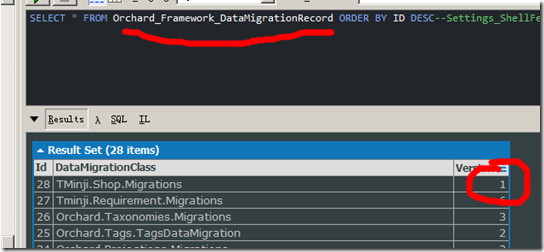
可以看到代码已经执行,然后,表 TMinji_Shop_ProductPartRecord 也已经被创建了。

三:创建 ProductPart
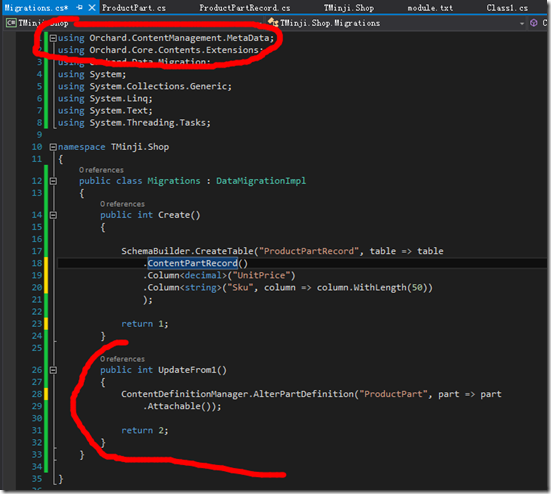
上面,我们创建了 ProductPart 这个类,但是还不够,我们需要把这个类更新到 ContentPartDefinition 这个表中,并且,我们需要注明 ProductPart 是 attachable 的,即:需用用户在后台附加(attach)ProductPart。
现在,我们继续通过代码来做到这一点,我们仍旧在 Migrations 中做,这回,我们首先要引入 Orchard.Core,然后增加下面的代码:
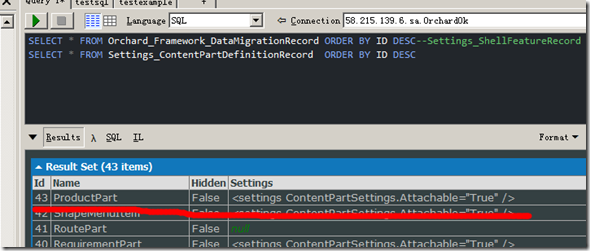
编译,刷新下后台,查看数据库:

发现 version 为 2 了,并且,Settings_ContentPartDefinitionRecord 表多了行数据:
并且,进入后台

发现,多了:

Edit 之,发现为:
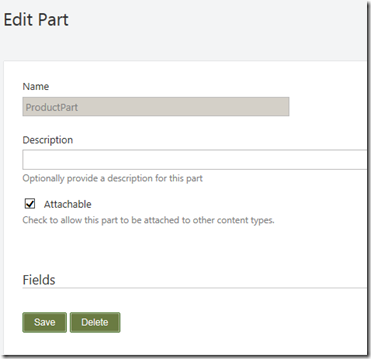
这正是我们的代码所定义的。
四:添加 Driver
现在,我们 Content -> Content Types and Create new Type,取名为 Book,并且,选择:Body, Comments, Product, Title, Autoroute, and Tags ,然后保存,然后,重复以上,添加 DVD。
当到了这个时候,如果我们去添加 book,我们会发现,并没有看到 Price 和 SKU,它们在哪里呢?是的,我们还缺少一个 Driver,
Driver 类似于 MVC 控制器,但是它对 contentpart 负责。典型的,它有三个方法:一个用于 part 的前台显式,一个用于后台 edit 模式下的显式,一个用于处理用户在保存 content item的时候(这个时候,part 被 attached)。
其返回值为 DriverResult,当然,大部分情况下,实际上返回为 ShapeResult(从 DriverResult 继承)。ShapeResult 告诉 Orchard,Razor 模版如何 render part。
现在,创建之:
1:首先,创建 Drivers 目录;
2:创建 ProductPartDriver:
using Orchard.ContentManagement;
using Orchard.ContentManagement.Drivers;
using System;
using System.Collections.Generic;
using System.Linq;
using System.Text;
using System.Threading.Tasks;
using TMinji.Shop.Models;namespace TMinji.Shop.Drivers
{
public class ProductPartDriver : ContentPartDriver<ProductPart>
{protected override string Prefix
{
get { return "Product"; }
}protected override DriverResult Editor(ProductPart part, dynamic shapeHelper)
{
return ContentShape("Parts_Product_Edit", () => shapeHelper
.EditorTemplate(TemplateName: "Parts/Product", Model: part, Prefix: Prefix));
}protected override DriverResult Editor(ProductPart part, IUpdateModel updater, dynamic shapeHelper)
{
updater.TryUpdateModel(part, Prefix, null, null);
return Editor(part, shapeHelper);
}}
}
现在,有必要对代码进行一下说明:
1:当前的 Driver 有两个方法,一个在显示 ProductPart 的 editor 的时候被嗲用,一个在后台提交 editor 表单的时候被调用(含 updater 的那个方法)。
2:我们把我们的 shape 命名为 Parts_Product_Edit,这样子,它的视图就是 Views/EditorTemplates/parts/product.cshtml。
现在,不妨来添加这个视图
@using System.Web.Mvc.Html
@model TMinji.Shop.Models.ProductPart
<fieldset>
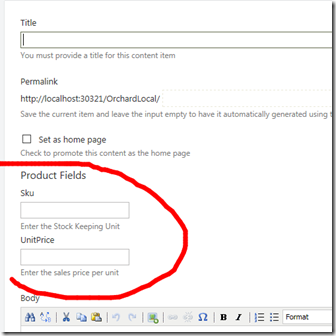
<legend>Product Fields</legend><div class="editor-label">@Html.LabelFor(x => x.Sku)</div>
<div class="editor-field">
@Html.EditorFor(x => x.Sku)
@Html.ValidationMessageFor(x => x.Sku)
</div>
<div class="hint">Enter the Stock Keeping Unit</div><div class="editor-label">@Html.LabelFor(x => x.UnitPrice)</div>
<div class="editor-field">
@Html.EditorFor(x => x.UnitPrice)
@Html.ValidationMessageFor(x => x.UnitPrice)
</div>
<div class="hint">Enter the sales price per unit</div>
</fieldset>
为了让这个视图能正确呈现,我们还需要就加入引用
System.Web
System.Web.Mvc
System.Web.WebPages
前者在 全局程序集 下,后两者,则可以在 lib\aspnetmvc 下可以找到(顺注:你一定知道这个 lib 就是哪个 lib)。
然后,我们根目录还缺少一个 web.config,我建议你直接从 blog 那个模块下面进行拷贝,(顺注:我的 orchard 是 1.8 版本):
<?xml version="1.0"?>
<configuration>
<configSections>
<sectionGroup name="system.web.webPages.razor" type="System.Web.WebPages.Razor.Configuration.RazorWebSectionGroup, System.Web.WebPages.Razor, Version=3.0.0.0, Culture=neutral, PublicKeyToken=31BF3856AD364E35">
<remove name="host"/>
<remove name="pages"/>
<section name="host" type="System.Web.WebPages.Razor.Configuration.HostSection, System.Web.WebPages.Razor, Version=3.0.0.0, Culture=neutral, PublicKeyToken=31BF3856AD364E35" requirePermission="false"/>
<section name="pages" type="System.Web.WebPages.Razor.Configuration.RazorPagesSection, System.Web.WebPages.Razor, Version=3.0.0.0, Culture=neutral, PublicKeyToken=31BF3856AD364E35" requirePermission="false"/>
</sectionGroup>
</configSections>
<system.web.webPages.razor>
<host factoryType="System.Web.Mvc.MvcWebRazorHostFactory, System.Web.Mvc, Version=5.1.0.0, Culture=neutral, PublicKeyToken=31bf3856ad364e35"/>
<pages pageBaseType="Orchard.Mvc.ViewEngines.Razor.WebViewPage">
<namespaces>
<add namespace="System.Web.Mvc"/>
<add namespace="System.Web.Mvc.Ajax"/>
<add namespace="System.Web.Mvc.Html"/>
<add namespace="System.Web.Routing"/>
<add namespace="System.Web.WebPages"/>
<add namespace="System.Linq"/>
<add namespace="System.Collections.Generic"/>
<add namespace="Orchard.Mvc.Html"/>
</namespaces>
</pages>
</system.web.webPages.razor>
<system.web>
<compilation targetFramework="4.5">
<assemblies>
<add assembly="System.Web.Abstractions, Version=4.0.0.0, Culture=neutral, PublicKeyToken=31bf3856ad364e35"/>
<add assembly="System.Web.Routing, Version=4.0.0.0, Culture=neutral, PublicKeyToken=31bf3856ad364e35"/>
<add assembly="System.Data.Linq, Version=4.0.0.0, Culture=neutral, PublicKeyToken=B77A5C561934E089"/>
<add assembly="System.Web.Mvc, Version=5.1.0.0, Culture=neutral, PublicKeyToken=31bf3856ad364e35"/>
<add assembly="System.Web.WebPages, Version=3.0.0.0, Culture=neutral, PublicKeyToken=31bf3856ad364e35"/>
</assemblies>
</compilation>
</system.web>
</configuration>
然后,在根目录下,在创建一个 Placement.info,
<Placement>
<Place Parts_Product_Edit="Content:1" />
</Placement>
这是告诉 Orchard,请显式在 Widget 的 Content 部位。
现在,我们可以看到:
五:添加 handler(持久化数据)
我们来添加下面的数据:
Books:
- The Hobbit, $50, SKU-1001
- Wizard's First Rule, $39, SKU-1002
- The Hunger Games, $29, SKU-1003
DVDs:
- Prometheus, $30, SKU-1004
- The Shawshank Redemption, $25, SKU-1005
- The Dark Knight, $20, SKU-1006
然后,保存成功,然后,我们打算修改这些数据,结果发现 Price 和 Sku 是空的,这是为什么呢?因为我们还没有实现持久化哦。要让 Orchard 持久化数据,我们需要:
1:创建 Handlers 文件夹;
2:添加 ProductPartHandler,如下:
public class ProductPartHandler : ContentHandler
{
public ProductPartHandler(IRepository<ProductPartRecord> repository)
{
Filters.Add(StorageFilter.For(repository));
}
}
现在,我们发现可以增删数据了。去查查数据库吧:

Orchard模块开发全接触2:新建 ProductPart的更多相关文章
- Orchard模块开发全接触1:起步
在<http://www.cnblogs.com/luminji/p/3831281.html>中简单介绍了 Orchard 的模块开发,接下来,我们需要做个更复杂的例子,Orchard ...
- Orchard模块开发全接触7:订单与支付之Event Bus
在这部分,我们要完成的工作有: 1:将购物车内的商品变成真正的订单: 2:理解 父子及一对多关系: 3:写一个针对 Event Bus 的扩展点: 4:实现一个针对该扩展点的模拟的 支付服务: 一:创 ...
- Orchard模块开发全接触5:深度改造前台第二部分
在这一部分,我们继续完善我们的购物车,我们要做以下一些事情: 1:完成 shoppingcart.cshtml: 2:让用户可以更新数量及从购物车删除商品: 3:创建一个 widget,在上面可以看到 ...
- Orchard模块开发全接触4:深度改造前台
这里,我们需要做一些事情,这些事情意味着深度改造前台: 1:为商品增加 添加到购物车 按钮,点击后功能实现: 2:商品排序: 3:购物车预览,以及添加 结算 按钮: 4:一个显式 购物车中有*个 商品 ...
- Orchard模块开发全接触3:分类的实现及内容呈现(Display)
一:分类用现有技术怎么实现? 实际就是创建 Query 和 Projection,如果不知道怎么做,参考:Orchard之在前台显式一个属于自己的列表(在这篇里,还进行了稍稍拓展),当然,基础的知道, ...
- Orchard模块开发全接触6:自定义用户注册
我们都知道 Orchard 的用户注册相当简单,现在,我们需要一个自定义的用户注册,现在,开始吧. 一:定义实体 Models/CustomerPartRecord.cs: public class ...
- Orchard模块开发全接触8:改造后台
后台默认提供了 Content 的管理,但是,所有的内容类型揉杂在一起,而我们需要更深度的定制一些功能,比如,我们只想管理订单,又比如,我们需要对注册用户进行管理.本篇的内容包括: 1:自定义 adm ...
- Orchard 模块开发学习笔记 (1)
创建模块 首先,打开Bin目录下的Orchard.exe 等到出现orchard>后, 看看命令列表中是否存在 codegen module 如果不存在,则需要先执行:feature enabl ...
- Odoo9.0模块开发全流程
构建Odoo模块 模块组成 业务对象 业务对象声明为Python类, 由Odoo自己主动加载. 数据文件 XML或CSV文件格式, 在当中声明了元数据(视图或工作流).配置数据(模块參数).演示数据等 ...
随机推荐
- THUSC 2018 酱油记
THUSC 2018 酱油记 游记分类:游记 Day \((-inf,-2]\) 自CTSC和APIO挂烂以后,仍然在停课集训,不过好像这两波考试让我的RP涨了一大波,因此模拟赛大多都考的不错,虽然经 ...
- C语言:指针实现输出梯形字符串
用指针实现,实现过程无需将子串复制到一个新的字符串中.(10分) 题目内容: 用指针实现,实现过程无需将子串复制到一个新的字符串中. 输入格式: 字符串 输出格式: 子串 输入样例: computer ...
- 【BZOJ】4292: [PA2015]Równanie
题解 \(f(n)\)的取值范围最多\(9^2 * 18\) 直接枚举判断就好 代码 #include <bits/stdc++.h> #define fi first #define s ...
- ERROR 2003 (HY000): Can't connect to MySQL server on "192.168.xxx.xxx" (111)
mac homebrew 安装的mysql5.6 除本机外无法被其他ip的电脑访问. 网上查原因 有几个: 1.my.cnf配置中 查看是否有 bind-address = 127.0.0.1 ...
- SpringBoot的Controller使用
一: 1.注解 2.control注解 3.效果 4.RespomseBody package com.caojun.springboot; import org.springframework.be ...
- 006.Zabbix添加监控主机
一 配置步骤和流程 Zabbix完整的监控配置流程可以简单的描述为: Host groups(主机组)---->Hosts(主机)---->Applications(监控项组)----&g ...
- JAVAEE——宜立方商城14:项目部署规划、Tomcat热部署、反向代理的配置
1. 学习计划 1.系统部署 2. 项目部署 2.1. 项目架构讲解 2.2. 网络拓扑图 2.3. 系统部署 2.3.1. 部署分析 e3-manager e3-manager-web e3-por ...
- mount: unknown filesystem type 'vboxsf' centos ubuntu 处理方案
Vagrant was unable to mount VirtualBox shared folders. This is usually because the filesystem " ...
- hdu 4438 第37届ACM/ICPC 天津赛区现场赛H题
题意:Alice和Bob两个人去打猎,有两种(只)猎物老虎和狼: 杀死老虎得分x,狼得分y: 如果两个人都选择同样的猎物,则Alice得分的概率是p,则Bob得分的概率是(1-p): 但是Alice事 ...
- 使用NewLife网络库构建可靠的自动售货机Socket服务端(一)
最近有个基于tcp socket 协议和设备交互需求,想到了新生命团队的各种组件,所以决定用NewLife网络库作为服务端来完成一系列的信息交互. 第一,首先说一下我们需要实现的功能需求吧 1,首先客 ...