Tensorflow学习笔记No.11
图像定位
图像定位是指在图像中将我们需要识别的部分使用定位框进行定位标记,本次主要讲述如何使用tensorflow2.0实现简单的图像定位任务。
我所使用的定位方法是训练神经网络使它输出定位框的四个顶点的坐标,通过这四个坐标来定位需要识别对象的位置。
数据集:https://pan.baidu.com/s/1dv-r19KixYhA1CfX2n06Hg 提取码:2kbc (数据集中的压缩文件需要解压)
1.数据读入
1.1图片读入
图片的读入在前面的博客中已经展示过很多次了,这里不再赘述,详情可以参考Tensorflow学习笔记No.5,里面详细介绍了读取图片的过程。
图像定位数据集的标签与之前的分类任务不同,是一个xml文件,我们需要使用爬虫从文件中爬取需要的信息。
导入需要的库
1 import tensorflow as tf

2 import numpy as np

3 import matplotlib.pyplot as plt

4 from lxml import etree

5 import glob

6 %matplotlib inline

7 import pathlib

8 from matplotlib.patches import Rectangle
首先设置路径
1 image_root =  pathlib.Path("E:/BaiduNetdiskDownload/图片定位与分割数据集/images")

2 label_root = pathlib.Path('E:/BaiduNetdiskDownload/图片定位与分割数据集/annotations/xmls')
通过.glob()方法获得所有的图片和标签路径,并转换为字符串的形式。
1 all_image_path = list(image_root.glob('*.jpg'))

2 all_label_path = list(label_root.glob('*.xml'))

3

4 all_image_path = [str(p) for p in all_image_path]

5 all_label_path = [str(p) for p in all_label_path]
然后简单展示一下我们的数据集是什么样子的,同时简单讲解一下如何使用爬虫爬取需要的信息。
随便找一找图片作为例子。
1 path = all_image_path[0]

2 path_ = all_label_path[0]

3

4 #path E:\\BaiduNetdiskDownload\\图片定位与分割数据集\\images\\Abyssinian_1.jpg

5 #path_ E:\\BaiduNetdiskDownload\\图片定位与分割数据集\\annotations\\xmls\\Abyssinian_1.xml
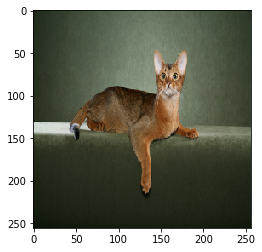
首先解码并输出这张图片(我使用的是jypyter notebook进行可视化)
1 img = tf.io.read_file(path)

2 img = tf.image.decode_jpeg(img)

3 plt.imshow(img)
得到如下图片:

1.2xml文件解析与数据爬取
我们本次的图像定位任务是定位动物的头部,也就是说我们得到的输出结果是把动物的头部框起来。
接下来对xml文件进行解析,文件内容如下:

文件中是非常整齐的xml格式
<name>和</name>就相当于一对括号把其中的内容括起来,里面的内容就属于这个标签之下。例如上图中的annotation就是最大的标签,里面包含了folder、source等标签(有点类似电脑里的文件夹?)。
我们可以使用爬虫来访问这种整齐格式之中的内容
首先使用python自带的open方法打开这个xml文件
1 xml = open(path_).read()
然后创建一个选择器来对内容进行访问
1 sel = etree.HTML(xml)
sel.xpath()方法可以访问xml文件中某个目录下的内容,我们用这个方法获得其中的文本信息。
例如,我们可以获得长宽信息,width和height位于size标签下,用text()访问其中的文本内容,内容会以字符串列表的形式返回。
由于只有一个长宽信息,我们直接取列表的首位元素转换成int类型即可。
1 width = int(sel.xpath('//size/width/text()')[0])

2 height = int(sel.xpath('//size/height/text()')[0])
同样的我们获取其他需要的信息。
1 xmin = int(sel.xpath('//bndbox/xmin/text()')[0])

2 ymin = int(sel.xpath('//bndbox/ymin/text()')[0])

3 xmax = int(sel.xpath('//bndbox/xmax/text()')[0])

4 ymax = int(sel.xpath('//bndbox/ymax/text()')[0])
事实上我们只需要知道左上和右下的顶点坐标即可确定一个矩形框,xmin,ymin代表左上角的坐标,xmax,ymax代表右上角的坐标。
我们把这个框展示在图片中看一下效果
1 plt.imshow(img)

2 rect = Rectangle((xmin, ymin), (xmax - xmin), (ymax - ymin), fill = False, color = 'blue')

3 pimg = plt.gca()

4 pimg.axes.add_patch(rect)
得到如下所示图片:
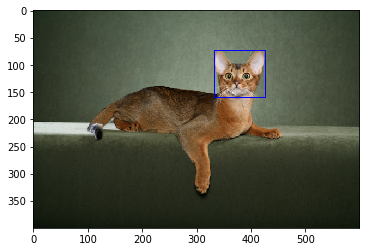
可以看到猫猫的头部被框起来了(爱猫人士表示强烈谴责),这就是我们最终想要得到的效果。我们希望神经网络能够识别出动物的头像并把它框出来。
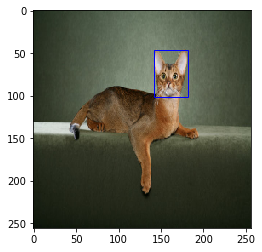
事实上我们的图片大小各不相同,但神经网络的输入尺寸是固定的,所有我们要把图片和lable坐标转换到同一尺度上,即224×224。
方法如下,同时输出效果图:
 1 img = tf.image.resize(img, (256, 256))

 2 img = img / 255

 3 plt.imshow(img)

 4

 5 xmin = xmin / width * 256

 6 xmax = xmax / width * 256

 7 ymin = ymin / height * 256

 8 ymax = ymax / height * 256

 9

10 plt.imshow(img)

11 rect = Rectangle((xmin, ymin), (xmax - xmin), (ymax - ymin), fill = False, color = 'blue')

12 pimg = plt.gca()

13 pimg.axes.add_patch(rect)
1.3数据集构建
我们的数据集中并非每一张图片都有对应的xml文件,所以我们只用有label的数据作为训练集和验证集。(共3686张可训练数据)
首先我们把标签的文件名从路径中分割出来,图片与标签名称一致,通过这种方式来筛选出我们需要的图片。
1 names = [x.split('\\')[-1].split('.xml')[0] for x in all_label_path]

2 train_image = [i for i in all_image_path if i.split('\\')[-1].split('.jpg')[0] in names]

3 train_image.sort(key=lambda x: x.split('\\')[-1].split('.jpg')[0])

4 all_label_path.sort(key=lambda x: x.split('\\')[-1].split('.xml')[0])
通过排序可以保证label和图片一一对应
然后我们将之前爬取并处理数据尺寸的方法写成函数
 1 def to_label(path):

 2     xml = open(r'{}'.format(path)).read()

 3     sel = etree.HTML(xml)

 4     width = int(sel.xpath('//size/width/text()')[0])

 5     height = int(sel.xpath('//size/height/text()')[0])

 6     xmin = int(sel.xpath('//bndbox/xmin/text()')[0])

 7     ymin = int(sel.xpath('//bndbox/ymin/text()')[0])

 8     xmax = int(sel.xpath('//bndbox/xmax/text()')[0])

 9     ymax = int(sel.xpath('//bndbox/ymax/text()')[0])

10     return [xmin / width, ymin / height, xmax / width, ymax / height]
我们用这个函数来处理数据的标签部分,同时分为四部分,对应了两个顶点的xy坐标,也就是神经网络的四个输出。
1 labels = [to_label(p) for p in all_label_path]

2 out1, out2, out3, out4 = list(zip(*labels))
下面进行乱序处理(这一步非常重要,否则模型训练的效果非常差,我一开始训练的时候拟合效果差就是因为没乱序。。。嘤嘤嘤ε(┬┬﹏┬┬)3)
1 index = np.random.permutation(len(train_image))

2 images = np.array(train_image)[index]

3

4 out1 = np.array(out1)[index]

5 out2 = np.array(out2)[index]

6 out3 = np.array(out3)[index]

7 out4 = np.array(out4)[index]
使用index列表来保证乱序后图片和标签依然一一对应。
然后将其封装为dataset类型的数据
1 label_data = tf.data.Dataset.from_tensor_slices((out1, out2, out3, out4))
下面就是对图片的尺寸变换和封装处理了
 1 def load_image(path):

 2     img = tf.io.read_file(path)

 3     img = tf.image.decode_jpeg(img, channels = 3)

 4     img = tf.image.resize(img, (224, 224))

 5     img = tf.cast(img, tf.float32)

 6     img = img / 127.5 - 1

 7     return img

 8

 9 image_data = tf.data.Dataset.from_tensor_slices(images)

10 image_data = image_data.map(load_image)
完成后再将image_data和label_data合并成为一个dataset,然后分成训练集和验证集。
 1 dataset = tf.data.Dataset.zip((image_data, label_data))

 2

 3 image_count = len(train_image)

 4 train_count = int(image_count * 0.8)

 5 test_count = image_count - train_count

 6 train_dataset = dataset.take(train_count)

 7 test_dataset = dataset.skip(train_count)

 8

 9 BATCH_SIZE = 8

10 STEPS_PER_EPOCH = train_count // BATCH_SIZE

11 VALIDATION_STEPS = test_count // BATCH_SIZE

12

13 train_dataset = train_dataset.shuffle(train_count).repeat().batch(BATCH_SIZE)

14 train_dataset = train_dataset.prefetch(buffer_size=tf.data.experimental.AUTOTUNE)

15 test_dataset = test_dataset.batch(BATCH_SIZE)
数据集构建完毕,下一步就是模型的构建。
2.模型构建与训练
不难发现这次的任务依然需要多输出模型来完成。我们选用预训练的Xception-Net的卷积部分作为卷积基来构建多输出模型。
迁移学习请参考Tensorflow学习笔记No.8,多输出模型请参考Tensorflow学习笔记No.10
模型如下:
 1 xception = tf.keras.applications.Xception(weights='imagenet',

 2                                           include_top=False,

 3                                           input_shape=(224, 224, 3))

 4

 5 xception.trianable = False

 6

 7 inputs = tf.keras.layers.Input(shape=(224, 224, 3))

 8

 9 x = xception(inputs)

10

11 x = tf.keras.layers.GlobalAveragePooling2D()(x)

12

13 x = tf.keras.layers.Dense(2048, activation='relu')(x)

14 x = tf.keras.layers.Dense(256, activation='relu')(x)

15

16 out1 = tf.keras.layers.Dense(1)(x)

17 out2 = tf.keras.layers.Dense(1)(x)

18 out3 = tf.keras.layers.Dense(1)(x)

19 out4 = tf.keras.layers.Dense(1)(x)

20

21 predictions = [out1, out2, out3, out4]

22

23 model = tf.keras.models.Model(inputs=inputs, outputs=predictions)
由于输出的是坐标,是一个大于0的数字,所以输出层可以直接去掉激活函数。
随后对模型进行训练,损失函数选择均方误差MSE
 1 model.compile(optimizer = tf.keras.optimizers.Adam(lr = 0.0001),

 2               loss = 'mse',

 3               metrics = ['mae']

 4              )

 5

 6 history = model.fit(train_dataset,

 7                           epochs=10,

 8                           steps_per_epoch=STEPS_PER_EPOCH,

 9                           validation_steps=VALIDATION_STEPS,

10                           validation_data=test_dataset)
训练结果如图所示:
 1 loss = history.history['loss']

 2 val_loss = history.history['val_loss']

 3

 4 epochs = range(10)

 5

 6 plt.figure()

 7 plt.plot(epochs, loss, 'r', label='Training loss')

 8 plt.plot(epochs, val_loss, 'bo', label='Validation loss')

 9 plt.title('Training and Validation Loss')

10 plt.xlabel('Epoch')

11 plt.ylabel('Loss Value')

12 plt.ylim([0, 0.15])

13 plt.legend()

14 plt.show()

可以发现loss最初下降的很快然后逐渐减缓,最终的拟合效果也不错。
然后我们找一组图片试试模型效果。
 1 plt.figure(figsize = (6, 6))

 2 for img, _ in test_dataset.skip(1).take(1):

 3     out1, out2, out3, out4 = model.predict(img)

 4     for i in range(0, 6):

 5         plt.subplot(2, 3, i + 1)

 6         plt.imshow(tf.keras.preprocessing.image.array_to_img(img[i]))

 7         xmin, ymin, xmax, ymax = out1[i] * 224, out2[i] * 224, out3[i] * 224, out4[i] * 224,

 8         rect = Rectangle((xmin, ymin), (xmax - xmin), (ymax - ymin), fill = False, color = 'red')

 9         ax = plt.gca()

10         ax.axes.add_patch(rect)

效果还不错,嘿嘿ヾ(≧▽≦*)o
本次对图像定位的介绍到这里就结束了,Bey~ o(* ̄▽ ̄*)ブ
Tensorflow学习笔记No.11的更多相关文章
- Tensorflow学习笔记2019.01.03
tensorflow学习笔记: 3.2 Tensorflow中定义数据流图 张量知识矩阵的一个超集. 超集:如果一个集合S2中的每一个元素都在集合S1中,且集合S1中可能包含S2中没有的元素,则集合S ...
- 深度学习-tensorflow学习笔记(1)-MNIST手写字体识别预备知识
深度学习-tensorflow学习笔记(1)-MNIST手写字体识别预备知识 在tf第一个例子的时候需要很多预备知识. tf基本知识 香农熵 交叉熵代价函数cross-entropy 卷积神经网络 s ...
- tensorflow学习笔记(4)-学习率
tensorflow学习笔记(4)-学习率 首先学习率如下图 所以在实际运用中我们会使用指数衰减的学习率 在tf中有这样一个函数 tf.train.exponential_decay(learning ...
- tensorflow学习笔记(1)-基本语法和前向传播
tensorflow学习笔记(1) (1)tf中的图 图中就是一个计算图,一个计算过程. 图中的constant是个常量 计 ...
- tensorflow学习笔记——使用TensorFlow操作MNIST数据(2)
tensorflow学习笔记——使用TensorFlow操作MNIST数据(1) 一:神经网络知识点整理 1.1,多层:使用多层权重,例如多层全连接方式 以下定义了三个隐藏层的全连接方式的神经网络样例 ...
- TensorFlow学习笔记——LeNet-5(训练自己的数据集)
在之前的TensorFlow学习笔记——图像识别与卷积神经网络(链接:请点击我)中了解了一下经典的卷积神经网络模型LeNet模型.那其实之前学习了别人的代码实现了LeNet网络对MNIST数据集的训练 ...
- tensorflow学习笔记——VGGNet
2014年,牛津大学计算机视觉组(Visual Geometry Group)和 Google DeepMind 公司的研究员一起研发了新的深度卷积神经网络:VGGNet ,并取得了ILSVRC201 ...
- tensorflow学习笔记——使用TensorFlow操作MNIST数据(1)
续集请点击我:tensorflow学习笔记——使用TensorFlow操作MNIST数据(2) 本节开始学习使用tensorflow教程,当然从最简单的MNIST开始.这怎么说呢,就好比编程入门有He ...
- TensorFlow学习笔记(一)
[TensorFlow API](https://www.tensorflow.org/versions/r0.12/how_tos/variable_scope/index.html) Tensor ...
随机推荐
- 接口自动化测试:apiAutoTest使用re 处理数据依赖
目录 废话 2020/11/19 参数依赖 更新后的效果 新版依赖数据如何使用 源码地址 道谢 废话 目前在工作中写脚本的时候发现了一些之前开源的apiAutoTest的可优化项,后面应该也是会慢慢的 ...
- 如何避免Cephfs被完全毁掉
前提 一套系统的最低要求是可恢复,也就是数据不丢失,但是在各种各样的原因下,整套系统都有被毁掉的可能,一直以来有个观点就是存储是需要两套的,一般情况下很难实现,但是如何把故障发生的概率降低到最低,这个 ...
- linux下制作软件包安装服务器
linux下的软件包在有网络的情况下比较好安装,在ubuntu下,更新sourcelist,然后使用apt-get就可以很方便的安装包,在centos下面,更新yum列表,然后使用yum也可以进行方便 ...
- JS中 `=+` 是什么?
JS中 =+ 是什么? 依然是赋值 =是赋值,+代表后面的数字为正数,同理=-代表后面的数字为负数 用处 相当于告诉编译器,即将赋值的数值类型为数字类型,不要把数字当作字符串去拼接 示例 functi ...
- Redis实现分布式缓存
Redis 分布式缓存实现(一) 1. 什么是缓存(Cache) 定义:就是计算机内存中的一段数据: 2. 内存中数据特点 a. 读写快 b. 断电立即丢失 3. 缓存解决了什么问题? a. 提 ...
- SNMP介绍及使用,超有用,建议收藏!
写在前面 如果你是对SNMP完全不了解,或者只想学习如何使用现成的SNMP工具,那你找对了文章,但如果你希望学习SNMP具体协议内容,推荐阅读官方的RFC文档. 1. 简介 SNMP(Simple N ...
- java中高级面试利器(boot,cloud,vue前后端提升)
https://github.com/Snailclimb/JavaGuide Java知识大全(面试) https://github.com/doocs/advanced-java Java工 ...
- 重新认识Lombok
Lombok插件 简介 那么lombok到底是个什么呢,lombok是一个可以通过简单的注解的形式来帮助我们简化消除一些必须有但显得很臃肿的 Java 代码的工具,简单来说,比如我们新建了一个类,然后 ...
- 知识解析:C语言函数有一些什么?为你呈现最全函数大全
大家双节快乐呀~国庆节过去了一半,大家放了几天假呀?玩的开心吗? 如果假日没有其他安排,不要宅在家虚度光阴哦~看看我的文章或者视频学习一些知识吧~ 今天为大家分享C语言库函数知识. 以下图片以字母 ...
- 分享:经常说你精通C语言,看看这十道题你会不会解!
今天给大家分享我们在日常工作中可能遇到的疑问,不看答案,你是否有把握都能答对?让我们来试试吧~ 一.会输出"hello-std-out"? 参考答案: stdout和stder ...