猫映射(Arnold变换),猫脸变换介绍与基于例题脚本的爆破
前置信息
http://www.jiamisoft.com/blog/index.php/7249-erzhituxiangjiamisuanfaarnold.html
https://mp.weixin.qq.com/s/IbkAlyAPvbgMeNgqfwisTg
Arnold变换
Arnold变换是V.J.Arnold在遍历理论的研究中提出的一种变换,原意为catmapping,俗称猫脸变换。Arnold变换直观、简单、具有周期性,使用非常方便。Arnold变换的原理是先作x轴方向的错切变换,再作y轴方向的错切变换,最后的模运算相当于切割回填操作。
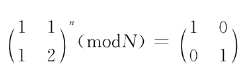
当对图像进行Arnold变换时,就是把图像的各个像素点位置按照下列公式进行移动,

从而得到一个相对原图像比较混乱的图像。对图像每进行一次Arnold变换,就相当于对该图像进行了一次置乱,一般来说这一过程需要反复进行多次才能达到令人满意的效果。利用Arnold变换对图像进行置乱后,使原本有意义的图像变成了像白噪声一样无意义的图像,从而实现了信息的初步隐藏。同时置乱次数可以作为水印系统的密钥,从而进一步增强系统的安全性和保密性。
Arnold变换也是具有周期性的。F.J.Dyson和H.Falk在分析离散Arnold变换的周期性时,给出了这样的结论:对于任意的N>2,Arnold变换的周期L≤N2/2。这是迄今为止最好的结果。计算Arnold周期的方法,对于给定的自然数N>2,下式的Arnold变换周期M是使得它成立的最小自然数n。
反变换查看原文,就不多赘述了
基于pillow库的加密实现
from PIL import Image

def arnold(infile: str, outfile: str = None, a: int = 1, b: int = 1, shuffle_times: int = 1, reverse: bool = False) -> None:

"""

Arnold猫脸变换函数

    Parameters:

infile - 输入图像路径

outfile - 输出图像路径

a - Anrold 变换参数

b - Anrold 变换参数

shuffle_times - 置乱次数

reverse - 逆变换

"""

inimg = Image.open(infile)

width, height = inimg.size

indata = inimg.load()

outimg = Image.new(inimg.mode, inimg.size)

outdata = outimg.load()

    for _ in range(shuffle_times):

        for x in range(width):

           for y in range(height):

                 if reverse:

                      nx = ((a * b + 1) * x - a * y) % width

                      ny = (y - b * x) % height

                 else:

                      nx = (x + a * y) % width

                      ny = (b * x + (a * b + 1) * y) % height

                     outdata[ny, nx] = indata[y, x]

            outimg.save(outfile if outfile else "arnold_"+infile, inimg.format)

arnold("before.png", "encode.png", 9, 39, 1)

arnold("encode.png", "decode.png", 9, 39, 1, True)
2024鹏程杯
import numpy as np

import cv2

def arnold_decode(image, arnold_times):

    a = 7

    b = 35

    # 创建新的解码图像,初始化为全0,数据类型为uint8

    decode_image = np.zeros(shape=image.shape, dtype=np.uint8)

    height, width = image.shape[0], image.shape[1]

    N = height  # N是正方形的边长

    for _ in range(arnold_times):  # 进行arnold_times次变换

        for old_x in range(height):

            for old_y in range(width):

                # 计算新的像素坐标

                new_x = ((a * b + 1) * old_x + (-a) * old_y) % N

                new_y = ((-b) * old_x + old_y) % N

                decode_image[new_x, new_y, :] = image[old_x, old_y, :]

    # 保存解码后的图像,确保图像保存成功

    try:

        cv2.imwrite('flag.png', decode_image, [int(cv2.IMWRITE_PNG_COMPRESSION), 0])  # 以PNG格式保存图像

        print("解码图像已保存为 flag.png")

    except Exception as e:

        print(f"保存图像时发生错误: {e}")

    return decode_image

if __name__ == '__main__':

    # 读取图像并确保图像加载成功

    image = cv2.imread('4.jpg')

    if image is not None:

        arnold_decode(image, 1)  # 此处arnold_times设置为1

    else:

        print("图像加载失败,请检查文件路径。")
2024源鲁杯CTFMisc
    image = np.array(image)

    arnold_image = np.zeros(shape=image.shape, dtype=image.dtype)

    h, w = image.shape[0], image.shape[1]

    N = h

    for _ in range(shuffle_times):

        for ori_x in range(h):

            for ori_y in range(w):

                new_x = (1*ori_x + b*ori_y)% N

                new_y = (a*ori_x + (a*b+1)*ori_y) % N

                if mode == '1':

                    arnold_image[new_x, new_y] = image[ori_x, ori_y]

                else:

                    arnold_image[new_x, new_y, :] = image[ori_x, ori_y, :]

    return Image.fromarray(arnold_image)

import numpy as np

from PIL import Image

def arnold_decode(image, shuffle_times=10, a=1, b=1, mode='1'):

    image = np.array(image)

    decode_image = np.zeros(shape=image.shape, dtype=image.dtype)

    h, w = image.shape[0], image.shape[1]

    N = h

    for _ in range(shuffle_times):

        for ori_x in range(h):

            for ori_y in range(w):

                new_x = ((a*b+1)*ori_x + (-b)* ori_y)% N

                new_y = ((-a)*ori_x + ori_y) % N

                if mode == '1':

                    decode_image[new_x, new_y] = image[ori_x, ori_y]

                else:

                    decode_image[new_x, new_y, :] = image[ori_x, ori_y, :]

    return Image.fromarray(decode_image)

img = Image.open('flag.png')

decode_img = arnold_decode(img)

decode_img.save('flag-output.png')
2024源鲁杯CTFCrypto
import matplotlib.pyplot as plt

import cv2

import numpy as np

from PIL import Image

def de_arnold(img,shuffle_time,a,b):

    r, c, d = img.shape

    dp = np.zeros(img.shape, np.uint8)

    for s in range(shuffle_time):

        for i in range(r):

            for j in range(c):

                x = ((a * b + 1) * i - b * j) % r

                y = (-a * i + j) % c

                dp[x, y, :] = img[i, j, :]

        img = np.copy(dp)

    cv2.imwrite(f"flag.png",img)

img_en = cv2.imread('en_flag.png')

de_arnold(img_en, 3,6, 9)
0xGame2024Misc
from PIL import Image
img = Image.open('mijiha.png')
if img.mode == "P":
img = img.convert("RGB")
assert img.size[0] == img.size[1]
dim = width, height = img.size
st = 1
a = 35
b = 7
for _ in range(st):
with Image.new(img.mode, dim) as canvas:
for nx in range(img.size[0]):
for ny in range(img.size[0]):
y = (ny - nx * a) % width
x = (nx - y * b) % height
canvas.putpixel((y, x), img.getpixel((ny, nx)))
canvas.show()
canvas.save('flag.png')
了解这些比赛例题解密代码后
如果只知道啊a,b不知道翻转次数
那我们只有一个办法,爆破。
这是基于理解修改的一个爆破脚本
import os

import cv2

import numpy as np

def de_arnold(img, shuffle_time, a, b):

    r, c, d = img.shape

    dp = np.zeros(img.shape, np.uint8)

    for s in range(shuffle_time):

        for i in range(r):

            for j in range(c):

                x = ((a * b + 1) * i - b * j) % r

                y = (-a * i + j) % c

                dp[x, y, :] = img[i, j, :]

        img = np.copy(dp)

    return img

# 参数设置

a, b = ?,  ? # Arnold变换的参数

max_attempts = ? # 爆破的最大尝试次数

output_dir = "decrypted_images"  # 输出文件夹

os.makedirs(output_dir, exist_ok=True)

# 读取加密图片

img_en = cv2.imread('en_flag.png')

if img_en is None:

    raise FileNotFoundError("加密图片未找到,请检查路径和文件名是否正确。")

# 开始爆破

for shuffle_time in range(1, max_attempts + 1):

    img_decrypted = de_arnold(img_en, shuffle_time, a, b)

    output_path = os.path.join(output_dir, f"flag_{shuffle_time}.png")

    cv2.imwrite(output_path, img_decrypted)

    print(f"解密图片已保存: {output_path}")

print(f"爆破完成,共生成 {max_attempts} 张解密图片,保存在文件夹: {output_dir}")
题目一个数据没给,我们可以直接对3个未知量直接进行爆破,注意一下能爆破说明数值不是很大
import matplotlib.pyplot as plt

import cv2

import numpy as np

def arnold_decode(image, shuffle_times, a, b):

    """ decode for rgb image that encoded by Arnold

    Args:

        image: rgb image encoded by Arnold

        shuffle_times: how many times to shuffle

    Returns:

        decode image

    """

    # 1:创建新图像

    decode_image = np.zeros(shape=image.shape)

    # 2:计算N

    h, w = image.shape[0], image.shape[1]

    N = h  # 或N=w

    # 3:遍历像素坐标变换

    for time in range(shuffle_times):

        for ori_x in range(h):

            for ori_y in range(w):

                # 按照公式坐标变换

                new_x = ((a * b + 1) * ori_x + (-b) * ori_y) % N

                new_y = ((-a) * ori_x + ori_y) % N

                decode_image[new_x, new_y, :] = image[ori_x, ori_y, :]

        image = np.copy(decode_image)

    return image

def arnold_brute(image,shuffle_times_range,a_range,b_range):

    for c in range(shuffle_times_range[0],shuffle_times_range[1]):

        for a in range(a_range[0],a_range[1]):

            for b in range(b_range[0],b_range[1]):

                print(f"[+] Trying shuffle_times={c} a={a} b={b}")

                decoded_img = arnold_decode(image,c,a,b)

                output_filename = f"flag_decodedc{c}_a{a}_b{b}.png"

                cv2.imwrite(output_filename, decoded_img, [int(cv2.IMWRITE_PNG_COMPRESSION), 0])

if __name__ == "__main__":

    img = cv2.imread("cat.png")

    arnold_brute(img, (1,8), (1,12), (1,12))
这样我们就可以得到原图
猫映射(Arnold变换),猫脸变换介绍与基于例题脚本的爆破的更多相关文章
- Arnold变换(猫脸变换)
Arnold变换是Arnold在遍历理论研究中提出的一种变换.由于Arnold本人最初对一张猫的图片进行了此种变换,因此它又被称为猫脸变换.Arnold变换可以对图像进行置乱,使得原本有意义的图像变成 ...
- 为什么要进行傅立叶变换?傅立叶变换究竟有何意义?如何用Matlab实现快速傅立叶变换
写在最前面:本文是我阅读了多篇相关文章后对它们进行分析重组整合而得,绝大部分内容非我所原创.在此向多位原创作者致敬!!!一.傅立叶变换的由来关于傅立叶变换,无论是书本还是在网上可以很容易找到关于傅立叶 ...
- JavaScript图形实例:图形的扇形变换和环形变换
1.1 扇形变换 将如图1所示的上边长方形的图形变换为下边的扇形图形的变换称为扇形变换. 设长方形图形中任一点P1(X1,Y1)变换为扇形图形上的点P2(X2,Y2),长方形的长为X,扇形圆心坐标为 ...
- FOC中的Clarke变换和Park变换详解(动图+推导+仿真+附件代码)
文章目录 1 前言 2 自然坐标系ABC 3 αβ\alpha\betaαβ 坐标系 3.1 Clarke变换 3.2 Clarke反变换 4 dqdqdq 坐标系 4.1 Park变换 正转 反转 ...
- TOTP 介绍及基于C#的简单实现
TOTP 介绍及基于C#的简单实现 Intro TOTP 是基于时间的一次性密码生成算法,它由 RFC 6238 定义.和基于事件的一次性密码生成算法不同 HOTP,TOTP 是基于时间的,它和 HO ...
- Spark 介绍(基于内存计算的大数据并行计算框架)
Spark 介绍(基于内存计算的大数据并行计算框架) Hadoop与Spark 行业广泛使用Hadoop来分析他们的数据集.原因是Hadoop框架基于一个简单的编程模型(MapReduce),它支持 ...
- Spring AOP 介绍与基于接口的实现
热烈推荐:超多IT资源,尽在798资源网 声明:转载文章,为防止丢失所以做此备份. 本文来自公众号:程序之心 原文地址:https://mp.weixin.qq.com/s/vo94gVyTss0LY ...
- [计算机图形学]视图变换:MVP变换、视口变换
目录 一.MVP变换 1. 模型变换 1.1 缩放矩阵 1.2 旋转矩阵 1.3 平移矩阵 2. 视角变换 3. 投影变换 二.Viewport变换 一.MVP变换 MVP变换是模型变换(M).视角变 ...
- UWP开发-二维变换以及三维变换
在开发中,由于某些需求,我们可能需要做一些平移,缩放,旋转甚至三维变换,所以我来讲讲在UWP中这些变换的实现方法. 一. 二维变换: UIElement.RenderTransform a.Trans ...
- 简单的2d图形变换--仿设变换AffineTransform
在ios中常常遇到些小的动画效果,比如点击一个按钮后,按钮上的三角形图片就旋转了.这种简单的小动画,常常通过更改view的transform属性来实现.这个transform属性,就是一个仿射变化矩阵 ...
随机推荐
- Selenium KPI接口 附件上传
实现功能 拖拽图片到百度上传图片搜索功能区域. 定位.send_keys(r'图片路径') 导入相关包 from selenium import webdriver from time import ...
- # 50 个最常被问到的 Selenium 面试问题和答案
Q #1) 什么是自动化测试? 自动化测试或测试自动化是自动化手动过程以测试被测应用程序/系统的过程.自动化测试涉及使用单独的测试工具,该工具可让您创建可以重复执行且不需要任何手动干预的测试脚本. Q ...
- Vulnhub-sundown
总结:该靶机是一个wordpress管理系统,需要信息收集得到插件信息,然后搜索插件漏洞,得到一个文件包含exp,利用其得到一个普通用户,利用hydra爆破密码然后ssh连接,信息收集得到一个数据库配 ...
- [tldr]windows使用scoop安装make工具辅助程序编译
make是一个好用的GNU工具,用来辅助我们进行自动化的程序编译,只需要一个Makefile文件,即可实现一行指令自动编译 scoop是windows的一个包管理工具 安装 scoop bucket ...
- JMeter 简介
JMeter 下载地址: https://jmeter.apache.org/ apipost 下载地址:(另外一个工具) https://www.apipost.cn/
- sudo: unable to resolve host xxxx: Name or service not known
前言 在 Linux 环境中,我使用 sudo 执行命令,发生报错:sudo: unable to resolve host xxxx: Name or service not known 解决 这个 ...
- 无法解析@NotBlank
当碰到无法解析的时候,一般都是地址写错了,找不到相应的路劲 我是全局能搜到这个包@NotBlank,在jakarta.validation-api包里面,但是我网上搜https://www.cnblo ...
- 深入理解泛型-重写泛型类方法遇到的问题(涉及JVM反编译字节码)
下面的代码DateInterval类想重写父类Pair<LocalDate>中的setSecond方法,保证设置的第二个日期要在第一个日期之后,不能出现second早于first的情况.这 ...
- nodejs队列
nodejs队列 创建具有指定并发性的队列对象.添加到队列的任务以并行方式处理(直到并发性限制).如果所有的worker都在进行中,任务就会排队,直到有一个worker可用.worker完成任务后,将 ...
- 『Plotly实战指南』--箱线图绘制与应用
在数据可视化领域,箱线图(Box Plot)是一种强大的工具,用于展示数据的分布特征.集中趋势以及异常值. 它不仅能够快速揭示数据的偏态.离散程度,还能帮助我们识别潜在的数据问题. 本文将从基础绘制到 ...