
快速遍历OpenCV Mat图像数据的多种方法和性能分析 | opencv mat for loop
本文首发于个人博客https://kezunlin.me/post/61d55ab4/,欢迎阅读!
opencv mat for loop
Series
- Part 1: compile opencv on ubuntu 16.04
- Part 2: compile opencv with CUDA support on windows 10
- Part 3: opencv mat for loop
- Part 4: speed up opencv image processing with openmp
Guide
Mat
- for gray image, use type
<uchar> - for RGB color image,use type
<Vec3b>
gray format storage
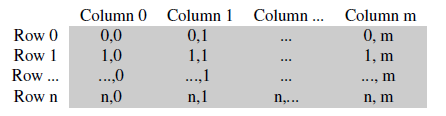
color format storage: BGR

we can use method
isContinuous()to judge whether the memory buffer is continuous or not.
color space reduction
uchar color_space_reduction(uchar pixel)

{

	/*

	0-9 ===>0

	10-19===>10

	20-29===>20

	...

	240-249===>24

	250-255===>25

	map from 256*256*256===>26*26*26

	*/

	int divideWith = 10;

	uchar new_pixel = (pixel / divideWith)*divideWith;

	return new_pixel;

}
color table
void get_color_table()

{

	// cache color value in table[256]

	int divideWith = 10;

	uchar table[256];

	for (int i = 0; i < 256; ++i)

		table[i] = divideWith* (i / divideWith);

}
C++
ptr []
// C ptr []: faster but not safe

Mat& ScanImageAndReduce_Cptr(Mat& I, const uchar* const table)

{

	// accept only char type matrices

	CV_Assert(I.depth() != sizeof(uchar));

	int channels = I.channels();

	int nRows = I.rows;

	int nCols = I.cols* channels;

	if (I.isContinuous())

	{

		nCols *= nRows;

		nRows = 1;

	}

	int i, j;

	uchar* p;

	for (i = 0; i < nRows; ++i)

	{

		p = I.ptr<uchar>(i);

		for (j = 0; j < nCols; ++j)

		{

			p[j] = table[p[j]];

		}

	}

	return I;

}
ptr ++
// C ptr ++: faster but not safe

Mat& ScanImageAndReduce_Cptr2(Mat& I, const uchar* const table)

{

	// accept only char type matrices

	CV_Assert(I.depth() != sizeof(uchar));

	int channels = I.channels();

	int nRows = I.rows;

	int nCols = I.cols* channels;

	if (I.isContinuous())

	{

		nCols *= nRows;

		nRows = 1;

	}

	uchar* start = I.ptr<uchar>(0); // same as I.ptr<uchar>(0,0)

	uchar* end = start + nRows * nCols;

	for (uchar* p=start; p < end; ++p)

	{

		*p = table[*p];

	}

	return I;

}
at(i,j)
// at<uchar>(i,j): random access, slow

Mat& ScanImageAndReduce_atRandomAccess(Mat& I, const uchar* const table)

{

   // accept only char type matrices

   CV_Assert(I.depth() != sizeof(uchar));

   const int channels = I.channels();

   switch (channels)

   {

   case 1:

   {

   	for (int i = 0; i < I.rows; ++i)

   		for (int j = 0; j < I.cols; ++j)

   			I.at<uchar>(i, j) = table[I.at<uchar>(i, j)];

   	break;

   }

   case 3:

   {

   	Mat_<Vec3b> _I = I;

   	for (int i = 0; i < I.rows; ++i)

   		for (int j = 0; j < I.cols; ++j)

   		{

   			_I(i, j)[0] = table[_I(i, j)[0]];

   			_I(i, j)[1] = table[_I(i, j)[1]];

   			_I(i, j)[2] = table[_I(i, j)[2]];

   		}

   	I = _I;

   	break;

   }

   }

   return I;

}
Iterator
// MatIterator_<uchar>: safe but slow

Mat& ScanImageAndReduce_Iterator(Mat& I, const uchar* const table)

{

   // accept only char type matrices

   CV_Assert(I.depth() != sizeof(uchar));

   const int channels = I.channels();

   switch (channels)

   {

   case 1:

   {

   	MatIterator_<uchar> it, end;

   	for (it = I.begin<uchar>(), end = I.end<uchar>(); it != end; ++it)

   		*it = table[*it];

   	break;

   }

   case 3:

   {

   	MatIterator_<Vec3b> it, end;

   	for (it = I.begin<Vec3b>(), end = I.end<Vec3b>(); it != end; ++it)

   	{

   		(*it)[0] = table[(*it)[0]];

   		(*it)[1] = table[(*it)[1]];

   		(*it)[2] = table[(*it)[2]];

   	}

   }

   }

   return I;

}
opencv LUT
// LUT

Mat& ScanImageAndReduce_LUT(Mat& I, const uchar* const table)

{

   Mat lookUpTable(1, 256, CV_8U);

   uchar* p = lookUpTable.data;

   for (int i = 0; i < 256; ++i)

   	p[i] = table[i];

   cv::LUT(I, lookUpTable, I);

   return I;

}
forEach
forEachmethod of theMatclass that utilizes all the cores on your machine to apply any function at every pixel.
// Parallel execution with function object.

struct ForEachOperator

{

	uchar m_table[256];

	ForEachOperator(const uchar* const table)

	{

		for (size_t i = 0; i < 256; i++)

		{

			m_table[i] = table[i];

		}

	}

	void operator ()(uchar& p, const int * position) const

	{

		// Perform a simple operation

		p = m_table[p];

	}

};

// forEach use multiple processors, very fast

Mat& ScanImageAndReduce_forEach(Mat& I, const uchar* const table)

{

	I.forEach<uchar>(ForEachOperator(table));

	return I;

}
forEach with lambda
// forEach lambda use multiple processors, very fast (lambda slower than ForEachOperator)

Mat& ScanImageAndReduce_forEach_with_lambda(Mat& I, const uchar* const table)

{

	I.forEach<uchar>

	(

		[=](uchar &p, const int * position) -> void

		{

			p = table[p];

		}

	);

	return I;

}
time cost
no foreach
[1 Cptr   ] times=5000, total_cost=988 ms, avg_cost=0.1976 ms

[1 Cptr2  ] times=5000, total_cost=1704 ms, avg_cost=0.3408 ms

[2 atRandom] times=5000, total_cost=9611 ms, avg_cost=1.9222 ms

[3 Iterator] times=5000, total_cost=20195 ms, avg_cost=4.039 ms

[4 LUT    ] times=5000, total_cost=899 ms, avg_cost=0.1798 ms

[1 Cptr   ] times=10000, total_cost=2425 ms, avg_cost=0.2425 ms

[1 Cptr2  ] times=10000, total_cost=3391 ms, avg_cost=0.3391 ms

[2 atRandom] times=10000, total_cost=20024 ms, avg_cost=2.0024 ms

[3 Iterator] times=10000, total_cost=39980 ms, avg_cost=3.998 ms

[4 LUT    ] times=10000, total_cost=103 ms, avg_cost=0.0103 ms
foreach
[5 forEach     ] times=200000, total_cost=199 ms, avg_cost=0.000995 ms

[5 forEach lambda] times=200000, total_cost=521 ms, avg_cost=0.002605 ms

[5 forEach     ] times=20000, total_cost=17 ms, avg_cost=0.00085 ms

[5 forEach lambda] times=20000, total_cost=23 ms, avg_cost=0.00115 ms
results
Loop Type | Time Cost (us)
:----: |
ptr [] | 242
ptr ++ | 339
at | 2002
iterator | 3998
LUT | 10
forEach | 0.85
forEach lambda | 1.15
forEach is 10x times faster than LUT, 240~340x times faster than ptr [] and ptr ++, and 2000~4000x times faster than at and iterator.
code
Python
pure python
# import the necessary packages

import matplotlib.pyplot as plt

import cv2

print(cv2.__version__)

%matplotlib inline
3.4.2
# load the original image, convert it to grayscale, and display

# it inline

image = cv2.imread("cat.jpg")

image = cv2.cvtColor(image, cv2.COLOR_BGR2GRAY)

print(image.shape)

#plt.imshow(image, cmap="gray")
(360, 480)
%load_ext cython
The cython extension is already loaded. To reload it, use:

  %reload_ext cython
%%cython -a

def threshold_python(T, image):

    # grab the image dimensions

    h = image.shape[0]

    w = image.shape[1]

    # loop over the image, pixel by pixel

    for y in range(0, h):

        for x in range(0, w):

            # threshold the pixel

            image[y, x] = 255 if image[y, x] >= T else 0

    # return the thresholded image

    return image
%timeit threshold_python(5, image)
263 ms ± 20.2 ms per loop (mean ± std. dev. of 7 runs, 1 loop each)
cython
%%cython -a

import cython

@cython.boundscheck(False)

cpdef unsigned char[:, :] threshold_cython(int T, unsigned char [:, :] image):

    # set the variable extension types

    cdef int x, y, w, h

    # grab the image dimensions

    h = image.shape[0]

    w = image.shape[1]

    # loop over the image

    for y in range(0, h):

        for x in range(0, w):

            # threshold the pixel

            image[y, x] = 255 if image[y, x] >= T else 0

    # return the thresholded image

    return image
numba
%timeit threshold_cython(5, image)
150 µs ± 7.14 µs per loop (mean ± std. dev. of 7 runs, 10000 loops each)
from numba import njit

@njit

def threshold_njit(T, image):

    # grab the image dimensions

    h = image.shape[0]

    w = image.shape[1]

    # loop over the image, pixel by pixel

    for y in range(0, h):

        for x in range(0, w):

            # threshold the pixel

            image[y, x] = 255 if image[y, x] >= T else 0

    # return the thresholded image

    return image
%timeit threshold_njit(5, image)
43.5 µs ± 142 ns per loop (mean ± std. dev. of 7 runs, 10000 loops each)
numpy
def threshold_numpy(T, image):

    image[image > T] = 255

    return image
%timeit threshold_numpy(5, image)
111 µs ± 334 ns per loop (mean ± std. dev. of 7 runs, 10000 loops each)
conclusions
image = cv2.imread("cat.jpg")

image = cv2.cvtColor(image, cv2.COLOR_BGR2GRAY)

print(image.shape)

%timeit threshold_python(5, image)

%timeit threshold_cython(5, image)

%timeit threshold_njit(5, image)

%timeit threshold_numpy(5, image)
(360, 480)

251 ms ± 6.5 ms per loop (mean ± std. dev. of 7 runs, 1 loop each)

143 µs ± 1.19 µs per loop (mean ± std. dev. of 7 runs, 10000 loops each)

43.8 µs ± 284 ns per loop (mean ± std. dev. of 7 runs, 10000 loops each)

113 µs ± 957 ns per loop (mean ± std. dev. of 7 runs, 10000 loops each)
image = cv2.imread("big.jpg")

image = cv2.cvtColor(image, cv2.COLOR_BGR2GRAY)

print(image.shape)

%timeit threshold_python(5, image)

%timeit threshold_cython(5, image)

%timeit threshold_njit(5, image)

%timeit threshold_numpy(5, image)
(2880, 5120)

21.8 s ± 460 ms per loop (mean ± std. dev. of 7 runs, 1 loop each)

12.3 ms ± 231 µs per loop (mean ± std. dev. of 7 runs, 100 loops each)

3.91 ms ± 66.1 µs per loop (mean ± std. dev. of 7 runs, 100 loops each)

10.3 ms ± 179 µs per loop (mean ± std. dev. of 7 runs, 100 loops each)
60,480
- python: 251 ms
- cython: 143 us
- numba: 43 us
- numpy: 113 us
2880, 5120
- python: 21 s
- cython: 12 ms
- numba: 4 ms
- numpy: 10 ms
Reference
- Part1: OpenCV访问Mat图像中每个像素的值 4种对比
- Part2: OpenCV访问Mat图像中每个像素的值 13种对比
- parallel-pixel-access-in-opencv-using-foreach
- fast-optimized-for-pixel-loops-with-opencv-and-python
- python performance tips
History
- 20180823: created.
Copyright
- Post author: kezunlin
- Post link: https://kezunlin.me/post/61d55ab4/
- Copyright Notice: All articles in this blog are licensed under CC BY-NC-SA 3.0 unless stating additionally.
快速遍历OpenCV Mat图像数据的多种方法和性能分析 | opencv mat for loop的更多相关文章
- 用 Python 排序数据的多种方法
用 Python 排序数据的多种方法 目录 [Python HOWTOs系列]排序 Python 列表有内置就地排序的方法 list.sort(),此外还有一个内置的 sorted() 函数将一个可迭 ...
- Python的list循环遍历中,删除数据的正确方法
在遍历list,删除符合条件的数据时,总是报异常,代码如下: num_list = [1, 2, 3, 4, 5] print(num_list) for i in range(len(num_lis ...
- Delphi导出数据的多种方法
//Dxdbgrid,则直接用SaveToexcel即可//使用 ExcelWithOdbc 控件function TDataModule1.GetDataToFile(DsData: TObject ...
- php遍历目录与文件夹的多种方法详解
遍历目录或遍历目录下指定类型的文件,这是每一个童鞋在写程序的时候难免会用到的.PHP本身也提供了很多灰常有用的函数,正确地使用它们,不会有错滴.下面就我个人学习过程中的一些总结,希望对想学PHP的童鞋 ...
- 遍历Map和List的几种方法和性能比较
public static void main(String[] args) { Map<String, String> map = new HashMap<String, Stri ...
- android+opencv+opencl: cv::dft()的opencl版本的性能分析
在小米mix 2s + 高通骁龙 845 + Adreno 630 上测试了opencl版本的cv::dft(). 测试数据 先看表格里面的描述: 名称 函数名 最大时间(ms) 平均时间(ms) 说 ...
- OpenCV图像数据字节对齐
目录 1. IplImage的data字段,是char*类型,是4字节对齐. 2. 手动创建的Mat通常是没有字节对齐的 3. 从IplImage转过来的Mat,是字节对齐的 4. 总结 图像数据是否 ...
- opencv-4-成像系统与Mat图像颜色空间
opencv-4-成像系统与Mat图像颜色空间 opencvc++qtmat 目标 知道 opencv 处理图像数据的格式 介绍 mat 基础内容 知道 BGR 颜色 显示 颜色转换 BGR 到 灰度 ...
- Python使用plotly绘制数据图表的方法
转载:http://www.jb51.net/article/118936.htm 本篇文章主要介绍了Python使用plotly绘制数据图表的方法,实例分析了plotly绘制的技巧. 导语:使用 p ...
随机推荐
- AB实验的高端玩法系列2 - 更敏感的AB实验, CUPED!
背景 AB实验可谓是互联网公司进行产品迭代增加用户粘性的大杀器.但人们对AB实验的应用往往只停留在开实验算P值,然后let it go...let it go ... 让我们把AB实验的结果简单的拆解 ...
- jQuery插件图片懒加载lazyload
来自XXX的前言: 什么是ImageLazyLoad技术 在页面上图片比较多的时候,打开一张页面必然引起与服务器大数据量的 交互.尤其是对于高清晰的图片,占的几M的空间.ImageLazyLoad技术 ...
- react中使用redux简易案例讲解
为什么我想要使用redux? 前段时间初步上手了react,最近在使用react的过程中发现对于组件之间通信的需求比较迫切,尤其是在axios异步请求后端数据的时候,这样的需求是特别强烈的!举个例子: ...
- Spring(二)装配Spring Bean
控制反转的概念:控制反转是一种通过描述(在Java中或者是XML或者注解)并通过第三方去产生或获取特定对象的方式. 在Spring中实现控制反转的是IoC容器,其实现方法是依赖注入(Dependenc ...
- Flink 从 0 到 1 学习 —— Flink Data transformation(转换)
toc: true title: Flink 从 0 到 1 学习 -- Flink Data transformation(转换) date: 2018-11-04 tags: Flink 大数据 ...
- postman的基本用法,请求,断言,环境变量
postman基本用法 Postman是一款功能强大的网页调试与发送网页HTTP请求的Chrome插件. 它提供功能强大的 Web API & HTTP 请求调试. 它能够发送任何类型的HTT ...
- 搭建邮件服务器,使用Postfix与Dovecot收发电子邮件
小知识: 我们为什么要搭建邮件服务器呢?有时候我们处于一个局域网内,不能及时的分享各自的研究成果,迫切的需要一种能够借助于网络且建立在计算机之间的传输数据的方法.所以我们需要搭建邮件服务器,这样的话既 ...
- Phpstudy隐藏后门
Phpstudy隐藏后门 1.事件背景 Phpstudy软件是国内的一款免费的PHP调试环境的程序集成包,通过集成Apache.PHP.MySQL.phpMyAdmin.ZendOptimizer多款 ...
- Java线程学习详解
线程基础 1. 线程的生命周期 1.1 新建状态: 使用 new 关键字和 Thread 类或其子类建立一个线程对象后,该线程对象就处于新建状态.它保持这个状态直到程序 start() 这个线程. 1 ...
- AD中如何插入logo(图片)
图片转成protel altium AD PCB封装 LOGO方法 1. 2. 3. 4.打开下列顺序文件夹 Examples-->Scripts-->Delphiscript Scrip ...