AssetBundle系列——游戏资源打包(一)
将本地资源打包,然后放到资源服务器上供游戏客户端下载或更新。服务器上包含以下资源列表:
(1)游戏内容资源assetbundle
(2)资源维护列表,包含每个资源的名字(完整路径名)和对应的版本号[资源名,版本号],如下表所示(VersionNum.xml):
<VersionNum>

  <File FileName="Assets.Resources.BigLevelTexture.TestLevel.assetbundle" Num="" />

  <File FileName="Assets.Resources.EquipmentTexture.Test001.assetbundle" Num="" />

  <File FileName="Assets.Resources.EquipmentTexture.Test002.assetbundle" Num="" />

  <File FileName="Assets.Resources.EquipmentTexture.Test003.assetbundle" Num="" />

  <File FileName="Assets.Resources.EquipmentTexture.Test004.assetbundle" Num="" />

  <File FileName="Assets.Resources.PetTexture.Empty.assetbundle" Num="" />

</VersionNum>
那么本地客户端的资源打包编辑器就需要完成以下工作:将资源打包、生成版本号。
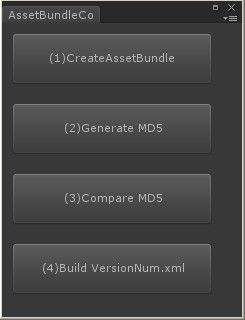
我们采用通过MD5码对比的方式来对版本号进行管理,如果某资源的MD5码变更了,则将其版本号+1,否则不变。那么,可以将编辑器的具体任务划分如下:
(1)将资源打包成assetbundle,并放到指定目录下
(2)为每个assetbund生成最新MD5码,用于检查资源是否有修改
(3)比较新旧MD5码列表,产生资源变更列表,对于每个变更的资源,将其版本号+1
(4)将变更列表文件也打包成assetbundle
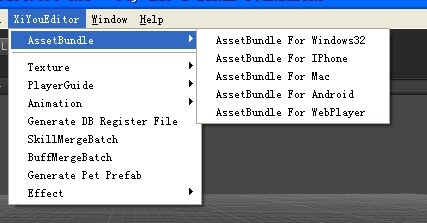
各个平台使用的资源包时各自独立的,打包资源代码时的选项不一样,编辑器界面如下,图2中的4个按钮每个对应上述的一步操作:
最终生成的资源目录结构如下所示:

编辑器代码如下所示(包括菜单项和窗口):
using UnityEditor;

using UnityEngine;

using System.IO;

using System.Collections;

using System.Collections.Generic;

public class AssetBundleController : EditorWindow

{

    public static AssetBundleController window;

    public static UnityEditor.BuildTarget buildTarget = BuildTarget.StandaloneWindows;

    [MenuItem("XiYouEditor/AssetBundle/AssetBundle For Windows32", false, )]

    public static void ExecuteWindows32()

    {

        if (window == null)

        {

            window = (AssetBundleController)GetWindow(typeof(AssetBundleController));

        }

        buildTarget = UnityEditor.BuildTarget.StandaloneWindows;

        window.Show();

    }

    [MenuItem("XiYouEditor/AssetBundle/AssetBundle For IPhone", false, )]

    public static void ExecuteIPhone()

    {

        if (window == null)

        {

            window = (AssetBundleController)GetWindow(typeof(AssetBundleController));

        }

        buildTarget = UnityEditor.BuildTarget.iPhone;

        window.Show();

    }

    [MenuItem("XiYouEditor/AssetBundle/AssetBundle For Mac", false, )]

    public static void ExecuteMac()

    {

        if (window == null)

        {

            window = (AssetBundleController)GetWindow(typeof(AssetBundleController));

        }

        buildTarget = UnityEditor.BuildTarget.StandaloneOSXUniversal;

        window.Show();

    }

    [MenuItem("XiYouEditor/AssetBundle/AssetBundle For Android", false, )]

    public static void ExecuteAndroid()

    {

        if (window == null)

        {

            window = (AssetBundleController)GetWindow(typeof(AssetBundleController));

        }

        buildTarget = UnityEditor.BuildTarget.Android;

        window.Show();

    }

    [MenuItem("XiYouEditor/AssetBundle/AssetBundle For WebPlayer", false, )]

    public static void ExecuteWebPlayer()

    {

        if (window == null)

        {

            window = (AssetBundleController)GetWindow(typeof(AssetBundleController));

        }

        buildTarget = UnityEditor.BuildTarget.WebPlayer;

        window.Show();

    }

    void OnGUI()

    {

        if (GUI.Button(new Rect(10f, 10f, 200f, 50f), "(1)CreateAssetBundle"))

        {

            CreateAssetBundle.Execute(buildTarget);

            EditorUtility.DisplayDialog("", "Step (1) Completed", "OK");

        }

        if (GUI.Button(new Rect(10f, 80f, 200f, 50f), "(2)Generate MD5"))

        {

            CreateMD5List.Execute(buildTarget);

            EditorUtility.DisplayDialog("", "Step (2) Completed", "OK");

        }

        if (GUI.Button(new Rect(10f, 150f, 200f, 50f), "(3)Compare MD5"))

        {

            CampareMD5ToGenerateVersionNum.Execute(buildTarget);

            EditorUtility.DisplayDialog("", "Step (3) Completed", "OK");

        }

        if (GUI.Button(new Rect(10f, 220f, 200f, 50f), "(4)Build VersionNum.xml"))

        {

            CreateAssetBundleForXmlVersion.Execute(buildTarget);

            EditorUtility.DisplayDialog("", "Step (4) Completed", "OK");

        }

    }

    public static string GetPlatformPath(UnityEditor.BuildTarget target)

    {

        string SavePath = "";

        switch (target)

        {

            case BuildTarget.StandaloneWindows:

                SavePath = "Assets/AssetBundle/Windows32/";

                break;

            case BuildTarget.StandaloneWindows64:

                SavePath = "Assets/AssetBundle/Windows64/";

                break;

            case BuildTarget.iPhone:

                SavePath = "Assets/AssetBundle/IOS/";

                break;

            case BuildTarget.StandaloneOSXUniversal:

                SavePath = "Assets/AssetBundle/Mac/";

                break;

            case BuildTarget.Android:

                SavePath = "Assets/AssetBundle/Android/";

                break;

            case BuildTarget.WebPlayer:

                SavePath = "Assets/AssetBundle/WebPlayer/";

                break;

            default:

                SavePath = "Assets/AssetBundle/";

                break;

        }

        if (Directory.Exists(SavePath) == false)

            Directory.CreateDirectory(SavePath);

        return SavePath;

    }

    public static string GetPlatformName(UnityEditor.BuildTarget target)

    {

        string platform = "Windows32";

        switch (target)

        {

            case BuildTarget.StandaloneWindows:

                platform = "Windows32";

                break;

            case BuildTarget.StandaloneWindows64:

                platform = "Windows64";

                break;

            case BuildTarget.iPhone:

                platform = "IOS";

                break;

            case BuildTarget.StandaloneOSXUniversal:

                platform = "Mac";

                break;

            case BuildTarget.Android:

                platform = "Android";

                break;

            case BuildTarget.WebPlayer:

                platform = "WebPlayer";

                break;

            default:

                break;

        }

        return platform;

    }

}
PS:每个操作的具体实现,见下一篇讲解...
AssetBundle系列——游戏资源打包(一)的更多相关文章
- [Unity Asset]AssetBundle系列——游戏资源打包
转载:http://www.cnblogs.com/sifenkesi/p/3557231.html 将本地资源打包,然后放到资源服务器上供游戏客户端下载或更新.服务器上包含以下资源列表:(1)游戏内 ...
- (转)AssetBundle系列——游戏资源打包(一)
转自:http://www.cnblogs.com/sifenkesi/p/3557231.html 将本地资源打包,然后放到资源服务器上供游戏客户端下载或更新.服务器上包含以下资源列表:(1)游戏内 ...
- AssetBundle系列——游戏资源打包(二)
本篇接着上一篇.上篇中说到的4步的代码分别如下所示: (1)将资源打包成assetbundle,并放到自定目录下 using UnityEditor; using UnityEngine; using ...
- (转)AssetBundle系列——游戏资源打包(二)
转自:http://www.cnblogs.com/sifenkesi/p/3557290.html 本篇接着上一篇.上篇中说到的4步的代码分别如下所示: (1)将资源打包成assetbundle,并 ...
- AssetBundle系列——共享资源打包/依赖资源打包
有人在之前的博客中问我有关共享资源打包的代码,其实这一块很简单,就两个函数: BuildPipeline.PushAssetDependencies():依赖资源压栈: BuildPipeline.P ...
- (转)AssetBundle系列——共享资源打包/依赖资源打包
有人在之前的博客中问我有关共享资源打包的代码,其实这一块很简单,就两个函数: BuildPipeline.PushAssetDependencies():依赖资源压栈: BuildPipeline.P ...
- AssetBundle系列——场景资源之打包(一)
本篇讲解的是3D游戏的场景资源打包方式,首先简单的分析一下场景中所包含的资源的类型. 场景资源一般包含:地表模型(或者是Unity Terrain),非实例化物体(摄像机.空气墙.光源.各种逻辑物体之 ...
- AssetBundle系列——场景资源之解包(二)
本篇接着上一篇继续和大家分享场景资源这一主题,主要包括两个方面: (1)加载场景 场景异步加载的代码比较简单,如下所示: private IEnumerator LoadLevelCoroutine( ...
- 【Cocos2d-Js基础教学(5)资源打包工具的使用及资源的异步加载处理】
TexturePacker是纹理资源打包工具,支持Cocos2dx的游戏资源打包. 如果用过的同学可以直接看下面的资源的异步加载处理 首先为什么用TexturePacker? 1,节省图片资源实际大小 ...
随机推荐
- iframe父子页面调用小结
子页面调用父页面 $('#Id', window.parent.document); //调用父页面元素 window.parent.func1(); //调用父页面方法 (子页面同理,需将js方 ...
- python安装包工具pip的安装
官方的安装帮助页面:http://pip.readthedocs.org/en/latest/installing.html windows: 下载代码get-pip.py, 运行该代码, 这个代码会 ...
- Android基本功:手势
一.概念 手势:其实是指用户手指或触摸笔在屏幕上的连续触碰行为,Andoird对两种手势行为都提供了支持: Andorid提供了手势检测,并为手势检测提供了相应的监听器: Android允许开发者添加 ...
- css/js在线压缩工具
http://tool.css-js.com/ 在进行前端的时候,可以参考百度性能监控中心给出的意见: http://developer.baidu.com/apm/index
- Scala 深入浅出实战经典 第75讲:模式匹配下的For循环
王家林亲授<DT大数据梦工厂>大数据实战视频 Scala 深入浅出实战经典(1-87讲)完整视频.PPT.代码下载: 百度云盘:http://pan.baidu.com/s/1c0noOt ...
- Scala 深入浅出实战经典 第65讲:Scala中隐式转换内幕揭秘、最佳实践及其在Spark中的应用源码解析
王家林亲授<DT大数据梦工厂>大数据实战视频 Scala 深入浅出实战经典(1-87讲)完整视频.PPT.代码下载:百度云盘:http://pan.baidu.com/s/1c0noOt6 ...
- Python将文本生成二维码
#coding:utf-8 ''' Python生成二维码 v1.0 主要将文本生成二维码图片 测试一:将文本生成白底黑字的二维码图片 测试二:将文本生成带logo的二维码图片 ''' __autho ...
- brew 出现 git 错误的问题分析
现象 brew update的时候出现 gitcrash 分析 在brew update 的时候看见有 git gc 的字样,提示有在gc 的动作.到/usr/local/ 目录,直接运行 git ...
- Visual Studio 压力测试注意点
常用的三个测试:单元测试.web性能分析.压力测试:前两个好说,压力测试的时候如果配置不注意,往往不成功. 默认压力测试的测试结果存储在微软云端的,(visual studio online),国内一 ...
- LeetCode: Unique Paths II 解题报告
Unique Paths II Total Accepted: 31019 Total Submissions: 110866My Submissions Question Solution Fol ...