SpringBoot笔记二:整合篇
Spring Boot与缓存
jsr-107
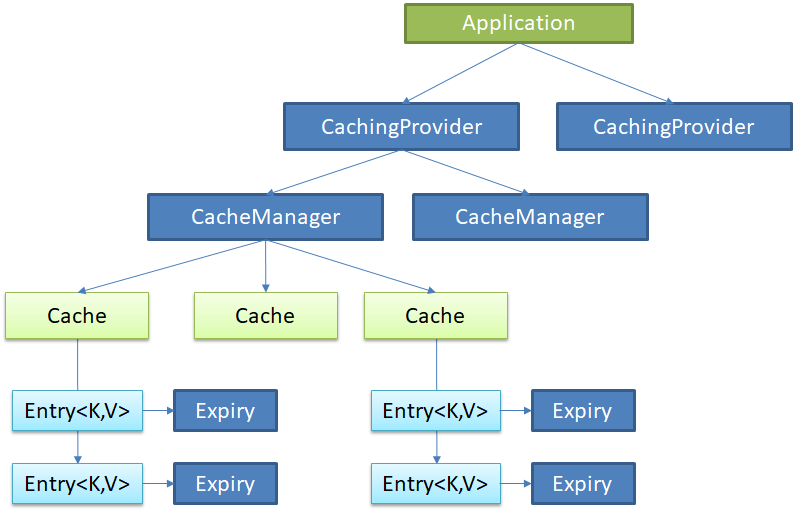
Java Caching定义了5个核心接口分别是CachingProvider, CacheManager, Cache, Entry 和 Expiry。
CachingProvider定义了创建、配置、获取、管理和控制多个CacheManager。一个应用可以在运行期访问多个CachingProvider。
CacheManager定义了创建、配置、获取、管理和控制多个唯一命名的Cache,这些Cache存在于CacheManager的上下文中。一个CacheManager仅被一个CachingProvider所拥有。
Cache是一个类似Map的数据结构并临时存储以Key为索引的值。一个Cache仅被一个CacheManager所拥有。
Entry是一个存储在Cache中的key-value对。
Expiry 每一个存储在Cache中的条目有一个定义的有效期。一旦超过这个时间,条目为过期的状态。一旦过期,条目将不可访问、更新和删除。缓存有效期可以通过ExpiryPolicy设置。
Spring缓存抽象
Spring从3.1开始定义了org.springframework.cache.Cache
和org.springframework.cache.CacheManager接口来统一不同的缓存技术;
并支持使用JCache(JSR-107)注解简化我们开发;
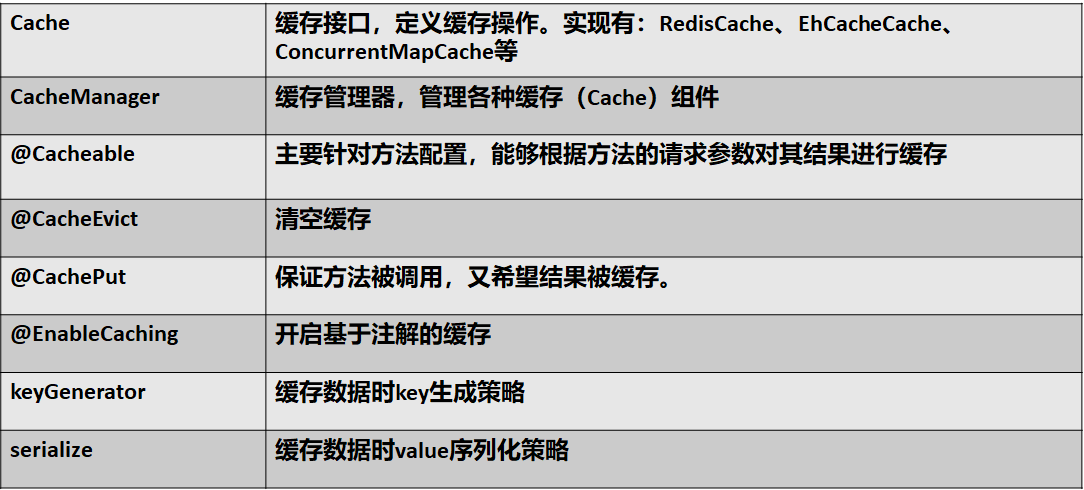
Cache接口为缓存的组件规范定义,包含缓存的各种操作集合;
Cache接口下Spring提供了各种xxxCache的实现;如RedisCache,EhCacheCache , ConcurrentMapCache等;
每次调用需要缓存功能的方法时,Spring会检查检查指定参数的指定的目标方法是否已经被调用过;如果有就直接从缓存中获取方法调用后的结果,如果没有就调用方法并缓存结果后返回给用户。下次调用直接从缓存中获取。
使用Spring缓存抽象时我们需要关注以下两点;
1、确定方法需要被缓存以及他们的缓存策略
2、从缓存中读取之前缓存存储的数据
初试缓存Cache:
启动类:
package com.mikey.cache;

import org.mybatis.spring.annotation.MapperScan;

import org.springframework.boot.SpringApplication;

import org.springframework.boot.autoconfigure.SpringBootApplication;

import org.springframework.cache.annotation.EnableCaching;

@MapperScan(value = "com.mikey.cache.mapper")

@SpringBootApplication

@EnableCaching//开启缓存

public class Springboot01CacheApplication {

    public static void main(String[] args) {

        SpringApplication.run(Springboot01CacheApplication.class, args);

    }

}
配置文件:
spring.datasource.url=jdbc:mysql://localhost:3306/spring_cache

spring.datasource.username=root

spring.datasource.password=root

#spring.datasource.driver-class-name=com.mysql.jdbc.Driver

mybatis.configuration.multiple-result-sets-enabled=true

logging.level.com.mikey.cache.mapper=debug
application.properties
Mapper:
package com.mikey.cache.mapper;

import com.mikey.cache.bean.Employee;

import org.apache.ibatis.annotations.*;

import org.springframework.stereotype.Component;

/**

 * @author Mikey

 * @Title:

 * @Description:

 * @date 2018/10/25 22:40

 * @Version 1.0

 */

@Component

@Mapper

public interface EmployeeMapper {

    @Select("select * from employee where id=#{id}")

    public Employee getEmpById(Integer id);

    @Update("update employee set lastName=#{lastName},email=#{email},gender=#{gender},d_id=#{d_id} where id=#{id}")

    public void updateEmp(Employee employee);

    @Delete("Delete from employee where id=#{id}")

    public void deleteEmpById(Integer id);

    @Insert("insert employee(lastName,email,gender,d_id) values(#{lastName},#{email},#{gender},#{dId}")

    public void insertEmployee(Employee employee);

}
EmployeeMapper
Service:
package com.mikey.cache.service;

import com.mikey.cache.bean.Employee;

import com.mikey.cache.mapper.EmployeeMapper;

import org.springframework.beans.factory.annotation.Autowired;

import org.springframework.cache.annotation.Cacheable;

import org.springframework.stereotype.Service;

/**

 * @author Mikey

 * @Title:

 * @Description:

 * @date 2018/10/25 22:58

 * @Version 1.0

 */

@Service

public class EmployeeService {

    @Autowired

    EmployeeMapper employeeMapper;

    /**

     * 将方法的运行结果进行缓存

     * @param id

     * @return

     */

//    @Cacheable(cacheNames = "emp",key = "#id")

    @Cacheable(cacheNames = "emp",condition = "#id>0",unless = "#result==null")

    public Employee getEmp(Integer id){

        System.out.println("查询"+id+"号员工");

        Employee employee=employeeMapper.getEmpById(id);

        return employee;

    }

}
EmployeeService
Controller:
package com.mikey.cache.controller;

import com.mikey.cache.bean.Employee;

import com.mikey.cache.service.EmployeeService;

import org.springframework.beans.factory.annotation.Autowired;

import org.springframework.stereotype.Controller;

import org.springframework.web.bind.annotation.PathVariable;

import org.springframework.web.bind.annotation.RequestMapping;

import org.springframework.web.bind.annotation.RestController;

/**

 * @author Mikey

 * @Title:

 * @Description:

 * @date 2018/10/25 23:00

 * @Version 1.0

 */

@RestController

public class EmployeeController {

    @Autowired

    EmployeeService employeeService;

    @RequestMapping("/emp/{id}")

    public Employee getEmployee(@PathVariable("id") Integer id){

        return employeeService.getEmp(id);

    }

}
EmployeeController

原理:
将方法的运行结果进行缓存;以后再要相同的数据,直接从缓存中获取,不用调用方法;

CacheManager管理多个Cache组件的,对缓存的真正CRUD操作在Cache组件中,每一个缓存组件有自己唯一一个名字;

原理:

  1、自动配置类;CacheAutoConfiguration

  2、缓存的配置类

  org.springframework.boot.autoconfigure.cache.GenericCacheConfiguration

  org.springframework.boot.autoconfigure.cache.JCacheCacheConfiguration

  org.springframework.boot.autoconfigure.cache.EhCacheCacheConfiguration

  org.springframework.boot.autoconfigure.cache.HazelcastCacheConfiguration

  org.springframework.boot.autoconfigure.cache.InfinispanCacheConfiguration

  org.springframework.boot.autoconfigure.cache.CouchbaseCacheConfiguration

  org.springframework.boot.autoconfigure.cache.RedisCacheConfiguration

  org.springframework.boot.autoconfigure.cache.CaffeineCacheConfiguration

  org.springframework.boot.autoconfigure.cache.GuavaCacheConfiguration

  org.springframework.boot.autoconfigure.cache.SimpleCacheConfiguration【默认】

  org.springframework.boot.autoconfigure.cache.NoOpCacheConfiguration

  3、哪个配置类默认生效:SimpleCacheConfiguration;
运行流程:
4、给容器中注册了一个CacheManager:ConcurrentMapCacheManager
5、可以获取和创建ConcurrentMapCache类型的缓存组件;他的作用将数据保存在ConcurrentMap中; 运行流程:
@Cacheable:
1、方法运行之前,先去查询Cache(缓存组件),按照cacheNames指定的名字获取;
(CacheManager先获取相应的缓存),第一次获取缓存如果没有Cache组件会自动创建。
2、去Cache中查找缓存的内容,使用一个key,默认就是方法的参数;
key是按照某种策略生成的;默认是使用keyGenerator生成的,默认使用SimpleKeyGenerator生成key;
SimpleKeyGenerator生成key的默认策略;
如果没有参数;key=new SimpleKey();
如果有一个参数:key=参数的值
如果有多个参数:key=new SimpleKey(params);
3、没有查到缓存就调用目标方法;
4、将目标方法返回的结果,放进缓存中 @Cacheable标注的方法执行之前先来检查缓存中有没有这个数据,默认按照参数的值作为key去查询缓存,
如果没有就运行方法并将结果放入缓存;以后再来调用就可以直接使用缓存中的数据; 核心:
1)、使用CacheManager【ConcurrentMapCacheManager】按照名字得到Cache【ConcurrentMapCache】组件
2)、key使用keyGenerator生成的,默认是SimpleKeyGenerator 几个属性:
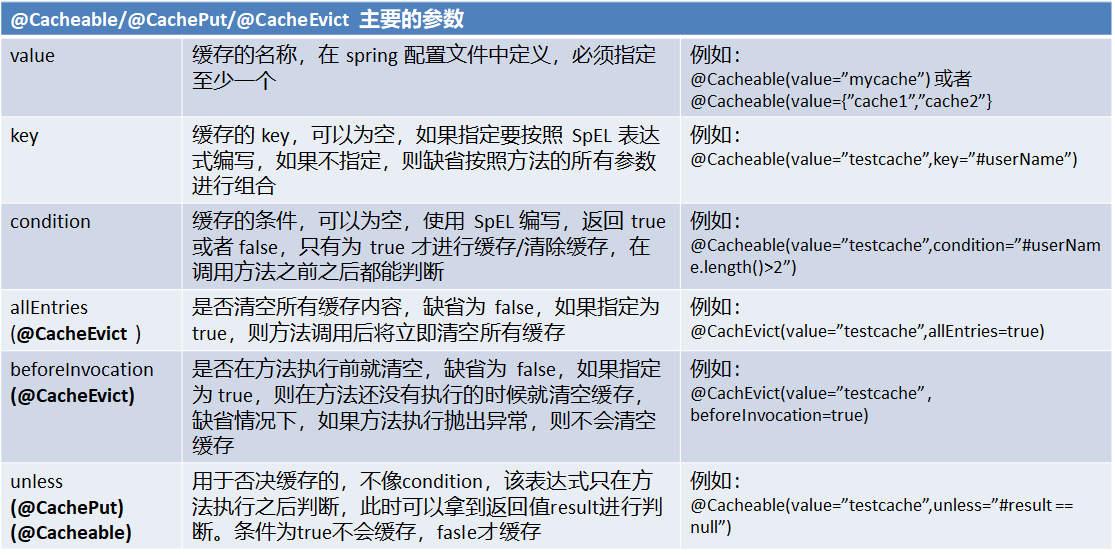
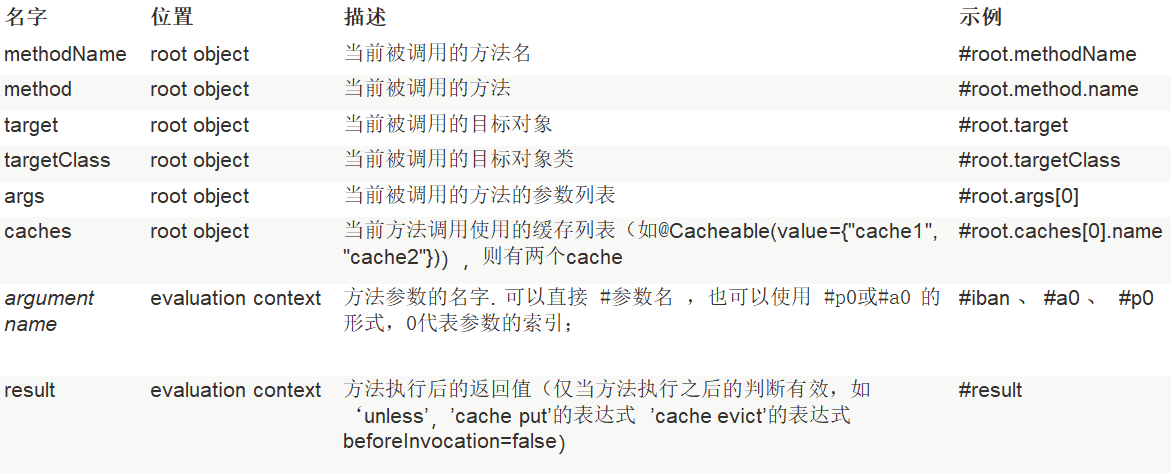
cacheNames/value:指定缓存组件的名字;将方法的返回结果放在哪个缓存中,是数组的方式,可以指定多个缓存; key:缓存数据使用的key;可以用它来指定。默认是使用方法参数的值 1-方法的返回值
编写SpEL; #i d;参数id的值 #a0 #p0 #root.args[0]
getEmp[2] keyGenerator:key的生成器;可以自己指定key的生成器的组件id
key/keyGenerator:二选一使用; cacheManager:指定缓存管理器;或者cacheResolver指定获取解析器 condition:指定符合条件的情况下才缓存;
,condition = "#id>0"
condition = "#a0>1":第一个参数的值》1的时候才进行缓存 unless:否定缓存;当unless指定的条件为true,方法的返回值就不会被缓存;可以获取到结果进行判断
unless = "#result == null"
unless = "#a0==2":如果第一个参数的值是2,结果不缓存;
sync:是否使用异步模式
自定义Key生成器:
package com.mikey.cache.config;

import org.springframework.cache.interceptor.KeyGenerator;

import org.springframework.context.annotation.Bean;

import org.springframework.context.annotation.Configuration;

import java.lang.reflect.Method;

import java.util.Arrays;

/**

 * @author Mikey

 * @Title:

 * @Description:

 * @date 2018/10/26 15:21

 * @Version 1.0

 */

@Configuration

public class MyCacheConfig {

    @Bean("myKeyGenerator")

    public KeyGenerator keyGenerator(){

        return new KeyGenerator(){

            @Override

            public Object generate(Object target, Method method, Object... params) {

                return method.getName()+"["+ Arrays.asList(params).toString()+"]";

            }

        };

    }

}
MyCacheConfig
注意:使用异步不支持unless
@CachePut:
/**

     * @CachePut:既调用方法,又更新缓存数据;同步更新缓存

     * 修改了数据库的某个数据,同时更新缓存;

     * 运行时机:

     *  1、先调用目标方法

     *  2、将目标方法的结果缓存起来

     *

     * 测试步骤:

     *  1、查询1号员工;查到的结果会放在缓存中;

     *          key:1  value:lastName:张三

     *  2、以后查询还是之前的结果

     *  3、更新1号员工;【lastName:zhangsan;gender:0】

     *          将方法的返回值也放进缓存了;

     *          key:传入的employee对象  值:返回的employee对象;

     *  4、查询1号员工?

     *      应该是更新后的员工;

     *          key = "#employee.id":使用传入的参数的员工id;

     *          key = "#result.id":使用返回后的id

     *             @Cacheable的key是不能用#result

     *      为什么是没更新前的?【1号员工没有在缓存中更新】

     *

     */

    @CachePut(/*value = "emp",*/key = "#result.id")

    public Employee updateEmp(Employee employee){

        System.out.println("updateEmp:"+employee);

        employeeMapper.updateEmp(employee);

        return employee;

    }
缓存的同key不同Value/cacheName;
参考:http://www.bubuko.com/infodetail-2378163.html
@CacheEvict:缓存清除:
key:指定要清除的数据
allEntries = true:指定清除这个缓存中所有的数据
beforeInvocation = false:缓存的清除是否在方法之前执行
默认代表缓存清除操作是在方法执行之后执行;如果出现异常缓存就不会清除
beforeInvocation = true:
代表清除缓存操作是在方法运行之前执行,无论方法是否出现异常,缓存都清除
@CacheEvict(value="emp",beforeInvocation = true/*key = "#id",*/)

    public void deleteEmp(Integer id){

        System.out.println("deleteEmp:"+id);

        //employeeMapper.deleteEmpById(id);

        int i = 10/0;

    }
@Caching 定义复杂的缓存规则
    // @Caching 定义复杂的缓存规则

    @Caching(

         cacheable = {

             @Cacheable(/*value="emp",*/key = "#lastName")

         },

         put = {

             @CachePut(/*value="emp",*/key = "#result.id"),

             @CachePut(/*value="emp",*/key = "#result.email")

         }

    )

    public Employee getEmpByLastName(String lastName){

        return employeeMapper.getEmpByLastName(lastName);

    }
@CacheConfig:
/*

 * Copyright 2002-2015 the original author or authors.

 *

 * Licensed under the Apache License, Version 2.0 (the "License");

 * you may not use this file except in compliance with the License.

 * You may obtain a copy of the License at

 *

 *      http://www.apache.org/licenses/LICENSE-2.0

 *

 * Unless required by applicable law or agreed to in writing, software

 * distributed under the License is distributed on an "AS IS" BASIS,

 * WITHOUT WARRANTIES OR CONDITIONS OF ANY KIND, either express or implied.

 * See the License for the specific language governing permissions and

 * limitations under the License.

 */

package org.springframework.cache.annotation;

import java.lang.annotation.Documented;

import java.lang.annotation.ElementType;

import java.lang.annotation.Retention;

import java.lang.annotation.RetentionPolicy;

import java.lang.annotation.Target;

/**

 * {@code @CacheConfig} provides a mechanism for sharing common cache-related

 * settings at the class level.

 *

 * <p>When this annotation is present on a given class, it provides a set

 * of default settings for any cache operation defined in that class.

 *

 * @author Stephane Nicoll

 * @author Sam Brannen

 * @since 4.1

 */

@Target(ElementType.TYPE)

@Retention(RetentionPolicy.RUNTIME)

@Documented

public @interface CacheConfig {

    /**

     * Names of the default caches to consider for caching operations defined

     * in the annotated class.

     * <p>If none is set at the operation level, these are used instead of the default.

     * <p>May be used to determine the target cache (or caches), matching the

     * qualifier value or the bean names of a specific bean definition.

     */

    String[] cacheNames() default {};

    /**

     * The bean name of the default {@link org.springframework.cache.interceptor.KeyGenerator} to

     * use for the class.

     * <p>If none is set at the operation level, this one is used instead of the default.

     * <p>The key generator is mutually exclusive with the use of a custom key. When such key is

     * defined for the operation, the value of this key generator is ignored.

     */

    String keyGenerator() default "";

    /**

     * The bean name of the custom {@link org.springframework.cache.CacheManager} to use to

     * create a default {@link org.springframework.cache.interceptor.CacheResolver} if none

     * is set already.

     * <p>If no resolver and no cache manager are set at the operation level, and no cache

     * resolver is set via {@link #cacheResolver}, this one is used instead of the default.

     * @see org.springframework.cache.interceptor.SimpleCacheResolver

     */

    String cacheManager() default "";

    /**

     * The bean name of the custom {@link org.springframework.cache.interceptor.CacheResolver} to use.

     * <p>If no resolver and no cache manager are set at the operation level, this one is used

     * instead of the default.

     */

    String cacheResolver() default "";

}
CacheConfig

完整文件:
package com.atguigu.cache.service;

import com.atguigu.cache.bean.Employee;

import com.atguigu.cache.mapper.EmployeeMapper;

import org.springframework.beans.factory.annotation.Autowired;

import org.springframework.cache.annotation.*;

import org.springframework.stereotype.Service;

@CacheConfig(cacheNames="emp"/*,cacheManager = "employeeCacheManager"*/) //抽取缓存的公共配置

@Service

public class EmployeeService {

    @Autowired

    EmployeeMapper employeeMapper;

    /**

     * 将方法的运行结果进行缓存;以后再要相同的数据,直接从缓存中获取,不用调用方法;

     * CacheManager管理多个Cache组件的,对缓存的真正CRUD操作在Cache组件中,每一个缓存组件有自己唯一一个名字;

     *

     *

     * 原理:

     *   1、自动配置类;CacheAutoConfiguration

     *   2、缓存的配置类

     *   org.springframework.boot.autoconfigure.cache.GenericCacheConfiguration

     *   org.springframework.boot.autoconfigure.cache.JCacheCacheConfiguration

     *   org.springframework.boot.autoconfigure.cache.EhCacheCacheConfiguration

     *   org.springframework.boot.autoconfigure.cache.HazelcastCacheConfiguration

     *   org.springframework.boot.autoconfigure.cache.InfinispanCacheConfiguration

     *   org.springframework.boot.autoconfigure.cache.CouchbaseCacheConfiguration

     *   org.springframework.boot.autoconfigure.cache.RedisCacheConfiguration

     *   org.springframework.boot.autoconfigure.cache.CaffeineCacheConfiguration

     *   org.springframework.boot.autoconfigure.cache.GuavaCacheConfiguration

     *   org.springframework.boot.autoconfigure.cache.SimpleCacheConfiguration【默认】

     *   org.springframework.boot.autoconfigure.cache.NoOpCacheConfiguration

     *   3、哪个配置类默认生效:SimpleCacheConfiguration;

     *

     *   4、给容器中注册了一个CacheManager:ConcurrentMapCacheManager

     *   5、可以获取和创建ConcurrentMapCache类型的缓存组件;他的作用将数据保存在ConcurrentMap中;

     *

     *   运行流程:

     *   @Cacheable:

     *   1、方法运行之前,先去查询Cache(缓存组件),按照cacheNames指定的名字获取;

     *      (CacheManager先获取相应的缓存),第一次获取缓存如果没有Cache组件会自动创建。

     *   2、去Cache中查找缓存的内容,使用一个key,默认就是方法的参数;

     *      key是按照某种策略生成的;默认是使用keyGenerator生成的,默认使用SimpleKeyGenerator生成key;

     *          SimpleKeyGenerator生成key的默认策略;

     *                  如果没有参数;key=new SimpleKey();

     *                  如果有一个参数:key=参数的值

     *                  如果有多个参数:key=new SimpleKey(params);

     *   3、没有查到缓存就调用目标方法;

     *   4、将目标方法返回的结果,放进缓存中

     *

     *   @Cacheable标注的方法执行之前先来检查缓存中有没有这个数据,默认按照参数的值作为key去查询缓存,

     *   如果没有就运行方法并将结果放入缓存;以后再来调用就可以直接使用缓存中的数据;

     *

     *   核心:

     *      1)、使用CacheManager【ConcurrentMapCacheManager】按照名字得到Cache【ConcurrentMapCache】组件

     *      2)、key使用keyGenerator生成的,默认是SimpleKeyGenerator

     *

     *

     *   几个属性:

     *      cacheNames/value:指定缓存组件的名字;将方法的返回结果放在哪个缓存中,是数组的方式,可以指定多个缓存;

     *

     *      key:缓存数据使用的key;可以用它来指定。默认是使用方法参数的值  1-方法的返回值

     *              编写SpEL; #i d;参数id的值   #a0  #p0  #root.args[0]

     *              getEmp[2]

     *

     *      keyGenerator:key的生成器;可以自己指定key的生成器的组件id

     *              key/keyGenerator:二选一使用;

     *

     *

     *      cacheManager:指定缓存管理器;或者cacheResolver指定获取解析器

     *

     *      condition:指定符合条件的情况下才缓存;

     *              ,condition = "#id>0"

     *          condition = "#a0>1":第一个参数的值》1的时候才进行缓存

     *

     *      unless:否定缓存;当unless指定的条件为true,方法的返回值就不会被缓存;可以获取到结果进行判断

     *              unless = "#result == null"

     *              unless = "#a0==2":如果第一个参数的值是2,结果不缓存;

     *      sync:是否使用异步模式

     * @param id

     * @return

     *

     */

    @Cacheable(value = {"emp"}/*,keyGenerator = "myKeyGenerator",condition = "#a0>1",unless = "#a0==2"*/)

    public Employee getEmp(Integer id){

        System.out.println("查询"+id+"号员工");

        Employee emp = employeeMapper.getEmpById(id);

        return emp;

    }

    /**

     * @CachePut:既调用方法,又更新缓存数据;同步更新缓存

     * 修改了数据库的某个数据,同时更新缓存;

     * 运行时机:

     *  1、先调用目标方法

     *  2、将目标方法的结果缓存起来

     *

     * 测试步骤:

     *  1、查询1号员工;查到的结果会放在缓存中;

     *          key:1  value:lastName:张三

     *  2、以后查询还是之前的结果

     *  3、更新1号员工;【lastName:zhangsan;gender:0】

     *          将方法的返回值也放进缓存了;

     *          key:传入的employee对象  值:返回的employee对象;

     *  4、查询1号员工?

     *      应该是更新后的员工;

     *          key = "#employee.id":使用传入的参数的员工id;

     *          key = "#result.id":使用返回后的id

     *             @Cacheable的key是不能用#result

     *      为什么是没更新前的?【1号员工没有在缓存中更新】

     *

     */

    @CachePut(/*value = "emp",*/key = "#result.id")

    public Employee updateEmp(Employee employee){

        System.out.println("updateEmp:"+employee);

        employeeMapper.updateEmp(employee);

        return employee;

    }

    /**

     * @CacheEvict:缓存清除

     *  key:指定要清除的数据

     *  allEntries = true:指定清除这个缓存中所有的数据

     *  beforeInvocation = false:缓存的清除是否在方法之前执行

     *      默认代表缓存清除操作是在方法执行之后执行;如果出现异常缓存就不会清除

     *

     *  beforeInvocation = true:

     *      代表清除缓存操作是在方法运行之前执行,无论方法是否出现异常,缓存都清除

     *

     *

     */

    @CacheEvict(value="emp",beforeInvocation = true/*key = "#id",*/)

    public void deleteEmp(Integer id){

        System.out.println("deleteEmp:"+id);

        //employeeMapper.deleteEmpById(id);

        int i = 10/0;

    }

    // @Caching 定义复杂的缓存规则

    @Caching(

         cacheable = {

             @Cacheable(/*value="emp",*/key = "#lastName")

         },

         put = {

             @CachePut(/*value="emp",*/key = "#result.id"),

             @CachePut(/*value="emp",*/key = "#result.email")

         }

    )

    public Employee getEmpByLastName(String lastName){

        return employeeMapper.getEmpByLastName(lastName);

    }

}
EmployeeService.java
整合Redis
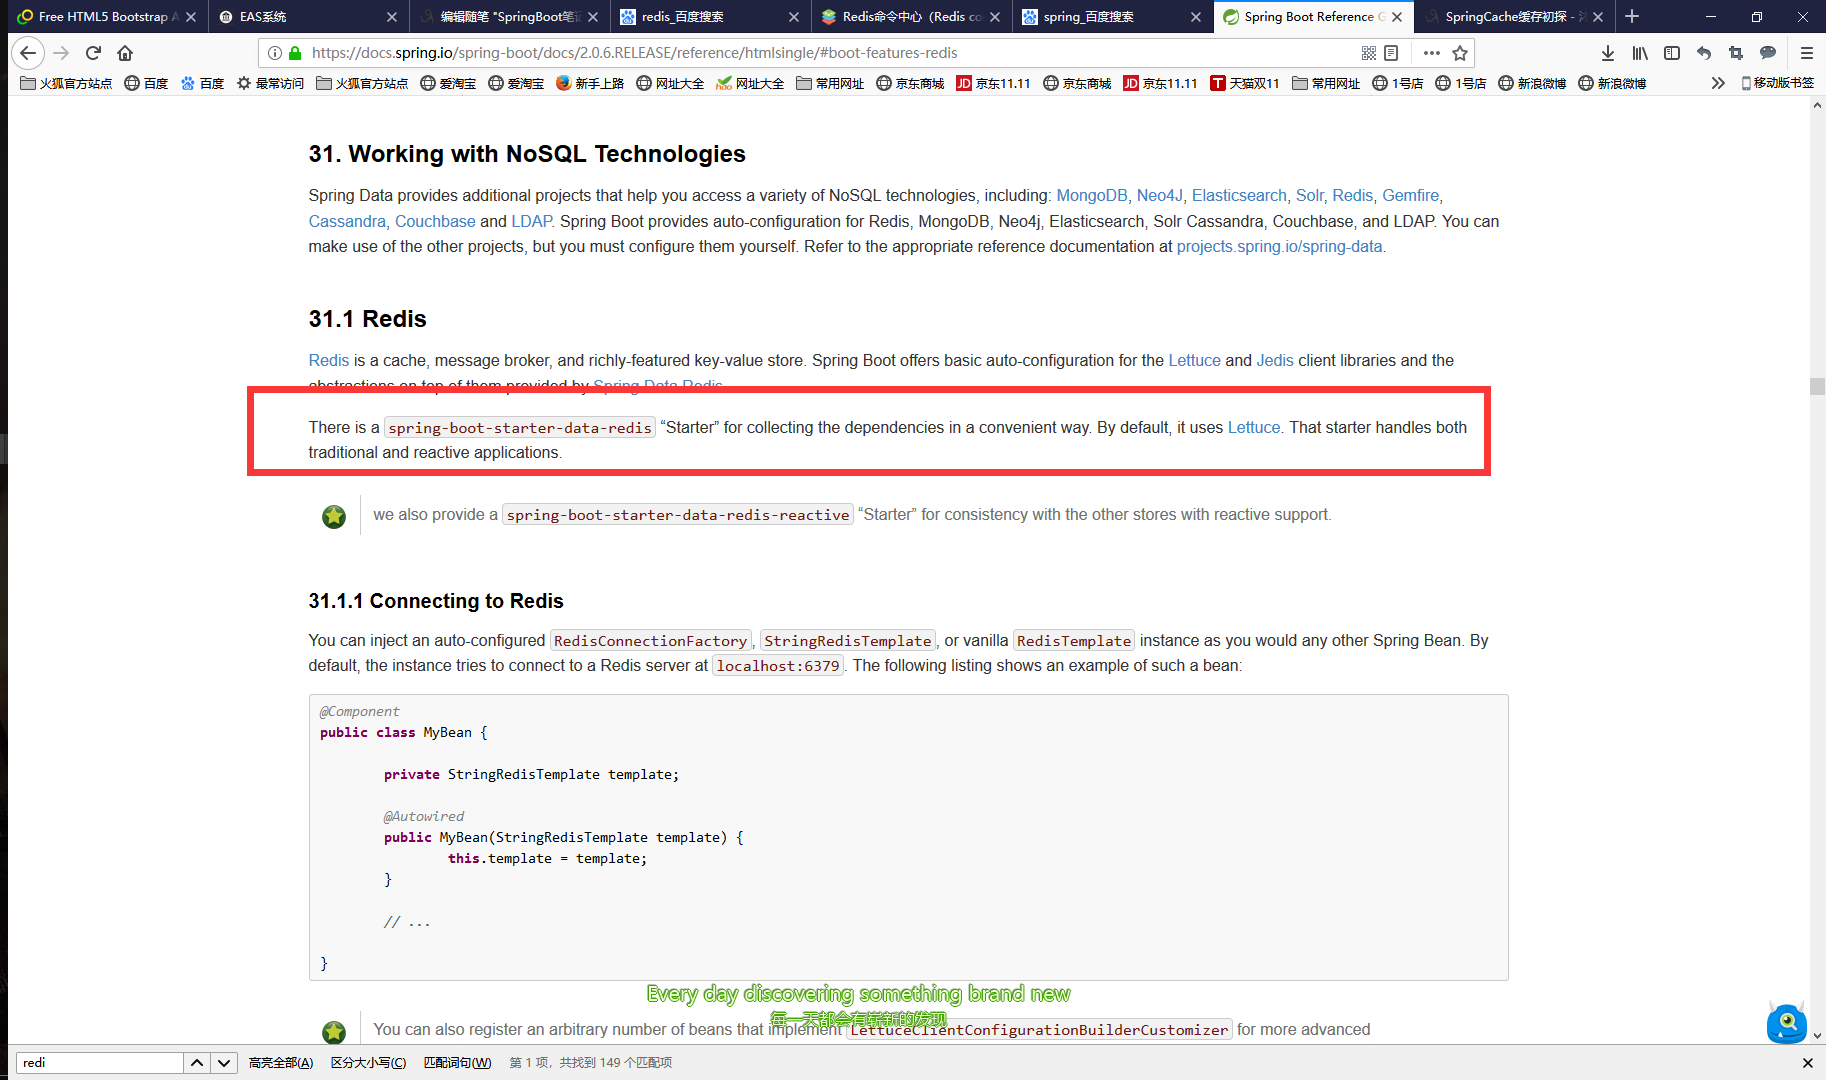
引入spring-boot-starter-data-redis
application.yml配置redis连接地址
使用RestTemplate操作redis
redisTemplate.opsForValue();//操作字符串
redisTemplate.opsForHash();//操作hash
redisTemplate.opsForList();//操作list
redisTemplate.opsForSet();//操作set
redisTemplate.opsForZSet();//操作有序set
配置缓存、CacheManagerCustomizers
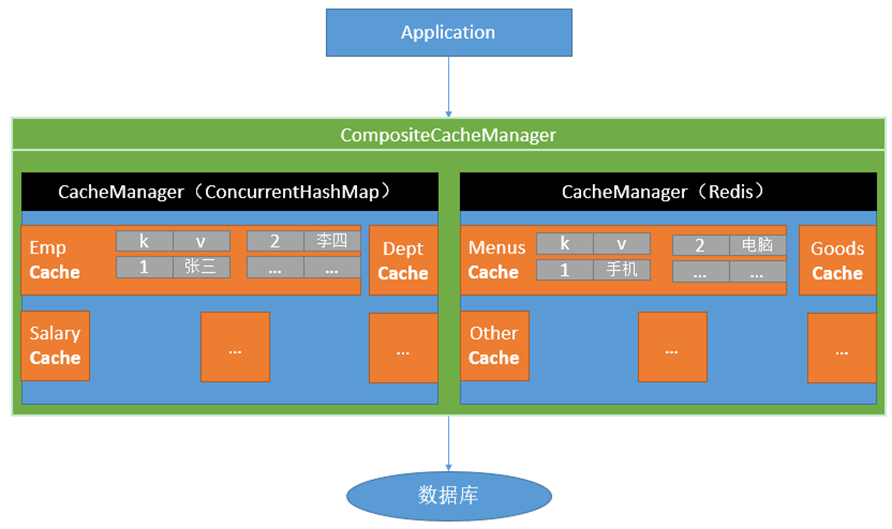
测试使用缓存、切换缓存、 CompositeCacheManager
安装镜像:
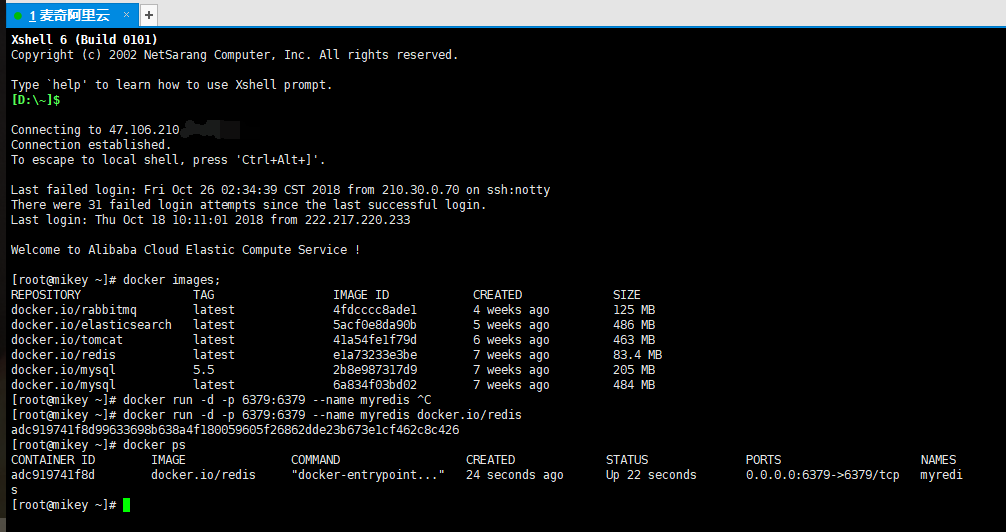
连接:

引入redis启动器:
官网:

配置redis:
package com.mikey.cache; import com.mikey.cache.bean.Employee;
import com.mikey.cache.mapper.EmployeeMapper;
import org.junit.Test;
import org.junit.runner.RunWith;
import org.springframework.beans.factory.annotation.Autowired;
import org.springframework.boot.test.context.SpringBootTest;
import org.springframework.data.redis.core.RedisTemplate;
import org.springframework.data.redis.core.StringRedisTemplate;
import org.springframework.test.context.junit4.SpringRunner; @RunWith(SpringRunner.class)
@SpringBootTest
public class Springboot01CacheApplicationTests { @Autowired
EmployeeMapper employeeMapper;
@Autowired
StringRedisTemplate stringRedisTemplate;//操作字符串
@Autowired
RedisTemplate redisTemplate;//k-v都是对象 @Test
public void contextLoads() {
Employee employee=employeeMapper.getEmpById(1);
System.out.println("Message="+employee);
} @Test
public void testRedis(){
// stringRedisTemplate.opsForValue().append("msg","hello");
// String msg = stringRedisTemplate.opsForValue().get("msg");
// System.out.println("Message="+msg);
stringRedisTemplate.opsForList().leftPush("mylist","1");
stringRedisTemplate.opsForList().leftPush("mylist","2");
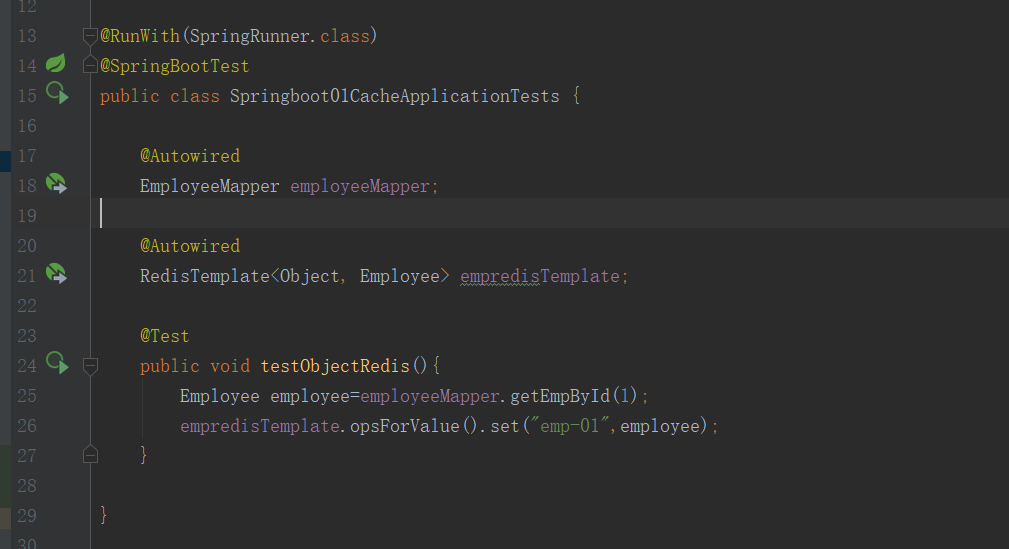
} @Test
public void testObjectRedis(){
Employee employee=employeeMapper.getEmpById(1);
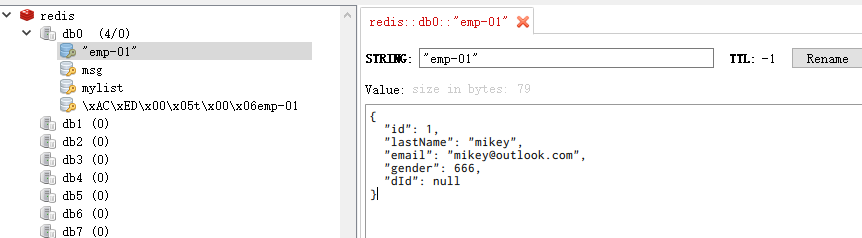
redisTemplate.opsForValue().set("emp-01",employee);
} }
测试类

将数据以json储存:
方法1:将数据直接转成json
方法2:配置:
配置类:
package com.mikey.cache.config;

import com.mikey.cache.bean.Employee;

import org.springframework.context.annotation.Bean;

import org.springframework.context.annotation.Configuration;

import org.springframework.data.redis.connection.RedisConnectionFactory;

import org.springframework.data.redis.core.RedisTemplate;

import org.springframework.data.redis.serializer.Jackson2JsonRedisSerializer;

/**

 * @author Mikey

 * @Title:

 * @Description:

 * @date 2018/10/26 19:45

 * @Version 1.0

 */

@Configuration

public class MyRedisConfig {

    @Bean

    public RedisTemplate<Object, Employee> empredisTemplate(

            RedisConnectionFactory redisConnectionFactory) throws Exception{

        RedisTemplate<Object,Employee> template=new RedisTemplate<Object, Employee>();

        template.setConnectionFactory(redisConnectionFactory);

        Jackson2JsonRedisSerializer<Employee> ser=new Jackson2JsonRedisSerializer<Employee>(Employee.class);

        template.setDefaultSerializer(ser);

        return template;

    }

}
MyRedisConfig.java
测试类:
结果:
配置redis的json格式:
package com.mikey.cache.config;

import com.mikey.cache.bean.Employee;

import org.springframework.context.annotation.Bean;

import org.springframework.context.annotation.Configuration;

import org.springframework.data.redis.cache.RedisCacheManager;

import org.springframework.data.redis.connection.RedisConnectionFactory;

import org.springframework.data.redis.core.RedisTemplate;

import org.springframework.data.redis.serializer.Jackson2JsonRedisSerializer;

/**

 * @author Mikey

 * @Title:

 * @Description:

 * @date 2018/10/26 19:45

 * @Version 1.0

 */

@Configuration

public class MyRedisConfig {

    @Bean

    public RedisTemplate<Object, Employee> empredisTemplate(

            RedisConnectionFactory redisConnectionFactory) throws Exception{

        RedisTemplate<Object,Employee> template=new RedisTemplate<Object, Employee>();

        template.setConnectionFactory(redisConnectionFactory);

        Jackson2JsonRedisSerializer<Employee> ser=new Jackson2JsonRedisSerializer<Employee>(Employee.class);

        template.setDefaultSerializer(ser);

        return template;

    }

    @Bean

    public RedisCacheManager empoyeeCacheManager(RedisTemplate<Object,Employee> employeeRedisTemplate){

        RedisCacheManager redisCacheManager=new RedisCacheManager(employeeRedisTemplate);

        redisCacheManager.setUsePrefix(true);

        return redisCacheManager;

    }

}
MyRedisConfig
序列号及反序列化:
package com.mikey.cache.config;

import com.mikey.cache.bean.Department;

import com.mikey.cache.bean.Employee;

import org.springframework.context.annotation.Bean;

import org.springframework.context.annotation.Configuration;

import org.springframework.context.annotation.Primary;

import org.springframework.data.redis.cache.RedisCacheManager;

import org.springframework.data.redis.connection.RedisConnectionFactory;

import org.springframework.data.redis.core.RedisTemplate;

import org.springframework.data.redis.serializer.Jackson2JsonRedisSerializer;

/**

 * @author Mikey

 * @Title:

 * @Description:

 * @date 2018/10/26 19:45

 * @Version 1.0

 */

@Configuration

public class MyRedisConfig {

    @Bean

    public RedisTemplate<Object, Employee> empredisTemplate(

            RedisConnectionFactory redisConnectionFactory) throws Exception{

        RedisTemplate<Object,Employee> template=new RedisTemplate<Object, Employee>();

        template.setConnectionFactory(redisConnectionFactory);

        Jackson2JsonRedisSerializer<Employee> ser=new Jackson2JsonRedisSerializer<Employee>(Employee.class);

        template.setDefaultSerializer(ser);

        return template;

    }

    @Bean

    public RedisTemplate<Object, Department> deptredisTemplate(

            RedisConnectionFactory redisConnectionFactory) throws Exception{

        RedisTemplate<Object,Department> template=new RedisTemplate<Object, Department>();

        template.setConnectionFactory(redisConnectionFactory);

        Jackson2JsonRedisSerializer<Department> ser=new Jackson2JsonRedisSerializer<Department>(Department.class);

        template.setDefaultSerializer(ser);

        return template;

    }

    @Primary//必须设置一个默认的

    @Bean

    public RedisCacheManager empoyeeCacheManager(RedisTemplate<Object,Employee> employeeRedisTemplate){

        RedisCacheManager redisCacheManager=new RedisCacheManager(employeeRedisTemplate);

        redisCacheManager.setUsePrefix(true);

        return redisCacheManager;

    }

    @Bean

    public RedisCacheManager deptCacheManager(RedisTemplate<Object,Department> deptloyeeRedisTemplate){

        RedisCacheManager redisCacheManager=new RedisCacheManager(deptloyeeRedisTemplate);

        redisCacheManager.setUsePrefix(true);

        return redisCacheManager;

    }

}
MyRedisConfig
直接使用缓存管理器
/**

 * @author Mikey

 * @Title:

 * @Description:

 * @date 2018/10/26 20:53

 * @Version 1.0

 */

@RestController

public class DeptController {

    @Autowired

    @Qualifier("deptCacheManager")

    private RedisCacheManager deptCacheManager;

    @Autowired

    private DeptService deptService;

    @GetMapping("/dept/{id}")

    public Department getDeptById(@PathVariable("id") Integer id){

        return deptService.getDeptById(id);

    }

    @GetMapping("/depts/{id}")

    public Department getDeptByIds(@PathVariable("id") Integer id){

        System.out.println("查询部门");

        Department department=deptService.getDeptById(1);

        Cache dept = deptCacheManager.getCache("dept");

        dept.put("dept:1",department);

        return department;

    }

}
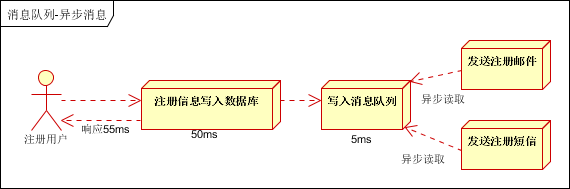
Spring Boot与消息
1JMS:java消息服务
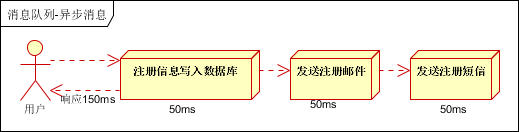
大多应用中,可通过消息服务中间件来提升系统异步通信、扩展解耦能力
消息服务中两个重要概念:
消息代理(message broker)和目的地(destination)
当消息发送者发送消息以后,将由消息代理接管,消息代理保证消息传递到指定目的地。
消息队列主要有两种形式的目的地
队列(queue):点对点消息通信(point-to-point)
主题(topic):发布(publish)/订阅(subscribe)消息通信
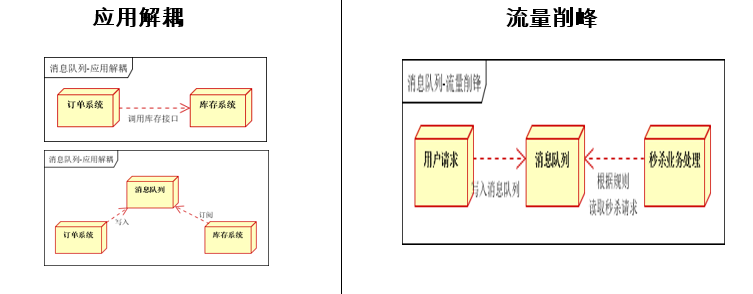
点对点式:
消息发送者发送消息,消息代理将其放入一个队列中,消息接收者从队列中获取消息内容,消息读取后被移出队列
消息只有唯一的发送者和接受者,但并不是说只能有一个接收者
发布订阅式:
发送者(发布者)发送消息到主题,多个接收者(订阅者)监听(订阅)这个主题,那么就会在消息到达时同时收到消息
JMS(Java Message Service)JAVA消息服务:
基于JVM消息代理的规范。ActiveMQ、HornetMQ是JMS实现
2AMQP:高级查询队列协议
AMQP(Advanced Message Queuing Protocol)
高级消息队列协议,也是一个消息代理的规范,兼容JMS
RabbitMQ是AMQP的实现

Spring支持
spring-jms提供了对JMS的支持
spring-rabbit提供了对AMQP的支持
需要ConnectionFactory的实现来连接消息代理
提供JmsTemplate、RabbitTemplate来发送消息
@JmsListener(JMS)、@RabbitListener(AMQP)注解在方法上监听消息代理发布的消息
@EnableJms、@EnableRabbit开启支持
Spring Boot自动配置
JmsAutoConfiguration
RabbitAutoConfiguration
3RabbitMQ:
RabbitMQ简介:
RabbitMQ是一个由erlang开发的AMQP(Advanved Message Queue Protocol)的开源实现。
核心概念
Message
消息,消息是不具名的,它由消息头和消息体组成。消息体是不透明的,而消息头则由一系列的可选属性组成,这些属性包括routing-key(路由键)、
priority(相对于其他消息的优先权)、delivery-mode(指出该消息可能需要持久性存储)等。
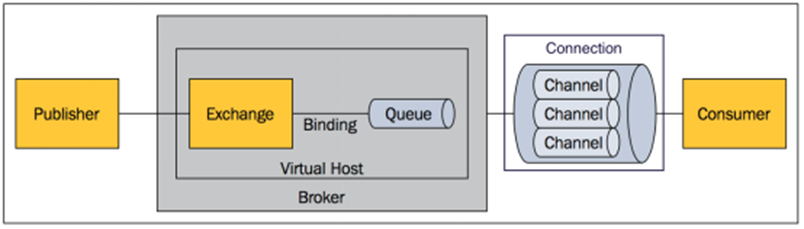
Publisher
消息的生产者,也是一个向交换器发布消息的客户端应用程序。
Exchange
交换器,用来接收生产者发送的消息并将这些消息路由给服务器中的队列。
Exchange有4种类型:direct(默认),fanout, topic, 和headers,不同类型的Exchange转发消息的策略有所区别
Queue
消息队列,用来保存消息直到发送给消费者。它是消息的容器,也是消息的终点。一个消息可投入一个或多个队列。
消息一直在队列里面,等待消费者连接到这个队列将其取走。
Binding
绑定,用于消息队列和交换器之间的关联。一个绑定就是基于路由键将交换器和消息队列连接起来的路由规则,
所以可以将交换器理解成一个由绑定构成的路由表。
Exchange 和Queue的绑定可以是多对多的关系。
Connection
网络连接,比如一个TCP连接。
Channel
信道,多路复用连接中的一条独立的双向数据流通道。信道是建立在真实的TCP连接内的虚拟连接,AMQP 命令都是通过信道发出去的,
不管是发布消息、订阅队列还是接收消息,这些动作都是通过信道完成。因为对于操作系统来说建立和销毁 TCP 都是非常昂贵的开销,
所以引入了信道的概念,以复用一条 TCP 连接。
Consumer
消息的消费者,表示一个从消息队列中取得消息的客户端应用程序。
Virtual Host
虚拟主机,表示一批交换器、消息队列和相关对象。虚拟主机是共享相同的身份认证和加密环境的独立服务器域。
每个 vhost 本质上就是一个 mini 版的 RabbitMQ 服务器,拥有自己的队列、交换器、绑定和权限机制。
vhost 是 AMQP 概念的基础,必须在连接时指定,RabbitMQ 默认的 vhost 是 / 。
Broker
表示消息队列服务器实体
RabbitMQ运行机制:
AMQP 中的消息路由
AMQP 中消息的路由过程和 Java 开发者熟悉的 JMS 存在一些差别,AMQP 中增加了 Exchange 和 Binding 的角色。生产者把消息发布到 Exchange 上,
消息最终到达队列并被消费者接收,而 Binding 决定交换器的消息应该发送到那个队列。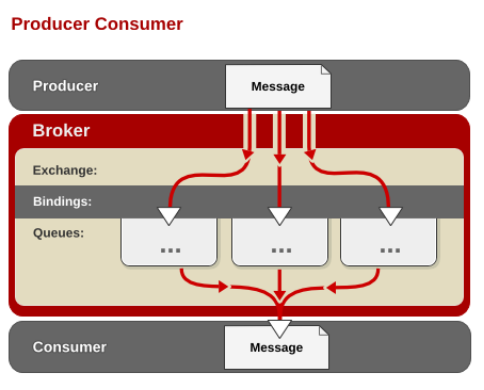
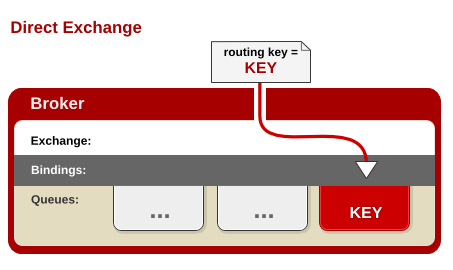
Exchange 类型
Exchange分发消息时根据类型的不同分发策略有区别,目前共四种类型:
direct、fanout、topic、headers 。headers 匹配 AMQP 消息的 header 而不是路由键,
headers 交换器和 direct 交换器完全一致,但性能差很多,目前几乎用不到了,所以直接看另外三种类型:
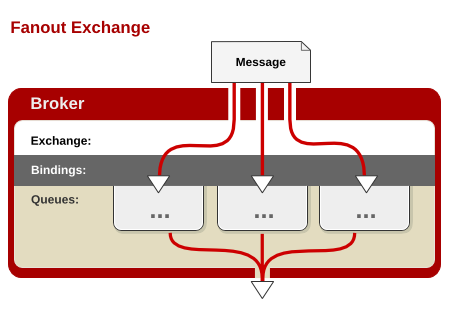
每个发到 fanout 类型交换器的消息都会分到所有绑定的队列上去。fanout 交换器不处理路由键,
只是简单的将队列绑定到交换器上,每个发送到交换器的消息都会被转发到与该交换器绑定的所有队列上。
很像子网广播,每台子网内的主机都获得了一份复制的消息。fanout 类型转发消息是最快的。
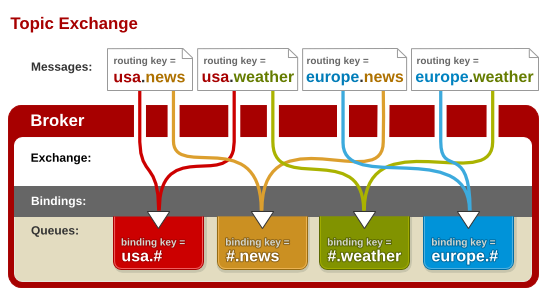
topic 交换器通过模式匹配分配消息的路由键属性,将路由键和某个模式进行匹配,
此时队列需要绑定到一个模式上。它将路由键和绑定键的字符串切分成单词,这些单词之间用点隔开。
它同样也会识别两个通配符:符号“#”和符号“*”。#匹配0个或多个单词,*匹配一个单词。
RabbitMQ整合:
引入 spring-boot-starter-amqp
application.yml配置
测试RabbitMQ
AmqpAdmin:管理组件
RabbitTemplate:消息发送处理组件

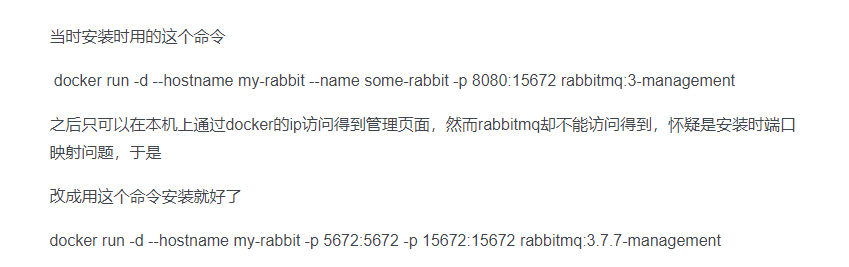
无法访问管理页面?
springboot 整合消息队列:
自动配置
1、RabbitAutoConfiguration
2、有自动配置了连接工厂ConnectionFactory;
3、RabbitProperties 封装了 RabbitMQ的配置
4、 RabbitTemplate :给RabbitMQ发送和接受消息;
5、 AmqpAdmin : RabbitMQ系统管理功能组件;
AmqpAdmin:创建和删除 Queue,Exchange,Binding
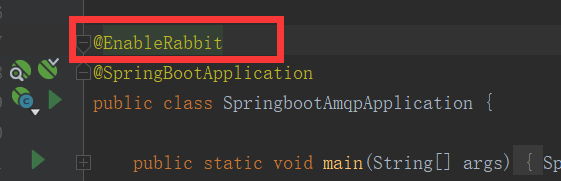
6、@EnableRabbit + @RabbitListener 监听消息队列的内容
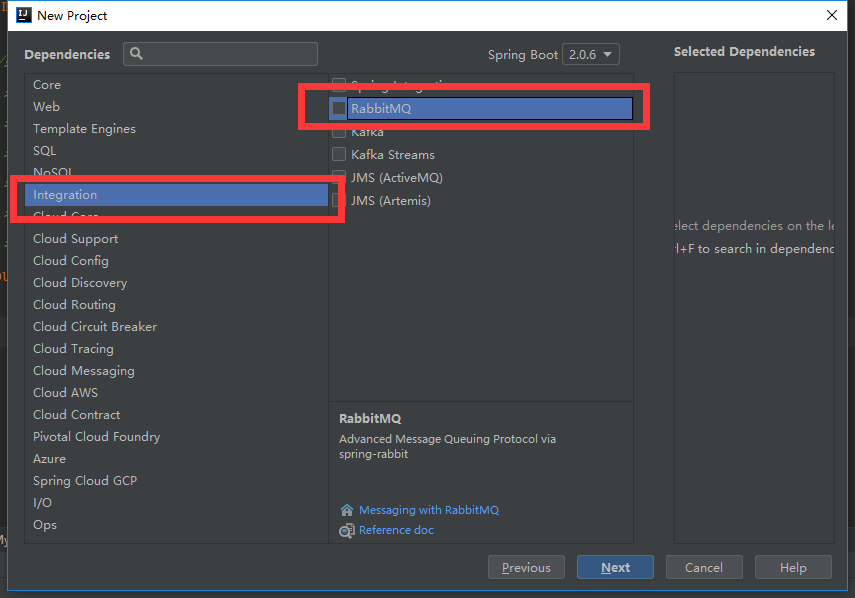
1.利用idea的spring初始化器创建应用选中RabbitMq模块
2.配置文件:
spring.rabbitmq.addresses=47.106.210.183

spring.rabbitmq.username=guest

spring.rabbitmq.password=guest

#spring.rabbitmq.port=5672//默认5672

#spring.rabbitmq.virtual-host=
3.测试:
package com.mikey.springbootamqp;

import org.junit.Test;

import org.junit.runner.RunWith;

import org.springframework.amqp.rabbit.core.RabbitTemplate;

import org.springframework.beans.factory.annotation.Autowired;

import org.springframework.boot.test.context.SpringBootTest;

import org.springframework.test.context.junit4.SpringRunner;

import java.util.Arrays;

import java.util.HashMap;

import java.util.Map;

@RunWith(SpringRunner.class)

@SpringBootTest

public class SpringbootAmqpApplicationTests {

    @Autowired

    private RabbitTemplate rabbitTemplate;

    @Test

    public void contextLoads() {

//        rabbitTemplate.send(exchange,routeKey,message);

        Map<String,Object> map=new HashMap<>();

        map.put("msg","这是第一个消息");

        map.put("data", Arrays.asList("helloworld",123,true));

        rabbitTemplate.convertAndSend("exchange.direct","atguigu.news",map);

    }

    @Test

    public void receive(){

        Object o = rabbitTemplate.receiveAndConvert("atguigu.news");

        System.out.println("数据类型="+o.getClass());

        System.out.println("数据="+o);

    }

}
Test
自定义messageconveter(json格式)
package com.mikey.springbootamqp.config;

import org.springframework.amqp.support.converter.Jackson2JsonMessageConverter;

import org.springframework.amqp.support.converter.MessageConverter;

import org.springframework.context.annotation.Bean;

import org.springframework.context.annotation.Configuration;

/**

 * @author Mikey

 * @Title:

 * @Description:

 * @date 2018/10/27 10:26

 * @Version 1.0

 */

@Configuration

public class MyAMQPConfig {

    @Bean

    public MessageConverter messageConverter(){

        return new Jackson2JsonMessageConverter();

    }

}
MyAMQPConfig .java
结果:
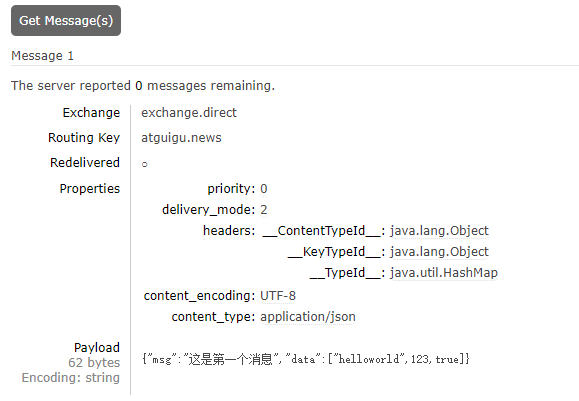
测试:
package com.mikey.springbootamqp;

import com.mikey.springbootamqp.bean.Book;

import org.junit.Test;

import org.junit.runner.RunWith;

import org.springframework.amqp.rabbit.core.RabbitTemplate;

import org.springframework.beans.factory.annotation.Autowired;

import org.springframework.boot.test.context.SpringBootTest;

import org.springframework.test.context.junit4.SpringRunner;

import java.util.Arrays;

import java.util.HashMap;

import java.util.Map;

@RunWith(SpringRunner.class)

@SpringBootTest

public class SpringbootAmqpApplicationTests {

    @Autowired

    private RabbitTemplate rabbitTemplate;

    @Test

    public void contextLoads() {

//        rabbitTemplate.send(exchange,routeKey,message);

        Map<String,Object> map=new HashMap<>();

        map.put("msg","这是第一个消息");

        map.put("data", Arrays.asList("helloworld",123,true));

        rabbitTemplate.convertAndSend("exchange.direct","atguigu.news",map);

    }

    @Test

    public void receive(){

        Object o = rabbitTemplate.receiveAndConvert("atguigu.news");

        System.out.println("数据类型="+o.getClass());

        System.out.println("数据="+o);

    }

    /**

     * 发送javaBean

     */

    @Test

    public void testBeanSend(){

        Book book = new Book("阿姆斯特朗", "回旋喷气式加速炮");

        System.out.println("Book="+book);

        rabbitTemplate.convertAndSend("exchange.direct","atguigu.news",book);

    }

    /**

     * 接收对象

     */

    @Test

    public void getBeanSend(){

        Book book = (Book) rabbitTemplate.receiveAndConvert("atguigu.news");

        System.out.println("messsage="+book);

    }

    /**

     * 广播发送

     */

    @Test

    public void sendAll(){

        rabbitTemplate.convertAndSend("exchange.fanout","",new Book("麦奇","麦奇"));

    }

}
Test
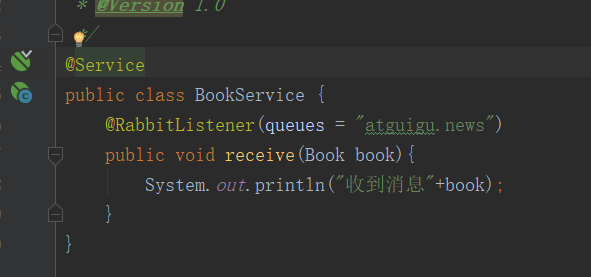
消息监听器:
启动类添加注解:
2.编写监听器:
创建消息队列和交换器:
package com.mikey.springbootamqp;

import com.mikey.springbootamqp.bean.Book;

import org.junit.Test;

import org.junit.runner.RunWith;

import org.springframework.amqp.core.AmqpAdmin;

import org.springframework.amqp.core.Binding;

import org.springframework.amqp.core.DirectExchange;

import org.springframework.amqp.core.Queue;

import org.springframework.amqp.rabbit.core.RabbitTemplate;

import org.springframework.beans.factory.annotation.Autowired;

import org.springframework.boot.test.context.SpringBootTest;

import org.springframework.test.context.junit4.SpringRunner;

import java.util.Arrays;

import java.util.HashMap;

import java.util.Map;

@RunWith(SpringRunner.class)

@SpringBootTest

public class SpringbootAmqpApplicationTests {

    @Autowired

    private RabbitTemplate rabbitTemplate;

    @Autowired

    private AmqpAdmin amqpAdmin;//操作

    /**

     * 添加Exchange

     */

    @Test

    public void createExchange(){

        amqpAdmin.declareExchange(new DirectExchange("amqpadmin.exchange"));

        System.out.println("创建完成");

    }

    /**

     * 添加队列

     */

    @Test

    public void createQueue(){

        amqpAdmin.declareQueue(new Queue("amqpadmin.queue"));

        System.out.println("创建队列成功");

    }

    /**

     * 添加绑定

     */

    @Test

    public void createBinding(){

        amqpAdmin.declareBinding(new Binding("amqpadmin.queue",Binding.DestinationType.QUEUE,"amqpadmin.exchange","ampq.haha",null));

    }

}
Spring Boot与检索
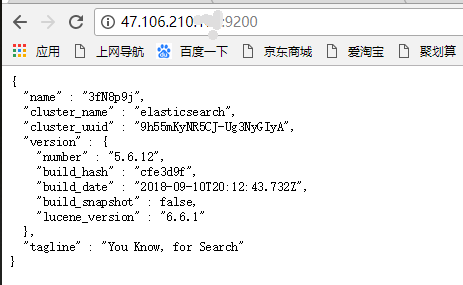
我们的应用经常需要添加检索功能,开源的 ElasticSearch 是目前全文搜索引擎的首选。他可以快速的存储、搜索和分析海量数据。
Spring Boot通过整合Spring Data ElasticSearch为我们提供了非常便捷的检索功能支持;
Elasticsearch是一个分布式搜索服务,提供Restful API,底层基于Lucene,采用多shard(分片)的方式保证数据安全,
并且提供自动resharding的功能,github等大型的站点也是采用了ElasticSearch作为其搜索服务,
docker安装:elasticSearch
docker运行命令:
docker run -e ES_JAVA_OPTS="-Xms256m -Xmx256m" -d -p 9200:9200 -p 9300:9300 --name ES01 5acf0e8da90b
限制堆空间内存,elasticSearch默认占用2G
启动成功:
学习文档:https://www.elastic.co/guide/cn/elasticsearch/guide/current/query-dsl-intro.html
概念:
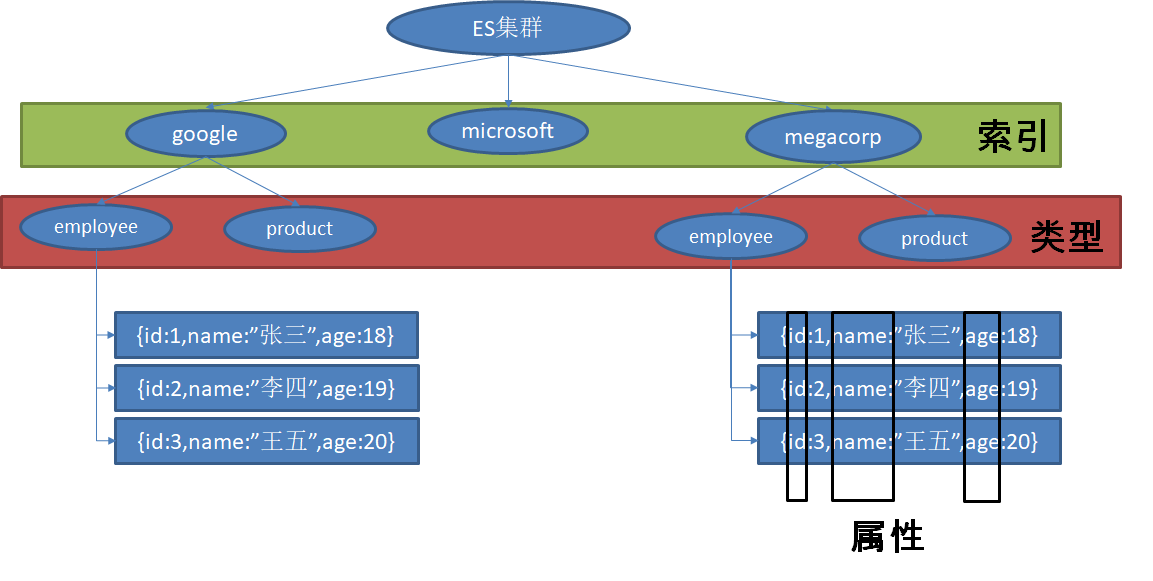
以 员工文档 的形式存储为例:
一个文档代表一个员工数据。存储数据到 ElasticSearch 的行为叫做 索引 ,
但在索引一个文档之前,需要确定将文档存储在哪里。
一个 ElasticSearch 集群可以 包含多个 索引 ,相应的每个索引可以包含多个 类型 。
这些不同的类型存储着多个 文档 ,每个文档又有 多个 属性 。
类似关系:
索引-数据库
类型-表
文档-表中的记录
属性-列
三、整合ElasticSearch测试
引入spring-boot-starter-data-elasticsearch
安装Spring Data 对应版本的ElasticSearch
application.yml配置
Spring Boot自动配置的
ElasticsearchRepository、ElasticsearchTemplate、Jest
测试ElasticSearch
/**
* SpringBoot默认支持两种技术来和ES交互;
* 1、Jest(默认不生效)
* 需要导入jest的工具包(io.searchbox.client.JestClient)
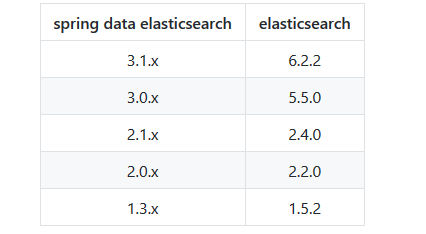
* 2、SpringData ElasticSearch【ES版本有可能不合适】
* 版本适配说明:https://github.com/spring-projects/spring-data-elasticsearch
* 如果版本不适配:2.4.6
* 1)、升级SpringBoot版本
* 2)、安装对应版本的ES
*
* 1)、Client 节点信息clusterNodes;clusterName
* 2)、ElasticsearchTemplate 操作es
* 3)、编写一个 ElasticsearchRepository 的子接口来操作ES;
* 两种用法:https://github.com/spring-projects/spring-data-elasticsearch
* 1)、编写一个 ElasticsearchRepository
*/
第一种:
配置文件:

先使用jest:

测试类:
package com.mikey.springbootelasticsearch;

import com.mikey.springbootelasticsearch.bean.Article;

import io.searchbox.client.JestClient;

import io.searchbox.core.Index;

import io.searchbox.core.Search;

import io.searchbox.core.SearchResult;

import org.junit.Test;

import org.junit.runner.RunWith;

import org.springframework.beans.factory.annotation.Autowired;

import org.springframework.boot.test.context.SpringBootTest;

import org.springframework.test.context.junit4.SpringRunner;

import java.io.IOException;

@RunWith(SpringRunner.class)

@SpringBootTest

public class SpringbootelasticsearchApplicationTests {

    @Autowired

    JestClient jestClient;

    @Test

    public void contextLoads() throws IOException {

        Article article = new Article();

        article.setId(1);

        article.setTitle("ElasticSearch");

        article.setAuthor("阿姆斯特朗炮");

        article.setContent("Hello world");

        Index build = new Index.Builder(article).index("atguigu").type("news").build();//构建一个索引功能

        jestClient.execute(build);

    }

    /**

     * 测试搜索

     */

    @Test

    public void search() throws IOException {

        String json="{\n"+

                "  \"query\" :{\n"+

                "    \"match\" :{\n"+

                "      \"content\" : \"hello\"\n"+

                "       }\n"+

                "      }\n"+

                "}";

        Search build = new Search.Builder(json).addIndex("atguigu").addType("news").build();

        SearchResult execute = jestClient.execute(build);

        System.out.println("Message="+execute.getJsonString());

    }

}
参考文档:https://github.com/searchbox-io/Jest/tree/master/jest
第二种:使用spring-boot-starter-data-elasticsearch
引入:在pom文件中spring-boot-starter-data-elasticsearch
配置文件:

编写bean:
package com.mikey.springbootelasticsearch.bean;

import org.springframework.data.elasticsearch.annotations.Document;

/**

 * @author Mikey

 * @Title:

 * @Description:

 * @date 2018/10/27 16:00

 * @Version 1.0

 */

@Document(indexName = "atguigu",type = "book")

public class Book {

    private Integer id;

    private String bookName;

    private String author;

    public Integer getId() {

        return id;

    }

    public void setId(Integer id) {

        this.id = id;

    }

    public String getBookName() {

        return bookName;

    }

    public void setBookName(String bookName) {

        this.bookName = bookName;

    }

    public String getAuthor() {

        return author;

    }

    public void setAuthor(String author) {

        this.author = author;

    }

    @Override

    public String toString() {

        return "Book{" +

                "id=" + id +

                ", bookName='" + bookName + '\'' +

                ", author='" + author + '\'' +

                '}';

    }

}
编写接口:
package com.atguigu.elastic.repository;

import com.atguigu.elastic.bean.Book;

import org.springframework.data.elasticsearch.repository.ElasticsearchRepository;

import java.util.List;

public interface BookRepository extends ElasticsearchRepository<Book,Integer> {

    //参照

    // https://docs.spring.io/spring-data/elasticsearch/docs/3.0.6.RELEASE/reference/html/

   public List<Book> findByBookNameLike(String bookName);

}
测试类:
@RunWith(SpringRunner.class)

@SpringBootTest

public class Springboot03ElasticApplicationTests {

    @Autowired

    JestClient jestClient;

    @Autowired

    BookRepository bookRepository;

    @Test

    public void test02(){

//        Book book = new Book();

//        book.setId(1);

//        book.setBookName("西游记");

//        book.setAuthor("吴承恩");

//        bookRepository.index(book);

        for (Book book : bookRepository.findByBookNameLike("游")) {

            System.out.println(book);

        }

        ;

    }

}
注意:要选择对应的版本不然会报连接超时异常:


参考文档:https://docs.spring.io/spring-data/elasticsearch/docs/3.0.6.RELEASE/reference/html/
Spring Boot与任务
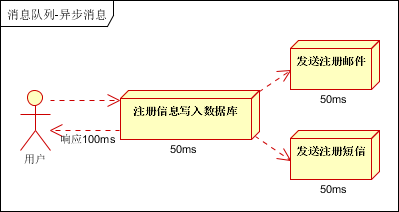
异步任务:
在Java应用中,绝大多数情况下都是通过同步的方式来实现交互处理的;但是在处理与第三方系统交互的时候,
容易造成响应迟缓的情况,之前大部分都是使用多线程来完成此类任务,其实,在Spring 3.x之后,
就已经内置了@Async来完美解决这个问题。
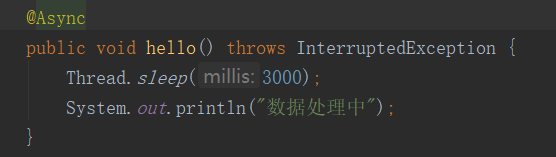
两个注解:
@EnableAysnc、@Aysnc
启动类添加:

方法上:
定时任务:
项目开发中经常需要执行一些定时任务,比如需要在每天凌晨时候,分析一次前一天的日志信息。
Spring为我们提供了异步执行任务调度的方式,提供TaskExecutor 、TaskScheduler 接口。
两个注解:@EnableScheduling、@Scheduled
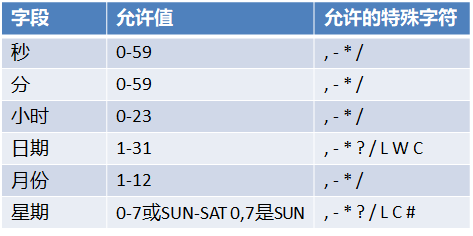
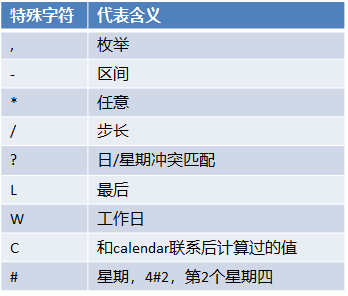
cron表达式:
代码实现:
启动类加入@EnableScheduling注解
import org.springframework.scheduling.annotation.Scheduled;

import org.springframework.stereotype.Service;

@Service

public class ScheduledService {

    /**

     * second(秒), minute(分), hour(时), day of month(日), month(月), day of week(周几).

     * 0 * * * * MON-FRI

     *  【0 0/5 14,18 * * ?】 每天14点整,和18点整,每隔5分钟执行一次

     *  【0 15 10 ? * 1-6】 每个月的周一至周六10:15分执行一次

     *  【0 0 2 ? * 6L】每个月的最后一个周六凌晨2点执行一次

     *  【0 0 2 LW * ?】每个月的最后一个工作日凌晨2点执行一次

     *  【0 0 2-4 ? * 1#1】每个月的第一个周一凌晨2点到4点期间,每个整点都执行一次;

     */

   // @Scheduled(cron = "0 * * * * MON-SAT")

    //@Scheduled(cron = "0,1,2,3,4 * * * * MON-SAT")

   // @Scheduled(cron = "0-4 * * * * MON-SAT")

    @Scheduled(cron = "0/4 * * * * MON-SAT")  //每4秒执行一次

    public void hello(){

        System.out.println("hello ... ");

    }

}
ScheduledService
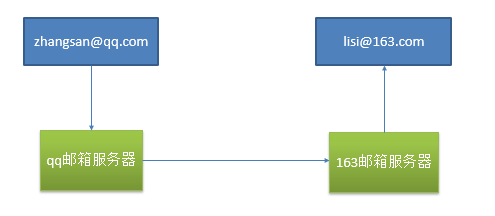
邮件任务:
邮件发送需要引入spring-boot-starter-mail
Spring Boot 自动配置MailSenderAutoConfiguration
定义MailProperties内容,配置在application.yml中
自动装配JavaMailSender
测试邮件发送
代码操作:
1.映入相关的启动器依赖:
org.springframework.boot

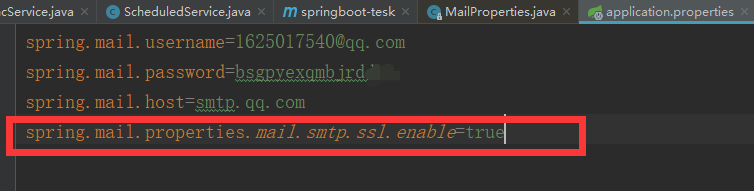
配置文件 :

测试类:
package com.mikey.boottesk;

import org.junit.Test;

import org.junit.runner.RunWith;

import org.springframework.beans.factory.annotation.Autowired;

import org.springframework.boot.test.context.SpringBootTest;

import org.springframework.mail.SimpleMailMessage;

import org.springframework.mail.javamail.JavaMailSender;

import org.springframework.test.context.junit4.SpringRunner;

@RunWith(SpringRunner.class)

@SpringBootTest

public class SpringbootTeskApplicationTests {

    @Autowired

    JavaMailSender javaMailSender;

    @Test

    public void contextLoads() {

        SimpleMailMessage simpleMailMessage = new SimpleMailMessage();

        simpleMailMessage.setSubject("今晚行动");

        simpleMailMessage.setText("hello world");

        simpleMailMessage.setTo("18276297824@163.com");

        simpleMailMessage.setFrom("1625017540@qq.com");

        javaMailSender.send(simpleMailMessage);

    }

}
SpringbootTeskApplicationTests
成功发送:

报错问题:
如果报不安全连接需要ssl则在配置文件中配置
带复杂内容的邮件:
package com.atguigu.task;

import org.junit.Test;

import org.junit.runner.RunWith;

import org.springframework.beans.factory.annotation.Autowired;

import org.springframework.boot.test.context.SpringBootTest;

import org.springframework.mail.SimpleMailMessage;

import org.springframework.mail.javamail.JavaMailSenderImpl;

import org.springframework.mail.javamail.MimeMessageHelper;

import org.springframework.test.context.junit4.SpringRunner;

import javax.mail.internet.MimeMessage;

import java.io.File;

@RunWith(SpringRunner.class)

@SpringBootTest

public class Springboot04TaskApplicationTests {

    @Autowired

    JavaMailSenderImpl mailSender;

    @Test

    public void contextLoads() {

        SimpleMailMessage message = new SimpleMailMessage();

        //邮件设置

        message.setSubject("通知-今晚开会");

        message.setText("今晚7:30开会");

        message.setTo("17512080612@163.com");

        message.setFrom("534096094@qq.com");

        mailSender.send(message);

    }

    @Test

    public void test02() throws  Exception{

        //1、创建一个复杂的消息邮件

        MimeMessage mimeMessage = mailSender.createMimeMessage();

        MimeMessageHelper helper = new MimeMessageHelper(mimeMessage, true);

        //邮件设置

        helper.setSubject("通知-今晚开会");

        helper.setText("<b style='color:red'>今天 7:30 开会</b>",true);

        helper.setTo("17512080612@163.com");

        helper.setFrom("534096094@qq.com");

        //上传文件

        helper.addAttachment("1.jpg",new File("C:\\Users\\lfy\\Pictures\\Saved Pictures\\1.jpg"));

        helper.addAttachment("2.jpg",new File("C:\\Users\\lfy\\Pictures\\Saved Pictures\\2.jpg"));

        mailSender.send(mimeMessage);

    }

}
Spring Boot与安全
两大安全框架:shiro,SpringSecutity
安全
SpringSecutity:
Spring Security是针对Spring项目的安全框架,也是Spring Boot底层安全模块默认的技术选型。他可以实现强大的web安全控制。对于安全控制,我们仅需引入spring-boot-starter-security模块,进行少量的配置,即可实现强大的安全管理。几个类:
WebSecurityConfigurerAdapter:自定义Security策略
AuthenticationManagerBuilder:自定义认证策略
@EnableWebSecurity:开启WebSecurity模式
应用程序的两个主要区域是“认证”和“授权”(或者访问控制)。这两个主要区域是Spring Security 的两个目标。
“认证”(Authentication),是建立一个他声明的主体的过程(一个“主体”一般是指用户,设备或一些可以在你的应用程序中执行动作的其他系统)。
“授权”(Authorization)指确定一个主体是否允许在你的应用程序执行一个动作的过程。为了抵达需要授权的店,主体的身份已经有认证过程建立。
这个概念是通用的而不只在Spring Security中。
二、Web&安全
登陆/注销
HttpSecurity配置登陆、注销功能
Thymeleaf提供的SpringSecurity标签支持
需要引入thymeleaf-extras-springsecurity4
sec:authentication=“name”获得当前用户的用户名
sec:authorize=“hasRole(‘ADMIN’)”当前用户必须拥有ADMIN权限时才会显示标签内容
remember me
表单添加remember-me的checkbox
配置启用remember-me功能
CSRF(Cross-site request forgery)跨站请求伪造
HttpSecurity启用csrf功能,会为表单添加_csrf的值,提交携带来预防CSRF;
初始化向导创建项目
引入web,thymelef模块
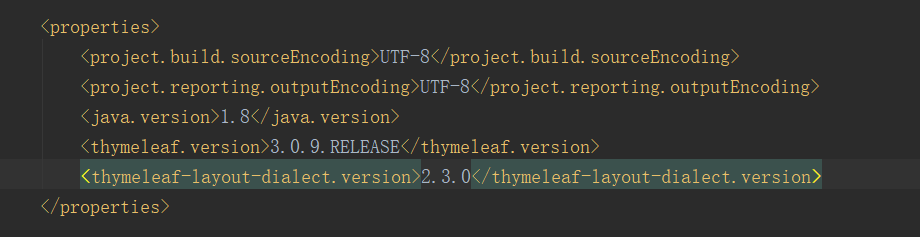
导入依赖:

<?xml version="1.0" encoding="UTF-8"?>

<project xmlns="http://maven.apache.org/POM/4.0.0" xmlns:xsi="http://www.w3.org/2001/XMLSchema-instance"

         xsi:schemaLocation="http://maven.apache.org/POM/4.0.0 http://maven.apache.org/xsd/maven-4.0.0.xsd">

    <modelVersion>4.0.0</modelVersion>

    <groupId>com.mikey</groupId>

    <artifactId>springboot-security</artifactId>

    <version>0.0.1-SNAPSHOT</version>

    <packaging>jar</packaging>

    <name>springboot-security</name>

    <description>Demo project for Spring Boot</description>

    <parent>

        <groupId>org.springframework.boot</groupId>

        <artifactId>spring-boot-starter-parent</artifactId>

        <version>1.5.17.RELEASE</version>

        <relativePath/> <!-- lookup parent from repository -->

    </parent>

    <properties>

        <project.build.sourceEncoding>UTF-8</project.build.sourceEncoding>

        <project.reporting.outputEncoding>UTF-8</project.reporting.outputEncoding>

        <java.version>1.8</java.version>

        <thymeleaf.version>3.0.9.RELEASE</thymeleaf.version>

        <thymeleaf-layout-dialect.version>2.3.0</thymeleaf-layout-dialect.version>

        <thymeleaf-extras-springsecurity4.version>3.0.2.RELEASE</thymeleaf-extras-springsecurity4.version>

    </properties>

    <dependencies>

        <dependency>

            <groupId>org.thymeleaf.extras</groupId>

            <artifactId>thymeleaf-extras-springsecurity4</artifactId>

        </dependency>

        <dependency>

            <groupId>org.springframework.boot</groupId>

            <artifactId>spring-boot-starter-security</artifactId>

        </dependency>

        <dependency>

            <groupId>org.springframework.boot</groupId>

            <artifactId>spring-boot-starter-thymeleaf</artifactId>

        </dependency>

        <dependency>

            <groupId>org.springframework.boot</groupId>

            <artifactId>spring-boot-starter-web</artifactId>

        </dependency>

        <dependency>

            <groupId>org.springframework.boot</groupId>

            <artifactId>spring-boot-starter-test</artifactId>

            <scope>test</scope>

        </dependency>

    </dependencies>

    <build>

        <plugins>

            <plugin>

                <groupId>org.springframework.boot</groupId>

                <artifactId>spring-boot-maven-plugin</artifactId>

            </plugin>

        </plugins>

    </build>

</project>
pom.xml
编写配置类:
参考:spring官网Security模块
1、引入SpringSecurity;

2、编写SpringSecurity的配置类;

        @EnableWebSecurity   extends WebSecurityConfigurerAdapter

3、控制请求的访问权限:

        configure(HttpSecurity http) {

             http.authorizeRequests().antMatchers("/").permitAll()

                 .antMatchers("/level1/**").hasRole("VIP1")

        }

4、定义认证规则:

        configure(AuthenticationManagerBuilder auth){

             auth.inMemoryAuthentication()

                 .withUser("zhangsan").password("123456").roles("VIP1","VIP2")

        }

5、开启自动配置的登陆功能:

        configure(HttpSecurity http){

             http.formLogin();

        }

6、注销:http.logout();

7、记住我:Remeberme();
目录
配置类:
import org.springframework.security.config.annotation.authentication.builders.AuthenticationManagerBuilder;

import org.springframework.security.config.annotation.web.builders.HttpSecurity;

import org.springframework.security.config.annotation.web.configuration.EnableWebSecurity;

import org.springframework.security.config.annotation.web.configuration.WebSecurityConfigurerAdapter;

@EnableWebSecurity

public class MySecurityConfig extends WebSecurityConfigurerAdapter {

    @Override

    protected void configure(HttpSecurity http) throws Exception {

        //super.configure(http);

        //定制请求的授权规则

        http.authorizeRequests().antMatchers("/").permitAll()

                .antMatchers("/level1/**").hasRole("VIP1")

                .antMatchers("/level2/**").hasRole("VIP2")

                .antMatchers("/level3/**").hasRole("VIP3");

        //开启自动配置的登陆功能,效果,如果没有登陆,没有权限就会来到登陆页面

        http.formLogin().usernameParameter("user").passwordParameter("pwd")

                .loginPage("/userlogin");

        //1、/login来到登陆页

        //2、重定向到/login?error表示登陆失败

        //3、更多详细规定

        //4、默认post形式的 /login代表处理登陆

        //5、一但定制loginPage;那么 loginPage的post请求就是登陆

        //开启自动配置的注销功能。

        http.logout().logoutSuccessUrl("/");//注销成功以后来到首页

        //1、访问 /logout 表示用户注销,清空session

        //2、注销成功会返回 /login?logout 页面;

        //开启记住我功能

        http.rememberMe().rememberMeParameter("remeber");

        //登陆成功以后,将cookie发给浏览器保存,以后访问页面带上这个cookie,只要通过检查就可以免登录

        //点击注销会删除cookie

    }

    //定义认证规则

    @Override

    protected void configure(AuthenticationManagerBuilder auth) throws Exception {

        //super.configure(auth);

        auth.inMemoryAuthentication()

                .withUser("zhangsan").password("123456").roles("VIP1","VIP2")

                .and()

                .withUser("lisi").password("123456").roles("VIP2","VIP3")

                .and()

                .withUser("wangwu").password("123456").roles("VIP1","VIP3");

    }

}
MySecurityConfig
视图:
<!DOCTYPE html>

<html xmlns:th="http://www.thymeleaf.org"

      xmlns:sec="http://www.thymeleaf.org/thymeleaf-extras-springsecurity4">

<head>

<meta http-equiv="Content-Type" content="text/html; charset=UTF-8">

<title>Insert title here</title>

</head>

<body>

<h1 align="center">欢迎光临武林秘籍管理系统</h1>

<div sec:authorize="!isAuthenticated()">

    <h2 align="center">游客您好,如果想查看武林秘籍 <a th:href="@{/userlogin}">请登录</a></h2>

</div>

<div sec:authorize="isAuthenticated()">

    <h2><span sec:authentication="name"></span>,您好,您的角色有:

        <span sec:authentication="principal.authorities"></span></h2>

    <form th:action="@{/logout}" method="post">

        <input type="submit" value="注销"/>

    </form>

</div>

<hr>

<div sec:authorize="hasRole('VIP1')">

    <h3>普通武功秘籍</h3>

    <ul>

        <li><a th:href="@{/level1/1}">罗汉拳</a></li>

        <li><a th:href="@{/level1/2}">武当长拳</a></li>

        <li><a th:href="@{/level1/3}">全真剑法</a></li>

    </ul>

</div>

<div sec:authorize="hasRole('VIP2')">

    <h3>高级武功秘籍</h3>

    <ul>

        <li><a th:href="@{/level2/1}">太极拳</a></li>

        <li><a th:href="@{/level2/2}">七伤拳</a></li>

        <li><a th:href="@{/level2/3}">梯云纵</a></li>

    </ul>

</div>

<div sec:authorize="hasRole('VIP3')">

    <h3>绝世武功秘籍</h3>

    <ul>

        <li><a th:href="@{/level3/1}">葵花宝典</a></li>

        <li><a th:href="@{/level3/2}">龟派气功</a></li>

        <li><a th:href="@{/level3/3}">独孤九剑</a></li>

    </ul>

</div>

</body>

</html>
记住我功能:
出现报错:

原因:模板引擎版本过低
解决方法:更换新版本的thymeleaf
Spring Boot与分布式
分布式:
在分布式系统中,国内常用zookeeper+dubbo组合,而Spring Boot推荐使用全栈的Spring,Spring Boot+Spring Cloud。
分布式系统:
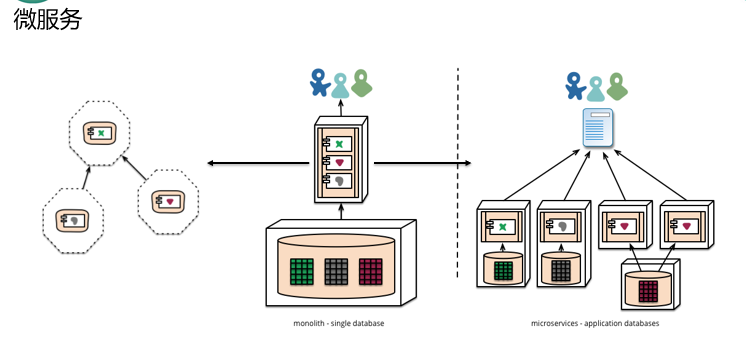
单一应用架构
当网站流量很小时,只需一个应用,将所有功能都部署在一起,以减少部署节点和成本。此时,用于简化增删改查工作量的数据访问框架(ORM)是关键。
垂直应用架构
当访问量逐渐增大,单一应用增加机器带来的加速度越来越小,将应用拆成互不相干的几个应用,以提升效率。此时,用于加速前端页面开发的Web框架(MVC)是关键。
分布式服务架构
当垂直应用越来越多,应用之间交互不可避免,将核心业务抽取出来,作为独立的服务,逐渐形成稳定的服务中心,使前端应用能更快速的响应多变的市场需求。此时,用于提高业务复用及整合的分布式服务框架(RPC)是关键。
流动计算架构
当服务越来越多,容量的评估,小服务资源的浪费等问题逐渐显现,此时需增加一个调度中心基于访问压力实时管理集群容量,提高集群利用率。此时,用于提高机器利用率的资源调度和治理中心(SOA)是关键
Dubbo/Zookeeper
ZooKeeper注册中心
ZooKeeper 是一个分布式的,开放源码的分布式应用程序协调服务。它是一个为分布式应用提供一致性服务的软件,提供的功能包括:配置维护、域名服务、分布式同步、组服务等。
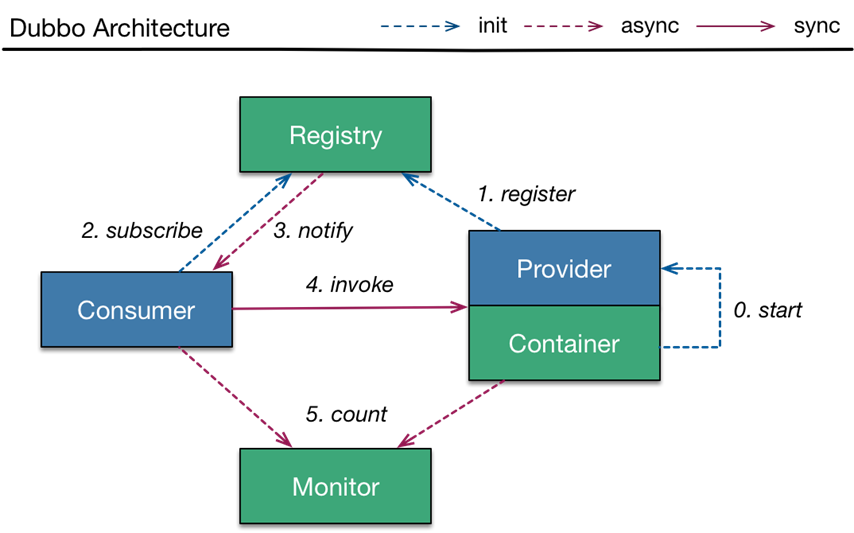
Dubbo分布式服务调用框架
Dubbo是Alibaba开源的分布式服务框架,它最大的特点是按照分层的方式来架构,使用这种方式可以使各个层之间解耦合(或者最大限度地松耦合)。从服务模型的角度来看,Dubbo采用的是一种非常简单的模型,要么是提供方提供服务,要么是消费方消费服务,所以基于这一点可以抽象出服务提供方(Provider)和服务消费方(Consumer)两个角色。
1、安装zookeeper作为注册中心
2、编写服务提供者
3、编写服务消费者
4、整合dubbo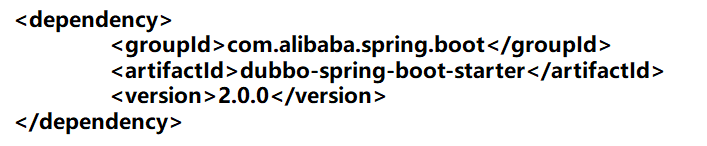
消费:
<?xml version="1.0" encoding="UTF-8"?>

<project xmlns="http://maven.apache.org/POM/4.0.0" xmlns:xsi="http://www.w3.org/2001/XMLSchema-instance"

    xsi:schemaLocation="http://maven.apache.org/POM/4.0.0 http://maven.apache.org/xsd/maven-4.0.0.xsd">

    <modelVersion>4.0.0</modelVersion>

    <groupId>com.atguigu</groupId>

    <artifactId>consumer-user</artifactId>

    <version>0.0.1-SNAPSHOT</version>

    <packaging>jar</packaging>

    <name>consumer-user</name>

    <description>Demo project for Spring Boot</description>

    <parent>

        <groupId>org.springframework.boot</groupId>

        <artifactId>spring-boot-starter-parent</artifactId>

        <version>1.5.12.RELEASE</version>

        <relativePath/> <!-- lookup parent from repository -->

    </parent>

    <properties>

        <project.build.sourceEncoding>UTF-8</project.build.sourceEncoding>

        <project.reporting.outputEncoding>UTF-8</project.reporting.outputEncoding>

        <java.version>1.8</java.version>

    </properties>

    <dependencies>

        <dependency>

            <groupId>org.springframework.boot</groupId>

            <artifactId>spring-boot-starter-web</artifactId>

        </dependency>

        <dependency>

            <groupId>com.alibaba.boot</groupId>

            <artifactId>dubbo-spring-boot-starter</artifactId>

            <version>0.1.0</version>

        </dependency>

        <!--引入zookeeper的客户端工具-->

        <!-- https://mvnrepository.com/artifact/com.github.sgroschupf/zkclient -->

        <dependency>

            <groupId>com.github.sgroschupf</groupId>

            <artifactId>zkclient</artifactId>

            <version>0.1</version>

        </dependency>

        <dependency>

            <groupId>org.springframework.boot</groupId>

            <artifactId>spring-boot-starter-test</artifactId>

            <scope>test</scope>

        </dependency>

    </dependencies>

    <build>

        <plugins>

            <plugin>

                <groupId>org.springframework.boot</groupId>

                <artifactId>spring-boot-maven-plugin</artifactId>

            </plugin>

        </plugins>

    </build>

</project>
pom.xml
dubbo.application.name=consumer-user

dubbo.registry.address=zookeeper://118.24.44.169:2181
application.properties
package com.atguigu.user;

import org.springframework.boot.SpringApplication;

import org.springframework.boot.autoconfigure.SpringBootApplication;

/**

 * 1、引入依赖‘

 * 2、配置dubbo的注册中心地址

 * 3、引用服务

 */

@SpringBootApplication

public class ConsumerUserApplication {

    public static void main(String[] args) {

        SpringApplication.run(ConsumerUserApplication.class, args);

    }

}
启动类
package com.atguigu.user.service;

import com.alibaba.dubbo.config.annotation.Reference;

import com.atguigu.ticket.service.TicketService;

import org.springframework.stereotype.Service;

@Service//Spring的service

public class UserService{

    @Reference//注意两个工程的全类名相同

    TicketService ticketService;

    public void hello(){

        String ticket = ticketService.getTicket();

        System.out.println("买到票了:"+ticket);

    }

}
UserService
package com.atguigu.ticket.service;

public interface TicketService {

    public String getTicket();

}
传递接口
package com.atguigu.user;

import com.atguigu.user.service.UserService;

import org.junit.Test;

import org.junit.runner.RunWith;

import org.springframework.beans.factory.annotation.Autowired;

import org.springframework.boot.test.context.SpringBootTest;

import org.springframework.test.context.junit4.SpringRunner;

@RunWith(SpringRunner.class)

@SpringBootTest

public class ConsumerUserApplicationTests {

    @Autowired

    UserService userService;

    @Test

    public void contextLoads() {

        userService.hello();

    }

}
测试类
服务:
pom文件同上
dubbo.application.name=provider-ticket

dubbo.registry.address=zookeeper://118.24.44.169:2181

dubbo.scan.base-packages=com.atguigu.ticket.service
application.properties
package com.atguigu.ticket;

import org.springframework.boot.SpringApplication;

import org.springframework.boot.autoconfigure.SpringBootApplication;

/**

 * 1、将服务提供者注册到注册中心

 *         1、引入dubbo和zkclient相关依赖

 *         2、配置dubbo的扫描包和注册中心地址

 *         3、使用@Service发布服务

 */

@SpringBootApplication

public class ProviderTicketApplication {

    public static void main(String[] args) {

        SpringApplication.run(ProviderTicketApplication.class, args);

    }

}
启动类
package com.atguigu.ticket.service;

import com.alibaba.dubbo.config.annotation.Service;

import org.springframework.stereotype.Component;

@Component

@Service //将服务发布出去,是dubbo的service

public class TicketServiceImpl implements TicketService {

    @Override

    public String getTicket() {

        return "《厉害了,我的国》";

    }

}
TicketServiceImpl
package com.atguigu.ticket.service;

public interface TicketService {

    public String getTicket();

}
TicketService
SpringBoot/Cloud
Spring Cloud
Spring Cloud是一个分布式的整体解决方案。Spring Cloud 为开发者提供了在分布式系统(配置管理,服务发现,熔断,路由,微代理,控制总线,一次性token,全局琐,leader选举,分布式session,集群状态)中快速构建的工具,使用Spring Cloud的开发者可以快速的启动服务或构建应用、同时能够快速和云平台资源进行对接。
SpringCloud分布式开发五大常用组件
服务发现——Netflix Eureka
客服端负载均衡——Netflix Ribbon
断路器——Netflix Hystrix
服务网关——Netflix Zuul
分布式配置——Spring Cloud Config
Spring Cloud 入门
1、创建provider
2、创建consumer
3、引入Spring Cloud
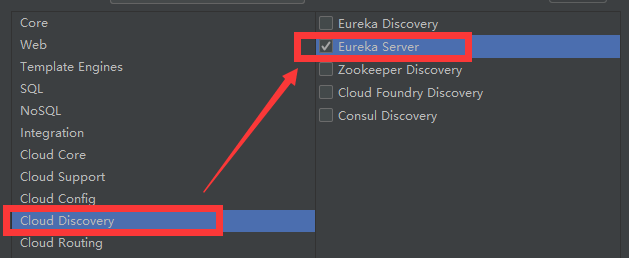
4、引入Eureka注册中心
5、引入Ribbon进行客户端负载均衡
工程结构:

1.新建空工程:
创建model下载Spring初始化向导
1.创建服务中心:eureka-server 选择服务模块
spring:

  application:

    name: consumer-user

server:

  port: 8200

eureka:

  instance:

    prefer-ip-address: true # 注册服务的时候使用服务的ip地址

  client:

    service-url:

      defaultZone: http://localhost:8761/eureka/
application.yml
启动类:注意要加注解:
package com.atguigu.consumeruser;

import org.springframework.boot.SpringApplication;

import org.springframework.boot.autoconfigure.SpringBootApplication;

import org.springframework.cloud.client.discovery.EnableDiscoveryClient;

import org.springframework.cloud.client.loadbalancer.LoadBalanced;

import org.springframework.context.annotation.Bean;

import org.springframework.web.client.RestTemplate;

@EnableDiscoveryClient //开启发现服务功能

@SpringBootApplication

public class ConsumerUserApplication {

    public static void main(String[] args) {

        SpringApplication.run(ConsumerUserApplication.class, args);

    }

    @LoadBalanced //使用负载均衡机制

    @Bean

    public RestTemplate restTemplate(){

        return new RestTemplate();

    }

}
ConsumerUserApplication
控制层:
package com.atguigu.consumeruser.controller;

import org.springframework.beans.factory.annotation.Autowired;

import org.springframework.web.bind.annotation.GetMapping;

import org.springframework.web.bind.annotation.RestController;

import org.springframework.web.client.RestTemplate;

@RestController

public class UserController {

    @Autowired

    RestTemplate restTemplate;

    @GetMapping("/buy")

    public String buyTicket(String name){

        String s = restTemplate.getForObject("http://PROVIDER-TICKET/ticket", String.class);

        return name+"购买了"+s;

    }

}
UserController
启动服务:如下即成功

2.新建provider-ticket 的model
server:

  port: 8002

spring:

  application:

    name: provider-ticket

eureka:

  instance:

    prefer-ip-address: true # 注册服务的时候使用服务的ip地址

  client:

    service-url:

      defaultZone: http://localhost:8761/eureka/
application.yml
启动类:
package com.atguigu.providerticket;

import org.springframework.boot.SpringApplication;

import org.springframework.boot.autoconfigure.SpringBootApplication;

@SpringBootApplication

public class ProviderTicketApplication {

    public static void main(String[] args) {

        SpringApplication.run(ProviderTicketApplication.class, args);

    }

}
ProviderTicketApplication
服务层:
package com.atguigu.providerticket.service;

import org.springframework.stereotype.Service;

@Service

public class TicketService {

    public String getTicket(){

        System.out.println("8002");

        return "《厉害了,我的国》";

    }

}
TicketService
控制层:
package com.atguigu.providerticket.controller;

import com.atguigu.providerticket.service.TicketService;

import org.springframework.beans.factory.annotation.Autowired;

import org.springframework.web.bind.annotation.GetMapping;

import org.springframework.web.bind.annotation.RestController;

@RestController

public class TicketController {

    @Autowired

    TicketService ticketService;

    @GetMapping("/ticket")

    public String getTicket(){

        return ticketService.getTicket();

    }

}
TicketController
3.新建model consumer-user
spring:

  application:

    name: consumer-user

server:

  port: 8200

eureka:

  instance:

    prefer-ip-address: true # 注册服务的时候使用服务的ip地址

  client:

    service-url:

      defaultZone: http://localhost:8761/eureka/
application.yml
启动类:
package com.atguigu.consumeruser;

import org.springframework.boot.SpringApplication;

import org.springframework.boot.autoconfigure.SpringBootApplication;

import org.springframework.cloud.client.discovery.EnableDiscoveryClient;

import org.springframework.cloud.client.loadbalancer.LoadBalanced;

import org.springframework.context.annotation.Bean;

import org.springframework.web.client.RestTemplate;

@EnableDiscoveryClient //开启发现服务功能

@SpringBootApplication

public class ConsumerUserApplication {

    public static void main(String[] args) {

        SpringApplication.run(ConsumerUserApplication.class, args);

    }

    @LoadBalanced //使用负载均衡机制

    @Bean

    public RestTemplate restTemplate(){

        return new RestTemplate();

    }

}
ConsumerUserApplication
控制层:
package com.atguigu.consumeruser.controller;

import org.springframework.beans.factory.annotation.Autowired;

import org.springframework.web.bind.annotation.GetMapping;

import org.springframework.web.bind.annotation.RestController;

import org.springframework.web.client.RestTemplate;

@RestController

public class UserController {

    @Autowired

    RestTemplate restTemplate;

    @GetMapping("/buy")

    public String buyTicket(String name){

        String s = restTemplate.getForObject("http://PROVIDER-TICKET/ticket", String.class);

        return name+"购买了"+s;

    }

}
UserController
浏览器测试访问:
成功:
Spring Boot与监控管理
一、监控管理
通过引入spring-boot-starter-actuator,可以使用Spring Boot为我们提供的准生产环境下的应用监控和管理功能。我们可以通过HTTP,JMX,SSH协议来进行操作,自动得到审计、健康及指标信息等
步骤:
引入spring-boot-starter-actuator
通过http方式访问监控端点
可进行shutdown(POST 提交,此端点默认关闭)
关闭即可在浏览器访问查看:

监控和管理端点:
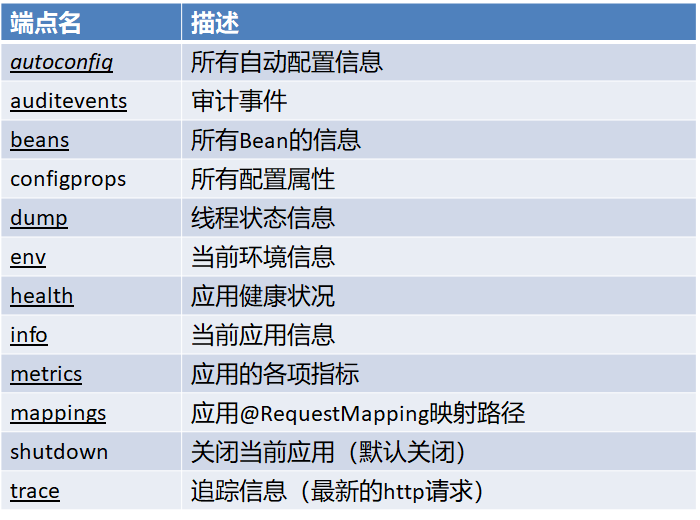
二:定制端点信息:
定制端点一般通过endpoints+端点名+属性名来设置。
修改端点id(endpoints.beans.id=mybeans)
开启远程应用关闭功能(endpoints.shutdown.enabled=true)
关闭端点(endpoints.beans.enabled=false)
开启所需端点
endpoints.enabled=false
endpoints.beans.enabled=true
定制端点访问根路径
management.context-path=/manage
关闭http端点
management.port=-1
三自定义健康指示器:
package com.atguigu.springboot08actuator;

import org.springframework.boot.SpringApplication;

import org.springframework.boot.autoconfigure.SpringBootApplication;

/**

 * 自定义健康状态指示器

 * 1、编写一个指示器 实现 HealthIndicator 接口

 * 2、指示器的名字 xxxxHealthIndicator

 * 3、加入容器中

 */

@SpringBootApplication

public class Springboot08ActuatorApplication {

    public static void main(String[] args) {

        SpringApplication.run(Springboot08ActuatorApplication.class, args);

    }

}
Springboot08ActuatorApplication
package com.atguigu.springboot08actuator.health;

import org.springframework.boot.actuate.health.Health;

import org.springframework.boot.actuate.health.HealthIndicator;

import org.springframework.stereotype.Component;

@Component

public class MyAppHealthIndicator implements HealthIndicator {

    @Override

    public Health health() {

        //自定义的检查方法

        //Health.up().build()代表健康

        return Health.down().withDetail("msg","服务异常").build();

    }

}
MyAppHealthIndicator
Spring Boot与部署
热部署:
在开发中我们修改一个Java文件后想看到效果不得不重启应用,这导致大量时间花费,我们希望不重启应用的情况下,程序可以自动部署(热部署)。有以下四种情况,如何能实现热部署。
1、模板引擎
在Spring Boot中开发情况下禁用模板引擎的cache
页面模板改变ctrl+F9可以重新编译当前页面并生效
2、Spring Loaded
Spring官方提供的热部署程序,实现修改类文件的热部署
下载Spring Loaded(项目地址https://github.com/spring-projects/spring-loaded)
添加运行时参数;
-javaagent:C:/springloaded-1.2.5.RELEASE.jar –noverify
3、JRebel
收费的一个热部署软件
安装插件使用即可
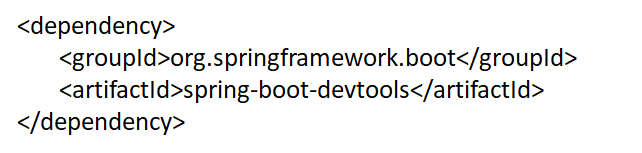
4、Spring Boot Devtools(推荐)
引入依赖
IDEA使用ctrl+F9
或做一些小调整
Intellij IEDA和Eclipse不同,Eclipse设置了自动编译之后,修改类它会自动编译,而IDEA在非RUN或DEBUG情况下才会自动编译(前提是你已经设置了Auto-Compile)。
设置自动编译(settings-compiler-make project automatically)
ctrl+shift+alt+/(maintenance)
勾选compiler.automake.allow.when.app.running
SpringBoot笔记二:整合篇的更多相关文章
- mybatis笔记<二> 整合spring
mybatis与spring整合需要添加几个jar包,mybatis-spring, spring-context, spring-jdbc 1. spring ioc只要一个jar包就ok 2. 我 ...
- springboot笔记08——整合swagger2
Swagger是什么? Swagger是一个RESTFUL 接口的文档在线自动生成和功能测试的框架.利用swagger2的注解可以快速的在项目中构建Api接口文档,并且提供了测试API的功能. Spr ...
- springboot笔记07——整合MyBatis
前言 Springboot 整合 MyBatis 有两种方式,分别是:"全注解版" 和 "注解.xml混合版". 创建项目 创建Springboot项目,选择依 ...
- springboot笔记10——整合Redis
依赖 <dependencies> <!--web依赖--> <dependency> <groupId>org.springframework.boo ...
- Spring Boot 学习笔记(六) 整合 RESTful 参数传递
Spring Boot 学习笔记 源码地址 Spring Boot 学习笔记(一) hello world Spring Boot 学习笔记(二) 整合 log4j2 Spring Boot 学习笔记 ...
- 纯JS实现KeyboardNav(学习笔记)二
纯JS实现KeyboardNav(学习笔记)二 这篇博客只是自己的学习笔记,供日后复习所用,没有经过精心排版,也没有按逻辑编写 这篇主要是添加css,优化js编写逻辑和代码排版 GitHub项目源码 ...
- Springboot security cas整合方案-原理篇
前言:网络中关于Spring security整合cas的方案有很多例,对于Springboot security整合cas方案则比较少,且有些仿制下来运行也有些错误,所以博主在此篇详细的分析cas原 ...
- springboot学习笔记-3 整合redis&mongodb
一.整合redis 1.1 建立实体类 @Entity @Table(name="user") public class User implements Serializable ...
- 源码学习系列之SpringBoot自动配置(篇二)
源码学习系列之SpringBoot自动配置(篇二)之HttpEncodingAutoConfiguration 源码分析 继上一篇博客源码学习系列之SpringBoot自动配置(篇一)之后,本博客继续 ...
随机推荐
- 转载UUID.randomUUID()
UUID.randomUUID()生成唯一识别码 原创 清晨-阳光zx 最后发布于2019-04-11 20:54:40 阅读数 3039 收藏 发布于2019-04-11 20:54:40 分类专栏 ...
- 利用mnist训练集生成的caffemodel对mnist测试集与自己手写的数字进行测试
从一到二:利用mnist训练集生成的caffemodel对mnist测试集与自己手写的数字进行测试 通过从零到一的教程,我们已经得到了通过mnist训练集生成的caffemodel,主要包含下面四个文 ...
- git相关项目迁移
1). 从原地址克隆一份裸版本库,比如原本托管于 GitHub. git clone --bare git://github.com/username/project_old.git --bare 创 ...
- eclipse中怎么导入git库下载下来的web项目
总的看来是有两种方式: 方式一:可以对已经从版本库下载到本地的项目操作(Maven导入) 你可以通过公司提供的内部的版本库的网址登录版本库,之后在里面下载自己想要的那个版本的代码包,见下图 点击右侧的 ...
- python闯关之路二(模块的应用)
1.有如下字符串:n = "路飞学城"(编程题) - 将字符串转换成utf-8的字符编码的字节,再将转换的字节重新转换为utf-8的字符编码的字符串 - 将字符串转换成gbk的字符 ...
- SQL - 各种joins
- python日常题目小练习
1.使用while循环输出1 2 3 4 5 6 8 9 10 i=0 while i<10: i+=1 if i==7: continue print(i) 结果: 2.求1-100的所有数的 ...
- TensorFlow:谷歌图像识别网络inception-v3下载与查看结构
学习博客: # https://www.cnblogs.com/felixwang2/p/9190731.html # https://www.cnblogs.com/felixwang2/p/919 ...
- C++(MFC)踩坑之旅 ------- 新建项目弹出“发生一个或多个错误”
结束隔离,回公司上班,把在家办公的程序考回公司的电脑,结果出错了,每当我新建项目时,都会弹出"发生一个或多个错误",点确定后回到新建项目的设置上面,折腾了两天时间才解决,以下是我的 ...
- CSS3实现魔方动画
本文将借助css3实现魔方动画效果,设计思路如下: HTML方面采用六个div容器形成六个立方面: CSS方面采用transform-style: preserve-3d;形成三维场景:transfo ...