
Flume简介及使用
一、Flume概述
    1)官网地址

    http://flume.apache.org/

    2)日志采集工具
  Flume是一种分布式,可靠且可用的服务,用于有效地收集,聚合和移动大量日志数据。它具有基于流数据流的简单灵活的架构。它具有可靠的可靠性机制和许多故障转移和恢复机制,具有强大的容错能力。
它使用简单的可扩展数据模型,允许在线分析应用程序。

    3)为什么需要flume

    数据从哪里来?

    -》爬虫

    -》日志数据 flume

    -》传统型数据库 sqoop

    4)flume架构

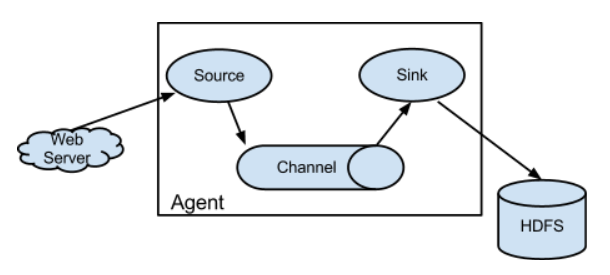
    source:数据源

    产生数据流,同时source将产生的数据流传输到channel

    channel:传输通道

    用于桥接Source和sinks

    sinks:下沉

    从channel收集数据

    event:传输单元

    Flume数据传传输的基本单元,以事件的形式将数据送往目的地。
二、Flume安装部署
    1)下载安装包

    http://archive.apache.org/dist/flume/1.6.0/

    2)上传到linux

    alt+p

    3)解压

    tar -zxvf apache-flume-1.6.0-bin.tar.gz

    4)重命名

    mv apache-flume-1.6.0-bin/ flume

    cd flume/conf

    mv flume-env.sh.template flume-env.sh

    5)修改配置文件

    vi flume-env.sh

    export JAVA_HOME=/root/hd/jdk1.8.0_144
三、Flume监听端口
1、安装telnet
    yum search telnet

    yum intsall telnet.x86_64
2、写配置文件 flumejob_telnet.conf
#smple.conf: A single-node Flume configuration

# Name the components on this agent 定义变量方便调用 加s可以有多个此角色

a1.sources = r1

a1.sinks = k1

a1.channels = c1

# Describe/configure the source 描述source角色 进行内容定制

# 此配置属于tcp source 必须是netcat类型

a1.sources.r1.type = netcat

a1.sources.r1.bind = localhost

a1.sources.r1.port = 44444

# Describe the sink 输出日志文件

a1.sinks.k1.type = logger

# Use a channel which buffers events in memory(file) 使用内存 总大小1000 每次传输100

a1.channels.c1.type = memory

a1.channels.c1.capacity = 1000

a1.channels.c1.transactionCapacity = 100

# Bind the source and sink to the channel 一个source可以绑定多个channel

# 一个sinks可以只能绑定一个channel  使用的是图二的模型

a1.sources.r1.channels = c1

a1.sinks.k1.channel = c1
放置在flume/conf/下
3、启动
bin/flume-ng agent --conf conf/ --name a1 --conf-file conf/flumejob_telnet.conf -Dflume.root.logger=INFO,console
4、发送数据
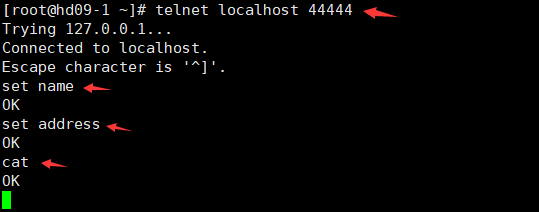
telnet localhost 44444
5、查看

四、实时的采集文件到HDFS
1、写配置文件 flumejob_hdfs.conf
# Name the components on this agent

a1.sources = r1

a1.sinks = k1

a1.channels = c1

# Describe/configure the source

# exec 执行一个命令的方式去查看文件 tail -F 实时查看

a1.sources.r1.type = exec

# 要执行的脚本command tail -F 默认10行 man tail  查看帮助

a1.sources.r1.command = tail -F /tmp/root/hive.log

# 执行这个command使用的是哪个脚本 -c 指定使用什么命令

# whereis bash

# bash: /usr/bin/bash /usr/share/man/man1/bash.1.gz

a1.sources.r1.shell = /usr/bin/bash -c

# Describe the sink

a1.sinks.k1.type = hdfs

a1.sinks.k1.hdfs.path = hdfs://hd09-1:9000/flume/%Y%m%d/%H

#上传文件的前缀

a1.sinks.k1.hdfs.filePrefix = logs-

#是否按照时间滚动文件夹

a1.sinks.k1.hdfs.round = true

#多少时间单位创建一个新的文件夹  秒 (默认30s)

a1.sinks.k1.hdfs.roundValue = 1

#重新定义时间单位(每小时滚动一个文件夹)

a1.sinks.k1.hdfs.roundUnit = minute

#是否使用本地时间戳

a1.sinks.k1.hdfs.useLocalTimeStamp = true

#积攒多少个 Event 才 flush 到 HDFS 一次

a1.sinks.k1.hdfs.batchSize = 500

#设置文件类型,可支持压缩

a1.sinks.k1.hdfs.fileType = DataStream

#多久生成一个新的文件 秒

a1.sinks.k1.hdfs.rollInterval = 30

#设置每个文件的滚动大小 字节(最好128M)

a1.sinks.k1.hdfs.rollSize = 134217700

#文件的滚动与 Event 数量无关

a1.sinks.k1.hdfs.rollCount = 0

#最小冗余数(备份数 生成滚动功能则生效roll hadoop本身有此功能 无需配置) 1份 不冗余

a1.sinks.k1.hdfs.minBlockReplicas = 1

# Use a channel which buffers events in memory

a1.channels.c1.type = memory

a1.channels.c1.capacity = 1000

a1.channels.c1.transactionCapacity = 100

# Bind the source and sink to the channel

a1.sources.r1.channels = c1

a1.sinks.k1.channel = c1
2、启动
bin/flume-ng agent --conf conf/ --name a1 --conf-file conf/flumejob_hdfs.conf
3、此时操作hive客户端
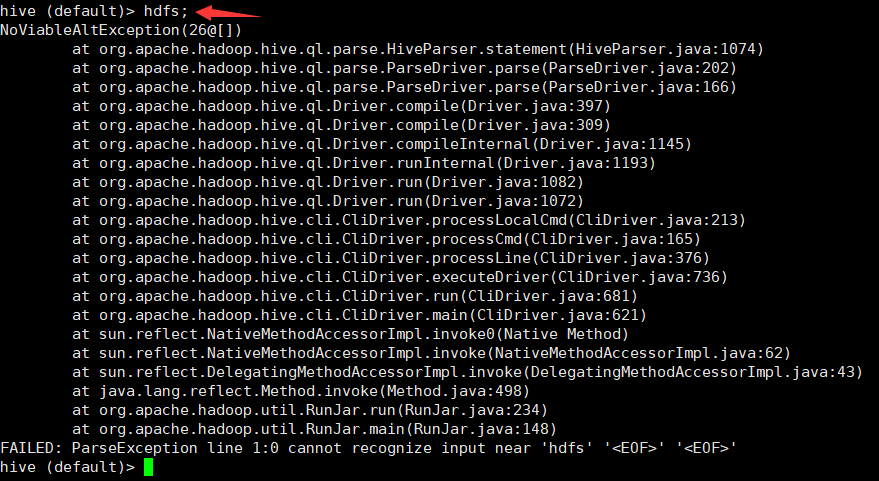
报错日志将存储到hdfs中

执行
hdfs dfs -cat /flume/20181125/19/logs-.1543146164570
得到文件内容和hive出错的日志一致

五、实时监听文件夹
1、写配置文件 flumejob_dir.conf
# 定义

a1.sources = r1

a1.sinks = k1

a1.channels = c1

# Describe/configure the source

a1.sources.r1.type = spooldir

# 监控的文件夹

a1.sources.r1.spoolDir = /root/spooldir

# 上传成功后显示后缀名

a1.sources.r1.fileSuffix = .COMPLETED

# 如论如何 加绝对路径的文件名 默认false

a1.sources.r1.fileHeader = true

#忽略所有以.tmp 结尾的文件(正在被写入),不上传

# ^以任何开头 出现无限次 以.tmp结尾的

a1.sources.r1.ignorePattern = ([^ ]*\.tmp)

# Describe the sink

a1.sinks.k1.type = hdfs

a1.sinks.k1.hdfs.path = hdfs://hd09-1:9000/flume/spooldir/%Y%m%d/%H

#上传文件的前缀

a1.sinks.k1.hdfs.filePrefix = spooldir-

#是否按照时间滚动文件夹

a1.sinks.k1.hdfs.round = true

#多少时间单位创建一个新的文件夹

a1.sinks.k1.hdfs.roundValue = 1

#重新定义时间单位

a1.sinks.k1.hdfs.roundUnit = hour

#是否使用本地时间戳

a1.sinks.k1.hdfs.useLocalTimeStamp = true

#积攒多少个 Event 才 flush 到 HDFS 一次

a1.sinks.k1.hdfs.batchSize = 50

#设置文件类型,可支持压缩

a1.sinks.k1.hdfs.fileType = DataStream

#多久生成一个新的文件

a1.sinks.k1.hdfs.rollInterval = 600

#设置每个文件的滚动大小大概是 128M

a1.sinks.k1.hdfs.rollSize = 134217700

#文件的滚动与 Event 数量无关

a1.sinks.k1.hdfs.rollCount = 0

#最小副本数

a1.sinks.k1.hdfs.minBlockReplicas = 1

# Use a channel which buffers events in memory

a1.channels.c1.type = memory

a1.channels.c1.capacity = 1000

a1.channels.c1.transactionCapacity = 100

# Bind the source and sink to the channel

a1.sources.r1.channels = c1

a1.sinks.k1.channel = c1
2、创建/root/spooldir文件夹
cd /root

mkdir spooldir
3、启动
bin/flume-ng agent --conf conf/ --name a1 --conf-file conf/flumejob_dir.conf
4、将/root下的a.txt复制到spooldir目录下
cp -rf /root/a.txt /root/spooldir/
此时

然后查看hdfs
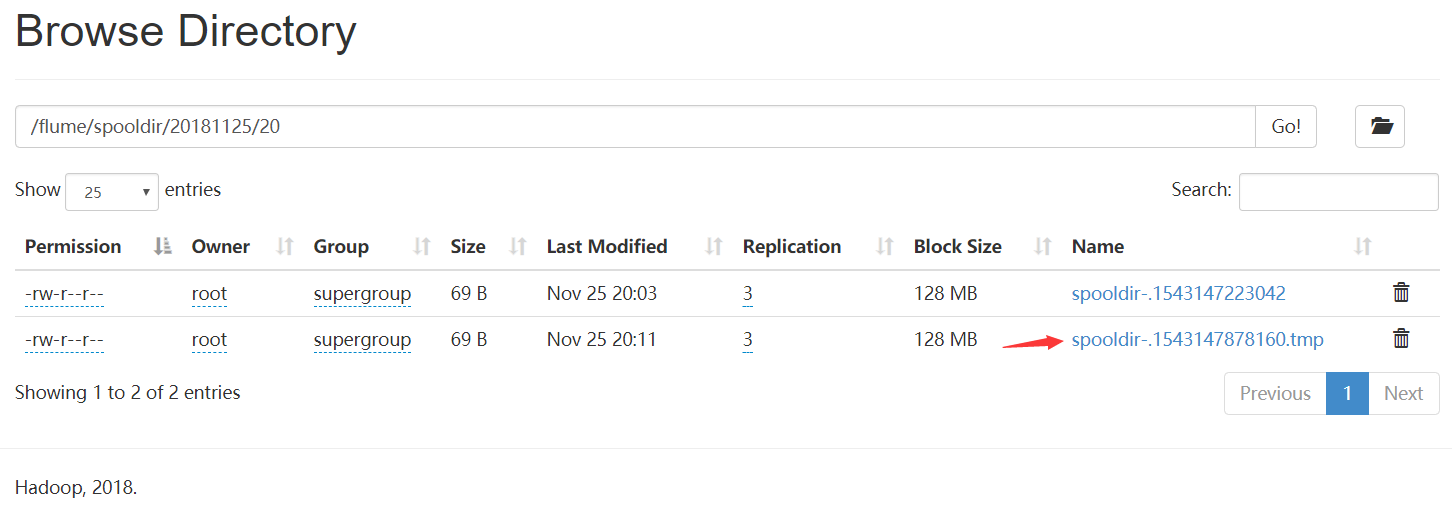
此时/flume/spooldir/20181125/20/spooldir-.1543147878160.tmp 文件中的内容就是a.txt文件中的内容,
如果此时关闭监听命令,那么spooldir-.1543147878160.tmp文件就变成spooldir-.1543147878160文件持久化到hdfs中。
六、多个channel/sink
1、需求
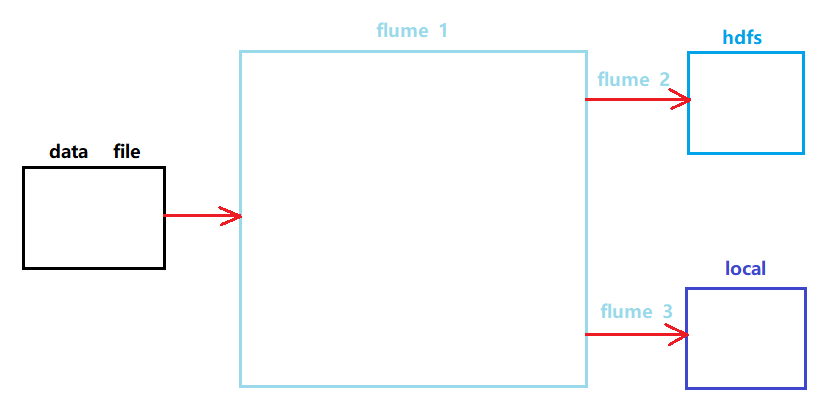
需求:监控hive.log文件,同时产生两个channel,一个channel对应的sink存储到hdfs中,另外一个channel对应的sink存储到本地。
2、示意图
3、写配置文件 flumejob_1.conf
# name the components on this agent

a1.sources = r1

a1.sinks = k1 k2

a1.channels = c1 c2

# 将数据流复制给多个 channel

a1.sources.r1.selector.type = replicating

# Describe/configure the source

a1.sources.r1.type = exec

a1.sources.r1.command = tail -F /tmp/root/hive.log

a1.sources.r1.shell = /bin/bash -c

# Describe the sink

# 分两个端口发送数据

a1.sinks.k1.type = avro

a1.sinks.k1.hostname = hd09-1

a1.sinks.k1.port = 4141

a1.sinks.k2.type = avro

a1.sinks.k2.hostname = hd09-1

a1.sinks.k2.port = 4142

# Describe the channel

a1.channels.c1.type = memory

a1.channels.c1.capacity = 1000

a1.channels.c1.transactionCapacity = 100

a1.channels.c2.type = memory

a1.channels.c2.capacity = 1000

a1.channels.c2.transactionCapacity = 100

# Bind the source and sink to the channel

a1.sources.r1.channels = c1 c2

a1.sinks.k1.channel = c1

a1.sinks.k2.channel = c2
4、写配置文件 flumejob_2.conf
# Name the components on this agent

a2.sources = r1

a2.sinks = k1

a2.channels = c1

# Describe/configure the source

a2.sources.r1.type = avro

# 端口抓取数据

a2.sources.r1.bind = hd09-1

a2.sources.r1.port = 4141

# Describe the sink

a2.sinks.k1.type = hdfs

a2.sinks.k1.hdfs.path = hdfs://hd09-1:9000/flume2/%Y%m%d/%H

#上传文件的前缀

a2.sinks.k1.hdfs.filePrefix = flume2-

#是否按照时间滚动文件夹

a2.sinks.k1.hdfs.round = true

#多少时间单位创建一个新的文件夹

a2.sinks.k1.hdfs.roundValue = 1

#重新定义时间单位

a2.sinks.k1.hdfs.roundUnit = hour

#是否使用本地时间戳

a2.sinks.k1.hdfs.useLocalTimeStamp = true

#积攒多少个 Event 才 flush 到 HDFS 一次

a2.sinks.k1.hdfs.batchSize = 100

#设置文件类型,可支持压缩

a2.sinks.k1.hdfs.fileType = DataStream

#多久生成一个新的文件

a2.sinks.k1.hdfs.rollInterval = 600

#设置每个文件的滚动大小大概是 128M

a2.sinks.k1.hdfs.rollSize = 134217700

#文件的滚动与 Event 数量无关

a2.sinks.k1.hdfs.rollCount = 0

#最小副本数

a2.sinks.k1.hdfs.minBlockReplicas = 1

# Describe the channel

a2.channels.c1.type = memory

a2.channels.c1.capacity = 1000

a2.channels.c1.transactionCapacity = 100

# Bind the source and sink to the channel

a2.sources.r1.channels = c1

a2.sinks.k1.channel = c1
5、写配置文件 flumejob_3.conf
# Name the components on this agent

a3.sources = r1

a3.sinks = k1

a3.channels = c1

# Describe/configure the source

a3.sources.r1.type = avro

a3.sources.r1.bind = hd09-1

a3.sources.r1.port = 4142

# Describe the sink

a3.sinks.k1.type = file_roll

a3.sinks.k1.sink.directory = /root/flume2

# Describe the channel

a3.channels.c1.type = memory

a3.channels.c1.capacity = 1000

a3.channels.c1.transactionCapacity = 100

# Bind the source and sink to the channel

a3.sources.r1.channels = c1

a3.sinks.k1.channel = c1
6、启动,分别在三个窗口依次执行以下命令
bin/flume-ng agent --conf conf/ --name a1 --conf-file conf/flumejob_1.conf

bin/flume-ng agent --conf conf/ --name a2 --conf-file conf/flumejob_2.conf

bin/flume-ng agent --conf conf/ --name a3 --conf-file conf/flumejob_3.conf
7、操作hive

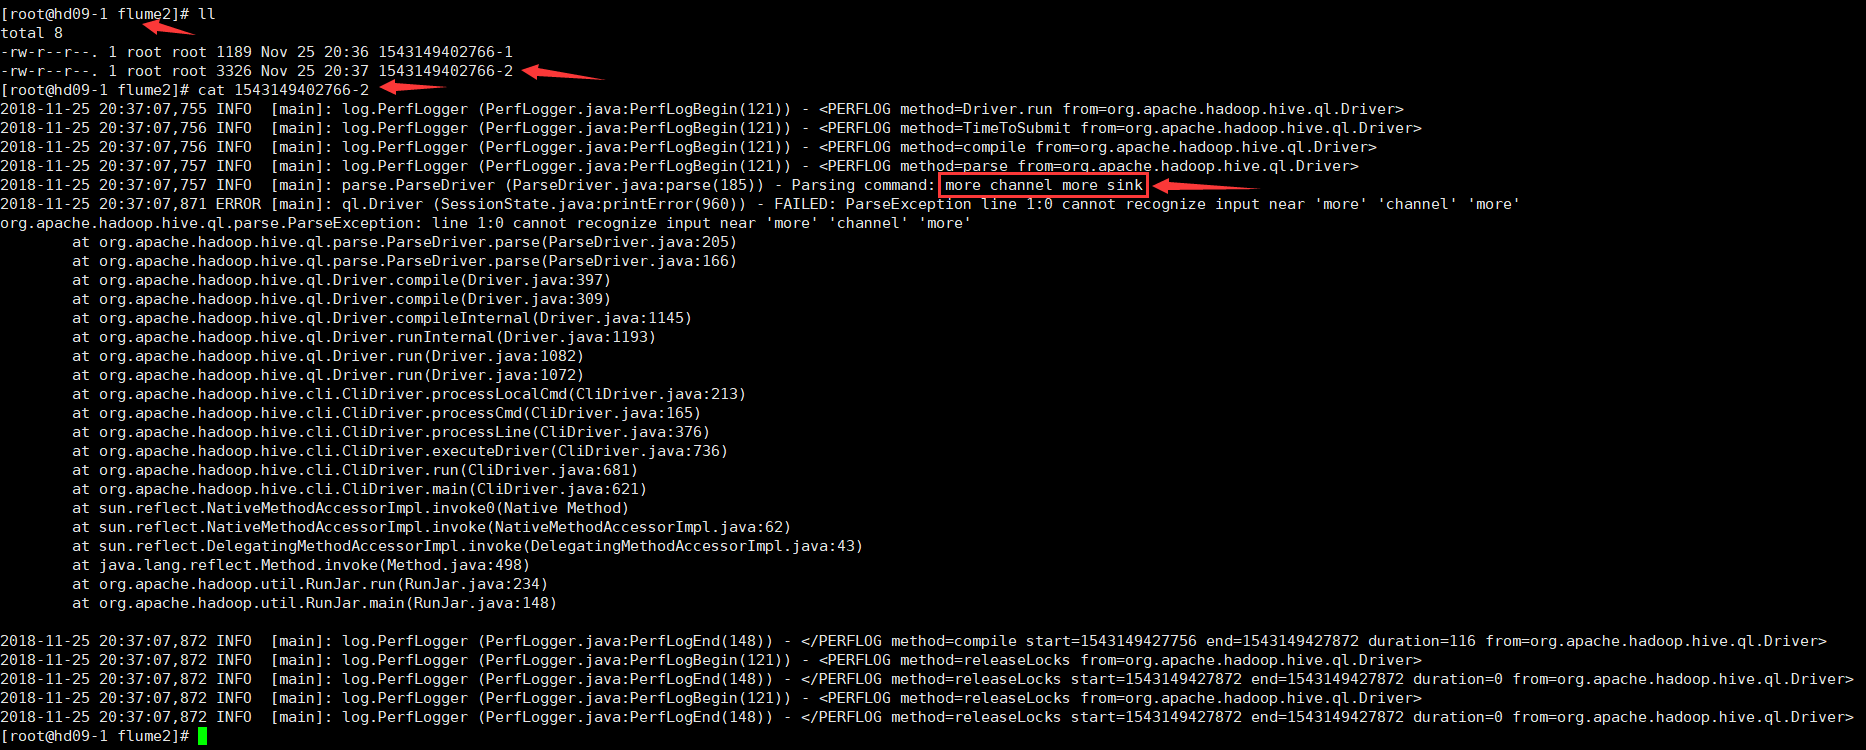
8、此时/root/flume2文件夹中
9、hdfs中
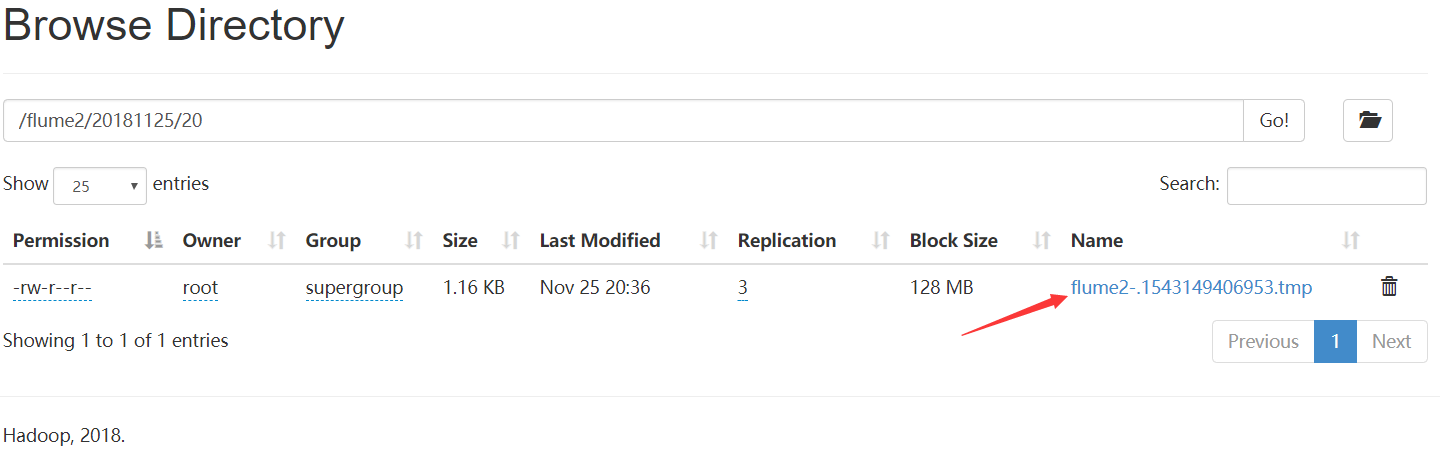
执行
hdfs dfs -cat /flume2/20181125/20/flume2-.1543149406953.tmp

文件flume2-.1543149406953.tmp过一会就变成flume2-.1543149406953
10、至此,实现了监控hive.log文件,同时产生两个channel,一个channel对应的sink存储到hdfs中,另外一个channel对应的sink存储到本地。
Flume简介及使用的更多相关文章
- Flume简介与使用(二)——Thrift Source采集数据
Flume简介与使用(二)——Thrift Source采集数据 继上一篇安装Flume后,本篇将介绍如何使用Thrift Source采集数据. Thrift是Google开发的用于跨语言RPC通信 ...
- Flume简介与使用(一)——Flume安装与配置
Flume简介与使用(一)——Flume安装与配置 Flume简介 Flume是一个分布式的.可靠的.实用的服务——从不同的数据源高效的采集.整合.移动海量数据. 分布式:可以多台机器同时运行采集数据 ...
- Flume 简介及基本使用
一.Flume简介 Apache Flume是一个分布式,高可用的数据收集系统.它可以从不同的数据源收集数据,经过聚合后发送到存储系统中,通常用于日志数据的收集.Flume 分为 NG 和 OG (1 ...
- 入门大数据---Flume 简介及基本使用
一.Flume简介 Apache Flume 是一个分布式,高可用的数据收集系统.它可以从不同的数据源收集数据,经过聚合后发送到存储系统中,通常用于日志数据的收集.Flume 分为 NG 和 OG ( ...
- Apache Flume 简介
转自:http://blog.163.com/guaiguai_family/blog/static/20078414520138100562883/ Flume 是 Cloudera 公司开源出来的 ...
- Flume简介与使用(三)——Kafka Sink消费数据之Kafka安装
前面已经介绍了如何利用Thrift Source生产数据,今天介绍如何用Kafka Sink消费数据. 其实之前已经在Flume配置文件里设置了用Kafka Sink消费数据 agent1.sinks ...
- Flume简介及安装
Hadoop业务的大致开发流程以及Flume在业务中的地位: 从Hadoop的业务开发流程图中可以看出,在大数据的业务处理过程中,对于数据的采集是十分重要的一步,也是不可避免的一步,从而引出我们本文的 ...
- flume简介
组件介绍: 代理 Flume Agent Flume内部有一个或者多个Agent 每一个Agent是一个独立的守护进程(JVM) 从客户端哪儿接收收集,或者从其他的Agent哪儿接收,然后迅速的将获取 ...
- Apache Flume简介及安装部署
概述 Flume 是 Cloudera 提供的一个高可用的,高可靠的,分布式的海量日志采集.聚合和传输的软件. Flume 的核心是把数据从数据源(source)收集过来,再将收集到的数据送到指定的目 ...
随机推荐
- [C++]怎么将.h和.cpp文件分别放在不同的目录
相关资料: http://blog.csdn.net/onafioo/article/details/8775501 具体操作: 1.找到.h文件目录.2.将所以的.h文件剪切到“include”目录 ...
- C语言 · 数的读法
基础练习 数的读法 时间限制:1.0s 内存限制:512.0MB 问题描述 Tom教授正在给研究生讲授一门关于基因的课程,有一件事情让他颇为头疼:一条染色体上有成千上万个碱基对,它们从0 ...
- openvpn 移植之buildroot添加相关选项
openvpn 移植第一步,在buildroot 内添加 openssl ,openvpn , 另外还有一个 RSA 的支持,我不确定这个需要程度如何,但是也添加进去了. buildroot 添加相关 ...
- Java反射机制的基本概念与使用
本篇文章分为以下几个部分: 1.认识反射 2.反射的源头(Class类) 3.利用反射操作构造方法 4.利用反射调用类中的方法 5.反射中的invoke方法 6.利用反射调用类中的属性 反射在我们普通 ...
- 常用的easyui使用方法
-------datagrid 1.获取某行的行号(row)tdg.datagrid('getRowIndex',rows)2.通过行号移除该行tdg.datagrid('deleteRow',ind ...
- SSH无密码验证配置
一. 准备工作 首先要确保你的linux系统中已经安装了ssh,对于ubuntu系统一般默认只安装了ssh client,所以还需要我们手动安装ssh server: sudo apt-get ins ...
- 第二百六十节,Tornado框架-内置模板方法
Tornado框架-内置模板方法 直接在html文件使用,不需要传值 Tornado默认提供的这些功能其实本质上就是 UIMethod 和 UIModule,也就是Tornado框架定义好的html文 ...
- 网易AI工程师面试常见知识
- C++ STL迭代器与索引相互转换
0 前言 C++ STL提供了vector.list等模板容器,极大地方便了编程使用. “遍历”是对容器使用的最常用的操作. 使用迭代器来遍历是最好最高效的遍历方法. 当然,对于有些容器的遍历除了使用 ...
- Mock利器:PowerMock
powerMock不仅支持接口mock,final类.静态类.静态方法.私有方法都支持mock,还是很强大的: 1.gradle引用: myonlycompile('org.powermock:pow ...