EXTjs+SpringMVC+Mybatis实现照片的上传,下载,查看关键技术整理
第一个问题:如何通过Extjs4实现照片上传的布局展示以及本地照片选择后的在一个区域内进行图片预览
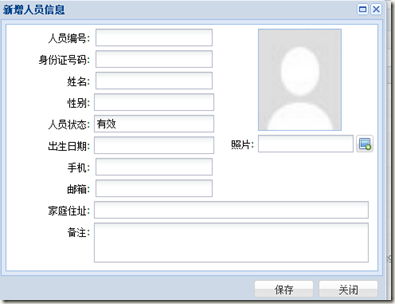
实现照片上传的布局展示:
items : [ {

                        xtype : 'box',

                        itemId : 'imageShow',

                        id:'imageShow',

                        border : 1,

                        style : {

                            borderColor : '#99bbe8',

                            borderStyle : 'solid',

                        },

                        margin : '0 0 5 55',

                        autoEl : {

                            width : 105,

                            height : 128,

                            tag : 'img',

                            //style : 'filter:progid:DXImageTransform.Microsoft.AlphaImageLoader(sizingMethod=scale);',

                            complete : 'off',

                            src : 'images/blank.jpg',

                        }

                    }, {

                        xtype : 'filefield',

                        name : 'imageFile',

                        itemId:'imageFile',

                        id:'person_imageFile',

                        labelWidth : 50,

                        width : 200,

                        fieldLabel : '照片',

                        allowBlank : false,

                        buttonText: '',

                        buttonConfig: {

                            iconCls: 'upload-icon'

                        }

                    } ]
显示的样式为:
第二个问题:如何在chrome中选择本地的照片后进行图片的预览:(对file控件进行监控)
'#personWindow #imageFile' : {

                change : this.handlerImageFile

            },
handlerImageFile:function(view,value){

        var file=Ext.query('#person_imageFile input[type=file]')[0];

        var img=view.previousSibling().getEl().dom;

          var reader = new FileReader();

          reader.onload = function(evt){img.src = evt.target.result;}

          reader.readAsDataURL(file.files[0]);

    },
第三个问题:如何跟SpringMVC结合保存照片呢?
1.含有照片的form,必须要通过form.submit来进行提交:
savePersonAction:function(button,urlString){

        var form = button.up('window').down('form').getForm();

        form.submit({

            clientValidation : true,

            url : urlString,

            params : {

                // newStatus: 'delivered'

            },

            scope : this,// 使回调函数中的this变成当前的类

            success : function(form, action) {

                if (action.result.success == 'true') {

                    Ext.Msg.alert('系统提示', action.result.msg,function(){

                        button.up('window').hide();

                        this.refreshGrid();

                    },this);

                } else {

                    Ext.Msg.alert('系统提示', action.result.errorMsg);

                }

            },

        });

    }
2.在spring的配置文件中增加配置:
<bean id="multipartResolver" class="org.springframework.web.multipart.commons.CommonsMultipartResolver">

        <!-- one of the properties available; the maximum file size in bytes -->

        <property name="maxUploadSize" value="100000"/>

        <property name="maxInMemorySize" value="4096" />

    </bean>
3.在bean中增加配置
private Date csrq;

    private String jtzz;

    private String bz;

    private Integer photoId;

    private CommonsMultipartFile imageFile;//上传的文件
4.使用bean来接受参数:
@ResponseBody

    @RequestMapping("/userManage/person/insertPerson")

    public String insertPerson(SysPersonModel sysPersonModel) {

        Map resultMap = new HashMap();

        try {

            sysPersonService.insertPerson(sysPersonModel);

            resultMap.put("success", "true");

            resultMap.put("msg", "保存成功");

        } catch (ApplicationException e) {

            resultMap.put("success", "ApplicationException");

            resultMap.put("errorMsg", e.getMessage());

        } catch (Exception e) {

            e.printStackTrace();

            resultMap.put("success", "Exception");

            resultMap.put("errorMsg", e.getMessage());

        }

        return JSON.toJSONString(resultMap);

    }
第四个问题:如何在Mybatis中进行文件的保存和查看呢?
1.增加Photo相关的Bean以及Mapper类,以及sql文件:
package cn.telchina.standard.entity;

public class PhotoModel {

    private Integer photoId;

    private String photoName;

    private Object photo;

    public Integer getPhotoId() {

        return photoId;

    }

    public void setPhotoId(Integer photoId) {

        this.photoId = photoId;

    }

    public String getPhotoName() {

        return photoName;

    }

    public void setPhotoName(String photoName) {

        this.photoName = photoName;

    }

    public Object getPhoto() {

        return photo;

    }

    public void setPhoto(Object photo) {

        this.photo = photo;

    }

}
package cn.telchina.standard.mapper;

import java.util.List;

import cn.telchina.standard.entity.PhotoModel;

public interface PhotoMapper {

    public int getPhotoId();

    public void createPhoto(PhotoModel photoModel);

    public int deletePhoto(int photoId);

    public int updatePhoto(PhotoModel photo);

    public  List<PhotoModel> getPhotoForUpdate(int photoId);

    public  List<PhotoModel> getPhoto(int photoId);

}
<?xml version="1.0" encoding="UTF-8"?>

<!DOCTYPE mapper PUBLIC "-//mybatis.org//DTD Mapper 3.0//EN"  "http://mybatis.org/dtd/mybatis-3-mapper.dtd">

<mapper namespace="cn.telchina.standard.mapper.PhotoMapper">

    <!-- <![CDATA[sql 尽量每个sql必须写,防止有些特殊字符对sql语句造成的破坏 -->

    <select id="getPhotoId" resultType="int">

        <![CDATA[

        select base.seq_photo.nextval id from dual

        ]]>

    </select>

    <insert id="createPhoto" parameterType="PhotoModel">

        <![CDATA[

        INSERT INTO base.PHOTO(photoid,photoname,photo)

            VALUES(#{photoId},#{photoName, jdbcType=VARCHAR}, empty_blob())

         ]]>

    </insert>

     <select id="getPhotoForUpdate" resultType="PhotoModel">

        SELECT photoid,

               photo,

               photoname

          FROM base.PHOTO

         WHERE photoid = #{photoId} for update

    </select>

    <delete id="deletePhoto" >

        DELETE FROM base.PHOTO

              WHERE PHOTO_ID = #{photoId}

    </delete>

    <update id="updatePhoto" parameterType="PhotoModel" >

        UPDATE base.PHOTO

           SET photoname = #{photoName, jdbcType=VARCHAR}

         WHERE photoid = #{photoId}

    </update>

    <select id="getPhoto" resultType="PhotoModel">

        SELECT photoid,

               photo,

               photoname

          FROM base.PHOTO

         WHERE photoid = #{photoId}

    </select>

</mapper>
2.在service中增加新增照片的代码:
@Transactional(rollbackFor = Exception.class)

    public void insertPerson(SysPersonModel sysPersonModel)

            throws ApplicationException {

        this.checkPersonByRybh(sysPersonModel.getRybh());

        this.checkPersonBySfzhm(sysPersonModel.getSfzhm());

        int photoId = photoMapper.getPhotoId();

        String fileName = sysPersonModel.getImageFile().getOriginalFilename();

        PhotoModel photoModel = new PhotoModel();

        photoModel.setPhotoId(photoId);

        photoModel.setPhotoName(fileName);

        photoMapper.createPhoto(photoModel);

        updatePhoto(sysPersonModel, photoId);

        sysPersonModel.setPhotoId(photoId);

        sysPersonMapper.insertPerson(sysPersonModel);

    }

private void updatePhoto(SysPersonModel sysPersonModel, Integer photoId) {

        List<PhotoModel> list = photoMapper.getPhotoForUpdate(photoId);

        PhotoModel newPhotoModel = list.get(0);

        BLOB photo = (BLOB) newPhotoModel.getPhoto();

        BufferedInputStream in = null;

        BufferedOutputStream out = null;

        try {

            out = new BufferedOutputStream(

                    photo.getBinaryOutputStream());// 暂时使用这个废弃的方法

            // ops = content.setBinaryStream(0);//ojdbc14支持,ojdbc6,5都不支持

            in = new BufferedInputStream(

                    (FileInputStream) sysPersonModel.getImageFile()

                            .getInputStream());

            byte[] data = FileCopyUtils.copyToByteArray(in);

            out.write(data);

        } catch (Exception e) {

            e.printStackTrace();

        } finally {

            try {

                if (in != null) {

                    in.close();

                }

                if (out != null) {

                    out.close();

                }

            } catch (IOException e) {

                e.printStackTrace();

            }

        }

    }
3文件的展示和下载:
前台代码:
//进入新增页面时初始化默认头像

    initImageSrc:function(view){

        if(view.down('#imageShow').getEl()){

            var img=view.down('#imageShow').getEl().dom;

            img.src='images/blank.jpg';

        }

    },

//查看

    showImg:function(view,photoId){

        if(photoId!=""){

            var img=view.down('#imageShow').getEl().dom;

            img.src='userManage/person/showPhoto.json?photoId='+photoId;

        }else{

            this.initImageSrc(view);

        }

    },

//下载

downFileButtonHandler:function(button){

        var sm = button.up('#datagrid').getSelectionModel();

        if (sm.getCount() == 0) {

            Ext.Msg.alert('系统提示', "修改人员信息前先选中一条记录!");

        } else {

            var record = sm.getSelection()[0];

            var photoId=record.data.photoId;

            if(photoId!=""){

                window.open('userManage/person/downFile.json?photoId='+photoId,"_self");

            }else{

                Ext.Msg.alert('系统提示', "该人员没有头像!");

            }

        }

    },
@ResponseBody

    @RequestMapping(value = "/userManage/person/showPhoto")

    public void showPhoto(Integer photoId, HttpServletResponse response) {

        OutputStream outputStream = null;

        InputStream in = null;

        try {

            PhotoModel photoModel = sysPersonService.getPhotoById(photoId);

            BLOB photo = (BLOB) photoModel.getPhoto();

            response.setContentType("image/jpeg");

            response.setCharacterEncoding("UTF-8");

            outputStream = new BufferedOutputStream(response.getOutputStream());

            in = new BufferedInputStream(photo.getBinaryStream());

            int len = 0;

            byte[] buf = new byte[1024];

            while ((len = in.read(buf, 0, 1024)) != -1) {

                outputStream.write(buf, 0, len);

            }

        } catch (ApplicationException e) {

            // TODO Auto-generated catch block

            e.printStackTrace();

        } catch (IOException e) {

            // TODO Auto-generated catch block

            e.printStackTrace();

        } catch (Exception e) {

            // TODO Auto-generated catch block

            e.printStackTrace();

        } finally {

            try {

                in.close();

                outputStream.flush();

                outputStream.close();

            } catch (IOException e) {

                // TODO Auto-generated catch block

                e.printStackTrace();

            }

        }

    }

    @ResponseBody

    @RequestMapping(value = "/userManage/person/downFile")

    public void downFile(Integer photoId, HttpServletResponse response) {

        OutputStream outputStream = null;

        InputStream in = null;

        try {

            PhotoModel photoModel = sysPersonService.getPhotoById(photoId);

            BLOB photo = (BLOB) photoModel.getPhoto();

            // byte[] data=photo.getBytes();

            String fileName = photoModel.getPhotoName() == null ? "照片.jpg"

                    : photoModel.getPhotoName();

            fileName = URLEncoder.encode(fileName, "UTF-8");

            response.reset();

            response.setHeader("Content-Disposition", "attachment; filename=\""

                    + fileName + "\"");

            response.addHeader("Content-Length", "" + photo.length());

            response.setContentType("application/octet-stream;charset=UTF-8");

            in = new BufferedInputStream(photo.getBinaryStream());

            outputStream = new BufferedOutputStream(response.getOutputStream());

            int len = 0;

            byte[] buf = new byte[1024];

            while ((len = in.read(buf, 0, 1024)) != -1) {

                outputStream.write(buf, 0, len);

            }

        } catch (ApplicationException e) {

            // TODO Auto-generated catch block

            e.printStackTrace();

        } catch (IOException e) {

            // TODO Auto-generated catch block

            e.printStackTrace();

        } catch (Exception e) {

            // TODO Auto-generated catch block

            e.printStackTrace();

        } finally {

            try {

                in.close();

                outputStream.flush();

                outputStream.close();

            } catch (IOException e) {

                // TODO Auto-generated catch block

                e.printStackTrace();

            }

        }

    }
EXTjs+SpringMVC+Mybatis实现照片的上传,下载,查看关键技术整理的更多相关文章
- SpringMVC——返回JSON数据&&文件上传下载
--------------------------------------------返回JSON数据------------------------------------------------ ...
- springmvc 多文件/文件夹上传 下载
注入依赖 <properties> <project.build.sourceEncoding>UTF-8</project.build.sourceEncoding&g ...
- CentOS上传下载查看命令
之前往CentOS中上传都用ftp软件,这里介绍一种另外的上传下载方式,两个命令轻松搞定.这两个命令目前只针对Xshell和SecureCRT等远程终端软件才支持,并且还会有时间的限制.大概30秒不上 ...
- extjs插件开发上传下载文件简单案例
前台,extjs,框架,mybatis,spring,springMVC,简单的文件上传下载案例. 必要的jar包,commons-fileupload-1.3.1.jar,commons-io-2. ...
- SpringMVC整合fastdfs-client-java实现web文件上传下载
原文:http://blog.csdn.net/wlwlwlwl015/article/details/52682153 本篇blog主要记录一下SpringMVC整合FastDFS的Java客户端实 ...
- springmvc文件上传下载简单实现案例(ssm框架使用)
springmvc文件上传下载实现起来非常简单,此springmvc上传下载案例适合已经搭建好的ssm框架(spring+springmvc+mybatis)使用,ssm框架项目的搭建我相信你们已经搭 ...
- SpringMVC实现上传下载功能
配置资源(jar包) 将前端页面整理好: 写核心的几个配置文件(applicationContext+wed.xml+jdbc.properties+log4j+springMVC.xml) 都是在s ...
- SpringMVC文件上传下载(单文件、多文件)
前言 大家好,我是bigsai,今天我们学习Springmvc的文件上传下载. 文件上传和下载是互联网web应用非常重要的组成部分,它是信息交互传输的重要渠道之一.你可能经常在网页上传下载文件,你可能 ...
- springmvc 上传下载
springmvc文件上传下载在网上搜索的代码 参考整理了一份需要使用的jar.commons-fileupload.jar与commons-io-1.4.jar 二个文件 1.表单属性为: enct ...
随机推荐
- Codeforces 1027F. Session in BSU
题目直通车:Codeforces 1027F. Session in BSU 思路: 对第一门考试,使用前一个时间,做标记,表示该时间已经用过,并让第一个时间指向第二个时间,表示,若之后的考试时间和当 ...
- HDU 4034 Graph Floyd最短路
原题链接:http://acm.hdu.edu.cn/showproblem.php?pid=4034 题意: 给你一个最短路的表,让你还原整个图,并使得边最少 题解: 这样想..这个表示通过floy ...
- RMI,socket,rpc,hessian,http比较
SOCKET使用时可以指定协议TCP,UDP等: RIM使用JRMP协议,JRMP又是基于TCP/IP: RPC底层使用SOCKET接口,定义了一套远程调用方法: HTTP是建立在TCP上,不是使用S ...
- HDU 2586 How far away? LCA 转化成RMQ
链接:http://acm.hdu.edu.cn/showproblem.php?pid=2586 [题意] 给出一个N 个和N-1条边的连通图,询问任意两点间的距离.N<=40000 . [分 ...
- iOS 代理 重定向消息 forwardInvocation
今天简单研究一下iOS的重定向消息forwardInvocation: 首先看看Invocation类: @interface NSInvocation : NSObject { @private _ ...
- Topshelf+Quartz.net+Dapper+Npoi(二)
quartznet 上篇说到quartznet这个东东,topshelf+quartznet有很多不错的文章,可以查看七七同学的文章(http://www.cnblogs.com/jys509/p/4 ...
- Visual Studio 插件开发资源
微软官方MSDN 官方MSDN永远是最大而全的电子字典Visual Studio Software Development Kit ,不过它的资料虽然详细,但没有一定的基础的话直接使用它的话有点无从入 ...
- SQL Server 2008 R2 SP3 and SQL Server 2008 SP4 are now available!
时间 2014-10-02 00:00:00 SQL Server Team Blog 原文 http://blogs.technet.com/b/dataplatforminsider/arc ...
- Ubuntu 16.04 -- 同时配置Nginx(转发)和frp(内网映射)和HTTPS(ca加密) - 端口转发
Ubuntu16.04下: sudo apt -get nginx 用这条命令安装完nginx之后, nginx在该目录下: 然后配置nginx: 如下: 红圈圈住的地方多写几个可以做负载均衡. 端口 ...
- vi中使用“/”查找字符
在vi 文件中使用"/"查找字符串 命令模式下,输入 /word 后回车,即查找word,按 n 查找下一个匹配单词,按 N 查找上一个匹配单词.