NetCore+Dapper WebApi架构搭建(六):添加JWT认证
WebApi必须保证安全,现在来添加JWT认证
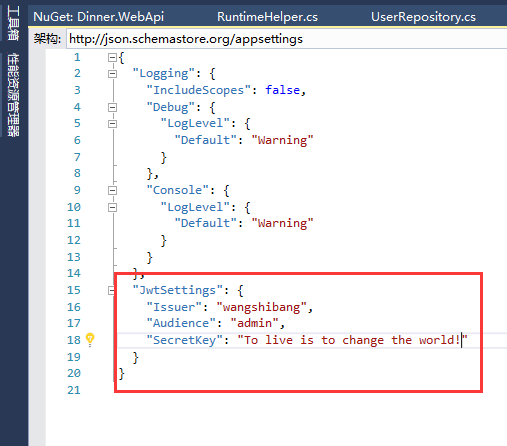
1、打开appsettings.json添加JWT认证的配置信息
2、在项目根目录下新建一个Models文件夹,添加一个JwtSettings.cs的实体
 namespace Dinner.WebApi.Models

 {

     public class JwtSettings

     {

         /// <summary>

         /// 证书颁发者

         /// </summary>

         public string Issuer { get; set; }

         /// <summary>

         /// 允许使用的角色

         /// </summary>

         public string Audience { get; set; }

         /// <summary>

         /// 加密字符串

         /// </summary>

         public string SecretKey { get; set; }

     }

 }
3、Startup.cs文件中的ConfigureServices添加Jwt认证的代码
 #region JWT认证

             services.Configure<JwtSettings>(Configuration.GetSection("JwtSettings"));

             JwtSettings setting = new JwtSettings();

             //绑定配置文件信息到实体

             Configuration.Bind("JwtSettings", setting);

             //添加Jwt认证

             services.AddAuthentication(option =>

             {

                 option.DefaultAuthenticateScheme = JwtBearerDefaults.AuthenticationScheme;

                 option.DefaultChallengeScheme = JwtBearerDefaults.AuthenticationScheme;

             }).AddJwtBearer(config =>

             {

                 config.TokenValidationParameters = new TokenValidationParameters

                 {

                     ValidAudience = setting.Audience,

                     ValidIssuer = setting.Issuer,

                     IssuerSigningKey = new SymmetricSecurityKey(Encoding.UTF8.GetBytes(setting.SecretKey))

                 };

                 /*

                 config.SecurityTokenValidators.Clear();

                 config.SecurityTokenValidators.Add(new MyTokenValidate());

                 config.Events = new JwtBearerEvents()

                 {

                     OnMessageReceived = context =>

                     {

                         var token = context.Request.Headers["myToken"];

                         context.Token = token.FirstOrDefault();

                         return Task.CompletedTask;

                     }

                 };

                 */

             });

             #endregion
4、Startup.cs文件中的Configure添加Jwt认证的代码
app.UseAuthentication();
5、基本配置都弄完了,现在是生成JwtToken,在ValuesController中添加一个生成Jwt的Action
 using Dinner.WebApi.Models;

 using Microsoft.AspNetCore.Mvc;

 using Microsoft.Extensions.Options;

 using Microsoft.IdentityModel.Tokens;

 using System;

 using System.Collections.Generic;

 using System.IdentityModel.Tokens.Jwt;

 using System.Security.Claims;

 using System.Text;

 namespace Dinner.WebApi.Controllers

 {

     [Route("api/[controller]/[action]")]

     public class ValuesController : Controller

     {

         private readonly JwtSettings setting;

         public ValuesController(IOptions<JwtSettings> _setting)

         {

             setting = _setting.Value;

         }

         // GET api/values

         [HttpGet]

         public IEnumerable<string> Get()

         {

             return new string[] { "value1", "value2" };

         }

         // GET api/values/5

         [HttpGet("{id}")]

         public string Get(int id)

         {

             return "value";

         }

         // POST api/values

         [HttpPost]

         public void Post([FromBody]string value)

         {

         }

         // PUT api/values/5

         [HttpPut("{id}")]

         public void Put(int id, [FromBody]string value)

         {

         }

         // DELETE api/values/5

         [HttpDelete("{id}")]

         public void Delete(int id)

         {

         }

         [HttpGet]

         public IActionResult GetGenerateJWT()

         {

             try

             {

                 var claims = new Claim[]

                 {

                     new Claim(ClaimTypes.Name, "wangshibang"),

                     new Claim(ClaimTypes.Role, "admin, Manage")

                 };

                 var key = new SymmetricSecurityKey(Encoding.UTF8.GetBytes(setting.SecretKey));

                 var creds = new SigningCredentials(key, SecurityAlgorithms.HmacSha256);

                 var token = new JwtSecurityToken(

                     setting.Issuer,

                     setting.Audience,

                     claims,

                     DateTime.Now,

                     DateTime.Now.AddMinutes(),

                     creds);

                 return Ok(new { Token = new JwtSecurityTokenHandler().WriteToken(token) });

             }

             catch (Exception ex)

             {

                 return BadRequest(ex.Message);

             }

         }

     }

 }
这样调用这个方法就会生成一个JwtToken,然后在UsersController上面添加一个[Authorize]的特性
上一篇我们说过SwaggerUI配置的最后一句有一个options.OperationFilter<HttpHeaderOperation>(); 这里我们来看这个HttpHeaderOperation
 using Microsoft.AspNetCore.Authorization;

 using Swashbuckle.AspNetCore.Swagger;

 using Swashbuckle.AspNetCore.SwaggerGen;

 using System.Collections.Generic;

 using System.Linq;

 namespace Dinner.WebApi

 {

     public class HttpHeaderOperation : IOperationFilter

     {

         public void Apply(Operation operation, OperationFilterContext context)

         {

             if (operation.Parameters == null)

             {

                 operation.Parameters = new List<IParameter>();

             }

             var actionAttrs = context.ApiDescription.ActionAttributes();

             var isAuthorized = actionAttrs.Any(a => a.GetType() == typeof(AuthorizeAttribute));

             if (isAuthorized == false) //提供action都没有权限特性标记,检查控制器有没有

             {

                 var controllerAttrs = context.ApiDescription.ControllerAttributes();

                 isAuthorized = controllerAttrs.Any(a => a.GetType() == typeof(AuthorizeAttribute));

             }

             var isAllowAnonymous = actionAttrs.Any(a => a.GetType() == typeof(AllowAnonymousAttribute));

             if (isAuthorized && isAllowAnonymous == false)

             {

                 operation.Parameters.Add(new NonBodyParameter()

                 {

                     Name = "Authorization",  //添加Authorization头部参数

                     In = "header",

                     Type = "string",

                     Required = false

                 });

             }

         }

     }

 }
这个代码主要就是在swagger页面添加了一个Authorization的头部输入框信息,以便来进行验证
现在我们基本工作都做好了,打开页面测试吧,注意:传入的Authorization参数必须是Bearer xxxxxxx的形式(xxxxxxx为生成的Token)

他返回了Http200就是成功了
整个项目的框架基本算是搭建好了,这只是一个雏形而已,其实Authorize这一块需要建一个BaseController继承Controller再在BaseController上添加一个Authorize然后所有Controller继承BaseController就不用一个一个的写Authorize了,不需要验证的加个AllowAnonymous就可以了,其他的直接扩展仓储接口写仓储就可以直接调用了
源码地址: https://github.com/wangyulong0505/Dinner
NetCore+Dapper WebApi架构搭建(六):添加JWT认证的更多相关文章
- NetCore+Dapper WebApi架构搭建(四):仓储的依赖注入
上一节我们讲到实体,仓储接口和仓储接口的实现需要遵循约定的命名规范,不仅是规范,而且为了依赖注入,现在我们实现仓储的依赖注入 在NetCore WebApi项目中新添加一个文件夹(Unit),当然你也 ...
- NetCore+Dapper WebApi架构搭建(五):Swagger构建WebApi界面
上一节讲解了仓储的依赖注入,想必现在都可以通过构造函数依赖注入直接调用 但是WebApi只是提供一个接口调用,为了方便我们的操作,我们得给他加上一个图形化界面工具,使用Swagger WebApi项目 ...
- NetCore+Dapper WebApi架构搭建(三):添加实体和仓储
上一节讲了类库添加一些底层的基本封装,下面来添加实体和仓储 1.Entities文件夹添加一个实体类Users,继承BaseModel,即拥有BaseModel的主键 using System; na ...
- NetCore+Dapper WebApi架构搭建(一):基本框架
初衷是想用dapper搭建一个高性能的架构,因为dapper操作数据库的效率很高 1.VS创建一个NetCore WebApi的框架,然后解决方案添加一个NetStandard的类库 整个解决方案如图 ...
- NetCore+Dapper WebApi架构搭建(二):底层封装
看下我们上一节搭建的架构,现在开始从事底层的封装 1.首先需要一个实体的接口IEntity namespace Dinner.Dapper { public interface IEntity< ...
- ASP.NET Core 6.0 添加 JWT 认证和授权
序言 本文将分别介绍 Authentication(认证) 和 Authorization(授权). 并以简单的例子在 ASP.NET Core 6.0 的 WebAPI 中分别实现这两个功能. 相关 ...
- 如何简单的在 ASP.NET Core 中集成 JWT 认证?
前情提要:ASP.NET Core 使用 JWT 搭建分布式无状态身份验证系统 文章超长预警(1万字以上),不想看全部实现过程的同学可以直接跳转到末尾查看成果或者一键安装相关的 nuget 包 自上一 ...
- Asp.net Core认证和授权:JWT认证和授权
JWT验证一般用户移动端,因为它不像cookie验证那样,没有授权跳转到登陆页面 JWT是json web token的简称,在 jwt.io 网址可以看到 新建一个API项目,通过postman ...
- drf JWT认证模块与自定制
JWT模块 在djangorestframework中,有一款扩展模块可用于做JWT认证,使用如下命令进行安装: pip install djangorestframework-jwt 现在,就让我们 ...
随机推荐
- 精心整理的十个必须要知道CSS+DIV技巧
1.css font的简写规则 当我们写字体样式的时候,我们也许会这样子写 font-size: 1em; line-height: 1.5em; font-weight: bold; font-s ...
- 20155322 2016-2017-2 《Java程序设计》第5周学习总结
20155322 2016-2017-2 <Java程序设计>第5周学习总结 教材学习内容总结 本周的学习任务是课本第八第九章: 第八章主要是讲异常处理.这里要理解Java的错误以对象的方 ...
- HDU 4720 Naive and Silly Muggles 平面几何
题目链接:http://acm.hdu.edu.cn/showproblem.php?pid=4720 解题报告:给出一个三角形的三个顶点坐标,要求用一个最小的圆将这个三个点都包含在内,另外输入一个点 ...
- c/c++ const 用法
概述 1. const有什么用途? 在 c程序中,const的用法主要有定义常量.修饰函数参数.修饰函数返回值等3个用处. 在c++程序中,它还可以修饰函数的定义体,定义类中某个成员为常态函数,即不改 ...
- python 爬虫 ~ 查看收发包的情况
DebugLog 可以用来查看收发包的情况,比较有意思,现特意记录下来: Sample: import urllib2 httpHandler = urllib2.HTTPHandler(debugl ...
- sklearn_模型遍历
# _*_ coding = utf_8 _*_ import matplotlib.pyplot as plt import seaborn as sns import pandas as pd f ...
- http方式传递参数值转义或乱码的处理(base64)
如果通过http方式传递参数url编码了,可用urlEncode和urlDecode,这种方式不同开发语言编码出来的可能不同,所以不同开发语言最好用base64编码和解码来处理: base64加密: ...
- JS设计模式——11.适配器模式
适配器模式概述 适配器模式可用来在现有接口和不兼容的类之间进行适配.使用这种模式的对象又叫包装器(wrapper). 适配器特点 从表面看,适配器模式很像门面模式.她们都要对别的对象进行包装并改变其呈 ...
- pywin32记录备忘
项目地址:http://sourceforge.net/projects/pywin32/ 文档地址:http://docs.activestate.com/activepython/2.7/pywi ...
- Servlet笔记1--概述
JavaEE概述及系统架构分析: (1) JavaEE概述: (2) 系统架构分析: