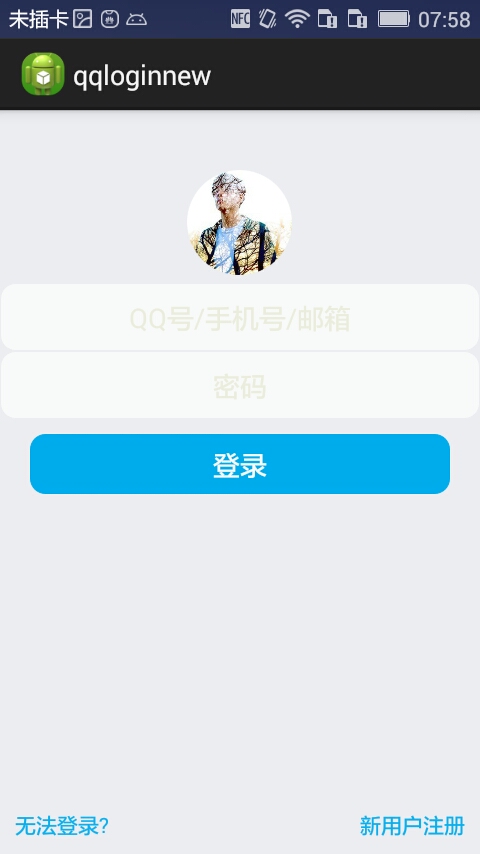
Android之QQ登录界面
首先过程中碰到的几个问题:
1、对 EditText 进行自定义背景
2、运行时自动 EditText 自动获得焦点
3、在获得焦点时即清空 hint ,而不是输入后清空
4、清空按钮的出现时机(在得到焦点并且有输入内容时)
.........
--- 这些问题都有一一解决 ---
以下是代码:
布局 fragment_main(问题2)
 <!-- android:focusable="true"

      android:focusableInTouchMode="true"

       把EditText默认的行为截断了! -->

 <RelativeLayout xmlns:android="http://schemas.android.com/apk/res/android"

     xmlns:tools="http://schemas.android.com/tools"

     android:layout_width="match_parent"

     android:layout_height="match_parent"

     android:background="#ECEDF1"

     android:focusable="true"

     android:focusableInTouchMode="true"

     tools:context="com.dragon.android.qqlogin.MainActivity$PlaceholderFragment" >

     <ImageView

         android:id="@+id/imageView1"

         android:layout_width="70dp"

         android:layout_height="70dp"

         android:layout_centerHorizontal="true"

         android:layout_marginBottom="5dp"

         android:layout_marginTop="40dp"

         android:src="@drawable/a" />

     <EditText

         android:id="@+id/editText1"

         android:layout_width="match_parent"

         android:layout_height="wrap_content"

         android:layout_below="@id/imageView1"

         android:ems="10"

         android:background="@drawable/bg_edittext"

         android:inputType="textPersonName"

         android:gravity="center"

         android:textColor="#6A6A6C"

         android:hint="@string/inaccount"

         android:textColorHint="#ECEDDD">

     </EditText>

     <EditText

         android:id="@+id/editText2"

         android:layout_width="match_parent"

         android:layout_height="wrap_content"

         android:layout_below="@id/editText1"

         android:ems="10"

         android:background="@drawable/bg_edittext"

         android:inputType="textPassword"

         android:gravity="center"

         android:textColor="#6A6A6C"

         android:hint="@string/inpwd"

         android:textColorHint="#ECEDDD" >

     </EditText>

     <Button

         android:id="@+id/button1"

         android:layout_width="match_parent"

         android:layout_height="40dp"

         android:layout_below="@id/editText2"

         android:layout_marginLeft="20dp"

         android:layout_marginRight="20dp"

         android:layout_marginTop="10dp"

         android:background="@drawable/bg_button"

         android:text="@string/button"

         android:gravity="center"

         android:textColor="#F9FAFB" />

     <LinearLayout

         android:layout_width="match_parent"

         android:layout_height="wrap_content"

         android:layout_alignParentBottom="true"

         android:padding="10dp" >

         <TextView

             android:id="@+id/textView2"

             android:layout_width="wrap_content"

             android:layout_height="wrap_content"

             android:gravity="center"

             android:text="@string/faillogin"

             android:textColor="#0EB1EF" />

         <TextView

             android:id="@+id/textView3"

             android:layout_width="match_parent"

             android:layout_height="wrap_content"

             android:gravity="right"

             android:text="@string/regist"

             android:textColor="#0EB1EF" />

     </LinearLayout>

     <Button

         android:id="@+id/button2"

         android:layout_width="16dp"

         android:layout_height="16dp"

         android:layout_alignTop="@id/editText1"

         android:layout_marginTop="15dp"

         android:layout_alignParentRight="true"

         android:layout_marginRight="10dp"

         android:background="@drawable/clear"

         android:visibility="invisible" />

     <Button

         android:id="@+id/button3"

         android:layout_width="16dp"

         android:layout_height="16dp"

         android:layout_alignTop="@id/editText2"

         android:layout_marginTop="15dp"

         android:layout_alignLeft="@+id/button2"

         android:background="@drawable/clear"

         android:visibility="invisible" />

 </RelativeLayout>
fragment_main
Button 和 EditText 的背景(问题1)
 <?xml version="1.0" encoding="utf-8"?>

 <shape xmlns:android="http://schemas.android.com/apk/res/android" >

     <stroke android:width="1px" android:color="#00ACED" />

     <solid android:color="#00ACED" />

     <corners android:radius="10dp" />

 </shape>
bg_button
 <?xml version="1.0" encoding="utf-8"?>

 <shape xmlns:android="http://schemas.android.com/apk/res/android" >

     <stroke android:width="1px" android:color="#ECEDF1" />

     <solid android:color="#F9FAFB" />

     <corners android:radius="10dp" />

     <padding

         android:top="10dp"

         android:bottom="10dp"/>

 </shape>
bg_edittext
strings
 <?xml version="1.0" encoding="utf-8"?>

 <resources>

     <string name="app_name">qqloginnew</string>

     <string name="action_settings">Settings</string>

     <string name="button">登录</string>

     <string name="faillogin">无法登录?</string>

     <string name="regist">新用户注册</string>

     <string name="inaccount">QQ号/手机号/邮箱</string>

     <string name="inpwd">密码</string>

     <string name="sucess">登录成功</string>

 </resources>
strings
MainActivity (问题3、4.....)
 package com.dragon.android.qqloginnew;

 import android.app.Activity;

 import android.os.Bundle;

 import android.text.Editable;

 import android.text.TextWatcher;

 import android.view.View;

 import android.view.View.OnClickListener;

 import android.view.View.OnFocusChangeListener;

 import android.widget.Button;

 import android.widget.EditText;

 public class MainActivity extends Activity {

     private EditText editText1;

     private EditText editText2;

     // private Button button;

     private Button clearButton1;

     private Button clearButton2;

     // 得到strings中的属性

     // private String string2 = getResources().getString(R.string.inaccount);

     @Override

     protected void onCreate(Bundle savedInstanceState) {

         super.onCreate(savedInstanceState);

         setContentView(R.layout.fragment_main);

         editText1 = (EditText) findViewById(R.id.editText1);

         editText2 = (EditText) findViewById(R.id.editText2);

         // button = (Button) findViewById(R.id.button1);

         clearButton1 = (Button) findViewById(R.id.button2);

         clearButton2 = (Button) findViewById(R.id.button3);

         // 对EditText进行焦点变更监听

         editText1.setOnFocusChangeListener(new EditTextListener(clearButton1));

         editText2.setOnFocusChangeListener(new EditTextListener(clearButton2));

         // 对清空按钮进行点击监听

         clearButton1.setOnClickListener(new ClearButtonListener());

         clearButton2.setOnClickListener(new ClearButtonListener());

         // 对EditText进行编辑监听

         editText1.addTextChangedListener(new MyEditTextWatcher(editText1));

         editText2.addTextChangedListener(new MyEditTextWatcher(editText2));

     }

     /**

      * 对EditText的内容进行实时监控

      *

      * @author Auser

      *

      */

     class MyEditTextWatcher implements TextWatcher {

         private CharSequence temp;

         private EditText editText;

         public MyEditTextWatcher(EditText editText) {

             this.editText = editText;

         }

         @Override

         // int start开始的位置, int count被改变的旧内容数, int after改变后的内容数量

         public void beforeTextChanged(CharSequence s, int start, int count,

                 int after) {

             // 这里的s表示改变之前的内容,通常start和count组合,可以在s中读取本次改变字段中被改变的内容。而after表示改变后新的内容的数量。

         }

         @Override

         // int start开始的位置, int before改变前的内容数量, int count新增量

         public void onTextChanged(CharSequence s, int start, int before,

                 int count) {

             // 这里的s表示改变之后的内容,通常start和count组合,可以在s中读取本次改变字段中新的内容。而before表示被改变的内容的数量。

             temp = s;

         }

         @Override

         // 表示最终内容

         public void afterTextChanged(Editable s) {

             if (temp.length() > 0) {

                 // 设置清空按钮为可见

                 if (editText == editText1) {

                     clearButton1.setVisibility(View.VISIBLE);

                 } else if (editText == editText2) {

                     clearButton2.setVisibility(View.VISIBLE);

                 }

             } else {

                 // 设置清空按钮不可见

                 if (editText == editText1) {

                     clearButton1.setVisibility(View.INVISIBLE);

                 } else if (editText == editText2) {

                     clearButton2.setVisibility(View.INVISIBLE);

                 }

             }

         }

     }

     /**

      * 清空按钮点击事件

      *

      * @author

      *

      */

     class ClearButtonListener implements OnClickListener {

         @Override

         public void onClick(View view) {

             if (view == clearButton1) {

                 editText1.setText("");

             } else if (view == clearButton2) {

                 editText2.setText("");

             }

         }

     }

     /**

      * 焦点变更事件

      *

      * @author Auser

      *

      */

     class EditTextListener implements OnFocusChangeListener {

         private Button clear;

         public EditTextListener(Button clear) {

             this.clear = clear;

         }

         @Override

         public void onFocusChange(View v, boolean hasFocus) {

             EditText textView = (EditText) v;

             String hint;

             if (hasFocus) {

                 // 当获取焦点时如果内容不为空则清空按钮可见

                 if (!textView.getText().toString().equals("")) {

                     clear.setVisibility(View.VISIBLE);

                 }

                 // if (textView == editText2) {

                 // // 设置输入格式为不可见的密码格式

                 // textView.setInputType(InputType.TYPE_CLASS_TEXT

                 // | InputType.TYPE_TEXT_VARIATION_PASSWORD);

                 // }

                 hint = textView.getHint().toString();

                 // 给TextView添加额外的数据

                 textView.setTag(hint);

                 textView.setHint("");

             } else {

                 // 当失去焦点时清空按钮不可见

                 clear.setVisibility(View.INVISIBLE);

                 // if (textView == editText2) {

                 // // 设置输入格式为可见的密码格式

                 // textView.setInputType(InputType.TYPE_CLASS_TEXT

                 // | InputType.TYPE_TEXT_VARIATION_VISIBLE_PASSWORD);

                 // }

                 // 取出之前添加的额外数据

                 hint = textView.getTag().toString();

                 textView.setHint(hint);

             }

         }

     }

 }
图片素材
a.png clear.png
-------------------------一个初步的登录界面------------------------
Android之QQ登录界面的更多相关文章
- Android菜鸟的成长笔记(3)——给QQ登录界面说So Easy
原文:Android菜鸟的成长笔记(3)--给QQ登录界面说So Easy 上一篇:Android菜鸟的成长笔记(2)--第一个Android应用 我们前面已经做了第一个Android应用程序,虽然有 ...
- [转]Android:布局实例之模仿QQ登录界面
Android:布局实例之模仿QQ登录界面 预览图: 准备: 1.找到模仿对象 QQ登陆界面UI下载>>>>> 2.导入工程 3.查看布局结构和使用控件 其对应效果图分布 ...
- QQ登录界面布局
简单的qq登录界面布局 <?xml version="1.0" encoding="utf-8"?> <RelativeLayout xmln ...
- 界面编程模仿篇(QQ登录界面逼真篇)
写了好多天的爬虫,偷空前前后后用了两天的时间(排除吃饭睡觉)写完了这个QQ登录界面,看起来还凑和着吧,如果是的大神的,莫见笑,纯属业余作品,废话先不多说,截图如下,其中第二幅图片中的红色方框部份有待完 ...
- 零基础~仿qq登录界面
html代码: <!DOCTYPE html> <html> <head> <meta charset="utf-8"> <t ...
- WPF开发实例——仿QQ登录界面
原文:WPF开发实例--仿QQ登录界面 版权声明:本文为博主原创文章,如需转载请标明转载地址 http://blog.csdn.net/u013981858 https://blog.csdn.net ...
- JavaSwing仿QQ登录界面,注释完善,适合新手学习
使用说明: 这是一个java做的仿制QQ登录界面,界面仅使用一个类, JDK版本为jdk-11 素材包的名字为:素材(下载)请在项目中新建一个名字为“素材”的文件夹. 素材: https://pan. ...
- swing实现QQ登录界面1.0( 实现了同一张图片只加载一次)、(以及实现简单的布局面板添加背景图片控件的标签控件和添加一个关闭按钮控件)
swing实现QQ登录界面1.0( 实现了同一张图片只加载一次).(以及实现简单的布局面板添加背景图片控件的标签控件和添加一个关闭按钮控件) 代码思路分析: 1.(同一张图片仅仅需要加载一次就够了,下 ...
- 编写Java程序,使用Swing布局管理器和常用控件,实现仿QQ登录界面
返回本章节 返回作业目录 需求说明: 使用Swing布局管理器和常用控件,实现仿QQ登录界面 实现思路: 创建登录界面的类QQLogin,该类继承父类JFrame,在该类中创建无参数的构造方法,在构造 ...
随机推荐
- 使用 MySQL 查找附近的位置
使用 MySQL 查找附近的位置 以下 SQL 语句将会在与坐标 37, -122 相距 25 英里的半径范围内查找最近的 20 个位置.该语句根据行的纬度/经度以及目标纬度/经度计算距离,然后只请求 ...
- 替换url中某个参数的值或是添加某个参数的方法(js 分页上下页可以使用)
function changeUrl(base, find, value) { var offset = base.indexOf(find); var index; var rr = ''; if( ...
- 不支持关键字“data source”
网上大部分都是说data source之间需要插入一个空格或者都是一些低级的拼写错误造成的,但是我没有出现这些情况,是通过把data source改成server解决的,具体config里面的代码如下 ...
- Maven 从svn下载后,pom.xml报错解决方案
Multiple annotations found at this line: - Execution default-testResources of goal org.apache.maven. ...
- my vim
set nu set cindent set smartindent set cursorline set showcmd set completeopt=preview,menu set autow ...
- Error Domain=ASIHTTPRequestErrorDomain Code=8 "Failed to move file from"xxx/xxx"to"xxx/xxx"
今天真的好高兴呀 我解决了一个折磨了我一周的问题,真的是激动地要哭出来了,为了这个问题,我嘴也烂了,头发抓了一地啊.虽然解决方法,最后还是展现出了“百度”的伟大,但是我还是很开心,在这里我展示一下我的 ...
- web 乱码摘抄
JavaWeb--中文乱码小结 JavaWeb--中文乱码小结 0.纯粹html乱码: 换个editor吧(有时候notepad都比sublime_text好用),最好是在<head>&l ...
- 柏克EPS应急电源签约联达大厦保安全
近日,柏克EPS应急电源成功签约佛山市联达大厦,保障大厦电力安全. 佛山市联达大厦占地6674㎡,总建筑面积约4.6万㎡,设有两层地下室,提供201个停车位,地面29层.大厦大楼分为主楼和副楼,主楼地 ...
- Android --差缺补漏之 Intent&putExtra()
伴随着Android Developers 的开发,再也不用FQ了,这意味着Android 对中国学习者有着越来越多的官方学习资料,学习起来有更明确的方向和目标. Android Developer ...
- ObjectiveC-MQTT初次接触
首先iOS与mac端用的框架是:https://github.com/ckrey/MQTT-Client-Framework 使用CocoaPods导入 pod 'MQTTClient/Websock ...