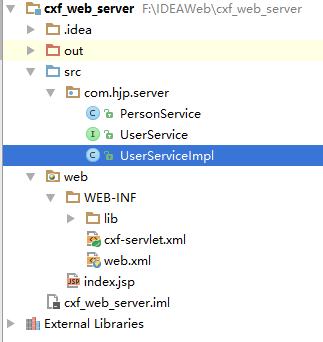
WebService之CXF
一、配置环境变量(Windows系统下要重启)
1、JAVA_HOME即JDK安装路径bin上一级,java -version命令验证
2、CXF_HOME即cxf安装路径bin上一级,cxf解压包下有samples文件夹,下有java_first_pojo文件夹,此处shift+右键打开命令窗口,ant server启动案例WebService服务,如果报错版本问题,打开samples下文件common_build.xml添加上面的JDK版本(如<equals arg1="${ant.java.version}" arg2="1.7"/>),ant client启动客户端
3、ANT_HOME即ant安装路径bin上一级,ant -version命令验证
二、发布WebService服务
Demo1、ServerFactoryBean类这种方式创建出的WSDL文档名字不符合开发规范,一般不用
1、新建PersonService类
package com.hjp.server;

public class PersonService {

    public String sayHello(String name){

        return "Hello "+name;

    }

}
PersonService
2、创建发布服务类,记得添加cxf安装文件下lib下jar包
package com.hjp.server;

import org.apache.cxf.frontend.ServerFactoryBean;

public class Publisher {

    public static void main(String[] args) {

        //创建cxf发布的服务对象

        ServerFactoryBean serverFactoryBean=new ServerFactoryBean();

        //设置服务的类

        serverFactoryBean.setServiceClass(PersonService.class);

        //设置服务地址

        serverFactoryBean.setAddress("http://localhost:5555/hello");

        //设置服务对象

        serverFactoryBean.setServiceBean(new PersonService());

        //发布

        serverFactoryBean.create();

    }

}
Publisher
Demo2、JaxWsServerFactoryBean类这种方式结合@WebService注解,WSDL文档名称比较规范
1、新建PersonService1类
package com.hjp.server;

import javax.jws.WebService;

@WebService

public class PersonService1 {

    public String sayHello(String name){

        return "Hello "+name;

    }

}
PersonService1
2、创建发布服务类
package com.hjp.server;

import org.apache.cxf.frontend.ServerFactoryBean;

import org.apache.cxf.jaxws.JaxWsServerFactoryBean;

public class Publisher1 {

    public static void main(String[] args) {

        //创建cxf发布的服务对象

        JaxWsServerFactoryBean serverFactoryBean=new JaxWsServerFactoryBean();

        //设置服务的类

        serverFactoryBean.setServiceClass(PersonService1.class);

        //设置服务地址

        serverFactoryBean.setAddress("http://localhost:5555/hello");

        //设置服务对象

        serverFactoryBean.setServiceBean(new PersonService1());

        //发布

        serverFactoryBean.create();

    }

}
Publisher1
Demo3、JaxWsServerFactoryBean发布接口类服务,@WebService注解加在接口上,在实现类上方法无效
1、新建UserService接口及其实现类UserServiceImpl
package com.hjp.server;

import javax.jws.WebService;

@WebService

public interface UserService {

    public String sayHello(String name);

}
UserService
package com.hjp.server;

public class UserServiceImpl implements UserService {

    @Override

    public String sayHello(String name) {

        return "Hello "+name;

    }

}
UserServiceImpl
2、创建发布服务类
package com.hjp.server;

import org.apache.cxf.jaxws.JaxWsServerFactoryBean;

public class Publisher2 {

    public static void main(String[] args) {

        //创建cxf发布的服务对象

        JaxWsServerFactoryBean serverFactoryBean=new JaxWsServerFactoryBean();

        //设置服务的接口类

        serverFactoryBean.setServiceClass(UserService.class);

        //设置服务地址

        serverFactoryBean.setAddress("http://localhost:5555/hello");

        //设置服务对象

        serverFactoryBean.setServiceBean(new UserServiceImpl());

        //发布

        serverFactoryBean.create();

    }

}
Publisher2
三、WebService服务客户端调用
1、使用wsimport命令方式,省略
2、使用cxf中wsdl2java命令(wsimport不支持soap12协议下生成客户端代码)
wsdl2java -d . -p com.hjp.stub.soap12 http://localhost:5555/hello?wsdl
-d生成的客户端代码存放路径,点代表当前路径;-p 第一个参数是生成客户端代码的包路径,第二个参数是wsdl访问地址;如果省略第一个参数,默认包路径为xmlns:tns后面域名倒序
附SOAP12协议代码:
package com.hjp.server;

import javax.jws.WebService;

import javax.xml.ws.BindingType;

import static javax.xml.ws.soap.SOAPBinding.SOAP12HTTP_BINDING;

@WebService

//默认是SOAP11,如果使用SOAP12,需要使用BindingType注解

@BindingType(value = SOAP12HTTP_BINDING)

public interface UserService {

    public String sayHello(String name);

}
UserService接口
四、配置CXFServlet发布服务
1、新建JavaWeb项目
2、面向发布普通类的服务
新建PersonService类
package com.hjp.server;

import javax.jws.WebService;

@WebService

public class PersonService {

    public String sayHello(String name){

        return "Hello "+name;

    }

}
PersonService
在WEB-INF下新建lib文件夹,将cxf所有相关jar包引入
在WEB-INF下新建cxf-servlet.xml文件,配置如下
<?xml version="1.0" encoding="UTF-8"?>

<beans xmlns="http://www.springframework.org/schema/beans"

       xmlns:xsi="http://www.w3.org/2001/XMLSchema-instance" xmlns:jaxws="http://cxf.apache.org/jaxws"

       xmlns:jaxrs="http://cxf.apache.org/jaxrs" xmlns:cxf="http://cxf.apache.org/core"

       xsi:schemaLocation="http://www.springframework.org/schema/beans

          http://www.springframework.org/schema/beans/spring-beans.xsd

            http://cxf.apache.org/jaxrs http://cxf.apache.org/schemas/jaxrs.xsd

            http://cxf.apache.org/jaxws http://cxf.apache.org/schemas/jaxws.xsd

            http://cxf.apache.org/core http://cxf.apache.org/schemas/core.xsd">

    <!-- 引入CXF Bean定义如下,早期的版本中使用 -->

    <import resource="classpath:META-INF/cxf/cxf.xml"/>

    <import resource="classpath:META-INF/cxf/cxf-extension-soap.xml"/>

    <import resource="classpath:META-INF/cxf/cxf-servlet.xml"/>

    <!--

    endpoint:发布类的形式的服务配置

    address:配置时前必须加/

    implementor:具体的服务类

    -->

    <jaxws:endpoint id="personService" address="/personService" implementor="com.hjp.server.PersonService">

        <jaxws:inInterceptors>

            <bean class="org.apache.cxf.interceptor.LoggingInInterceptor"></bean>

        </jaxws:inInterceptors>

        <jaxws:outInterceptors>

            <bean class="org.apache.cxf.interceptor.LoggingOutInterceptor"></bean>

        </jaxws:outInterceptors>

    </jaxws:endpoint>

</beans>
cxf-servlet.xml
在web.xml中配置CXFServlet
<?xml version="1.0" encoding="UTF-8"?>

<web-app xmlns="http://xmlns.jcp.org/xml/ns/javaee"

         xmlns:xsi="http://www.w3.org/2001/XMLSchema-instance"

         xsi:schemaLocation="http://xmlns.jcp.org/xml/ns/javaee http://xmlns.jcp.org/xml/ns/javaee/web-app_3_1.xsd"

         version="3.1">

    <servlet>

        <servlet-name>mycxf</servlet-name>

        <servlet-class>org.apache.cxf.transport.servlet.CXFServlet</servlet-class>

    </servlet>

    <servlet-mapping>

        <servlet-name>mycxf</servlet-name>

        <url-pattern>/services/*</url-pattern>

    </servlet-mapping>

</web-app>
web.xml
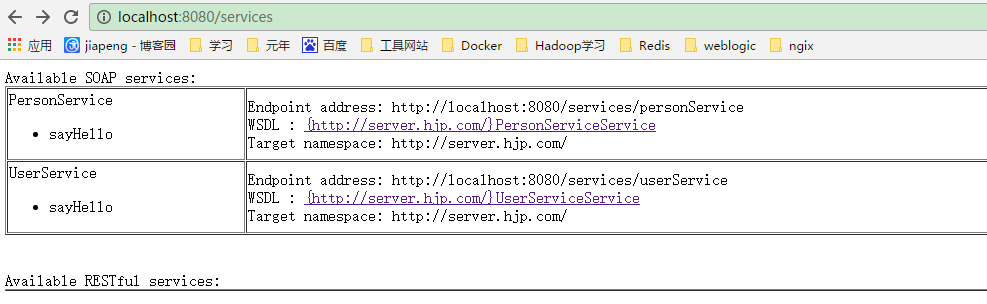
访问地址:http://localhost:8080/services如下图,点击WSDL链接,指向WSDL地址

3、面向发布接口的服务
新建接口及其实现类
package com.hjp.server;

import javax.jws.WebService;

@WebService

public interface UserService {

    public String sayHello(String name);

}
UserService
package com.hjp.server;

public class UserServiceImpl implements UserService {

    @Override

    public String sayHello(String name) {

        return "Hello "+name;

    }

}
UserServiceImpl
修改cxf-servlet.xml配置文件
<?xml version="1.0" encoding="UTF-8"?>

<beans xmlns="http://www.springframework.org/schema/beans"

       xmlns:xsi="http://www.w3.org/2001/XMLSchema-instance" xmlns:jaxws="http://cxf.apache.org/jaxws"

       xmlns:jaxrs="http://cxf.apache.org/jaxrs" xmlns:cxf="http://cxf.apache.org/core"

       xsi:schemaLocation="http://www.springframework.org/schema/beans

          http://www.springframework.org/schema/beans/spring-beans.xsd

            http://cxf.apache.org/jaxrs http://cxf.apache.org/schemas/jaxrs.xsd

            http://cxf.apache.org/jaxws http://cxf.apache.org/schemas/jaxws.xsd

            http://cxf.apache.org/core http://cxf.apache.org/schemas/core.xsd">

    <!-- 引入CXF Bean定义如下,早期的版本中使用 -->

    <import resource="classpath:META-INF/cxf/cxf.xml"/>

    <import resource="classpath:META-INF/cxf/cxf-extension-soap.xml"/>

    <import resource="classpath:META-INF/cxf/cxf-servlet.xml"/>

    <!--

    endpoint:发布类的形式的服务配置

    address:配置时前必须加/

    implementor:具体的服务类

    -->

    <jaxws:endpoint id="personService" address="/personService" implementor="com.hjp.server.PersonService">

        <jaxws:inInterceptors>

            <bean class="org.apache.cxf.interceptor.LoggingInInterceptor"></bean>

        </jaxws:inInterceptors>

        <jaxws:outInterceptors>

            <bean class="org.apache.cxf.interceptor.LoggingOutInterceptor"></bean>

        </jaxws:outInterceptors>

    </jaxws:endpoint>

    <!--

    server:发布接口类形式服务

    serviceClass:接口类

    -->

    <jaxws:server id="userService" address="/userService" serviceClass="com.hjp.server.UserService">

        <!--配置接口实现类-->

        <jaxws:serviceBean>

            <bean class="com.hjp.server.UserServiceImpl"></bean>

        </jaxws:serviceBean>

        <jaxws:inInterceptors>

            <bean class="org.apache.cxf.interceptor.LoggingInInterceptor"></bean>

        </jaxws:inInterceptors>

        <jaxws:outInterceptors>

            <bean class="org.apache.cxf.interceptor.LoggingOutInterceptor"></bean>

        </jaxws:outInterceptors>

    </jaxws:server>

</beans>
cxf-servlet.xml
访问地址:http://localhost:8080/services如下图,点击相应WSDL链接,指向相应WSDL地址
五、WebService发布方式和客户端代码生成方式相互独立,只要有WSDL地址,就可以用某种客户端代码生成工具生成客户端代码
WebService之CXF的更多相关文章
- WebService之CXF注解报错(一)
WebService之CXF注解 1.详细报错例如以下 usage: java org.apache.catalina.startup.Catalina [ -config {pathname} ] ...
- WebService它CXF注释错误(两)
WebService它CXF注解 1.详细报错例如以下 五月 04, 2014 11:24:12 下午 org.apache.cxf.wsdl.service.factory.ReflectionSe ...
- WebService之CXF注解报错(三)
WebService之CXF注解 1.具体错误如下 五月 04, 2014 11:29:28 下午 org.apache.cxf.wsdl.service.factory.ReflectionServ ...
- WebService之CXF注解报错(二)
WebService之CXF注解 1.具体报错如下 五月 04, 2014 11:24:12 下午 org.apache.cxf.wsdl.service.factory.ReflectionServ ...
- 转载 WebService 的CXF框架 WS方式Spring开发
WebService 的CXF框架 WS方式Spring开发 1.建项目,导包. 1 <project xmlns="http://maven.apache.org/POM/4.0 ...
- 【WebService】WebService之CXF和Spring整合(六)
前面介绍了WebService与CXF的使用,项目中我们经常用到Spring,这里介绍CXF与Spring整合 步骤 1.创建一个Maven Web项目,可以参照:[Maven]Eclipse 使用M ...
- 转-JAVA webservice之CXF 范例--http://cxshun.iteye.com/blog/1275408
JAVA webservice之CXF 博客分类: j2ee相关 昨天我们一起学习了一下xfire,今天我们来看一下CXF,为什么学完那个接着学这个呢.因为CXF是在xfire的基础上实现 的,所以我 ...
- Webservice与CXF框架快速入门
1. Webservice Webservice是一套远程调用技术规范 远程调用RPC, 实现了系统与系统进程间的远程通信.java领域有很多可实现远程通讯的技术,如:RMI(Socket + 序列化 ...
- WebService之CXF框架
本文主要包括以下内容 ant工具的使用 利用cxf实现webservice cxf与spring整合 ajax访问webservice ant 工具 1.为什么要用到ant这个工具呢? Ant做为一种 ...
- So easy Webservice 7.CXF 发布WebService
(一)使用ServerFactoryBean 方式实现发布WS服务 1.新建项目,添加cxf jar包到项目中 2.编写服务实现类 /** * CXF WebService * 不用注解 * @aut ...
随机推荐
- Android学习之发送及接收广播
1.使用标准广播 1.1 定义广播接收器 public class MyBroadcastReceiver extends BroadcastReceiver { @Override public v ...
- 关于Unity中的光照(三)
法线贴图 次时代游戏用的比较多 1:法线贴图是凹凸贴图技术上 的一种应用,有时也称为Dot3(仿立体)凹凸纹理贴图;2: 法线贴图是不增加多边形的情况下,增强模型的细节;3: 法线贴图是高精度模型导出 ...
- mysql小题趣事
题一 答案: case when +条件 +then 显示什么 +else+显示另外什么+end
- 《深入理解Java虚拟机》读书笔记:Java内存区域
xmind文件下载地址
- Mybatis表关联一对多
有了前面几章的基础,对一些简单的应用是可以处理的,但在实际项目中,经常是关联表的查询,比如:最常见到的多对一,一对多等.这些查询是如何处理的呢,这一讲就讲这个问题.前面几篇教程中介绍的都是单表映射的一 ...
- (转) IDirectSoundBuffer::SetVolume的参数与音量分贝的函数关系
假如将播放器的控制音量切割成0-100的话,由于IDirectSoundBuffer::SetVolume(LONG lVolume)中参数的输入值是[-10000,0] MySetVolume( D ...
- Git -- 远程仓库简介
到目前为止,我们已经掌握了如何在Git仓库里对一个文件进行时光穿梭,你再也不用担心文件备份或者丢失的问题了. 可是有用过集中式版本控制系统SVN的童鞋会站出来说,这些功能在SVN里早就有了,没看出Gi ...
- Java虚拟机性能管理神器 - VisualVM(2) 入门
一下载VisualVM 最新版本下载 历史版本下载 二启动VisualVM 三VisualVM用户目录 四VisualVM窗口 1应用程序窗口 2详情窗口 五VisualVM插件 Java虚拟机性 ...
- R语言curve绘图函数
curve 函数常用于绘制函数对应的曲线,确定函数的表达式,以及对应的需要展示的起始坐标和终止坐标,curve函数就会自动化的绘制在该区间内的函数图像 基本用法,代码示例: curve(sin, -2 ...
- ping失败的结果分析
①Request timed out 这是大家经常碰到的提示信息,很多文章中说这是对方机器置了过滤ICMP数据包,从上面工作过程来看,这是不完全正确的,至少有下几种情况. a. 对方已关机,或者网络上 ...