
【WebService】WebService之CXF和Spring整合(六)
前面介绍了WebService与CXF的使用,项目中我们经常用到Spring,这里介绍CXF与Spring整合
步骤
1、创建一个Maven Web项目,可以参照:【Maven】Eclipse 使用Maven创建Java Web项目
2、添加spring依赖和cxf依赖的jar包,在pom文件中设置依赖即可
 <project xmlns="http://maven.apache.org/POM/4.0.0" xmlns:xsi="http://www.w3.org/2001/XMLSchema-instance"

     xsi:schemaLocation="http://maven.apache.org/POM/4.0.0 http://maven.apache.org/maven-v4_0_0.xsd">

     <modelVersion>4.0.0</modelVersion>

     <groupId>test.hd</groupId>

     <artifactId>test-webservice-cxf-spring</artifactId>

     <packaging>war</packaging>

     <version>0.0.1-SNAPSHOT</version>

     <name>test-webservice-cxf-spring Maven Webapp</name>

     <url>http://maven.apache.org</url>

      <!-- 定义maven变量 -->

     <properties>

         <!-- spring -->

         <spring.version>4.0.0.RELEASE</spring.version>

         <!-- log -->

         <commons-logging.version>1.1.3</commons-logging.version>

         <!-- CXF -->

         <cxf-version>3.1.5</cxf-version>

         <!-- Servlet -->

         <servlet.version>3.0.1</servlet.version>

         <jsp-api.version>2.2</jsp-api.version>

         <!-- jstl -->

         <jstl.version>1.2</jstl.version>

         <standard.version>1.1.2</standard.version>

         <!-- test -->

         <junit.version>3.8.1</junit.version>

         <!-- jdk -->

         <jdk.version>1.7</jdk.version>

         <maven.compiler.plugin.version>2.3.2</maven.compiler.plugin.version>

     </properties>

     <dependencies>

         <dependency>

             <groupId>org.springframework</groupId>

             <artifactId>spring-core</artifactId>

             <version>${spring.version}</version>

         </dependency>

         <dependency>

             <groupId>org.springframework</groupId>

             <artifactId>spring-beans</artifactId>

             <version>${spring.version}</version>

         </dependency>

         <dependency>

             <groupId>org.springframework</groupId>

             <artifactId>spring-context</artifactId>

             <version>${spring.version}</version>

         </dependency>

         <dependency>

             <groupId>org.springframework</groupId>

             <artifactId>spring-jdbc</artifactId>

             <version>${spring.version}</version>

         </dependency>

         <dependency>

             <groupId>org.springframework</groupId>

             <artifactId>spring-expression</artifactId>

             <version>${spring.version}</version>

         </dependency>

         <dependency>

             <groupId>org.springframework</groupId>

             <artifactId>spring-web</artifactId>

             <version>${spring.version}</version>

         </dependency>

         <dependency>

             <groupId>org.springframework</groupId>

             <artifactId>spring-webmvc</artifactId>

             <version>${spring.version}</version>

         </dependency>

         <dependency>

             <groupId>org.springframework</groupId>

             <artifactId>spring-tx</artifactId>

             <version>${spring.version}</version>

         </dependency>

         <!-- CXF -->

         <dependency>

             <groupId>org.apache.cxf</groupId>

             <artifactId>cxf-core</artifactId>

             <version>${cxf-version}</version>

         </dependency>

         <dependency>

             <groupId>org.apache.cxf</groupId>

             <artifactId>cxf-rt-frontend-jaxws</artifactId>

             <version>${cxf-version}</version>

         </dependency>

         <dependency>

             <groupId>org.apache.cxf</groupId>

             <artifactId>cxf-rt-transports-http</artifactId>

             <version>${cxf-version}</version>

         </dependency>

         <!-- Servlet -->

         <dependency>

             <groupId>javax.servlet</groupId>

             <artifactId>javax.servlet-api</artifactId>

             <version>${servlet.version}</version>

             <scope>provided</scope>

         </dependency>

         <dependency>

             <groupId>javax.servlet.jsp</groupId>

             <artifactId>jsp-api</artifactId>

             <version>${jsp-api.version}</version>

             <scope>provided</scope>

         </dependency>

         <!-- jstl -->

         <dependency>

             <groupId>javax.servlet</groupId>

             <artifactId>jstl</artifactId>

             <version>${jstl.version}</version>

         </dependency>

         <dependency>

             <groupId>taglibs</groupId>

             <artifactId>standard</artifactId>

             <version>${standard.version}</version>

         </dependency>

         <!-- test -->

         <dependency>

             <groupId>junit</groupId>

             <artifactId>junit</artifactId>

             <version>${junit.version}</version>

             <scope>test</scope>

         </dependency>

     </dependencies>

     <build>

         <plugins>

             <!-- define the project compile level -->

             <plugin>

                 <groupId>org.apache.maven.plugins</groupId>

                 <artifactId>maven-compiler-plugin</artifactId>

                 <version>${maven.compiler.plugin.version}</version>

                 <configuration>

                     <source>${jdk.version}</source>

                     <target>${jdk.version}</target>

                 </configuration>

             </plugin>

         </plugins>

         <finalName>test-webservice-cxf-spring</finalName>

     </build>

 </project>
3、新建一个接口,使用@WebService(SEI和SEI的实现类)注解标注接口,使用@WebMethod(SEI中的所有方法)注解标注接口中定义的所有方法,如下:
 package com.test.ws;

 import javax.jws.WebMethod;

 import javax.jws.WebService;

 /**

  * 定义SEI(WebService EndPoint Interface)终端

  * @author H__D

  * @date 2017年7月28日 上午11:35:34

  *

  */

 //使用@WebService注解标注WebServiceI接口

 @WebService

 public interface HelloWS {

     //使用@WebMethod注解标注WebServiceI接口中的方法

     @WebMethod

     public String sayHello(String name);

 }
4、编写一个接口实现类,使用@WebService注解标注实现类,如下:
 package com.test.ws;

 import javax.jws.WebService;

 /**

  * SEI的具体实现

  * @author H__D

  * @date 2017年7月28日 上午11:37:43

  *

  */

 //使用@WebService注解标注

 @WebService

 public class HelloWSImpl implements HelloWS{

     @Override

     public String sayHello(String name) {

         System.out.println("WebService sayHello : " + name);

         return "Hello : " + name;

     }

 }
5、编辑web.xml文件
 <?xml version="1.0" encoding="UTF-8"?>

 <web-app xmlns:xsi="http://www.w3.org/2001/XMLSchema-instance"

     xmlns="http://java.sun.com/xml/ns/javaee"

     xsi:schemaLocation="http://java.sun.com/xml/ns/javaee http://java.sun.com/xml/ns/javaee/web-app_3_0.xsd"

     id="WebApp_ID" version="3.0">

     <display-name>test-webservice-cxf-spring</display-name>

     <!-- 指定Spring Bean的配置文件所在目录。默认配置在WEB-INF目录下 -->

     <context-param>

         <param-name>contextConfigLocation</param-name>

         <param-value>classpath:spring/spring-context.xml</param-value>

     </context-param>

     <!-- Spring配置 -->

     <listener>

         <listener-class>org.springframework.web.context.ContextLoaderListener</listener-class>

     </listener>

     <!--cxfservlet的作用就是解析webservice请求 -->

     <servlet>

         <servlet-name>cxf</servlet-name>

         <servlet-class>org.apache.cxf.transport.servlet.CXFServlet</servlet-class>

         <load-on-startup>1</load-on-startup>

     </servlet>

     <!-- 所有前缀为ws的请求都被解析为webservice请求 -->

     <servlet-mapping>

         <servlet-name>cxf</servlet-name>

         <url-pattern>/ws/*</url-pattern>

     </servlet-mapping>

     <welcome-file-list>

         <welcome-file>index.jsp</welcome-file>

     </welcome-file-list>

 </web-app>
6、在src/main/resources中新建一个文件夹spring,在spring文件夹中新建一个spring-content.xml的配置文件和一个cxf的webservice配置文件(cxf-beans.xml),进行相关配置
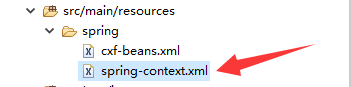
spring-content.xml
 <?xml version="1.0" encoding="UTF-8"?>

 <beans xmlns="http://www.springframework.org/schema/beans"

     xmlns:xsi="http://www.w3.org/2001/XMLSchema-instance" xmlns:mvc="http://www.springframework.org/schema/mvc"

     xmlns:context="http://www.springframework.org/schema/context" xmlns:tx="http://www.springframework.org/schema/tx"

     xmlns:util="http://www.springframework.org/schema/util" xmlns:aop="http://www.springframework.org/schema/aop"

     xsi:schemaLocation="http://www.springframework.org/schema/beans http://www.springframework.org/schema/beans/spring-beans-4.0.xsd

         http://www.springframework.org/schema/mvc http://www.springframework.org/schema/mvc/spring-mvc-4.0.xsd

         http://www.springframework.org/schema/context http://www.springframework.org/schema/context/spring-context-4.0.xsd

         http://www.springframework.org/schema/util http://www.springframework.org/schema/util/spring-util-4.0.xsd

         http://www.springframework.org/schema/tx http://www.springframework.org/schema/tx/spring-tx.xsd

         http://www.springframework.org/schema/aop http://www.springframework.org/schema/aop/spring-aop-4.0.xsd">

     <!-- 注解注册 -->

     <context:annotation-config />

     <context:component-scan base-package="com.test" />

     <!-- 引入cxf的webservice配置文件 -->

     <import resource="classpath:spring/cxf-beans.xml" />

 </beans>
cxf-beans.xml
 <?xml version="1.0" encoding="UTF-8"?>

 <beans xmlns="http://www.springframework.org/schema/beans"

     xmlns:xsi="http://www.w3.org/2001/XMLSchema-instance" xmlns:jaxws="http://cxf.apache.org/jaxws"

     xsi:schemaLocation=" http://www.springframework.org/schema/beans http://www.springframework.org/schema/beans/spring-beans.xsd http://cxf.apache.org/jaxws http://cxf.apache.org/schemas/jaxws.xsd">

     <!-- 引cxf的一些核心配置 -->

     <import resource="classpath:META-INF/cxf/cxf.xml" />

     <import resource="classpath:META-INF/cxf/cxf-servlet.xml" />

     <!-- 定义webservice服务,相当于发布 -->

     <jaxws:server id="HelloWS" address="/helloWS"

         serviceClass="com.test.ws.HelloWS">

         <!--发布服务类 -->

         <jaxws:serviceBean>

             <bean class="com.test.ws.HelloWSImpl"></bean>

         </jaxws:serviceBean>

         <!-- 输入拦截器 -->

         <jaxws:inInterceptors>

              <bean class="org.apache.cxf.interceptor.LoggingInInterceptor"></bean>

          </jaxws:inInterceptors>

          <!-- 输出拦截器 -->

          <jaxws:outInterceptors>

              <bean class="org.apache.cxf.interceptor.LoggingOutInterceptor"></bean>

          </jaxws:outInterceptors>

     </jaxws:server>

 </beans>
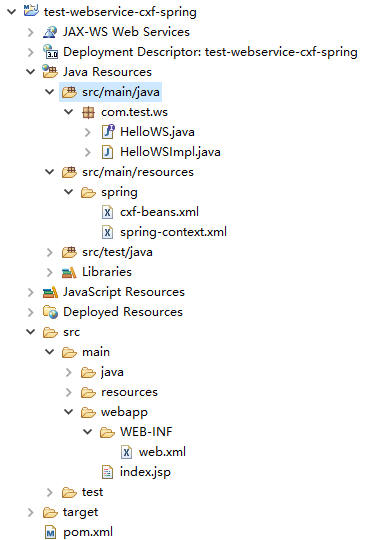
7、搭建完成,如下图
8、发布到tomcat中,并启动tomcat

9、使用浏览器访问获取wsdl文件,或者进行webservice调用都行

【WebService】WebService之CXF和Spring整合(六)的更多相关文章
- CXF、Spring整合的SOAP Web Service服务端
1.建工程,导入CXFjar包 2.服务接口 package com.cxf.soap; import java.util.List; import javax.jws.WebService; @We ...
- CXF和spring整合遇到的问题:No bean named 'cxf' is defined
今天在做ws和spring整合的时候,很不幸的遇到了这个问题,百度了好久,竟然没人遇到这个问题,后来谷歌了一下,都是遇到这个问题的了...在看到一篇文章中提到了cxf.xml,所以我果断的打开这个配置 ...
- webservice的cxf和spring整合发布
1.新建一个web项目 2.导入cxf相应的jar包,并部署到项目中 3.服务接口 package com.xiaostudy; /** * @desc 服务器接口 * @author xiaostu ...
- webservice的cxf和spring整合客户端开发
1.新建一个java项目 2.导入cxf相关的jar包,并部署到项目中 3.用命令生成客户端使用说明文档 wsdl2java -p com.xiaostudy -d . http://127.0.0. ...
- WS之cxf与spring整合1
1.在web.xml中加入CXFServlet: <!-- 下面表示所有来自/cxfservice/*的请求,都交给 CXFServlet来处理 .--> <servlet> ...
- WS之cxf与spring整合2
在action中加入webservice
- CXF 与Spring整合配置
<?xml version="1.0" encoding="UTF-8"?> <web-app xmlns="http://java ...
- 13_CXF和Spring整合发布服务
[服务端] 第一步:建立一个Web项目 第二步:填充CXF jar包 第三步:创建接口及服务类 [工程截图(对比之前的WebService_CXF_Server00)] [applicationCon ...
- Spring整合CXF步骤,Spring实现webService,spring整合WebService
Spring整合CXF步骤 Spring实现webService, spring整合WebService >>>>>>>>>>>> ...
随机推荐
- Python3 reversed 函数
Python3 reversed 函数 Python3 内置函数 描述 reversed 函数返回一个反转的迭代器. 语法 以下是 reversed 的语法: reversed(seq) 参数 se ...
- pandas中series和dataframe之间的区别
series结构有索引,和列名组成,如果没有,那么程序会自动赋名为None series的索引名具有唯一性,索引可以数字和字符,系统会自动将他们转化为一个类型object. dataframe由索引和 ...
- e-olymp Problem8352 Taxi
作为我在这个OJ玩了一下午的终结吧. 水题一道,阅读理解OJ. 传送门:点我 Taxi At the peak hour, three taxi buses drove up at the same ...
- 【模型】Toon Dragon
下载地址:点击下载
- Sigma Function (平方数与平方数*2的约数和是奇数)
Sigma Function https://vjudge.net/contest/288520#problem/D Sigma function is an interesting function ...
- Codeforces Beta Round #67 (Div. 2)
Codeforces Beta Round #67 (Div. 2) http://codeforces.com/contest/75 A #include<bits/stdc++.h> ...
- GridView和DataFormatString 日期格式 精确小数点后位数
如果DataFormatString无效,请添加属性 HtmlEncode = "false" --------------------------------------- Da ...
- ClickHouse高性能数据库
ClickHouse之简单性能测试 前面的文章ClickHouse之初步认识已经简单的介绍了ClickHouse,接下来进行简单的性能测试.测试数据来源于美国民用航班的数据,从1987年到2017 ...
- Android Studio 增加按钮响应事件
在xml文件里增加android:onClick属性 比如: android:onClick=doanything 然后写响应方法 public void doanything(View v) { . ...
- go语言中的方法method
package main; import "fmt" //重新定义一个类型 //为该INT类型扩展方法 type INT int; type A struct { name str ...