Android 中常用的布局
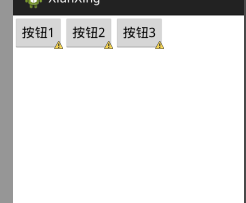
一、线性布局----LinearLayout
horizontal 水平
<?xml version="1.0" encoding="utf-8"?>

<LinearLayout xmlns:android="http://schemas.android.com/apk/res/android"

    android:layout_width="match_parent"

    android:layout_height="match_parent"

    android:orientation="horizontal" >

    <Button

        android:layout_height="wrap_content"

        android:layout_width="wrap_content"

        android:text="按钮1"

        />

    <Button

        android:layout_height="wrap_content"

        android:layout_width="wrap_content"

        android:text="按钮2"

        />

    <Button

        android:layout_height="wrap_content"

        android:layout_width="wrap_content"

        android:text="按钮3"

        />

</LinearLayout>
vertical 垂直

<?xml version="1.0" encoding="utf-8"?>

<LinearLayout xmlns:android="http://schemas.android.com/apk/res/android"

    android:layout_width="match_parent"

    android:layout_height="match_parent"

    android:orientation="vertical" >

    <Button

        android:layout_height="wrap_content"

        android:layout_width="wrap_content"

        android:text="按钮1"

        />

    <Button

        android:layout_height="wrap_content"

        android:layout_width="wrap_content"

        android:text="按钮2"

        />

    <Button

        android:layout_height="wrap_content"

        android:layout_width="wrap_content"

        android:text="按钮3"

        />

</LinearLayout>
如果你可以看懂了,那请做一个来练练手

参考答案:http://www.cnblogs.com/896240130Master/p/6090786.html
二、相当布局----RelativeLayout
RelativeLayout是Android五大布局结构中最灵活的一种布局结构,比较适合一些复杂界面的布局。
按照各子元素之间的位置关系完成布局。在此布局中的子元素里与位置相关的属性将生效。例如android:layout_below, android:layout_above, android:layout_centerVertical等。注意在指定位置关系时,引用的ID必须在引用之前,先被定义,否则将出现异常。
默认左上角。所以使用的时候会重叠

我们可以加上你在哪个布局的下面:下图

android:layout_below="@id/xxxx" //在谁的下面
参考属性:
- android:layout_above 将该控件的底部至于给定ID的控件之上
- android:layout_below 将该控件的顶部至于给定ID的控件之下
- android:layout_toLeftOf 将该控件的右边缘和给定ID的控件的左边缘对齐
- android:layout_toRightOf 将该控件的左边缘和给定ID的控件的右边缘对齐
- android:layout_alignBaseline 该控件的baseline和给定ID的控件的baseline对齐
- android:layout_alignBottom 将该控件的底部边缘与给定ID控件的底部边缘
- android:layout_alignLeft 将该控件的左边缘与给定ID控件的左边缘对齐
- android:layout_alignRight 将该控件的右边缘与给定ID控件的右边缘对齐
- android:layout_alignTop 将给定控件的顶部边缘与给定ID控件的顶部对齐
- android:alignParentBottom 如果该值为true,则将该控件的底部和父控件的底部对齐
- android:layout_alignParentLeft 如果该值为true,则将该控件的左边与父控件的左边对齐
- android:layout_alignParentRight 如果该值为true,则将该控件的右边与父控件的右边对齐
- android:layout_alignParentTop 如果该值为true,则将空间的顶部与父控件的顶部对齐
- android:layout_centerHorizontal 如果值为真,该控件将被至于水平方向的中央
- android:layout_centerInParent 如果值为真,该控件将被至于父控件水平方向和垂直方向的中央
- android:layout_centerVertical 如果值为真,该控件将被至于垂直方向的中央
结果图如下:

三、帧布局------FrameLayout
FrameLayout是五大布局中最简单的一个布局,可以说成是层布局方式。在这个布局中,整个界面被当成一块空白备用区域,所有的子元素都不能被指定放置的位置,它们统统放于这块区域的左上角,并且后面的子元素直接覆盖在前面的子元素之上,将前面的子元素部分和全部遮挡。如下,第一个TextView被第二个TextView完全遮挡,第三个TextView遮挡了第二个TextView的部分位置。
待更新。。。。
四、表格布局----TableLayout
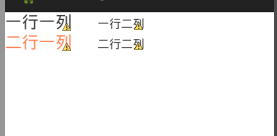
代码如下:
<?xml version="1.0" encoding="utf-8"?>

<TableLayout xmlns:android="http://schemas.android.com/apk/res/android"

    android:layout_width="match_parent"

    android:layout_height="match_parent" >

    <!-- tablerow 代表一行 -->

        <TableRow

             android:layout_width="match_parent"

             android:layout_height="match_parent">

            <TextView

                android:layout_width="match_parent"

                android:layout_height="wrap_content"

                android:text="一行一列"

                android:textSize="20sp"

                />

             <TextView

                android:layout_width="match_parent"

                android:layout_height="wrap_content"

                android:text="一行二列"

                android:layout_marginLeft="30dp"

                />

        </TableRow>

        <!-- tablerow 代表一行 -->

        <TableRow

             android:layout_width="match_parent"

             android:layout_height="match_parent">

            <TextView

                android:layout_width="match_parent"

                android:layout_height="wrap_content"

                android:textColor="#FF7F50"

                android:text="二行一列"

                android:textSize="20sp"

                />

             <TextView

                android:layout_width="match_parent"

                android:layout_height="wrap_content"

                android:text="二行二列"

                android:layout_marginLeft="30dp"

                />

        </TableRow>

</TableLayout>
五、绝对布局---谷歌工程师已经废弃掉了。这里就不多加了解
Android 中常用的布局的更多相关文章
- android中常用的布局管理器
Android中的几种常用的布局,主要介绍内容有: View视图 RelativeLayout 相对布局管理器 LinearLayout 线性布局管理器 FrameLayout ...
- Android中常用的布局
一般分为5大类. Android中所有的空间第一字母都是大写 1.线性布局 LinearLayout 2.相对布局 RelativeLayout 3.帧布局--分层显示 FrameLayout 4. ...
- android中常用的布局管理器(二)
接上篇博客 (3)LinearLayout 线性布局管理器 线性布局管理器是将放入其中的组件按照垂直或水平方向来布局,每一行或每一列只能放一个组件,并且不会换行,当组件排列到窗体的边缘后,后面 ...
- 四种方式写按钮点击事件和Android 中常用的布局
1.匿名内部类的方式 2.创建一个类实现onClickListener,实现onClick方法,设置控件点击时传一个类的对象 3.让当前类实现onClickListener,设置控件点击事件时传递一个 ...
- Android中的五大布局
Android中的五大布局 1.了解布局 一个丰富的界面总是要由很多个控件组成的,那我们如何才能让各个控件都有条不紊地 摆放在界面上,而不是乱糟糟的呢?这就需要借助布局来实现了.布局是一种可用于放置很 ...
- Android中的LinearLayout布局
LinearLayout : 线性布局 在一般情况下,当有很多控件需要在一个界面列出来时,我们就可以使用线性布局(LinearLayout)了, 线性布局是按照垂直方向(vertical)或水平方向 ...
- Android中常用的5大布局详述
Android的界面是有布局和组件协同完成的,布局好比是建筑里的框架,而组件则相当于建筑里的砖瓦.组件按照布局的要求依次排列,就组成了用户所看见的界面. 所有的布局方式都可以归类为ViewGroup的 ...
- Android中常用布局单位
Android在UI布局时经常用到一些单位,对单位混用直接会影响UI的显示,要想正确的在布局中使用每种单位就必须先真正的熟悉它. UI显示效果的影响因素:屏幕尺寸.屏幕密度.分辨率:而android手 ...
- Android中常用控件及属性
在之前的博客为大家带来了很多关于Android和jsp的介绍,本篇将为大家带来,关于Andriod中常用控件及属性的使用方法,目的方便大家遗忘时,及时复习参考.好了废话不多讲,现在开始我们本篇内容的介 ...
随机推荐
- codeforces 495C. Treasure 解题报告
题目链接:http://codeforces.com/problemset/problem/495/C 题目意思:给出一串只有三种字符( ')','(' 和 '#')组成的字符串,每个位置的这个字符 ...
- 【leetcode】Convert Sorted List to Binary Search Tree (middle)
Given a singly linked list where elements are sorted in ascending order, convert it to a height bala ...
- 【python】多进程学习
来源:廖雪峰 讲解看来源吧 把例子记一下 1.用fork创建进程 import os print "Process (%s) start..." % os.getpid() pid ...
- pycharm远程上传文件到Linux
配置远程SFTP 1. 在PyCharm中打开SFTP配置面板,路径为Tools => Deployment => Configuration: 2. 配置Connection参数设置,填 ...
- 从键盘输入成绩,找出最高分,并输出学生成绩等级。成绩>=最高分-10,为A,成绩>=最高分-20,为B,成绩>=最高分-30,为C,其余等级为D
import java.util.Scanner;public class TestStudent { public static void main(String[] args) { //从键盘获得 ...
- zmq-ios framwork
1.附件见zeromq-ios.framework百度网盘/iOS/zmq 2.zeromq-ios.framework解压拖进工程文件 3.objc-zmq见百度网盘/iOS/zmq 4.objc- ...
- MVC – 4.mvc初体验(1)
1.MVC请求模式 2.MVC简单请求流程图 展开 折叠 3.返回string的mvc方法 展开 折叠 4.加载视图的方法
- 20.策略者模式(Stragety Pattern)
using System; using System.Collections.Generic; using System.Linq; using System.Text; using System.T ...
- Delphi线程的终止
当线程对象的Execute()执行完毕,我们就认为此线程终止了.这时候,它会调用Delphi的一个标准例程EndThread(),这个例程再调用API函数ExitThread().由ExitThrea ...
- poj 3278:Catch That Cow(简单一维广搜)
Catch That Cow Time Limit: 2000MS Memory Limit: 65536K Total Submissions: 45648 Accepted: 14310 ...