
Android中的五大布局
Android中的五大布局
1.了解布局
一个丰富的界面总是要由很多个控件组成的,那我们如何才能让各个控件都有条不紊地 摆放在界面上,而不是乱糟糟的呢?这就需要借助布局来实现了。布局是一种可用于放置很 多控件的容器,它可以按照一定的规律调整内部控件的位置,从而编写出精美的界面。当然, 布局的内部除了放置控件外,也可以放置布局,通过多层布局的嵌套,我们就能够完成一些 比较复杂的界面实现.
2.布局的分类
线性布局(LinearLayout)
相对布局(RelativeLayout)
表格布局(TableLayout)
帧布局(FrameLayout)
绝对布局(了解)
下面我们来看一下线性布局
创建线性布局步骤:
首先我们找到Android项目res/layout
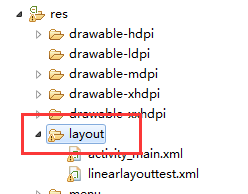
然后右键,弹出下面操作
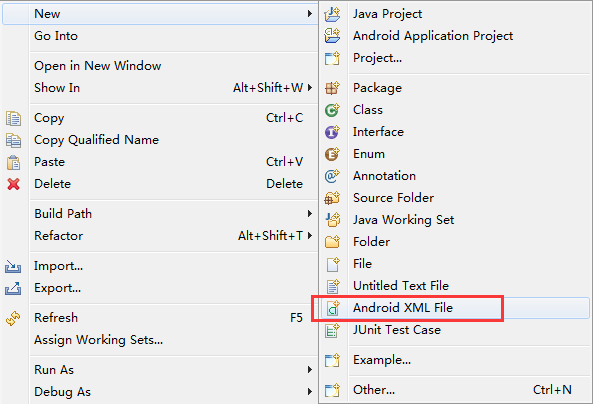
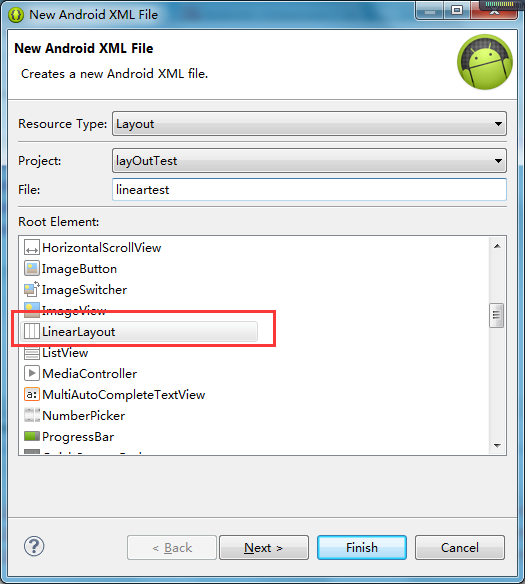
当创建布局文件后,我们来浏览一下该文件的内容
 <?xml version="1.0" encoding="utf-8"?>

 <LinearLayout xmlns:android="http://schemas.android.com/apk/res/android"

     android:layout_width="match_parent"

     android:layout_height="match_parent"

     android:orientation="vertical" >

 9 </LinearLayout>
然后我们修改一下文件中的内容
 <?xml version="1.0" encoding="utf-8"?>

 <LinearLayout xmlns:android="http://schemas.android.com/apk/res/android"

     android:layout_width="match_parent"

     android:layout_height="match_parent"

     android:orientation="vertical" >

      <TextView

         android:layout_width="wrap_content"

         android:layout_height="wrap_content"

         android:background="#ffff00"

         android:text="AAA"

         android:textSize="25sp" />

          <TextView

         android:layout_width="wrap_content"

         android:layout_height="wrap_content"

         android:background="#eee"

         android:text="BBB"

         android:textSize="25sp" />

          <TextView

         android:layout_width="wrap_content"

         android:layout_height="wrap_content"

         android:background="#ccc"

         android:text="CCC"

         android:textSize="25sp"/>

 </LinearLayout>
下面我们部署一下Android项目,看看运行的结果是如何的
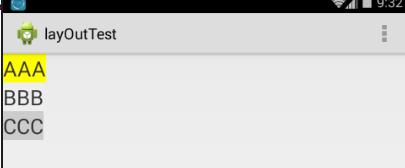
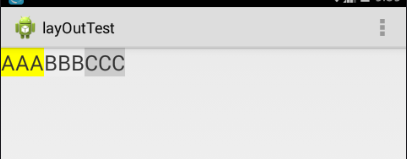
图1 图2
运行可以看到控件是垂直放置的,那么有垂直就有水平放置的,其实是垂直还是水平的根LinearLayout中的android:orientation有关,该属性有两个值,一个vertical(垂直的),另一个是horizontal(水平的),如果android:orientation属性设置为vertical那么效果图就是图1,如果android:orientation属性设置为horizontal,那么效果图就是图2
了解 LinearLayout 的排列规律后,我们再来学习一下它的几个关键属性的用法吧。
android:layout_gravity 属性
android:layout_gravity 是用于指定控件在布局中的对齐 方 式 。 android:layout_gravity 的 可 选 值 和 android:gravity 差 不 多 , 但 是 需 要 注 意 , 当 LinearLayout 的排列方向是 horizontal 时,只有垂直方向上的对齐方式才会生效,因为此时水 平方向上的长度是不固定的,每添加一个控件,水平方向上的长度都会改变,因而无法指定 该方向上的对齐方式。同样的道理,当 LinearLayout 的排列方向是 vertical 时,只有水平方 向上的对齐方式才会生效
 <LinearLayout xmlns:android="http://schemas.android.com/apk/res/android"

   android:layout_width="match_parent"

   android:layout_height="match_parent"

 4   android:orientation="horizontal" >

   <Button

     android:id="@+id/button1"

     android:layout_width="wrap_content"

     android:layout_height="wrap_content"

     android:layout_gravity="top"

     android:text="Button 1" />

   <Button

     android:id="@+id/button2"

13     android:layout_width="wrap_content"

14     android:layout_height="wrap_content"

     android:layout_gravity="center_vertical"

     android:text="Button 2" />

   <Button

     android:id="@+id/button3"

19     android:layout_width="wrap_content"

20     android:layout_height="wrap_content"

21     android:layout_gravity="bottom"

     android:text="Button 3" />

 </LinearLayout>
我们一起来看看运行结果吧
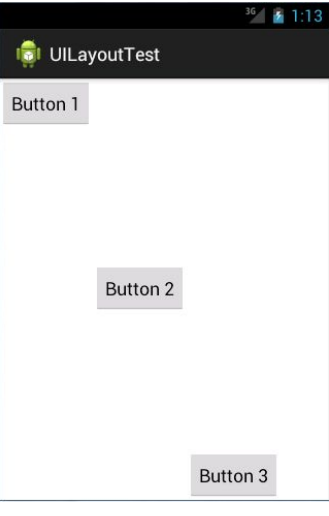
android:layout_weight属性
layout_weight解析1
这个属性 允许我们使用比例的方式来指定控件的大小,它在手机屏幕的适配性方面可以起到非常重要的作用
 <?xml version="1.0" encoding="utf-8"?>

 <LinearLayout xmlns:android="http://schemas.android.com/apk/res/android"

     android:layout_width="match_parent"

     android:layout_height="match_parent"

     android:baselineAligned="false"

     android:orientation="horizontal" >

     <TextView

         android:layout_width="0dp"

         android:layout_height="48dp"

         android:layout_weight="1"

         android:background="#ffff00"

         android:gravity="center"

         android:text="1"

         android:textSize="25sp" />

     <TextView

         android:layout_width="0dp"

         android:layout_height="48dp"

         android:layout_weight="2"

         android:background="#ccc"

         android:gravity="center"

         android:text="2"

         android:textSize="25sp" />

   <TextView

         android:layout_width="0dp"

         android:layout_height="48dp"

         android:layout_weight="3"

         android:background="#ff0000"

         android:gravity="center"

         android:text="3"

         android:textSize="25sp" />

 </LinearLayout>

  运行结果:
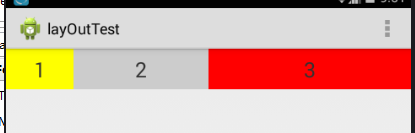
结果为什么是这样的呢?其实系统会先把 LinearLayout 下所有控件指定的 layout_weight 值相加,得到一个总值,然后每个控件所占大小的比例就是用该控件的 layout_weight 值除以刚才算出的总值
layout_weight解析2
 <?xml version="1.0" encoding="utf-8"?>

 <LinearLayout xmlns:android="http://schemas.android.com/apk/res/android"

     android:layout_width="match_parent"

     android:layout_height="match_parent"

     android:orientation="horizontal" >

     <TextView

         android:layout_width="0dp"

         android:layout_height="48dp"

         android:layout_weight="1"

         android:background="#ffff00"

         android:gravity="center"

         android:text="1111111111"

         android:textSize="25sp" />

     <TextView

         android:layout_width="0dp"

         android:layout_height="48dp"

         android:layout_weight="2"

         android:background="#ccc"

         android:gravity="center"

         android:text="2"

         android:textSize="25sp" />

   <TextView

         android:layout_width="0dp"

         android:layout_height="48dp"

         android:layout_weight="3"

         android:background="#ff0000"

         android:gravity="center"

         android:text="3"

         android:textSize="25sp" />

 </LinearLayout>
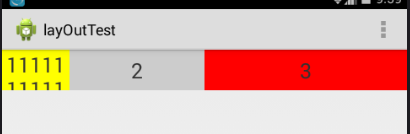
运行结果

由于TextView会参考父元素LinearLayout的android:baselineAligned的基线,解决办法把baselineAligned设置为false,如:android:baselineAligned="false",运行结果如下:
layout_weight解析3
 <?xml version="1.0" encoding="utf-8"?>

 <LinearLayout xmlns:android="http://schemas.android.com/apk/res/android"

     android:layout_width="match_parent"

     android:layout_height="match_parent"

     android:baselineAligned="false"

     android:orientation="horizontal" >

     <TextView

         android:layout_width="wrap_content"

         android:layout_height="48dp"

         android:layout_weight="1"

         android:background="#ffff00"

         android:gravity="center"

         android:text="1111111111"

         android:textSize="25sp" />

     <TextView

         android:layout_width="0dp"

         android:layout_height="48dp"

         android:layout_weight="2"

         android:background="#ccc"

         android:gravity="center"

         android:text="2"

         android:textSize="25sp" />

   <TextView

         android:layout_width="0dp"

         android:layout_height="48dp"

         android:layout_weight="3"

         android:background="#ff0000"

         android:gravity="center"

         android:text="3"

         android:textSize="25sp" />

 </LinearLayout>
运行结果:
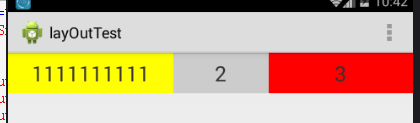
结果明显不是我们预期想的那样,不再是按1:2:3的比例显示结果,其实原因是这样的,第一个TextView设置了android:layout_width="wrap_content",首先它会用屏幕的总宽度减去控件所占的宽度,然后再把剩下的屏幕宽度按比例分配给控件
layout_weight解析4
 <?xml version="1.0" encoding="utf-8"?>

 <LinearLayout xmlns:android="http://schemas.android.com/apk/res/android"

     android:layout_width="match_parent"

     android:layout_height="match_parent"

     android:baselineAligned="false"

     android:orientation="horizontal" >

     <TextView

         android:layout_width="match_parent"

         android:layout_height="48dp"

         android:layout_weight="1"

         android:background="#ffff00"

         android:gravity="center"

         android:text="1111111111"

         android:textSize="25sp" />

     <TextView

         android:layout_width="match_parent"

         android:layout_height="48dp"

         android:layout_weight="2"

         android:background="#ccc"

         android:gravity="center"

         android:text="2"

         android:textSize="25sp" />

     <TextView

         android:layout_width="match_parent"

         android:layout_height="48dp"

         android:layout_weight="2"

         android:background="#ff0000"

         android:gravity="center"

         android:text="3"

         android:textSize="25sp" />

 </LinearLayout>
运行结果
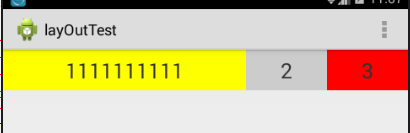
结果为什么不是按1:2:2显示呢?而且权重为1占的宽度比较大呢?其实当控件的属性设置为android:layout_width="match_parent"时,表示控件的宽度与屏幕的宽度一样宽,如果要计算出控件占屏幕的多少宽度,可以通过这个公式计算 : 控件的宽度+父控件剩余宽度*比例 ,假如整个屏幕宽度是480,而且每个控件的属性设置成了android:layout_width="match_parent" ,那么说明每一个控件也是480, 父控件剩余宽度=总屏幕宽度 - 每一个控件相加后的和 ,这里的是 480 - 3*480 = -2*480 ,根据控件的宽度+父控件剩余宽度*比例,可以算出第一个控件所占屏幕的宽度 : 480 + (-2*480)/5 ,第二,三个控件 480 + (-2*480)*2/5
相对布局(RelativeLayout)
RelativeLayout 又称作相对布局,也是一种非常常用的布局。和 LinearLayout 的排列规 则不同,RelativeLayout 显得更加随意一些,它可以通过相对定位的方式让控件出现在布局 的任何位置
创建相对布局步骤

创建完相对布局文件后,我们来看看内容
 <?xml version="1.0" encoding="utf-8"?>

 <RelativeLayout xmlns:android="http://schemas.android.com/apk/res/android"

     android:layout_width="match_parent"

     android:layout_height="match_parent" >

 </RelativeLayout>
下面我们添加控件到相对布局文件中
 <?xml version="1.0" encoding="utf-8"?>

 <RelativeLayout xmlns:android="http://schemas.android.com/apk/res/android"

     android:layout_width="match_parent"

     android:layout_height="match_parent" >

     <Button

         android:id="@+id/btn1"

         android:layout_width="wrap_content"

         android:layout_height="wrap_content"

         android:layout_alignParentLeft="true"

         android:layout_alignParentTop="true"

         android:text="Button 1" />

     <Button

         android:id="@+id/btn2"

         android:layout_width="wrap_content"

         android:layout_height="wrap_content"

         android:layout_alignParentRight="true"

         android:layout_alignParentTop="true"

         android:text="Button 2" />

     <Button

         android:id="@+id/btn3"

         android:layout_width="wrap_content"

         android:layout_height="wrap_content"

         android:layout_centerInParent="true"

         android:text="Button 3" />

     <Button

         android:id="@+id/btn4"

         android:layout_width="wrap_content"

         android:layout_height="wrap_content"

         android:layout_alignParentBottom="true"

         android:layout_alignParentLeft="true"

         android:text="Button 4" />

     <Button

         android:id="@+id/btn5"

         android:layout_width="wrap_content"

         android:layout_height="wrap_content"

         android:layout_alignParentBottom="true"

         android:layout_alignParentRight="true"

         android:text="Button 5" />

 </RelativeLayout>
运行结果
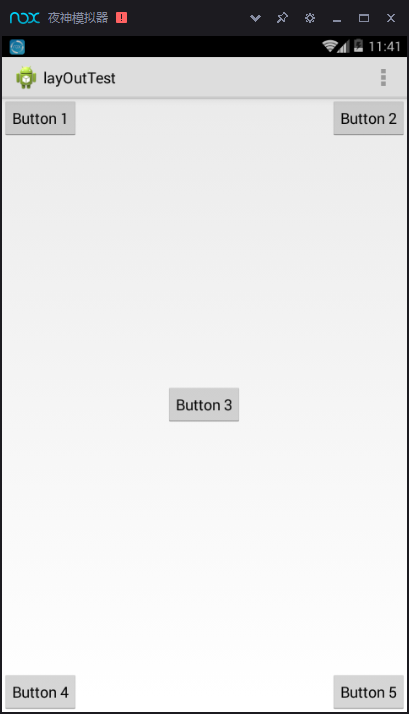
上面例子中的每个控件都是相对于父布局进行定位的,那控件可不可以相对于控件进行 定位呢?
 <?xml version="1.0" encoding="utf-8"?>

 <RelativeLayout xmlns:android="http://schemas.android.com/apk/res/android"

     android:layout_width="match_parent"

     android:layout_height="match_parent" >

       <Button

         android:id="@+id/btn1"

         android:layout_width="wrap_content"

         android:layout_height="wrap_content"

         android:layout_above="@+id/btn3"

         android:layout_toLeftOf="@+id/btn3"

         android:text="Button 1" />

     <Button

         android:id="@+id/btn2"

         android:layout_width="wrap_content"

         android:layout_height="wrap_content"

          android:layout_above="@+id/btn3"

         android:layout_toRightOf="@+id/btn3"

         android:text="Button 2" />

     <Button

         android:id="@+id/btn3"

         android:layout_width="wrap_content"

         android:layout_height="wrap_content"

         android:layout_centerInParent="true"

         android:text="Button 3" />

     <Button

         android:id="@+id/btn4"

         android:layout_width="wrap_content"

         android:layout_height="wrap_content"

         android:layout_below="@+id/btn3"

         android:layout_toLeftOf="@+id/btn3"

         android:text="Button 4" />

     <Button

         android:id="@+id/btn5"

         android:layout_width="wrap_content"

         android:layout_height="wrap_content"

         android:layout_below="@+id/btn3"

         android:layout_toRightOf="@+id/btn3"

         android:text="Button 5" />

 </RelativeLayout>

  运行结果

android:layout_above 属性可以让 一个控件位于另一个控件的上方,需要为这个属性指定相对控件 id 的引用,android:layout_below 表示让一个控件位于另一个控件的下方,android:layout_toLeftOf 表示让 一个控件位于另一个控件的左侧,android:layout_toRightOf 表示让一个控件位于另一个控件 的右侧。RelativeLayout 中还有另外一组相对于控件进行定位的属性,android:layout_alignLeft 表 示让一个控件的左边缘和另一个控件的左边缘对齐,android:layout_alignRight 表示让一个控件的右边缘和另一个控件的右边缘对齐,还有 android:layout_alignTop 和 android:layout_ alignBottom
帧布局(FrameLayout)
创建帧布局

 <?xml version="1.0" encoding="utf-8"?>

 <FrameLayout xmlns:android="http://schemas.android.com/apk/res/android"

     android:layout_width="match_parent"

     android:layout_height="match_parent" >

     <Button

         android:id="@+id/btn1"

         android:layout_width="wrap_content"

         android:layout_height="wrap_content"

         android:text="Button 1" />

     <ImageView

         android:id="@+id/image_view"

         android:layout_width="wrap_content"

         android:layout_height="wrap_content"

         android:src="@drawable/ic_launcher" />

 </FrameLayout>
运行结果:
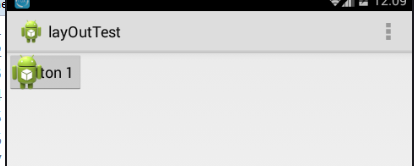
可以看到,按钮和图片都是位于布局的左上角。由于图片是在按钮之后添加的,因此图 片压在了按钮的上面
Android中的五大布局的更多相关文章
- Android中的五大布局和logcat打印日志
在android中的布局有五大类,有的时候你可能用到一种,但有的时候你也可能需要两种或者三种布局同时一起使用.这五种布局为别为:LinearLayout(线性布局),FrameLayout(框架布局) ...
- android中的五大布局(控件的容器,可以放button等控件)
一.android中五大布局相当于是容器,这些容器里可以放控件也可以放另一个容器,子控件和布局都需要制定属性. 1.相对布局:RelativeLayout @1控件默认堆叠排列,需要制定控件的相对位置 ...
- 兔子--Android中的五大布局
LinearLayout:被称为线性布局,分为水平和垂直,设置的垂直或水平的属性值,来排列全部的子元素.全部的子元素都被堆放在其他元素之后,因此一个垂直列表的每一行仅仅会有一个元素,而无论他们有多宽, ...
- Android学习笔记(第二篇)View中的五大布局
PS:人不要低估自己的实力,但是也不能高估自己的能力.凡事谦为本... 学习内容: 1.用户界面View中的五大布局... i.首先介绍一下view的概念 view是什么呢?我们已经知道一个Act ...
- Android开发-之五大布局
在html中大家都知道布局是什么意思了,简单来说就是将页面划分模块,比如html中的div.table等.那么Android中也是这样的.Android五大布局让界面更加美化,开发起来也更加方便.当然 ...
- Android中的LinearLayout布局
LinearLayout : 线性布局 在一般情况下,当有很多控件需要在一个界面列出来时,我们就可以使用线性布局(LinearLayout)了, 线性布局是按照垂直方向(vertical)或水平方向 ...
- android中的常用布局管理器(三)
接上篇博客 (5)TableLayout 表格布局管理器 在android中,线性布局和表格布局用的是最多的. 在很多的输出操作中,往往会使用表格的形式对显示的数据进行排版,tablelayo ...
- Android 中常用的布局
一.线性布局----LinearLayout horizontal 水平 <?xml version="1.0" encoding="utf-8"?& ...
- Android中常用的布局
一般分为5大类. Android中所有的空间第一字母都是大写 1.线性布局 LinearLayout 2.相对布局 RelativeLayout 3.帧布局--分层显示 FrameLayout 4. ...
随机推荐
- mysql查看存储过程
查询数据库中的存储过程 方法一: select `name` from mysql.proc where db = 'your_db_name' and `type` = 'PROCEDURE' 方法 ...
- LeetCode----202. Happy Number(Java)
package isHappy202; /* * Write an algorithm to determine if a number is "happy". A happy n ...
- YTU 3023: 树的遍历
原文链接:https://www.dreamwings.cn/ytu3023/2617.html 3023: 树的遍历 时间限制: 1 Sec 内存限制: 128 MB 提交: 3 解决: 2 题 ...
- Linux常用命令(四)
1.xargs 作用是将参数列表转换成小块分段传递给其他命令,以避免参数列表过长的问题 语法格式: # xargs [-ni] 常用参数: 参数 参数说明 -n 分组输出,n个分为一组 -i 与大括号 ...
- mysql 插入中文报错: com.mysql.jdbc.MysqlDataTruncation: Data truncation: Incorrect datetime value...
总结写在前面, 总结: 当Java通过jdbc链接mysql插入中文时,要保证程序可以正常执行,而且插入的中文不会乱码, mysql服务器端,对数据表(不是数据库)的编码设置,要保证是支持中文的,例如 ...
- linux 循环处理文件夹下所有文件脚本
#!/bin/bashfunction ergodic(){ for file in ` ls $1 ` do if [ -d $1"/"$file ] then ergodic ...
- Cmap的使用
1.定义 template <class KEY,class ARG_KEY,class VALUE, class ARG_VALUE> class CMap:public CObject ...
- 开发板上使用core文件调试
转载:http://www.nginx.cn/1521.html 如果开发板的操作系统也是linux,core调试方法依然适用.如果开发板上不支持gdb,可将开发板的环境(依赖库).可执行文件和cor ...
- C++中虚析构函数的作用
我们知道,用C++开发的时候,用来做基类的类的析构函数一般都是虚函数.可是,为什么要这样做呢?下面用一个小例子来说明: 有下面的两个类: class ClxBase { public: ...
- js函数式编程
最近在看朴灵的<深入浅出nodejs>其中讲到函数式编程.理解记录下 高阶函数 比较常见,即将函数作为参数,或是将函数作为返回值得函数. 如ECMAScript5中提供的一些数组方法 fo ...