
springMVC4 注解配置实例
结构:
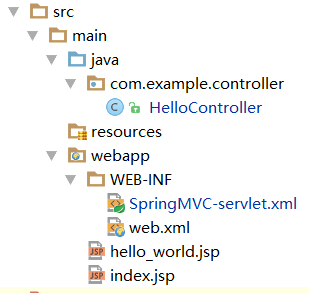
maven配置:
<project xmlns="http://maven.apache.org/POM/4.0.0" xmlns:xsi="http://www.w3.org/2001/XMLSchema-instance"

  xsi:schemaLocation="http://maven.apache.org/POM/4.0.0 http://maven.apache.org/maven-v4_0_0.xsd">

  <modelVersion>4.0.0</modelVersion>

  <groupId>java-springmvc-demo6</groupId>

  <artifactId>java-springmvc-demo6</artifactId>

  <packaging>war</packaging>

  <version>1.0-SNAPSHOT</version>

  <name>java-springmvc-demo6 Maven Webapp</name>

  <url>http://maven.apache.org</url>

  <!--项目依赖 -->

  <dependencies>

    <!--日志包-->

    <dependency>

      <groupId>junit</groupId>

      <artifactId>junit</artifactId>

      <version>3.8.1</version>

      <scope>test</scope>

    </dependency>

    <dependency>

      <groupId>org.slf4j</groupId>

      <artifactId>slf4j-log4j12</artifactId>

      <version>1.7.21</version>

    </dependency>

    <!--j2ee相关包 servlet、jsp、jstl-->

    <dependency>

      <groupId>javax.servlet</groupId>

      <artifactId>javax.servlet-api</artifactId>

      <version>3.1.0</version>

    </dependency>

    <dependency>

      <groupId>javax.servlet.jsp</groupId>

      <artifactId>jsp-api</artifactId>

      <version>2.2</version>

    </dependency>

    <dependency>

      <groupId>javax.servlet</groupId>

      <artifactId>jstl</artifactId>

      <version>1.2</version>

    </dependency>

    <!--spring相关包-->

    <dependency>

      <groupId>org.springframework</groupId>

      <artifactId>spring-web</artifactId>

      <version>4.3.1.RELEASE</version>

    </dependency>

    <dependency>

      <groupId>org.springframework</groupId>

      <artifactId>spring-webmvc</artifactId>

      <version>4.3.1.RELEASE</version>

    </dependency>

    <!--其他需要的包-->

    <dependency>

      <groupId>org.apache.commons</groupId>

      <artifactId>commons-lang3</artifactId>

      <version>3.4</version>

    </dependency>

    <dependency>

      <groupId>commons-fileupload</groupId>

      <artifactId>commons-fileupload</artifactId>

      <version>1.3.1</version>

    </dependency>

  </dependencies>

  <build>

    <finalName>maven-springmvc</finalName>

    <resources>

      <!--表示把java目录下的有关xml文件,properties文件编译/打包的时候放在resource目录下-->

      <resource>

        <directory>${basedir}/src/main/java</directory>

        <includes>

          <include>**/*.properties</include>

          <include>**/*.xml</include>

        </includes>

      </resource>

      <resource>

        <directory>${basedir}/src/main/resources</directory>

      </resource>

    </resources>

    <plugins>

      <!--servlet容器 jetty插件-->

      <plugin>

        <groupId>org.eclipse.jetty</groupId>

        <artifactId>jetty-maven-plugin</artifactId>

        <version>9.3.10.v20160621</version>

      </plugin>

      <plugin>

        <groupId>org.apache.maven.plugins</groupId>

        <artifactId>maven-compiler-plugin</artifactId>

        <configuration>

          <source>1.6</source>

          <target>1.6</target>

        </configuration>

      </plugin>

    </plugins>

  </build>

</project>
web.xml:
<?xml version="1.0" encoding="UTF-8"?>

<web-app id="WebApp_ID" version="2.5"

    xmlns:xsi="http://www.w3.org/2001/XMLSchema-instance"

    xmlns="http://java.sun.com/xml/ns/javaee"

    xsi:schemaLocation="http://java.sun.com/xml/ns/javaee

                        http://java.sun.com/xml/ns/javaee/web-app_2_5.xsd">

  <display-name>java-springmvc-demo5</display-name>

  <servlet>

      <servlet-name>SpringMVC</servlet-name>

      <servlet-class>org.springframework.web.servlet.DispatcherServlet</servlet-class>

    <!-- 默认的servlet.xml文件是放在WEB-INF目录下,名称与<servlet-name>的名字要相关。但可以通过以下设置重新自定义servlet.xml配置文件的位置和名称。-->

      <!--<init-param>-->

       <!--<param-name>contextConfigLocation</param-name>-->

       <!--<param-value>/WEB-INF/SpringMVC-servlet.xml</param-value>-->

      <!--</init-param>-->

    <load-on-startup>1</load-on-startup>

  </servlet>

  <servlet-mapping>

      <servlet-name>SpringMVC</servlet-name>

      <url-pattern>/</url-pattern>

  </servlet-mapping>

    <!--欢迎页面-->

  <welcome-file-list>

    <welcome-file>index.jsp</welcome-file>

  </welcome-file-list>

</web-app>
SpringMVC-servlet.xml:
<?xml version="1.0" encoding="UTF-8"?>

<beans xmlns="http://www.springframework.org/schema/beans"

       xmlns:xsi="http://www.w3.org/2001/XMLSchema-instance" xmlns:p="http://www.springframework.org/schema/p"

       xmlns:context="http://www.springframework.org/schema/context"

       xmlns:mvc="http://www.springframework.org/schema/mvc"

       xsi:schemaLocation="

        http://www.springframework.org/schema/beans

        http://www.springframework.org/schema/beans/spring-beans-3.0.xsd

        http://www.springframework.org/schema/context

        http://www.springframework.org/schema/context/spring-context.xsd

        http://www.springframework.org/schema/mvc

        http://www.springframework.org/schema/mvc/spring-mvc-3.0.xsd">

    <!-- 默认扫描的包路径 -->

    <context:component-scan base-package="com.example.controller" />

    <!-- 添加注解驱动 -->

    <mvc:annotation-driven />

    <!--所有的访问都统一先由InternalResourceViewResolver类处理-->

    <bean id="viewResolver" class="org.springframework.web.servlet.view.InternalResourceViewResolver">

        <!--定义跳转的文件的前缀(jsp文件所在目录)-->

        <property name="prefix" value="/" />

        <!-- 定义跳转的文件的后缀 -->

        <property name="suffix" value=".jsp" />

    </bean>

</beans>
HelloController.java:
import org.springframework.stereotype.Controller;

import org.springframework.web.bind.annotation.RequestMapping;

@Controller//该注解用来识别控制器

@RequestMapping("hello")//该注解用来控制url书写时,控制器的选择

public class HelloController{

    @RequestMapping("helloworld")//该注解用来控制url书写时,具体方法的选择(还可以绑定参数等)

    public String helloworld() {

        return "hello_world";//跳转到jsp页面

    }

}
之后通过“http://localhost:8080/hello/helloworld”可访问到hello_world.jsp页面
springMVC4 注解配置实例的更多相关文章
- spring注解配置实例
在spring中使用注解配置前需要先在配置文件指定需要扫描的包. 通过注解的方式依赖注入,可以不用创建set方法,也不用在xml文件中申明注入关系. 实例结构如下: 整个流程是: 先创建好数据库的表对 ...
- JPA多对多@manytomany注解配置实例
维护端注解 @ManyToMany (cascade = CascadeType.REFRESH) @JoinTable (//关联表 name = "student_teacher&quo ...
- springMVC注解方式+easyUI+MYSQL配置实例
刚接触springMVC,使用的注解方式,也在学习阶段,所以把自己学习到的记下来.本文利用springMVC从数据库读取用户信息为例,分享一下. 1.准备相关架包及资源.因为使用springMVC+e ...
- mybatis学习一:基于xml与注解配置入门实例与问题
注:本case参考自:http://www.cnblogs.com/ysocean/p/7277545.html 一:Mybatis的介绍: MyBatis 本是apache的一个开源项目iBatis ...
- SpringMVC4零配置--web.xml
servlet3.0+规范后,允许servlet,filter,listener不必声明在web.xml中,而是以硬编码的方式存在,实现容器的零配置. ServletContainerInitiali ...
- [原创]java WEB学习笔记103:Spring学习---Spring Bean配置:基于注解的方式(基于注解配置bean,基于注解来装配bean的属性)
本博客的目的:①总结自己的学习过程,相当于学习笔记 ②将自己的经验分享给大家,相互学习,互相交流,不可商用 内容难免出现问题,欢迎指正,交流,探讨,可以留言,也可以通过以下方式联系. 本人互联网技术爱 ...
- SpringMVC4零配置--Web上下文配置【MvcConfig】
与SpringSecurity的配置类似,spring同样为我们提供了一个实现类WebMvcConfigurationSupport和一个注解@EnableWebMvc以帮助我们减少bean的声明. ...
- 权限控制框架Shiro简单介绍及配置实例
Shiro是什么 http://shiro.apache.org/ Apache Shiro是一个非常易用的Java安全框架,它能提供验证.授权.加密和Session控制.Shiro非常轻量级,而且A ...
- 【Spring五】AOP之使用注解配置
AOP使用注解配置流程: 1.当spring容器启动时候. < context:component- scan base-package= "cn.itheima03.sprin ...
随机推荐
- C语言 指针小结
指针 -->指针变量 类型名 *变量名 int *point1; char *point2; 注意:*p可以直接使用,它代表指针p指向的变量,*p可以当做被指向的变量使用!~~~~ 一个变量的地 ...
- sqlserver 中数据导入到mysql中的方法以及注意事项
数据导入从sql server 到mysql (将数据以文本格式从sqlserver中导出,注意编码格式,再将文本文件导入mysql中): 1.若从slqserver中导出的表中不包含中文采用: bc ...
- C#中的扩展方法
扩展方法使你能够向现有类型“添加”方法,而无需创建新的派生类型.重新编译或以其他方式修改原始类型. 扩展方法是一种特殊的静态方法,但可以像扩展类型上的实例方法一样进行调用. 以上是msdn官网对扩展方 ...
- linux 如何查找io的进程
[root@NB ok]# echo chenlin|base64;echo Y2hlbmxpbgo= [root@NB ok]# yum search iotop Loaded plugins: f ...
- 蓝牙协议分析(7)_BLE连接有关的技术分析
转自:http://www.wowotech.net/bluetooth/ble_connection.html#comments 1. 前言 了解蓝牙的人都知道,在经典蓝牙中,保持连接(Connec ...
- Python学习笔记(3)
1.元组 元组的定义符号是() ,元素定义与列表完全一致.不同的是元组的内容是不可变的. 2.字典 字典里面的内容是无序的. 字典的元素组成形式是 key:value key的定义规则:key是不 ...
- linux下libuv库安装教程
下载并编译libuv libuv需要自己手动下载源码,并手动编译. 当前目录为:/home/xlz/test/github,在后面,会用$PATH来代替,我的系统的Debian8,64bit. $gi ...
- Oracle 11g RAC 环境打PSU补丁的详细步骤
首先重要的事情说三遍:操作之前还是自己先看文档!操作之前还是自己先看文档!!操作之前还是自己先看文档!!! 把11.2.0.4 RAC 环境打PSU补丁的步骤详细记录一下,方便参考. 环境:11.2. ...
- Memo
1.Webpack: node_modules/css/index.js didn't return a function npm install css-loader style-loader ...
- find命令与cat命令区别
在当前目录下查找 MEMBERINTERFACE 这个字符串的文件find . -name '*'|xargs grep "MEMBERINTERFACE"find / -name ...