unity3d Pathfinding插件使用
Overview
- The central script of the A* Pathfinding Project is the script 'astarpath.cs',
it acts as a central hub for everything else.
In the AstarPath inspector you create all
graphs and adjust all settings.
There should always be one (always one, no more) astarpath.cs component in a scene which uses pathfinding.
The astarpath.cs script can be found at Components–>Pathfinding–>Pathfinder - The second most important component is the 'Seeker.cs' component, a Seeker component
should be attached to every GameObject which uses pathfinding (e.g all AIs).
The Seeker component handles path
calls for one unit and post processes the paths. The Seeker isn't
needed, but it makes pathfinding easier. - Lastly there are the modifier scripts (e.g SimpleSmoothModifier.cs). Modifiers post-processes paths to smooth or simplify them, if a modifier is attached to the same GameObject as a Seeker it
will post-process all paths that Seeker handles.
See Using Modifiers.
Pathfinding is all about finding the best path between point A and B.
This is what the A* Pathfinding Project does, in this tutorial you will
learn how to set up the project in a new scene and get a simple AI moving while avoiding obstacles.
Downloading
The first thing you need to do, if you haven't done so already, is to download the A* Pathfinding Project
The project can be downloaded from here, you can either download the free version with some limited features
(but still very powerful) or buy the pro version with more cool stuff included.
If you want, you can explore the different example scenes in the project before you start with the next section.
Javascript (Unityscript)
If you are using UnityScript, you should first follow the instructions on the page Working
with Javascript.
All example code is in C#. But I hope it will not be too hard following them since C# and Unityscript are quite similar. You should know that unityscript does not support optional parameters. So you must always pass all parameters to a function. If you get
an error message that the function you are trying to call has no such overload, this might be the problem. Then check the docs for all parameters and their default values.
Deploying for iPhone
Depending on which platform you are building for, you might want to read this page first: Deploying
for iphone
Errors?
At this stage, if you are getting any compiler errors from the code you can first check the Readme_upgrading.txt file included, if you are upgrading from an older version. A common problem is that classes in the A* Pathfinding Project
have the same name as classes in your project. This can be solved either by renaming one of the classes, or placing your class in a namespace so it will not conflict with the other class anymore.
If you are still getting errors, take a look at the forums (see http://www.arongranberg.com/forums) to see if anyone else has
the same problem or post a new question there.
Overview
- The central script of the A* Pathfinding Project is the script 'astarpath.cs',
it acts as a central hub for everything else.
In the AstarPath inspector you create all
graphs and adjust all settings.
There should always be one (always one, no more) astarpath.cs component in a scene which uses pathfinding.
The astarpath.cs script can be found at Components–>Pathfinding–>Pathfinder - The second most important component is the 'Seeker.cs' component, a Seeker component
should be attached to every GameObject which uses pathfinding (e.g all AIs).
The Seeker component handles path
calls for one unit and post processes the paths. The Seeker isn't
needed, but it makes pathfinding easier. - Lastly there are the modifier scripts (e.g SimpleSmoothModifier.cs). Modifiers post-processes paths to smooth or simplify them, if a modifier is attached to the same GameObject as a Seeker it
will post-process all paths that Seeker handles.
See Using Modifiers.
New Scene
Create a new scene, name it "PathfindingTest". Now let's create something which an AI could walk on and something for it to avoid: add a plane to the scene, place it in the scene origin (0,0,0) and scale it to 10,10,10.
Create a new layer (Edit->Project Settings->Tags) named "Ground" and place the plane in that layer. Now create some cubes of differerent scales and place them on the plane, these will be obstacles which the AI should avoid. Place them in a new layer named "Obstacles".这些增加的障碍物必须有自已的碰撞体,或是capsule
colider,or box colider.
Your scene should now look something like this:

Adding A*
Now we have ground for an AI to stand on and obstacles for it to avoid. So now we are going to add the A* Pathfinding System
to the scene to enable pathfinding.
Create a new GameObject, name it "A*", add the "AstarPath" component to it (Components–>Pathfinding–>Pathfinder).
The AstarPath inspector is divided into several
parts. The two most important is the Graphs area and the Scan button at the bottom.
The Graphs area holds all the graphs in your scene, you may have up to 16 but usually 1 or 2 will be sufficient. A single graph is usually to be preferred.
If you open the Graphs area by clicking on it you will see a list of graphs which you can add. I can't explain them all here but the two main ones is the Grid Graph which generates nodes in a grid pattern and the Navmesh Graph which takes a mesh as the walkable
area.
The Scan button is for updating the graphs, this is also done on startup (unless the startup is cached, more about that in another part) and some graphs will do it automatically when changing the graph settings and the scanning won't cause any lag.
There is also a shortcut to use Cmd+Alt+S (mac) or Ctrl+Alt+S (windows).
For this tutorial we will create a Grid Graph, after adding it, click on the new Grid
Graphlabel to bring up the graph inspector.

As the name implies, the GridGraph will generate a grid of nodes, width*depth. A grid can be positioned anywhere in the scene and you can rotate it any way you want.
The Node Size variable determines how large a square/node in the grid is, for this tutorial you can leave it at 1, so the nodes will be spaced 1 unit apart.
The position needs to be changed though. Switch to bottom-left in the small selector to the right of the position field (currently named "Center"), then enter (-50,-0.1,-50). The -0.1 is to avoid
floating point errors, in our scene the ground is at Y=0, if the graph was to have position Y=0 too, we might get annoying floating point errors when casting rays against it for example (like the height check does).
To make the grid fit our scene we need to change the width and depth variables, set both to 100 in this case. You can see that the grid is correctly positioned by the white bounding rectangle in
the scene view which should now be enclosing the plane exactly.
Height Testing
In order to place the nodes at their correct height, the A* system fires off a bunch of rays against the scene to see where they hit. That's the Height Testing settings.
A ray, optionally thick (as opposed to a line), is fired from [Ray Length] units above the grid downwards, a node is placed where it hits. If it doesn't hit anything, it is either made unwalkable if the Unwalkable When No Ground variable is toggled or the node
is placed at Y=0 relative to the grid if it is set to false.
We need to change the mask used, currently it includes everything, but that would include our obstacles as well, and we don't want that. So set the Mask to only include the "Ground" layer which we created earlier.
Collision Testing
When a node has been placed, it is checked for walkability, this can be done with a Sphere, Capsule or a Ray. Usually a capsule is used with the same diameter and height as the AI character which is going to be walking around in the world, preferably with some
margin though.
Our AI will have the standard diameter and height of 1 and 2 world units respectively, but we will set the diameter and height for the collision testing to 2 and 2 to get some margin.
Next, to make the system aware of the obstacles we placed, we need to change the mask for the Collision Testing, this time set it to contain only the "Obstacles" layer as we wouldn't want our ground to be treated as an obstacle.
Now everything should be set up correctly to scan the graph.
Press Scan. Wait a fraction of a second and you've got a generated grid! (if you have done everything correctly, that is, compare your settings to the image below, also check that Show Graphs is true)
 |
 |
Adding the AI
What is a pathfinding test without some moving stuff?
Not fun at all, so let's add an AI to play around with.
Create a Capsule and add the Character Controller component to it, also place it somewhere visible on the plane.
Add the Seeker component to the
AI, this script is a helper script for calling pathfinding from other scripts, it can also handle path modifiers which can e.g smooth the path or simplify it using raycasts.
We are going to write our own, really simple script for moving the AI, so open your favourite script-editor and follow.
Moving Stuff Around
The call to the Seeker is really
simple, three arguments, a start position, an end position and a callback function (must be in the form "void SomeFunction (Path p)"):
So let's start our script with a simple snippet calling the pathfinder at startup:
OnPathComplete);
Save it to a file in your project named AstarAI.cs and add the script to the AI GameObject.
In the inspector, change Target Position to something like (-20,0,22). This is the position the AI will try to find a path to now.
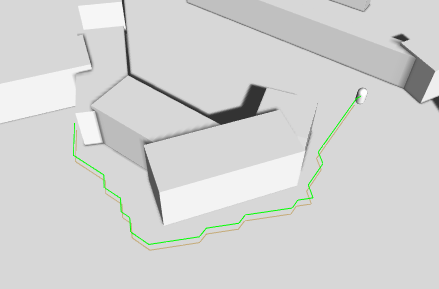
Press Play. You should get the log message and also the path should show in the scene view as a green line (the Seeker component
draws the latest path using Gizmos).
If you do not see a green line, make sure that the checkbox Show Gizmos on the Seeker component
is checked. More recent Unity versions also depth-test gizmos, so it might be hidden under the ground, to disable the depth-testing click the Gizmos button above the scene view window and uncheck the 3D Gizmos checkbox.
In case you get an error, make sure that the Seeker component
really is attached to the same GameObject as the AstarAI script. If you still get an error, the target position might not be reachable, try to change it a bit.
It looks a bit edgy, but that will do for now as you might be waiting for an explanation of what that code really did.
What happens is that first the script calls the Seeker's
StartPath function. The seeker will then create a new Path instance and then sent it forward to the AstarPath script
(the Pathfinder component you added before). The AstarPath script
will put the path in a queue. When available, the script will then process the path by searching the grid, node by node until the end node is found.
The searching step is explained really well in this tutorial here. It does not work exactly like in the tutorial,
but the concept is the same.
Once calculated the path is returned to the Seeker which
will post process it if any modifiers are attached and then the Seeker will
call the callback function specified in the call. The callback is also sent to Seeker.pathCallback which
you can register to if you don't want to specify a callback every time you call StartPath:
OnPathComplete;
- Note
- When removing or destroying the script, callback references are not removed, so it is good practise to add a removing snipped in case that should happen
When we get the calculatated path back, how can we get info from it?
A Path instance contains two arrays related to that.
Path.vectorPath is a Vector3 array which holds the path, this array will be modified if any smoothing is used, it is the recommended way to get a path.
secondly there is the Path.path array which is an array of Node elements, it holds all the nodes the path visisted which can be useful to get additonal info on the traversed path.
First though, you should always check path.error, if that is true, the path has failed for some reason. Path.errorLog will have more info on what went wrong in case path.error is true.
To expand our AI script, let's add some movement: Also add the CharacterController to the AI gameObject.
OnPathComplete);
If you press play now, the AI will follow the calculated path, neat, eh?
What the code does is to, in FixedUpdate get the normalized direction towards the next waypoint, move towards it a bit, then it checks if it is close enough to continue to the next waypoint, in this example that is done by simply by incrementing the currentWaypoint
index.
The AI will stop a short distance from the end point, but that's just because we haven't got any special logic for the last point.
Smoothing the Path
Now you have learned how to set up a simple grid graph and how to call the pathfinding, but surely there must be a way to get those paths to look a bit smoother?
Sure it is. Path smoothing and simplification scripts are called Path Modifiers and are scripts which can be added to the same GameObject as a Seeker.
The most straight forward one is the Simple Smooth modifier which can be found at Components–>Pathfinding–>Modifiers–>Simple
Smooth. Add that to our AI.
What this modifier is going to do, is to subdivide the path a number of times until each segment becomes smaller than the Max Segment Length variable. Then it will smooth the path by moving the points closer to each other. The modifier has a number of settings,
I won't go through all of them here. See the SimpleSmoothModifier documentation
for more info about each variable. For this tutorial you can set Max Segment Length to, say 1. Iterations to 5 and Strength to 0.25. Experiment with it to get good values.
Now press play again, the path should look much smoother, just as we wanted.
- Note
- Smoothers don't usually take world geometry or the graph into account, so be careful with applying too much smoothing since that could cause paths to pass through unwalkable areas.

Another good modifier to use is the FunnelModifier which
will simplify the path a great deal. If you add it, make sure it has the top, or just below the StartEnd modifier, priority since it requires original path data to work. Read more about modifiers here Using
ModifiersYou can see a list of all modifiers if you click on Class Collections above and go to "Modifiers".
The End
That was the end of the Get Started tutorial. I hope you learned something from it.
From here on you can explore the rest of the documentation or dig straight in to the project.
If you want a litle better AI, you can use the AIPath script
which is included in the project.
unity3d Pathfinding插件使用的更多相关文章
- unity3d 游戏插件 溶解特效插件 - Dissolve Shader
unity3d 游戏插件 溶解特效插件 - Dissolve Shader 链接: https://pan.baidu.com/s/1hr7w39U 密码: 3ed2
- 出售 unity3d串口插件
出售unity3d串口插件 利用C++编写,解决了mono库 serialport的bug. serialport串口的bug地方在于: 1.有一些数据无法收到. 2.会丢失第一个字节. 3.延迟 我 ...
- Unity3D框架插件uFrame实践记录(一)
1.概览 uFrame是提供给Unity3D开发者使用的一个框架插件,它本身模仿了MVVM这种架构模式(事实上并不包含Model部分,且多出了Controller部分).因为用于Unity3D,所以它 ...
- Unity3D 常用插件
1.FX Maker FX Maker是一款制作特效的工具,它专为移动操作系统做了优化.FX Maker包括300种Prefab特效,300种纹理结构.100种网格.100种曲线效果.支持英文和韩文, ...
- Unity3D 集合插件目录
http://unity3d.9ria.com/?p=2171 这个基本上很全 下面自己觉的还不错的,当然那些大众的就不列出来了 一.KGFMapSystem Quick Start : http:/ ...
- Unity3D TouchScript 插件教程一
只是个人学习小记,谈不上教程,但是为了命中搜索引擎关键词,只好装逼了:),可能对于大家来说太简单了吧,网上中文教程没搜到 ,只好自己摸索了. 插件资源下载地址:https://www.assetsto ...
- [Unity]Unity3D编辑器插件扩展和组件扩展
1. 插件扩展 1.1. 命名空间 using UnityEditor; using UnityEngine; //非必需,常用到 1.2. 使用语法 [MenuItem("Assets/M ...
- unity3d CarWaypoints插件
编写初衷: 1.网上没有现成的好用的waypoints插件 2.自己在做一个赛车游戏,如果没有这款插件的话在制作游戏的过程中会被累成狗 3.从来没有接触过插件方面的东西,所以想自己尝试一下 插件用途: ...
- 【狼】unity3d iTween插件的学习
之前在一个三消游戏项目中接触到iTween,最近又要用到,发现iTween真的是一个很好用,省事的插件,有很多函数里包括 Hashtable的他都用一个函数很简单的完成了, 举几个例子 void Lo ...
随机推荐
- 项目中遇到的所有ECharts图表集合
全放在了ECharts官网示例里面以后会一直往里面添加: https://gallery.echartsjs.com/explore.html?u=bd-2133619855&type=wor ...
- C#中的值类型、引用类型,代码告诉你他是什么类型。
C#代码告诉你这是什么类型. using System; using System.Collections.Generic; using System.Linq; using System.Text; ...
- 以SqlHelper为例论面向对象中封装的使用(续)
上文以SqlHelper为例说明了面向对象中封装的好处,但是上文只是简单封装,考虑下面代码的情况: public static Activate GetByCode(string code) { Li ...
- Java基础10一面向对象
抽象 概念:当一个类中没有足够的信息描述一个现实生活中具体存在的事物,那么这个类就是抽象类. 抽象类一般是对概念领域中的描述. 语法: [访问修饰符] abstract class 类名{ } 如: ...
- 23个Python爬虫开源项目代码:爬取微信、淘宝、豆瓣、知乎、微博等
来源:全球人工智能 作者:SFLYQ 今天为大家整理了23个Python爬虫项目.整理的原因是,爬虫入门简单快速,也非常适合新入门的小伙伴培养信心.所有链接指向GitHub,祝大家玩的愉快 1.Wec ...
- Cocos2d-x-3.6学习笔记第一天
系统环境: win7,python2.7 开发工具:vs2013 cocos版本:cocos2d-x-3.6 暂无模拟手机的环境 新建我的第一个cocos2d项目 1.打开cmd,cd到cocos2d ...
- Matlab与C++混合编程
原文链接:http://blog.csdn.net/zouxy09/article/details/20553007 一不小心,成了一个忠实复制者...
- PHP SPL 文件处理(SplFileInfo和SplFileObject)
SplFileInfo用来获取文件详细信息.SplFileObject遍历.查找指定行.写入csv文件等内容 SplFileInfo用来获取文件详细信息: $file = new SplFileInf ...
- Nginx+Keepalived(双机热备)搭建高可用负载均衡环境(HA)-转帖篇
原文:https://my.oschina.net/xshuai/blog/917097 摘要: Nginx+Keepalived搭建高可用负载均衡环境(HA) http://blog.csdn.ne ...
- Project Euler 31 1000-digit Fibonacci number( DP )
题意:在无限硬币的情况下能组成200的方案数有多少个 思路:DP,设数组 dp[ n ] [ k ] 代表前 n 种硬币能够组成 k 元的方案数,那么就能得到 dp [ n ] [ k ] = dp ...